1
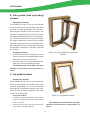
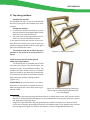
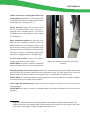
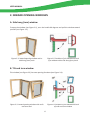
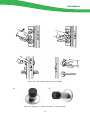
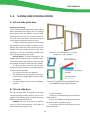
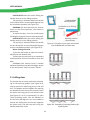
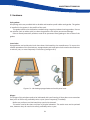
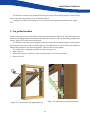
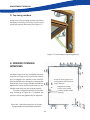
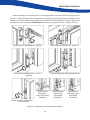
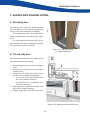
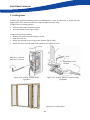
INSTRUCTIONS
& MAINTENANCE
CONTENTS
USER MANUAL ...................................................................................................... 3
GENERAL RULES .................................................................................................... 3
1. OUTWARD OPENING WINDOWS ..................................................................... 3
a. Side hung window ........................................................................................ 3
b. Side guided (side projecng) window .......................................................... 4
c. Top guided window ...................................................................................... 4
d. Top swing window........................................................................................ 5
2. INWARD OPENING WINDOWS ......................................................................... 8
a. Side hung (turn) window.............................................................................. 8
b. Tilt and turn window.................................................................................... 8
c. Tilt only (boom hung) window ................................................................... 9
3. ENTRANCE AND TERRACE DOORS ................................................................... 10
a. Opening and closing the entrance door ...................................................... 11
b. Terrace doors ............................................................................................... 12
c. French doors – use of a passive door leaf .................................................... 12
4. SLIDING AND FOLDING DOORS ........................................................................ 13
a. Li and slide pao door ............................................................................... 13
b. Tilt and slide door ........................................................................................ 13
c. Folding door ................................................................................................. 14
5. SPECIAL PRODUCTS ......................................................................................... 15
a. Vercal sliding sash window ........................................................................ 15
b. Fireguard window ........................................................................................ 15
MAINTENANCE MANUAL ..................................................................................... 17
1. PRODUCT MAINTENANCE DURING INSTALLATION ........................................... 17
2. GENERAL MAINTENANCE INSTRUCTIONS (FOR THE END USER) ....................... 19
3. OUTWARD OPENING WINDOWS ....................................................................... 22
4. INWARD OPENING WINDOWS .......................................................................... 24
5. ENTRANCE AND TERRACE DOORS ..................................................................... 26
6. OUTWARD OPENING ALUCLAD DOORS ............................................................. 27
7. SLIDING AND FOLDING DOORS ......................................................................... 29
8. SPECIAL PRODUCTS ........................................................................................... 31
9. FACT SHEET for TEKNOL AQUA 1410-01 treated items ..................................... 33
10. FACT SHEET for GORI 605 treated items ........................................................ 34
USER MANUAL
GENERAL RULES:
Livingwood Windows Ltd supplies high quality windows and doors. Our products are designed
to last for many years and in order to maintain good operaon it is important to adhere to the
following:
• ensure that no extra weight is hung on a window sash or door leaf
• Please take care not to hit the window reveal (either plastered or mber) when opening and
closing windows or doors.
• ensure that no objects interfere with the opening between the sash and the jamb
• if young children have access to a window it is important that the window is locked using the
lockable handle
• the window or door must not be le unsecured in the open posion in the event of a dra
• a window or door must not be le in the open posion in the event of a strong wind or a
storm
• a window or door slamming shut may cause injury
• when closing a window or door, make sure to not jam your hand between the sash and the
jamb
1. 1. OUTWARD OPENING WINDOWS
A. Side hung window
Opening the window:
The window will open if you turn the handle
and then slowly push the window away from
yourself. The hardware design includes a builtin fricon stay; fricon brake for the open posion. Depending on the type and dimensions
of the product, fricon stay is either operated
by friconal force or secured using the handle.
The fricon stay secured using the handle is
acvated when the handle is turned downward
(see Figure 1.1).
Closing the window:
• to close the window completely, ensure
that the hook on the espagnolee locates
Figure 1.1. Side hung window
with the inner hook of the catch.
• the outer hook on the catch leaves the window in the micro venlaon posion.
The window must not be le in the open posion in the event of a strong wind or a storm.
3
USER MANUAL
B. Side guided (side projecng)
window
Opening the window:
The window will open if you turn the handle
and then slowly push the window away from
yourself. To open completely, push the window using the handle as far as possible. The
window is completely open once it has been
turned approximately 90° from its inial posion. This moves the side of the sash nearest
the hinges toward the centre of the window
opening, leaving about a 15 cenmetre clearance between the sash and the jamb. Opening
the window completely is normally required
for cleaning.
Closing the window:
• to close the window completely, ensure
that the hook on the espagnolee locates
with the inner hook of the catch.
• the outer hook on the catch leaves the window in the micro venlaon posion.
The window must not be le in the open
posion in the event of a strong wind or a
storm.
Figure 1.2. Side guided (side projecng)
window
C. Top guided window
Opening the window:
The window will open if you turn the handle
and then slowly push the window away from
yourself. Depending on its size, the window
opening fully is somemes limited in the interest of security (a stop is installed on the track
in the side of the jamb).
•
•
Figure 1.3. Top guided window
Closing the window:
to close the window completely, ensure that the
hook on the espagnolee locates with the inner
hook of the catch.
the outer hook on the catch leaves the window
in the micro venlaon posion.
The window must not be le in the open
posion in the event of a strong wind or a
storm.
4
USER MANUAL
D. Top swing window
Opening the window:
The window will open if you turn the handle
and then slowly push the window away from
yourself.
Closing the window:
• to close the window completely, ensure
that the hook on the espagnolee locates
with the inner hook of the catch.
• the outer hook on the catch leaves the window in the micro venlaon posion.
If you want to wash the outside of the window (from the inside), you need to push the
window using the handle unl the outer glass
pane turns toward the room.1
The window must not be le in the open
posion in the event of a strong wind or a
storm.
Figure 1.4. Top swing window
Inial restrictor for the double glazeĚ
>t12 top swing window:
The window sash is provided with a inial
restrictor (see Figure 1.6), which allows the
window to open 10 cenmetres inially. The
window will open further when it is released
from the clamp on the jamb and then opened.
The same lock funcons as a posion retainer
when the outer surface is being washed.
(Figure 1.5).2
PLEASE NOTE: ensure that there is no restricon either in the inside or outside of the window that may hinder it from fully reversing ie:
outside sots
1
2
Figure 1.5. Outward opening top swing window in the so-called washing posion with
the sash ipped
All outward opening top swing windows have a so-called dead-centre sash posion where
the sash is at approximately 90 degrees to the jamb and where turning it any further requires
the applicaon of greater force.
Hinges for LW12 and LW11 Top swing windows are made as modules, as a result of which
in the case of certain sash height dimensions the boom edge of the window sash overlaps
the top edge of the jamb. For further informaon, contact Livingwood Windows Ltd.
5
USER MANUAL
LW12 products use two dierent types of restrictors:
• for taller windows, with external sash dimensions from approximately 470 millimetres, the
le hinge has a built-in catch when viewed from the side nearest the room.
• for shorter windows, with external sash dimensions ranging from approximately 400 to 470
millimetres, a catch is aached on the right jamb when viewed from the side nearest the
room.
Opening a sash with a built-in restrica)
tor (see opon a, Figure 1.6): when the sash
is opened approximately 10 cenmetres, the
built-in catch is engaged automacally, prevenng the sash from opening any further.
A catch also serves as a retainer for the open
posion of the sash. To open the sash further,
b)
release the catch from the clamp by pulling
the sash lightly toward the room and pushing
the catch outward.3 The built-in catch may
funcon as a posion retainer when the outer
surface of a window is being washed (PLEASE
NOTE: The availability of this funcon depends
on how the window is installed in relaon to
the wall and on the height of the product.)
Opening a sash with an oponal restrictor (see opon b, Figure 1.6): when the sash
is opened approximately 10 cenmetres, the
catch is engaged automacally, prevenng the
sash from opening any further. To open the
sash further, release the catch by pushing it
up using the green knob. The catch may funcon as a posion retainer, to prevent it closing
by itself, when the outer surface of a window is
being washed (PLEASE NOTE: The availability
of this funcon depends on how the window
is installed in relaon to the wall and on the
height of the product.)
Any add-on restrictor may be locked – to
Figure 1.6. Restrictor for a LW12 top
swing window
do so, with the child-proof lock in the closed
a
–
integrated
restrictor;
posion, turn the locking pin (stamped prompt
b – add-on restrictor
LOCK) 90 degrees.
3
The technique for opening the catch requires the sash to hang freely, and at the same me
the hook needs to be pushed outward
6
USER MANUAL
Inial restrictor for a triple glazed LW11 top
swing window (child safety): The window sash
is provided with a built-in hinge system with a
mul-stage catch (see Figure 1.7).
Secure position: open the window up to
the first limited position (the restrictor is
engaged with an audible snap) – in the rst
secured posion, the window is open about
10 cenmetres.
Open venlaon posion: to open the window into the venlaon posion, press the
PRESS buon (on the le jamb track) and at
the same me slowly push the window away
from yourself. On reaching the limited posion,
the built-in retainer is acvated automacally
(the catch is engaged with an audible snap).
To close the window: release the built-in
retainer and close the sash slowly.
PLEASE NOTE: the built-in retainer is acvated
both in the open and in the security posions.
Figure 1.7. Catcher for an LW11 top swing
window
Washing posion of the outer surface: release the restrictor by pressing the PRESS buon and
push the sash unl the outer glass pane turns toward the room. The sash will reach the secured
posion when the built-in retainer on the jamb track is secured with an audible snap.
PLEASE NOTE: the availability of this funcon depends on how the window is installed in relaon
to the wall and on the height of the product4.
To turn back the window sash: release the built-in retainer and slowly turn the sash into the
closed posion.
PLEASE NOTE: the built-in retainer is acvated both in the open venlaon and in the security
posions.
4
Hinges for LW12 and LW11 top swing windows are made as modules. With certain sash
height dimensions the boom edge of the window sash overlaps the top edge of the jamb.
For further informaon, contact Livingwood Windows Ltd.
7
USER MANUAL
2. INWARD OPENING WINDOWS
A. Side hung (turn) window
To open the window (see Figure 2.1), turn the handle 90 degrees and pull the window toward
yourself (see Figure 2.2).
Figure 2.1. Inward opening window with a
side hung (turn) sash
Figure 2.2. Posions of the handle and sash
of a window with a side hung (turn) sash
B. Tilt and turn window
This window (see Figure 2.3) has two opening funcons (see Figure 2.4).
Figure 2.3. Inward opening window with a lt
and turn sash
Figure 2.4. Posions of the handle and sash
of a lt and turn window
8
USER MANUAL
•
•
•
To open the window as side hung (turn), turn the handle up from the closed posion 90
degrees into the open posion and pull the window toward you.
To open the window as boom hung (lt), turn the handle up from the closed posion 180
degrees into the open posion and pull the window toward you.
Furthermore, the lt and turn window has built-in single-stage micro venlaon. To acvate
this, turn up the handle on the closed window 135 degrees (between the open and venlaon
posions).
PLEASE NOTE: When the window is open in the side hung posion (90 degrees) the handle must
not be turned up to the venlaon posion (180 degrees). First close the window and then
move the handle to the venlaon posion. Failure to do so may cause damage to the hardware
C. Tilt only (boom hung) window
The window (see Figure 2.5) opens when you
turn the handle on the top horizontal sash prole. Turn it by 90 degrees and then pull the
sash toward you (see Figure 2.6).
Figure 2.5. Inward opening window with a lt
only (boom hung) sash
Figure 2.6. Posions of the handle and sash of a lt only (boom hung) window
9
USER MANUAL
3. ENTRANCE AND TERRACE DOORS
A. Opening and closing the entrance door
The door is provided with three locking points:
the door will lock at the top, in the middle and
at the boom. To lock, the handle rst needs
to be raised up. Only then can the door be
locked using a twist knob or key.
Firstly unlock the door with the key provided. The handle is then depressed and all
locking points are released. To lock the door,
pull the handle up which will acvate all of the
locks and then lock the door with the key.
Fix2002 doors provided with three point
locks are opened and closed as above (see
Figure 3.2). For convenience, the locking
mechanism is complemented with the addon twist knob funcon. At home, the door is
conveniently locked and opened using a twist
knob. On leaving, home the twist knob can be
de-acvated using the nipple on the end plate
of the lock. The lock is in the secure posion
and can no longer be opened without a key,
even from inside. Using a key to unlock the
lock re-acvates the funcon of the twist knob
automacally.
The door must not be le in the open
posion in the event of a strong wind or a
storm.
We recommend that a stopper be used on
either the wall or the oor (see Figure 3.3)
Figure 3.1. Locking the entrance door
(Fix2151)
10
USER MANUAL
Figure 3.2. Locking the entrance door (Fix2002)
a)
b)
Figure 3.3. Stopper: a – oor mounted; b – wall mounted.
11
USER MANUAL
B. Terrace doors
Opening and closing
The door is provided with three locking points. The door will lock at the top, in the middle and
at the boom. To open the door, the door handle needs to be turned into the horizontal posion.
To lock it, the handle needs to be turned downward.
By turning the handle down whilst open, the door can be secured in the desired posion.
The door must not be le in the open posion in the event of a strong wind or a storm.
C. French door – use of a passive
door leaf
The french door has an acve leaf (with a
handle and lock) and a passive leaf closed
by means of sliding bolts (see Figure 3.4).
The sliding bolts secure the door leaf in the
dedicated sliding bolt slots in the top jamb
and the sill.
To open the sliding bolt, pull it out of its
slot (see Figure 3.4.) and push it up (boom
sill) or pull it down (top jamb). To open the
door leaf, both the top and the boom sliding
bolts need to be opened.
1. Slot for the
bolt in the
open posion
PLEASE NOTE: To avoid damage to the wood,
replace the sliding bolt in its slot aer.
2. Slot for
the bolt in
the closed
posion
3. Sliding bolt
slot in the sill
Figure 3.4. Sliding bolt of the passive leaf of a
double leaf door
12
USER MANUAL
4. 4. SLIDING AND FOLDING DOORS
A. Li and slide pao door
a)
Opening and closing:
In the closed posion, the handle of the sliding
door is pointed up (see Figure 4.1). The sliding
door opens when the handle is turned 180°
(downward from the top vercal posion).
The sash rises onto rollers, and then it may be
slowly pushed toward the passive sash.
To open completely, push the door using
the handle as far as possible. The door is completely open when the sash has slid up to the
stopper. The sash can be secured in the open
posion by turning the handle up 180° (the
sash will descend onto the track).
PLEASE NOTE: To avoid damage to the
stopper ensure that the door is opened slowly.
If the door moves too quickly it may damage
the stopper and pull it away from the mber.
To close the door, pull the moving sash
against the jamb and turn the handle back up
into the vercal posion.
For closing, there are two opons:
• the stage closest to the jamb of the counter pin of the espagnolee closes the door
completely
• the outer stage is for the micro venlaon
posion.
b)
Figure 4.1. GU sliding door: a – closed
posion; b – open posion
Opening posion
Venlaon and sliding
posion
Closed posion
Figure 4.2. Posions of the handle and sash
of a U966Oz lt and slide pao door
B. Tilt and slide door
The lt and slide door is manufactured using
inward opening window proles. Due to the
weight of the moving sash, the door uses two
dierent locking components.
U966Oz (tilt and slide door for lighter
units). In the closed posion, the handle is
pointed down (see Figure 4.2).
To open the door:
1) rst turn handle 90 degrees and pull to
lted posion;
2) then turn addional 45 degrees and pull
the leaf inwards completely open;
3) only aer these rst two steps you may
slide it sideways.
13
USER MANUAL
PLEASE NOTE: When the sash is sliding, the
handle must be in the sliding posion.
Tilt opening is acvated when the handle
on the closed sash is turned up 90 degrees into
the venlaon posion (see Figure 4.2).
GU966Mz (lt and slide door for heavier
units). In the closed posion, the handle is
pointed up.
To open the door, turn the handle down
135 degrees and pull the sash toward yourself.
PLEASE NOTE: When the sash is sliding, the
handle must be in the sliding posion.
Tilt opening is acvated when the handle
on the closed sash is turned down 90 degrees
into the venlaon posion (see Figure 4.3).
When closing note that
1) rst the leaf needs to catch the threshold/cill with the boom side;
2) aer that you may push it to completely
closed posion and turn handle to close the
door;
GU966Mz (the heavier units) is handle
operated hardware, but sll with bigger sashes
it may need some “help” to push it closed.
Closed posion
Venlaon and sliding
posion
Opening posion
Figure 4.3. Posions of the sash and handle
of a GU966Mz lt and slide door
C. Folding door
The product has an acve sash which, depending on the opening paern (see Figure 4.4),
may be opened as side hung (turn) or lt and
turn. The paern and the opons for opening
are detailed in the annex to the contract. Open
the acve side hung (turn) or lt and turn sash
(see Figures 2.2 to 2.4, respecvely). To open
/ fold up folding sashs, turn the handles on
all the sashs 90 degrees. For some paerns
release the sliding bolts on the sash opposite
the acve sash, and pull the sash using the
handle toward the room.
Figure 4.4. Examples of opening paerns for
a folding door
14
USER MANUAL
Reverse the order of opening to close the
sashs.
Sash coupling components are installed for
some opening paerns (see Figure 4.4 – points
marked in red). The door needs to be opened
and closed as shown in Figure 4.5.
1. Open the acve sash.
2. Open the passive sash. Turn the sash unl
the coupling components have locked into
one another.
3. Release the other sashs, turning the handle
90 degrees, and fold up the sashs.
Reverse the order of opening to close.
Handle
Sash reang
devices
Handle
Figure 4.5. Example of opening
a folding door
5. SPECIAL PRODUCTS
A. Vercal sliding sash window
A vercal sliding sash window has two
sashs. To open the sashs, open the rotang
locking device (see Figure 5.1, 1) and raise the
boom sash up. To open the sash, pull the sash
down using the “ring” on the top sash board.
Washing. To wash the boom sash, release
the sliding bolts on the top sash board and lt
the sash toward the room.
To wash the top sash, pull the “ring” of
the sash down unl it passes the 2 top guides.
Once past these release the sliding bolts on
the top sash and lt the sash toward the room.
PLEASE NOTE: When the top sash is lted
into the washing posion, the boom sash
needs to be in the washing posion rst.
Figure 5.1. Vercal sliding sash window
15
USER MANUAL
1
2
Figure 5.2. Sliding bolts of the boom sash for a vercal sliding sash window:
1 – open; 2 – closed
PLEASE NOTE: To prevent the sash opening into the washing posion accidentally, lock the
sliding bolts in the closed posion (see prompt 2, Figure 5.2).
Reverse the order of opening to close.
The window must not be le in the open posion in the event of a strong wind or a storm.
B. Fireguard window
The reguard window is a non-opening product provided with a glazing unit that meets the EI30
re resistance class. Fireguard windows need to be installed in accordance with the Livingwood
Windows instrucons for the installaon of a reguard window
PLEASE NOTE: The reguard glass is temperature sensive. Below –10°C, the glass freezes,
turning opaque. On thawing the glass won’t return to its original condion but its re resistant
properes are preserved. Because of that, the reguard pane in a glazing unit is always the pane
nearest the room. Above 45°C, the reguard pane begins to respond to heat. The glass turns
opaque. Aer that, visual quality and re resistance properes are impaired irreversibly, and a
new glazing unit will need to be ordered.
16
MAINTENANCE MANUAL
1. PRODUCT MAINTENANCE DURING INSTALLATION
(See also Livingwood Windows installaon instrucons)
GENERAL RULES
•
•
•
•
Avoid leng the wood become damp (for humidity control, see below).
All nishing damage needs to be repaired immediately (sand the damaged area and cover
with the repair paint provided).
Before carrying out plastering, painng walls, etc, the products should be covered with lm
to protect them against damage. Only tape suitable for water-based acrylic wood paints
should be used. Once work has been completed, the protective film needs to be remove
as soon as possible to prevent the tape glue damaging the painted surface of the products.
When using a disc cuer, take care not to chip the product as this may result in rust spots later
appearing on the surface. In addion, sparks may damage the surface of the glazing unit.
HUMIDITY CONTROL
Livingwood Windows Ltd supplies wooden windows and entrance doors nished with breathable,
water-based wood paint designed for industrial use (including stains and varnishes). This means
that the humidity of the wood under the nishing layer is adjusted in line with the environmental condions. Excess interior humidity during construcon has an adverse eect on wooden
windows and doors.
Wood humidity depends directly on the ambient humidity. When it stays in a given environment for a long me, wood takes on the equilibrium humidity in line with that environment. If the
ambient humidity changes, humidity in the wood also changes, unl a new equilibrium humidity
is formed. As humidity in the wood changes, changes occur in the volume of the wooden member
(cross secon and contracon).*
Windows and entrance doors are produced using wood intended for dry indoor condions.
Windows and entrance doors need to be installed in the nal stages of building, in order to minimise construcon humidity and other construcon-related stresses, which may aect products.
The wooden secons of windows and entrance doors do not resist excessive humidity stress
during construcon, which is produced when, for example, oors are poured, masonry is laid,
walls are plastered or any other wet construcon materials are used.** Construcon humidity
causes the wooden secons of the window to expand resulng in members expanding crosswise,
irregularies at joints, and cracked glued joints. As the wood dries and humidity levels change,
cracks may appear at the joints of the window. This may cause pressure on the gaskets resulng
in distorons and impairment of the product.***
17
MAINTENANCE MANUAL
To prevent humidity damage to windows, the following guidelines need to be adhered to on
the construcon site:
•
•
•
•
•
•
The place for storing windows and entrance doors needs to be suciently venlated during
storage.
Remember that the protecve lm on the packaging does not protect against humidity, only
against major soiling and dust during transport, storage and installaon.
Once windows and entrance doors have been installed, the air inside the building needs to
be suciently dry. If not, the air should be dried either by heang, venlaon, or using a
condensaon air drier.
In winter, it is important to make sure that no water is condensed on the inside of doors or
windows – constant exposure to water will subject wood to the same kind of damage as
above. Moreover, if the sashs of the windows and doors freeze to the jamb this may result in
further damage.
The condion of windows and entrance doors needs to be checked regularly to detect and
prevent humidity damage as early as possible.
If windows and entrance doors are covered with lm to prevent soiling, it is essenal to check
that no excess humidity accumulates between the lm and the product. The room needs to
be dried and the lms need to be removed temporarily if humidity accumulates there.
It is important to remember that contemporary windows and doors are airght. Thus, replacement of old windows and entrance doors may result in reduced venlaon. Faulty venlaon
may cause humidity levels indoors to rise.
In naturally venlated buildings, the following measures need to be implemented to ensure
the quality of air indoors:
• Order windows with dampers that should be opened when the product is being used so that
fresh air may enter the living premises.
• Open windows regularly to air the premises. Windows may also be le open in the venlaon
posion (also called micro venlaon).
Livingwood Windows Ltd recommends that alongside the replacement of windows and doors, the venlaon and heang design of the property should also be considered.
Accumulaon of excess humidity in a dwelling may cause mould to grow, which in turn may
cause respiratory illness and damage to components of the building.
When new buildings are constructed, Livingwood Windows Ltd recommends introducing a controlled
venlaon design with exhaust, supply and heat recovery. This will result in good quality indoor
air and heang energy savings.
18
MAINTENANCE MANUAL
2. GENERAL MAINTENANCE INSTRUCTIONS
(FOR THE END USER)
•
•
•
•
Discharge channels need to be clear and, if necessary, cleaned.
Check the joints between the window and the wall: if the joints are cracked they need to be
lled to prevent humidity entering between the jamb and the wall.
Remove any mould that appears on the product surface.
Check the wooden surfaces of the product and perform any maintenance needed.
We advise that any maintenance carried out be logged in the table at the end of the maintenance manual. For informaon on maintenance products, please contact Livingwood Windows
Ltd.
A. FINISHING
The funcon of nishing is to protect the wooden surface against adverse eects originang in
the environment, e.g. humidity, UV radiaon, environmental polluon, etc. Therefore, it is very
important to check and maintain the wooden components of the products.
Washing wooden surfaces:
At least twice a year (preferably in spring and autumn), the wooden surfaces of windows and
doors need to be washed with clean water containing an added neutral cleaning product (for
example Teknoclean or similar) to remove any dust and other impuries that over an extended
period of me will damage the nished surfaces and therefore the funconality of the product.
Eects of the weather and the environment on the nishing layer of the product vary depending on the locaon of the building and the degree of protecon of the products. Any damage
detected during maintenance should be repaired immediately in order to prevent the wood
turning grey/blue or the paint bleeding.
Treatment with maintenance products:
At least once a year, preferably immediately aer the above cleaning, treat the wooden secons
with a maintenance product (e.g. Aidol Pegeset, Teknowax or other suitable wax. In the absence
of anything beer, car wax will do) according to the product instrucons. First perform any checks
and all necessary repairs outlined in item 2.
Inspect the corner joints of the members on the outside of the product. If there are cracks,
sand and ll with a joint protecon product that is neutral and suitable for exterior wooden
surfaces as well as for nishing.
19
MAINTENANCE MANUAL
Repairing damage:
Damage detected on nished surfaces needs to be repaired as follows:
• Remove loose paint/varnish and sand the damaged area with ne sandpaper (such as
P180…280) as needed. Clean and wash the sanded spot to remove any dust and dry it
properly. Apply a layer of repair varnish or paint of suitable colour, using a high-quality synthec brush designed for applying water-based acrylic paint. Once the rst layer has dried,
apply another layer to the surface.
• Repairs should only be made if the temperature exceeds 8°C and relave humidity is below
85%, otherwise the coang systems may cure poorly and performance may diminish. It is also
not advisable to perform repairs in intensive sunlight.
• When carrying out repairs, make sure that sash gaskets are not painted over.
• It is important for minor damage to be repaired quickly. Over me, minor damage may develop extensively and become dicult or impossible to repair. If there has been major damage,
the manufacturer needs to be noed immediately.
Resin:
Pinewood is a natural material containing resin which helps it beer resist the eects of the weather. On hot summer days the temperature on the outer surface of the product may be quite high
and this in turn may acvate the excreon of resin. As a result, small dots of resin may appear
on the surface of the wood. These may be removed carefully, using turpenne, white spirit or
another suitable product.
PLEASE NOTE: Unl the layer of paint cracks and comes loose from the surface of the wood, any
secreon of resin is not a defect of nishing for the purposes of the warranty.
B. MAINTENANCE OF ALUMINIUM CLADDING
Aluminium cladding is not maintenance free.
• The aluminium cladding on the outside of the product renders windows and doors much
more resistant to the eects of its surroundings and atmospheric polluon.
• It is advisable to clean aluminium cladding twice a year (more frequently in areas with heavy
atmospheric polluon). To clean aluminium use a so sponge and water, adding detergent if
needed. Cleaner paste may also be used as long as it does not contain abrasive parcles and/
or solvent.
• To protect the colour of the aluminium from fading due to environmental impact, it is advisable to occasionally wax aluminium cladding (for example, using car wax).
20
MAINTENANCE MANUAL
C. Hardware
Sash gaskets:
All opening sashs are provided with a durable and weather-proof rubber sash gasket. The gasket
is installed in the groove in the prole of the sash.
The gasket needs to be cleaned as needed using a regular window cleaning product. Do not
use solvent (such as white spirit) to clean the gasket as this will do permanent damage.
Paint or wood protecon products need to be prevented from geng on the surface of the
gasket.
Lever bolts:
Espagnolees and mul-point locks have been lubricated by the manufacturer. To ensure the
smooth operaon of the mechanisms, espagnolees and mul-point locks need to be oiled once
or twice a year, or more frequently if necessary (see gure 6.1)
Figure 6.1. Lubricang espagnolees and mul-point locks
Hinges:
The hinges of the window need to be lubricated with non-freezing oil that does not accumulate
dust (such as Teon oil) preferably twice a year (more frequently, if needed).
Before any surfaces are lubricated they need to be cleaned.
The tracks need to be clean and clear of physical obstacles. The tracks must not be painted
over, however they do need to be oiled, preferably twice a year.
21
MAINTENANCE MANUAL
3. OUTWARD OPENING WINDOWS
A. Side hung window
Window hinges (see Figure 7.1) need to be
lubricated. Lubricaon is also required by the
venlaon retainer (if any) in the top groove
of the sash.
B. Side guided
(side projecng) window
Figure 7.1. Lubricang a bu hinge
Window pivots with sliding stoppers, the inside
of tracks, the sliding surfaces of the aluminium
(see Figure 7.2) and the moving parts of the
espagnolees, all need to be lubricated. Once
lubricated, the acon of the sliding stopper
(see point 7.3, 2) diminishes somewhat but
returns to normal. The sliding stopper must
not be lubricated (see Figure 7.4).
Figure 7.3. Adjusng a side projecng gearing
Figure 7.4. Lubricang a side projecng
gearing
Figure 7.2. Lubricang side projecng gearing
22
MAINTENANCE MANUAL
The fricon’s intensity may be adjusted using the screw of the sliding stopper inside the top
track of the jamb by turning it with a suitable spanner.
To adjust the LW12 sash sideways, turn the cam at the adjustment locaons (see Figure
7.3).
C. Top guided window
Hinge pivots and the insides of tracks need to be lubricated (see Figure 7.5). Once lubricated, the
acon of the sliding stopper diminishes somewhat but returns to normal. The sliding stopper (see
point 3, Figure 7.6) must not be lubricated.
The fricon’s intensity may be adjusted using the screw of the sliding stopper inside the bus
of the jamb by turning it with a suitable spanner. The adjustment is correct when the window is
opened and remains in the desired posion. Take care not to over ghten.
The LW12 sash is adjusted vercally as shown in Figure 7.6:
• Open screw 2.
• Adjust the eccentric at point 1 using a box spanner to the correct posion.
• Secure screw 2.
Figure 7.6. Adjusng a top guided gearing
Figure 7.5. Lubricang a top guided gearing
23
MAINTENANCE MANUAL
D. Top swing window
Hinge pivots of a top swing window need to be
lubricated. Similarly, the tracks and the child
proof lock require lubricang. See Figure 7.7.
Figure 7.7. Lubricang a top swing gearing
4. INWARD OPENING
WINDOWS
Window hinges and the venlaon posion
retainer (see Figure 8.1) need to be lubricated. To reghten the handle screws carefully
turn the handle cover 90 degrees, releasing the
head of the screw. Using a suitable screwdriver,
ghten the screws of the handle and turn the
handle cover back into the vercal posion.
The sash is adjusted vercally or horizontally according to Figure 8.2. If needed, the
pressure of the sash gasket may be adjusted.
Grease all moving parts and
locking points and verify their
proper funcon
Reghten the xing
screws of the handle
(remove handle rosee
carefully)
Figure 8.1. Lubricang retainers for hinges,
espagnolees and venlaon posions.
24
MAINTENANCE MANUAL
When adjusng the “mushroom pin” on the espagnolee, make sure that all closing points are
lined up. To adjust the pressure of the gasket using the (a) top sash hinge shown in Figure 8,2, the
handle on the open window sash needs to be turned into the lt and open posion, aer which
the adjuster screw is released. PLEASE NOTE: use help to support the sash – danger of injury.
Horizintal sash adjustment – saty arm
Gasket pressure adjustment – stay arm
Horizontal sash adjustment – corner
bearing
Vercal and gasket pressure adjustment
g) Horizontal
sash adjustment (concealed
hardware)
h) Vercal sash
adjustment
(concealed
hardware)
Gasket pressure adjustment –
mushroom pin
Figure 8.2. Adjusng an inward opening window
25
i) gasket pressure adjustment
(concealed
hardware)
MAINTENANCE MANUAL
5. ENTRANCE AND TERRACE DOORS
The hinges, lock, locking points and venlaon retainer need to be lubricated with non-freezing
oil (such as silicone oil) preferably twice a year (more frequently if needed).
To adjust the height of the sash (see Figure 9.1):
• Open 4.5 × 40 screws and secure bolts (if any) on all hinges.
• By turning the cam counter-clockwise, the door sash adjusts downward.
• By turning the cam clockwise, the door sash adjusts upward.
• Tighten 4.5 × 40 screws and secure bolts.
PLEASE NOTE: When the door sash is adjusted upward, it needs to be raised at the same me.
To adjust the sash sideways (see Figure 9.1):
• Open 4.5 × 40 screws and secure bolts (if any) on all hinges.
• Turn the horizontal adjuster screws to the posion needed.
• Tighten 4.5 × 40 screws and secure bolts.
Screws for regulang
the horizontal height of
the sash
Screws 4,5 × 40 mm
Security bolt
Screws for regulang vercal
height of the sash
Screws 4,5 × 40 mm
Security bolt
Figure 9.1. Adjusng the height of the door sash and sideways
26
USER MANUAL
6. OUTWARD OPENING ALUCLAD DOORS
Outward opening aluminium clad wooden doors are equipped with three-piece Türband
4 hinges (Figure 10.1)
PLEASE NOTE: Keep the hinges clean.Hinges should not be oiled, since they were
assembled using Teon, which may be damaged if an incorrect lubricant is used.
Figure 10.2. Horizontal adjustment:
1. Remove the top hinge cover.
2. Use a 3 mm box spanner to adjust the
posion of the door horizontally (le / right
direcon).
Figure 10.1. Three-piece Türband 4 hinge
27
USER MANUAL
Figure 10.3. Adjustment of seal pressure:
1. Remove the hinge covers.
2. Undo the locking screws.
3. Use a 6 mm box spanner to adjust the posion and depth of the door in relaon to the
handle (outside / inside).
Figure 10.4. Vercal adjustment:
1. Remove the boom hinge cover.
2. Use a 6 mm box spanner to adjust the
posion of the door vercally (up / down
direcon).
28
MAINTENANCE MANUAL
7. SLIDING AND FOLDING DOORS
A. GU sliding door
All moving parts need to be lubricated with
non-freezing oil (such as silicone oil) preferably
twice a year (more frequently if needed).
The espagnolee catch can be adjusted by
being turned inward or outward (see Figure
10.1).
For cleaning and lubricaon, only use suitable products that do not damage the ancorrosive protecon of the hardware.
Figure 11.1. GU sliding door
1 – espagnolee strike
B. Tilt and slide door
On a lt and slide pao door, the height of the
sash may be adjusted if needed:
•
•
•
•
•
Remove hinge covers from the sash (Figure
10.2).
Remove the security cover by pulling it
toward you (c).
Using the screw under the security cover,
the sash may be adjusted as follows:
- to raise the sash +4 millimetres, turn
the screw counter-clockwise
- to lower the sash –1 millimetre, turn
the screw clockwise
Aer adjustment, push the security cover
back into its original posion.
Replace hinge covers (e and f) on the sash.
Figure 11.2. Adjusng a lt and slide door
29
MAINTENANCE MANUAL
C. Folding door
To adjust the posion of folding sashs on a folding door, it may be necessary to adjust the sash
hinges (both outer and inner) and the roller mechanism of the sash.
To adjust the horizontal posion:
• Fold the sashs into a suitable posion
• Turn the middle screw (Figure 10.3)
To adjust the vercal posion:
• Remove the cover from the adjuster screw.
• Open the lock nut.
• Adjust the adjuster screw using a box spanner (gure 10.4)
• Secure the lock nut and replace the cover for the adjuster screw.
180° turn = 0,5 mm
360° turn = 1,0 mm
Regulang screw
Locknut
Figure 11.4. Folding window’s support roller,
regulaon
Figure 11.3. Folding window hinge,
regulaon
Figure 11.5. Folding door
30
MAINTENANCE MANUAL
8. SPECIAL PRODUCTS
A. Vercal sliding sash window
The hinge pivots of the vercal sliding sash window need to be lubricated. Similarly, the tracks
and the child proof lock (if any) require lubricang.
B. GLAZING UNIT
Washing panes
Glass panes are mostly washed in spring or autumn (minimum temperature +5 °C). Use a proper
window washing kit and suitable glass cleaning product to wash the glass panes. A good window
washing kit consists of a window washer, a stand to aach the washer to, a squeegee and a rod
(if needed, a telescopic rod of adjustable length).
Clean the glazing unit, starng on its outer side, as soiled areas are easier to detect when
seen against light. To remove dirt or cleaning product uid, use a dedicated squeegee. To dry the
surface of glass it is not advisable to use newsprint, since prinng ink soils and may damage the
surface of the glass. If needed, improve the drying result with a piece of microbre glass cloth,
chamois or no-fuzz paper. Pay parcular aenon to the corners and edges of the glass surface.
PLEASE NOTE: when installing a glazing unit with a self-cleaning glass pane (for example SGG
Bioclean) or when washing glass panes, it is important to adhere to these specic handling
requirements:
• Never aempt to remove an individual stain from the surface without using water.
• Always use non-aggressive glass cleaning products.
• Do not use glass maintenance products containing silicone or abrasive parcles.
Do not use commercial cleaning products designed for a purpose other than cleaning glass.
• Do not use the following chemical cleaning products: sodium carbonate, bleach, detergent
or spirit.
• Avoid contact between glass and any other sharp or abrasive objects, including jewellery,
buckles, measuring tapes, razor blades, knives, sandpaper, etc.
Scratches. Avoid objects with sharp edges coming into contact with the glass surface. Glass is
strong but not scratch resistant. Only light scratches may be removed from the surface of glass
using cerium oxide.
31
MAINTENANCE MANUAL
Thermal stress. A rapid increase in the temperature of glass or large temperature dierences in
glass can create thermal stress, which may cause glass to break.
To avoid crical thermal stress:
• Avoid glass coming into contact with either hot air or a hot object.
• Avoid contact between objects and the glazing unit.
Sources:
* E. Just. Puitkonstruktsioonid [Wooden structures] (Tallinna Tehnikaülikool, EEP0011; EEK0050;
hp://www.tud.u.ee/material/epi/Elmar%20Just/Puit%202012.pdf)
** Wooden and aluminium windows and their installaon (RT 41-10947-et)
*** Wooden and aluminium windows and their installaon (RT 41-10947-et)
32
MAINTENANCE MANUAL
9. FACT SHEET for TEKNOL AQUA 1410-01 treated items
This item has been treated with wood
preservave: (Regulated by the Biocides Regulaon 528/2012, PT8)
TEKNOL AQUA 1410-01
Biocides approved for product type 8
a) Items treated with TEKNOL AQUA
1410-01 contain:
b) Items treated with TEKNOL AQUA
1410-01 are protected against:
Wood destroying or discolouring fungi
c) Items treated with TEKNOL AQUA
1410-01 contain the following biocides:
Propiconazole, IPBC
d) Items treated with TEKNOL AQUA
1410-01 contain the following
nanomaterials:
—
Teknos A/S Industrivej 19 DK-6580
Vamdrup; Tel.: +45 76 93 94 00
The wood preservave TEKNOL AQUA
1410-01 is produced by:
e) Special precauons for items treated with TEKNOL AQUA 1410-01:
The surface of the wood must be coated with e.g. varnish or paint. Coang of the
surface must be carried out at regular intervals.
01.09.2013/Factsheet according European Biocidal Products Direcve
33
MAINTENANCE MANUAL
10. FACT SHEET for GORI 605 treated items
This item has been treated with wood
preservave:
(Regulated by the Biocides Regulaon
528/2012, PT8)
GORI 605
Biocides approved for product type 8
a) Items treated with GORI 605
contain:
b) Items treated with GORI 605 are
protected against:
Wood destroying or discolouring fungi
Propiconazole, Tebuconazole, IPBC
c) Items treated with GORI 605 contain
the following biocides:
–
d) Items treated with GORI 605 contain
the following nanomaterials:
Teknos A/S Industrivej 19 DK-6580
Vamdrup; Tel.: +45 76 93 94 00
The wood preservave GORI 605 is
produced by:
e) Special precauons for items treated with GORI 605:
In order to protect aquac organisms, do not use the treated wood near the
aquac environment (rivers, streams, lakes etc.).
The surface of the wood must be coated with e.g. varnish or paint. Coang of the
surface must be carried out at regular intervals.
01.09.2013/Factsheet according European Biocidal Products Direcve
34
Performed maintance works
Date
Performed works
Unit 6, Ticehurst Yard
Ticehurst Farm
Tostock, Bury St Edmunds
Suffolk, IP30 9PH
Tel: 01359 272 646
[email protected]