1
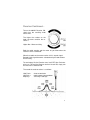
Series 800-HL
Dual-Frequency
Pipe and Cable Locator
User Manual
Manufactured Exclusively By:
Utility Tool Company, Inc.
2900 Commerce Boulevard
Birmingham, Alabama 35210
Tel
205-956-3710
Fax
205-956-3711
view instructional videos at:
www.pipehorn.com
DANGER! SHOCK HAZARD
CONNECTING DIRECTLY TO ANY
CONDUCTOR CAN BE HAZARDOUS AND RESULT IN ELECTRIC
SHOCK, INJURY, OR DEATH.
ONLY LICENSED OR AUTHORIZED PERSONS SHOULD MAKE
DIRECT CONNECTIONS TO POTENTIALLY ENERGIZED CONDUCTORS.
This device complies with Part 15 of the
FCC Rules. Operation is subject to the
following two conditions: (1) this device
may not cause harmful interference, and
(2) this device must accept any interference
received, including interference that may
cause undesired operation.
NOTICE
This User’s Manual is provided as an informational guide only and is subject to
change without notice.
This Manual contains certain information
which is proprietary in nature and protected
by U.S. and Foreign Patents, Copyrights,
and Registered Trademarks. All rights are
reserved. No part of this document may be
photocopied, reproduced, transmitted, or
converted into another language without
the express written consent of Utility Tool
Company, Inc.
Copyright © Utility Tool Company, Inc 2015
2
CONTENTS
General Information
Equipment List
Advantages of the 800-HL
APWA Uniform Color Code
4
4
5
6
Terminology
7
The Equipment
8
The Transmitter
The Receiver
8
8
The Signal
10
Pinpointing
11
Inductive Locating
12
Apply the HF Signal
Determine the Source of Signal
Verify the Conductor Pinpointed
Search and Sweep
One Person
Two Person
Conductive Locating
Applying Signal to the Conductor
Using Two Frequencies
12
13
14
15
15
16
18
18
19
System Check
20
Maintenance
21
Warranty
22
Repair Service
23
3
GENERAL INFORMATION
The Pipehorn Series 800-HL is a state-of-the-art, dual-frequency,
pipe and cable locating system designed for the professional
with complex locating jobs. It is a carefully engineered, precision
instrument that, with reasonable care, will give many years of
satisfactory service. The 800-HL is very simple to operate, but
for best results, the operator should carefully read this manual.
The 800-HL is two tools combined into one for attacking any locating job. It can operate as a low-frequency conductive locator
and as a high-frequency inductive or conductive locator.
This equipment is used to locate and trace all types of buried or
concealed conductors such as: pipe, cable, tracer wire, traceable
fiber optics, or even sewer snakes or fish tape inserted into nonconductive pipe. The 800-HL has an audible response as well
as a visual response to help verify the locate and to help give an
estimated depth.
Equipment List
The 800-HL consists of the following:
1 Receiver
2 Dual-Frequency
Transmitter
3 Set of Conductive
Cables
4 Ground Rod
5 Quick Guide
6 Instruction Manual
7 Vinyl Carrying Case
4
Advantages of the 800-HL
Every locating job is different. Success calls for a unique blend
of equipment, experience, and persistence. In some situations,
a low-frequency, conductive locator will perform better than a
high-frequency, inductive locator. In other situations, the reverse
is true.
The advantage of the low-frequency is long distance tracing on
good conductors and isolating one conductor among many. The
disadvantage is that it must be directly connected to the pipe or
cable.
The advantage of the high-frequency is that it traces poor conductors, can locate short lengths better than the low-frequency,
and it does not have to be directly connected, though this
method is available. Inductive operation is much faster and easier allowing the operator to move the signal to any place which is
useful. The disadvantage of high-frequency during inductive
locating is that it can place more signal on adjacent conductors,
making isolation more difficult.
The 800-HL combines these two frequencies into one unit. It is
capable of both inductive and conductive modes. Sometimes
one frequency performs well where the other does not. Therefore we made both frequencies run at the same time during conductive mode. Also during conductive mode the high-frequency
no longer induces signal which helps isolate the target. So as
you follow the line you can switch from one frequency to the
other at the receiver allowing a multitude of locating options and
techniques.
The Receiver has a meter to show signal strength which is helpful in noisy situations. This meter also aids in depth estimation.
We have also tuned the Receiver’s audio feedback to produce
tones that are most audible by the human ear.
5
SAFETY FIRST!
DANGER! Shock Hazard. Connecting directly to any conductor can be hazardous and result in electric shock, injury,
or death. Only licensed or authorized persons should make
direct connections to potentially energized conductors.
Always exercise good safety procedures when operation locating
equipment. These include, hooking a transmitter directly to energized conductors only when licensed or authorized, being constantly aware of traffic and equipment operating nearby, and removing any flammable or toxic liquids and gases from the area
before using a locator.
Employing proper safety practices during locating tasks will
perhaps avoid an accident and may save your life.
APWA Uniform Color Code
Use this code for marking buried utilities. This code is used to
identify the various types of underground utilities. Make sure the
color you use corresponds to the chart below for the type of utility you are marking.
Electric Power Lines or Conduits - Safety Red
6
Communication Lines or Cables
- Safety Alert Orange
Storm & Sanitary Sewers
- Safety Green
Water
- Safety Precaution Blue
Proposed Excavation Area
- High Visibility White
TERMINOLOGY
When the following terms are used in this manual, they have the
meanings specified below:
Conductor - pipe, cable, conduit, traceable optic fiber, tracer
wire/tape, sewer snake, fish tape, or other lines needed to
find.
Tracer Signal or Signal - the output from a Transmitter, either
directly or through the air, which is carried along the conductor and detected with the Receiver.
Inductive - place the tracer signal on the conductor without
making a direct electrical contact.
Conductive - place the tracer signal on the conductor by making a direct electrical contact or “direct-hookup”
LF - low-frequency
HF - high-frequency
Sensitivity - the amount of signal the Receiver is set to detect;
increasing the sensitivity allow the receiver to detect weaker
signals when it is farther from the Transmitter or conductor,
as the case may be. Also known as “GAIN”
Saturated Tone - when the receiver sensitivity is set too high
and the tone no longer changes as you pass over a conductor. In other words the receiver is receiving too much signal
from the transmitter and can no longer pinpoint the line. The
800-HL receiver will beep during saturation. Lower the sensitivity to eliminate saturation and allow for better pinpointing.
Search & Sweep - refers to scanning the area using the high
frequency to find all of the conductors in the ground. Can be
performed by one or two people.
7
THE EQUIPMENT
Transmitter
Modes: Inductive
Conductive
Signal Clamp
- HF
- HF & LF
- HF & LF
During Inductive Mode, only the High-Frequency is being induced. To put the most signal on a conductor, place the handle
of the Transmitter in-line and directly over the conductor.
During the Conductive or Signal Clamp Mode, both frequencies are being sent out at the same time. The high-frequency is
no longer inducing and all signal is focused on the target conductor. For maximum benefit, place the ground rod as far away as
possible at 90° from the conductor. Remember to ground away
from trouble including adjacent conductors, fences, and other
metallic structures.
The 800-HL Transmitter produces an audible tone when the unit
is ON. When the tone is a high pitch, then a good signal is being
put out. If during Conductive mode, a low pitch is heard then
there is poor signal being placed on the conductor. This could
be due to a bad ground or poor connection to the pipe, etc. If the
Transmitter starts beeping then the batteries are getting low.
Receiver
The Receiver can be used during
all modes described above. The
800-HL Receiver can operate on
both the high– and low-frequency.
Signal response feedback is given
by an audio speaker and a meter.
Switching from High-frequency to
Low-frequency is done by flipping a
switch on the side of the receiver.
8
Receiver Continued...
To turn the 800-HL Receiver ON,
simply turn the sensitivity knob
until it clicks.
The higher the number on the
knob, the more sensitive the receiver is.
Higher No. = More sensitivity
Both the audio speaker and the meter let you know when the
receiver is over a conductor.
When the needle on the meter reaches 10 it is at peak signal.
Beyond 10 the signal becomes saturated and you need to lower
the sensitivity.
To save battery life, the Receiver turns itself OFF after 5 minutes
of no use. To reset the Receiver and turn it back ON, simply turn
the switch OFF and back ON.
The sound the receiver makes is as follows:
High Pitch =
Low Pitch =
Beeping =
close to conductor
moving away from conductor
sensitivity is too high
9
THE SIGNAL
At any given distance, say 2 feet, at any direction from the conductor, the strength of the signal is the same under most conditions. This allows the Receiver to pinpoint directly over the conductor, as shown below, because that is the area with the peak
(strongest) signal reading.
While locating always hold the Receiver vertically, and in the
direction of the pipe (in-line with the handle). Swinging the Receiver as you scan may lead you to interpret the signal incorrectly.
Under ideal situations you will receive a balanced signal, as
shown above. However, in some cases an un-balanced signal
will occur, usually due to interference from another conductor, as
shown below.
10
PINPOINTING
As you move closer to the conductor the Receiver’s sound becomes a higher (shrill) pitch. As you move away from the conductor the pitch lowers and eventually goes away. Always
maintain a solid, non-beeping tone from the Receiver to ensure proper alignment with the conductor.
Be careful when on a hill or steep bank. Try to keep the Receiver level, not parallel to the hill. The Receiver will go towards
the strongest tone, and if it is kept parallel to the hill side that
tone will NOT be directly over the conductor as shown below.
The deeper the conductor is, the worse this problem becomes.
INCORRECT
CORRECT
11
INDUCTIVE LOCATING
This method is used when there is no direct access to the target
conductor. It is also helpful in finding conductors with locations
that are unknown.
With the 800-HL the High-frequency is the only frequency induced onto the conductor. It will only do so when the connection
cables have been disconnected from the transmitter.
Starting From a Known Point
Use the following steps to begin tracing a conductor from a
known point such as, a meter, valve, pedestal, or line marker,
where access to the conductor for direct hook-up is not possible
or is prohibited.
Apply the HF Signal
Place the 800-HL Transmitter directly over the conductor with the
handle in-line with the conductor, as shown below. Careful alignment and placement of the Transmitter will maximize the signal
on the conductor. Turn the Transmitter ON.
Set Up the Receiver
Depending on the depth of the conductor, move 20-30 feet away
from the Transmitter. The deeper the conductor, the farther
away from the transmitter you must start. Face the Transmitter
and position the Receiver antenna near the ground. Set the Receiver to receive High-Frequency as explained on page 8. Move
the sensitivity knob clockwise to turn the receiver ON.
12
Set Proper Sensitivity & Scan the Area
Adjust the sensitivity knob to get a solid, non-beeping tone from
the Receiver. Scan to the left or right to find the stronger signal.
The higher pitch sound indicates you are getting closer to the
conductor, a lower pitch sound indicates you are moving away
from a conductor. If the sound starts beeping, lower the sensitivity and continue scanning.
Pinpoint the Conductor
When scanning and the sound peaks, or changes from LOW to
HIGH to LOW pitch, then you have come across the conductor.
Be sure the tone dies off evenly on both sides of the peak (letting
you know you have a balanced signal). The peak, or highest
pitch, indicates when the antenna is directly over the conductor
as described on page 11.
Determine Source of Signal
After pinpointing, raise the receiver antenna and point it at the
Transmitter. If the signal does not get significantly weaker, then
the signal is coming through the air from the Transmitter more so
than from the conductor. There may be no conductor or you
may be too close to the transmitter. Move farther away from the
Transmitter, pinpoint again, and re-check as shown below.
13
Verify the Conductor Pinpointed
Mark the spot where you have pinpointed the line and check the
direction by twisting the receiver left and right to get the strongest signal.
Now place the Transmitter on the mark, in-line with the conductor, and trace the conductor back to its source.
Trace the Conductor’s Path
When satisfied that you’ve found the target conductor, begin
walking away from the Transmitter, tracing the path of the conductor by sweeping the antenna left and right. Always keep the
antenna level and listen for the LOW-HIGH-LOW sound change.
Trace as far as necessary adjusting the sensitivity control to
maintain a solid, non-beeping tone.
Weak or Confusing Signal
When the sensitivity control is fully clock-wise or the tone becomes jittery or unclear, reposition the Transmitter at the last
clear location and continue tracing.
14
SEARCH AND SWEEP
One Person
This technique is beneficial in finding conductors with unknown
locations, and with no access points. Basically you use the
equipment in a way that scans the entire ground to find all conductors in a specific area. Please read the instructions for inductive locating before proceeding.
Position the Transmitter
Lay the 800-HL Transmitter on its side, as shown below. This
will “flood” the area with signal. Turn ON the Transmitter.
Set Up the Receiver
Set up with the Receiver the same as you would during inductive
locating. Move 5-10 feet from the Transmitter, face the Transmitter with the antenna near the ground, and turn the Receiver
ON. Set the sensitivity control so that the meter reads 4 and
you hear a low pitched tone.
Locate the Conductor(s)
With the Receiver facing the Transmitter, walk in a circle around
the Transmitter. Keep a steady distance from the Transmitter
and from the ground. Listen for the HIGH pitch tone areas, DO
NOT adjust the sensitivity. After locating the HIGH pitch areas,
go back and pin-point the conductors in those areas. You may
need to re-adjust the sensitivity at this step, looking for the LOWHIGH-LOW sound change. Mark the places with the highest
tones for further pinpointing later.
15
For Full Coverage
Re-locate the 800-HL Transmitter at least once several steps to
the right or left in order to provide complete coverage. This is
because any conductor which is directly underneath the Transmitter will not be detected.
Pinpoint and Determine Signal Source
As with normal Inductive Locating, place the 800-HL Transmitter
upright on one of the marks made earlier, (in line with the suspected run of the conductor). Pinpoint the conductor on the
other side of the search area in the normal manner, as described
on page 11.
After pinpointing the conductor, raise the receiver toward the
transmitter to be sure the signal is mostly coming from the conductor and not through the air, as described on page 13.
Repeat this process for each of the HIGH pitch areas found earlier and mark the lines accordingly.
SEARCH AND SWEEP
Two Person
Generally, two people can perform a search over a broad area
quicker than one person.
Set Up the Search
Start over an area where there are no conductors. One person
holds the Transmitter to his/her side in line with the suspected
run of the conductor(s). The other person stands approximately
30 feet away from the Transmitter, holding the Receiver to his/
her side. (Be sure the Receiver is set to receive High-frequency,
page 8.) Turn both units ON, and keep them pointed at each
other. Set the Receiver’s sensitivity control so that the meter
reads 4 and you hear a low pitched tone. The tone will get higher
as you get closer to conductors.
16
Sweep the Area for Conductors
Maintain a constant distance between the Receiver and the
Transmitter. Move together across the area where the conductors are suspected to run. DO NOT adjust the sensitivity during
the sweep. When the operators sweep together over a conductor, the tone from the Receiver will get HIGH (shrill) or begin
beeping, indicating a stronger signal. Temporarily mark the high
pitch areas for pinpointing later.
Pinpoint and Determine Signal Source
Set the Transmitter down in one of the high pitch areas found,
and pinpoint with the receiver (page 11). After checking direction, get a good solid tone on the receiver and let the other person pinpoint using the transmitter. Move the Transmitter left and
right until the Receiver gets the strongest (highest pitch) signal
response. At this point the Transmitter and Receiver are directly
over the conductor.
After pinpointing the conductor, raise the Receiver toward the
Transmitter to be sure the signal is mostly coming from the conductor and not through the air, as described on page 13.
Conductors Going in Different Directions
Set up as before in different directions to sweep the area for conductors running at 45° and 90° to the original locating position.
17
Conductive Locating
Conductive locating is done when there is an access point available for direct connection to the target conductor. This technique
applies maximum signal to the target conductor with minimal
signal applied to adjacent conductors.
The 800-HL puts out both a Low– and a High-frequency during
Conductive Locating. Conductors, such as deep high-pressure
gas mains, communication cables, and other insulated continuous pipes and cables, are generally good candidates for LF locating. Tracer wire and tape which may have breaks, poor conductors like cast iron with partially insulating couplings are better
candidates for HF locating. Actual field experience will be your
best teacher in learning which frequency is best suited for a particular application in your area.
Only licensed or authorized persons should make direct connections. DO NOT HOOK DIRECT TO LIVE POWER CABLES.
Make certain that the owner of the conductor has authorized direct hook-up for purposes of locating.
Appling Signal to the Conductor
Remove any rust, paint, or other insulating substances from the
point of contact with the conductor.
Position the supplied Ground Rod as far away from and 90° from
the conductor as possible. Try to avoid grounding over an adjacent conductor. Connect to the Conductor, then to Ground, then
insert the phono plug into the jack, and last, turn the Transmitter
ON.
18
Trace the Conductor
From the Receiver select which frequency you wish to trace with.
Sometimes one frequency will trace better than the other. Step a
few feet from the Transmitter in the direction of the suspected
conductor and set the sensitivity to get a solid steady tone from
the Receiver.
Begin walking away from the Transmitter along the path of the
conductor while sweeping the receiver’s antenna left and right
maintaining the LOW-HIGH-LOW tone pattern. If one frequency
is not tracing well, try the other with flick of the switch on the receiver. In many situations you will find benefit to having access
to both frequencies at the same time on a conductor. This can
help isolate and verify conductors.
Verify the Conductor
After marking the conductor along the path away from the Transmitter (30 ft. recommended), move the Transmitter to that spot
and inductively trace back to the source point (as described on
page 14. Be sure the Receiver is set to receive High-frequency.
This will help ensure that you are on the right conductor.
Using Two Frequencies
There are many benefits to have two frequencies running at the
same time. The 800-HL uses a low and a high-frequency. If you
come to a break or insulated joint in a line, the Low-frequency
may stop at that spot. With the 800-HL you can simply switch
the Receiver to receive the High-frequency and continue with
your locate. By continuing to check the high frequency you can
see if there are Tee’s in the line or other access points that the
Low-frequency may skip over. Also if the conductor material
changes, one frequency may run good at first but at the change
the other frequency may run better. For other locating tips, call
us at 205-956-3710 or check out our website at
www.pipehorn.com.
19
SYSTEM CHECK
Verifying the Transmitter, Receiver, Conductive Cables, and optional
Signal Clamp are operational before use is recommended.
Check Induction
Place the transmitter on the ground away from utility lines and other
interfering metal objects, such as vehicles and fences. Turn it on and
listen for the high-pitched tone indicating good battery and good signal.
Select high-frequency on the Receiver and set the sensitivity knob precisely at 2. The Receiver should be beeping when against the Transmitter as shown. Move in a line away from the Transmitter. The beeping tone should continue for at least 3 feet.
Check Conduction & Clamp
Plug the conductive cables into the Transmitter. The Transmitter makes
a low tone because the clips are not connected to anything. Connect
the clips together. A high-pitched tone from the Transmitter indicates
good signal and good cables. Place the cables in a loop. With the knob
still at 2, touch the Receiver to the red wire keeping the handle in-line
with the wire as shown. A beeping tone from the Receiver on both high
and low-frequency indicates conduction is operational. To check the
optional Signal Clamp, plug it into the Transmitter and listen for the
good signal tone. Place the Receiver tip inside the Clamp’s ring. A
beeping tone from the Receiver on both high and low-frequency indicates the Clamp is operational.
If the locator fails the checks above, or if the Transmitter makes a beeping tone, or if the Receiver’s volume is low, replace batteries and repeat
checks. If it fails again with good batteries, the locator may need repair.
20
MAINTENANCE
The Pipehorn Series 800-HL does not require periodic calibration or
any further internal adjustments. With reasonable care it should
give many years of trouble free service.
Batteries
The Receiver and Transmitter contains alkaline batteries for their
power source and you should change them periodically. How often
the instrument is used determines battery life. If the Receiver’s volume is low, the Transmitter is producing a beeping tone, the operation distance decreases, or if the instrument becomes inoperative, it
is likely the result of dead batteries. You should install fresh batteries as necessary. Change the batteries at least once every six
months to be certain that the instrument will be ready to operate
when needed.
NOTE: The usual reason for an inoperative unit is that the power
switch was not returned to the OFF position when work was completed. The Receiver times out after 5 minutes of no use, and the
Transmitter creates an audible tone letting the operator know it is
still turned on.
Receiver:
2 Eveready #522 alkaline 9V
or equivalent
Transmitter:
8 Eveready #E93 alkaline
“C” cells or equivalent
21
WARRANTY
THERE ARE NO WARRANTIES, EXPRESS OR IMPLIED,
INCLUDING ANY WARRANTY OF MERCHANTABILITY,
BEYOND THOSE STATED BELOW.
Utility Tool Company, Inc. warrants the equipment it manufactures to be free from defects in workmanship or material, under
normal and proper use and service by the original user, for three
years from the date of original shipment from the factory.
Batteries and other expendable items are not included in this
Warranty.
Unauthorized repair, alteration, or improper
maintenance will void this Warranty. Alteration or removal of the
serial number will also void the Warranty. Utility Tool Company
will not be obligated under this Warranty if the equipment has
been misused, misapplied, or accidentally damaged.
If a product is found defective under this Warranty, Utility Tool
Company will, at its option, repair or replace the unit free of
charge at Utility Tool Company’s factory. The unit should be
returned to the factory prepaid with customary shipping
precautions. Utility Tool Company’s obligations under this
Warranty are limited to the repair or replacement of defective
parts which are not the result of alteration, misuse, abuse, or
accidental damage, or at the option of Utility Tool Company, the
refund of the purchase price. Utility Tool Company assumes no
other liabilities, contingent or consequential, to any equipment
found defective under this Warranty.
22
REPAIR SERVICE
For fast service (usually less than 48 hours), return the unit prepaid to:
Utility Tool Company, Inc.
2900 Commerce Blvd.
Birmingham, Alabama 35210
Phone (205) 956-3710
If you have questions or suggestions regarding our equipment or
a particular application, contact our applications support group at
the number listed above between 8:00am and 4:30pm Central
Time.
Thank you for purchasing the Pipehorn equipment. We value
your business and want to keep it. Please fill in the following for
your records:
Pipehorn Series 800-HL Serial Number:
__________________________________________________
Date of Purchase: ___________________________________
Also, check out our website for more tips and information at:
www.pipehorn.com
23
view instructional videos at:
www.pipehorn.com