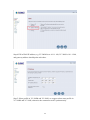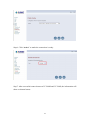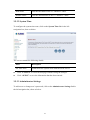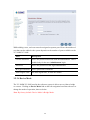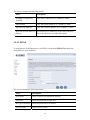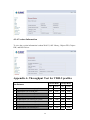
1
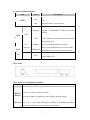
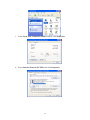
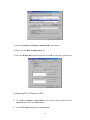
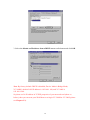
VDSL2 Router VC-200M / VC-200S User's Manual Copyright Copyright© 2007 by PLANET Technology Corp. All rights reserved. No part of this publication may be reproduced, transmitted, transcribed, stored in a retrieval system, or translated into any language or computer language, in any form or by any means, electronic, mechanical, magnetic, optical, chemical, manual or otherwise, without the prior written permission of PLANET. PLANET makes no representations or warranties, either expressed or implied, with respect to the contents hereof and specifically disclaims any warranties, merchantability or fitness for any particular purpose. Any software described in this manual is sold or licensed "as is". Should the programs prove defective following their purchase, the buyer (and not this company, its distributor, or its dealer) assumes the entire cost of all necessary servicing, repair, and any incidental or consequential damages resulting from any defect in the software. Further, this company reserves the right to revise this publication and to make changes from time to time in the contents hereof without obligation to notify any person of such revision or changes. All brand and product names mentioned in this manual are trademarks and/or registered trademarks of their respective holders. Federal Communication Commission Interference Statement This equipment has been tested and found to comply with the limits for a Class B digital device, pursuant to Part 15 of FCC Rules. These limits are designed to provide reasonable protection against harmful interference in a residential installation. This equipment generates, uses, and can radiate radio frequency energy and, if not installed and used in accordance with the instructions, may cause harmful interference to radio communications. However, there is no guarantee that interference will not occur in a particular installation. If this equipment does cause harmful interference to radio or television reception, which can be determined by turning the equipment off and on, the user is encouraged to try to correct the interference by one or more of the following measures: 1. Reorient or relocate the receiving antenna. 2. Increase the separation between the equipment and receiver. 3. Connect the equipment into an outlet on a circuit different from that to which the receiver is connected. 4. Consult the dealer or an experienced radio technician for help. 2 FCC Caution: To assure continued compliance (example-use only shielded interface cables when connecting to computer or peripheral devices). Any changes or modifications not expressly approved by the party responsible for compliance could void the user’s authority to operate the equipment. This device complies with Part 15 of the FCC Rules. Operation is subject to the Following two conditions: (1) This device may not cause harmful interference, and (2) this Device must accept any interference received, including interference that may cause undesired operation. R&TTE Compliance Statement This equipment complies with all the requirements of DIRECTIVE 1999/5/EC OF THE EUROPEAN PARLIAMENT AND THE COUNCIL OF 9 March 1999 on radio equipment and telecommunication terminal Equipment and the mutual recognition of their conformity (R&TTE) The R&TTE Directive repeals and replaces in the directive 98/13/EEC (Telecommunications Terminal Equipment and Satellite Earth Station Equipment) As of April 8, 2000. WEEE To avoid the potential effects on the environment and human health as a result of the presence of hazardous substances in electrical and electronic equipment, end users of electrical and electronic equipment should understand the meaning of the crossed-out wheeled bin symbol. Do not dispose of WEEE as unsorted municipal waste and have to collect such WEEE separately. Safety This equipment is designed with the utmost care for the safety of those who install and use it. However, special attention must be paid to the dangers of electric shock and static electricity when working with electrical equipment. All guidelines of this and of the computer manufacture must therefore be allowed at all times to ensure the safe use of the equipment. 3 Revision User’s Manual for VDSL2 Router Model: VC-200M / VC-200S Rev: 1.0 (March 2007) Part No. EM-VC200v1 4 Table of Contents CHAPTER 1: INTRODUCTION...............................................................................7 1.1 Feature ........................................................................................................7 1.2 Package Contents........................................................................................8 1.3 Physical Details ..........................................................................................8 CHAPTER 2: HARDWARE INSTALLATION.....................................................10 2.1 System Requirement.................................................................................10 2.2 Hardware Installation ...............................................................................10 2.3 Configuring the Network Properties.........................................................11 CHAPTER 3: CONFIGURATION..........................................................................17 3.1 Determine your connection settings .........................................................17 3.2 Connecting the VDSL2 Router to your network ......................................17 3.3 Configuring with Web Browser ...............................................................17 3.4 Quick Installation .....................................................................................18 3.5 Configuration Menu for Administrator ....................................................24 3.5.1 Setup Wizard ...................................................................................24 3.5.2 Advanced Setup...............................................................................25 3.5.3 System .............................................................................................25 3.5.3.1 Host Name Config ..................................................................26 3.5.3.2 System Time ...........................................................................27 3.5.3.3 Administrator Settings............................................................27 3.5.3.4 Device Mode...........................................................................28 3.5.3.5 Firmware Upgrade..................................................................29 3.5.3.6 System Status..........................................................................29 3.5.3.7 System Logs ...........................................................................30 3.5.3.8 Reset .......................................................................................31 3.5.4 WAN................................................................................................32 3.5.4.1 Dynamic IP .............................................................................32 3.5.4.2 Static IP...................................................................................33 3.5.4.3 PPPoE .....................................................................................34 3.5.4.4 DNS ........................................................................................35 3.5.5 LAN .................................................................................................36 5 3.5.5.1 LAN Setting............................................................................37 3.5.5.2 DHCP Client List....................................................................38 3.5.6 NAT .................................................................................................38 3.5.6.1 Virtual Server .........................................................................39 3.5.6.2 Port Mapping ..........................................................................40 3.5.6.3 DMZ .......................................................................................41 3.5.7 Route................................................................................................42 3.5.7.1 Static Route.............................................................................43 3.5.7.2 Routing Table List ..................................................................44 3.5.8 UPnP................................................................................................45 3.5.8.1 Settings ...................................................................................45 CHAPTER 4: OPERATING THE VDSL2 SYSTEM............................................46 4.1 Configuration Settings..............................................................................46 4.1.1 Channel Configuration ....................................................................47 4.1.2 Line Configuration ..........................................................................48 4.1.3 Profile Configuration.......................................................................49 4.1.4 Active...............................................................................................51 4.1.5 Channel Status .................................................................................51 4.1.6 Version Information ........................................................................52 Appendix A: Throughput Test for VDSL2 profiles .......................................52 Appendix B: Glossary ....................................................................................53 6 Chapter 1: Introduction The PLANET VDSL2 Router, VC-200M / VC-200S is based on two core networking technologies: Ethernet and VDSL2 (Very High Speed Digital Subscriber Line 2). This technology offers the absolute fastest possible data transmission speeds over existing copper telephone lines without the need for rewiring. The ideal situation, the date rate of VDSL2 can up to 40Mbps upstream and 100Mbps downstream. The VC-200M / VC-200S supports ITU-T G993.2, and provide selectable operating mode of bridging and routing. Via the user-friendly management interface, VC-200M / VC-200S can be managed by computer running standard web browsers. Furthermore, VC-200M / VC-200S provides DHCP server, NAT, virtual server, DMZ, DNS proxy, and UPnP capability. It provides the natural firewall function (Network Address Translation, NAT). All incoming and outgoing IPs are monitored and filtered VC-200M / VC-200S provide 4-port 10/100 Ethernet switch, it provide data deliver and receive in local network, so that it is the best selection for small enterprise and residence. 1.1 Feature Internet Access Features Shared Internet Access. All users on the LAN can access the Internet through the VC-200M / VC-200S using only a single external IP Address. The local (invalid) IP Addresses are hidden from external sources. This process is called NAT (Network Address Translation). Built-in VDSL2 modem. The VC-200M/VC-200S provides VDSL2 modem, and supports all common VDSL2 connections. Fixed or Dynamic IP Address or PPPoE. On the Internet (WAN port) connection, the VC-200M / VC-200S supports both Dynamic IP Address (IP Address is allocated on connection) and Fixed IP Address. Advanced Internet Functions Virtual Servers. This feature allows Internet users to access Internet servers on your LAN. The required setup is quick and easy. Firewall. Supports simple firewall with NAT technology. Universal Plug and Play (UPnP) UPnP allows automatic discovery and configuration of the Broadband Router. UPnP is supported by Windows ME, XP, or later. 7 Selectable VDSL2 transmission modes. User can choose transmission modes (8a,8b,12a,12b,and 17a) through management interface on VC-200M / VC-200S User Friendly Interface. VC-200M / VC-200S can be managed and controlled through Web UI. LAN Features 4-Port Switch. The VC-200M / VC-200S incorporates a 4-port 10/100BaseT switching hub, making it easy to create or extend your LAN. DHCP Server Support. Dynamic Host Configuration Protocol provides a dynamic IP address to PCs and other devices upon request. The VC-200M / VC-200S can act as a DHCP Server for devices on your local LAN. 1.2 Package Contents ‧ ‧ ‧ ‧ ‧ ‧ VC-200M / VC-200S Unit Power Adapter Quick Installation Guide User’s Manual CD RJ-11cable RJ-45 cable 1.3 Physical Details Front Panel VC-200M front panel VC-200S front panel 8 Front Panel LED definition LED State ON When the router is powered on, and in ready state. OFF When the router is powered off. PWR Flashing Router is trying to establish a connection between VC-200M and VC-200S, or telecom’s network. ON Successfully connected between VC-200M and VC-200S, or router and telecom's network, and in ready state. LNK DSL ACT LNK/ACT LAN 1-4 100 Description Flashing Data is being transmitted or received. Flashing/ON Data is being transmitted or received via the corresponding LAN port, and in ready state. ON Orange color, it corresponding LAN port is using 100Base-TX. Rear Panel Rear panel Port and Button Definition Connector Description POWER Power connector with 12V DC 1 A RESET Button Press 1-3 seconds for reboot system. Press more than 5 seconds for reset to factory default setting. Router is successfully connected to a device through the corresponding LAN (1-4) port (1, 2, 3, or 4). If the LED light of LNK/ACT is flashing, the Router is actively sending or receiving data over that port. 9 PHONE The RJ-11 connector allows voice communication between the router and phone through a twisted-pair phone wire. *Future Feature VDSL2 The RJ-11 connector allows data communication between the router and the VDSL2 network through a twisted-pair phone wire Chapter 2: Hardware Installation This chapter offers information about installing your router. If you are not familiar with the hardware or software parameters presented here, please consult your service provider for the values needed. 2.1 System Requirement 1. Personal computer (PC) 2. Pentium II 233 MHz processor minimum 3. 32 MB RAM minimum 4. 20 MB of free disk space minimum 2.2 Hardware Installation This section describes how to connect and configure VC-200M/VC-200S. Power Adapter To PC/Hub Step 1. Connect the VDSL2 Line There are two ways to connect VC-200M or VC-2000S. 10 To VDSL2/Phone Line I. II. Connect the supplied RJ11 cable to VDSL2 ports between VC-200M and VC-200S. Uses the supplied RJ-11cable connects to VC-200M or VC-200S with your phone company. Step 2. Connect a Workstation to the Router's LAN port Uses the supplied RJ-45 cable connects to PC with the Switching Hub port of VC-200M / VC-200S. Both 10Base-T and 100Base-TX connections can be used simultaneously. If required, using a standard RJ-45 cable connect to any LAN port of VC-200M / VC-200S with a normal Hub. Any LAN port of VC-200M / VC-200S will automatically function as an "Uplink" port when required. Step 3. Connect the Power Adapter to the Router Connect the power adapter to the port labeled 12V DC on the rear panel of router. Step 4. Connect All Cables to the Network The procedure for connecting cables differs depending on whether or not your telephone equipment is connected to a POTS splitter. 2.3 Configuring the Network Properties Configuring PC in Windows XP 1. Go to Start / Control Panel (in Classic View). In the Control Panel, double-click on Network Connections 2. Double-click Local Area Connection. 11 3. In the Local Area Connection Status window, click Properties. 4. Select Internet Protocol (TCP/IP) and click Properties. 12 5. Select the Obtain an IP address automatically and the Obtain DNS server address automatically radio buttons. 6. Click OK to finish the configuration. Configuring PC in Windows 2000 1. Go to Start / Settings / Control Panel. In the Control Panel, double-click on Network and Dial-up Connections. 2. Double-click Local Area Connection. 3. In the Local Area Connection Status window click Properties. 13 4. Select Internet Protocol (TCP/IP) and click Properties. 5. Select the Obtain an IP address automatically and the Obtain DNS server address automatically radio buttons. 6. Click OK to finish the configuration. Configuring PC in Windows 98/Me 1. Go to Start / Settings / Control Panel. In the Control Panel, double-click on Network and choose the Configuration tab. 2. Select TCP/IP -> NE2000 Compatible, or the name of your Network Interface Card (NIC) in your PC. 14 3. Select the Obtain an IP address automatically radio button. 4. Then select the DNS Configuration tab. 5. Select the Disable DNS radio button and click OK to finish the configuration. Configuring PC in Windows NT4.0 1. Go to Start / Settings / Control Panel. In the Control Panel, double-click on Network and choose the Protocols tab. 2. Select TCP/IP Protocol and click Properties. 15 3. Select the Obtain an IP address from a DHCP server radio button and click OK. Note: By factory default: DHCP is disabled, Device Mode is Bridge Mode, VC-200M’s default LAN IP address is 192.168.1.100, and VC-200S is 192.168.1.200. So please set fix IP address in TCP/IP properties of your network card (show as below), then you can start your Web Browser to login VC-200M or VC-200S (please see Chapter 3.3). 16 Chapter 3: Configuration 3.1 Determine your connection settings Before you configure the router, you need to know the connection information supplied by your VDSL2 service provider. 3.2 Connecting the VDSL2 Router to your network Unlike a simple hub or switch, the setup of the VDSL2 Router consists of more than simply plugging everything together. Because the Router acts as a DHCP server, you will have to set some values within the Router, and also configure your networked PCs to accept the IP Addresses the Router chooses to assign them. Generally there are several different operating modes for your applications. And you can know which mode is necessary for your system. These modes are router, bridge. 3.3 Configuring with Web Browser It is advisable to change the administrator password to safeguard the security of your network. 17 1. To configure the router, open your browser, type http://192.168.1.100 for VC-200M and http://192.168.1.200 for VC-200S in the browsers address box. Save this address in your Favorites for future reference. At login prompt will appear, and default password is “admin”, then click 'LOGIN'. 3.4 Quick Installation There are two device modes: Bridge Mode and Router Mode can configure the VC-200M and VC-200S when in different mode, displayed show as below. Bridge Mode Step1- Click “Bridge Mode” in VC-200M and VC-200S, and then press “APPLY” to submit setting. 18 Step2- Select profile in VC-200M and VC-200S, we suggest select same profile in VC-200M and VC-200S, otherwise the connection won’t synchronously. Step3- Click “Active” to make the connection is ready. 19 Step4- After successful connect between VC-200M and VC-200S, the information will show on channel status. Router Mode 20 Step1- Click “Router Mode” in VC-200M and VC-200S, and then press “APPLY” to submit setting. Step2- Change LAN IP address, e.g. VC-200M is 192.168.1.100, VC-200S is 192.168.99.100. Step3- Select WAN IP address, e.g. we set WAN to the Static IP address. 21 Step4- Fill in WAN IP address, e.g.VC-200M is set 10.1.1.100, VC-200S is 10.1.1.200, and gateway address should point each other. Step5- Select profile in VC-200M and VC-200S, we suggest select same profile in VC-200M and VC-200S, otherwise the connection won’t synchronously. 22 Step6- Click “Active” to make the connection is ready. Step7- After successful connect between VC-200M and VC-200S, the information will show on channel status. 23 Note: Please reference the throughput test for Bridge Mode and Router Mode in Appendix A: Throughput Test for VDSL2 profiles. 3.5 Configuration Menu for Administrator The chapter is only for Administrator. The Homepage is the first screen displayed when a user logs on the VC-200M/VC-200S Web UI. The VC-200M/VC-200S Web UI is categorized into two modules. 1. Setup Wizard- An easy-to use setup wizard provides the most common configurations. 2. Advanced Setup- Advanced setup features allow the user to configure all the functions that are supported by VC-200M/VC-200S like routing, and UPnP. 3.5.1 Setup Wizard The Setup Wizard is designed for ease-of-use in order to quickly configure the most common settings. The Admin can view the Setup Wizard link in the Web UI. The wizard’s first step that allows the admin to configure the system host settings displayed show as below. 24 There are five steps to complete the wizard. Follow the instructions given in each step and enter the desired settings. 3.5.2 Advanced Setup Click on the Advanced Setup link in the Web UI in case you want to configure a wider range of settings. The following configuration options are displayed in the left navigation bar, show as below. z System z WAN z LAN z NAT z Route z UPnP 3.5.3 System The System link can be viewed in the left navigation bar. The following are the options available under system, show as below. z Host Name Config 25 z System Time z Administrator Settings z Firmware Upgrade z Device Mode z System Status z System Log z Reset 3.5.3.1 Host Name Config To configure System settings, the user has to enter host and domain name. Click on the Host Name Config link in the left navigation bar, show as below. The screen contains the following details: Filed Description 26 Host Name Enter the host name of the VC-200M/VC-200S. Domain Name Enter the domain name of the VC-200M/VC-200S. 3.5.3.2 System Time To configure the system time zone, click on the System Time link in the left navigation bar, show as below. The screen contains the following details: Filed Description Set Time Zone Synchronize the system clock with the SNTP server. z Click “CANCEL” to exit from this page without saving the changes. z Click “APPLY” to save the information that has been entered. 3.5.3.3 Administrator Settings To add a user or change user’s password, click on the Administrator Settings link in the left navigation bar, show as below. 27 While adding a user, each user must be assigned a separate port. Hence the number of user that can bee added to the system depends on the number of ports available on the VC-200M/VC-200S. Filed Description Current Password This is the password associate with the administrator. This is enabled only for the user Administrator login. Password This is the password of the login administrator. Re-Type Password This is password verification. Auto-Logout Time The auto-logout time, at least one minute. 3.5.3.4 Device Mode The VC-200M/VC-200S used in the reference system is able to act as either a bridge or a router. Clicking on Device Mode link on the left navigation bar allows the user to change the mode of operation, show as below. Note: By factory default: Device Mode is Bridge Mode. 28 3.5.3.5 Firmware Upgrade To update the system firmware, click on the Firmware Upgrade link in the left navigation bar, show as below. z Click “Browse” to select a specified file name to change the file Name. z Click “APPLY” to start the firmware update. 3.5.3.6 System Status To view system status, click on the System Status link in the left navigation bar, show as below. This screen displays the status of certain important system parameters. It also offers control over the current DHCP lease for the IP Address. 29 z Click “Release” to release IP Address for the WAN interface. z Click “Renew” to renew the IP Address for the WAN interface. 3.5.3.7 System Logs To view the system logs, click on the System Logs link in the left navigation bar, show as below. 30 The screen contains the following details: Filed Description Log File This lists all the system events. z Click “Download” to download the log file to the computer. z Click “Clear” to clear this page. z Click “Refresh” to retrieve system event and update the log file. 3.5.3.8 Reset To restart the system, click on the Reset link in the left navigation bar, show as below. z Click “Reset” to restart the system. 31 3.5.4 WAN The WAN settings can be viewed in the left navigation bar. The following are the options available under WAN, show as below. z Dynamic IP z Static IP z PPPoE z DNS 3.5.4.1 Dynamic IP To configure the WAN interface to dynamically obtain an IP Address, click on the Dynamic IP link in the left navigation bar, show as below. 32 The screen contains the following details: z Click “APPLY” to save the information that has been entered. z Click “CANCEL” to exit from this page. 3.5.4.2 Static IP To configure the WAN interface to use a Static IP Address, click on the Static IP link in the left navigation bar, show as below. 33 The Screen contains the following details: Filed Description IP Address assigned by your ISP Enter the IP Address of VC-200M/VC-200S. Subnet Mask Enter the Subnet Mask of VC-200M/VC-200S. ISP Gateway Address Enter the Gateway address of VC-200M/VC-200S. Does ISP provide more IP Address Provides more IP Addresses of the WAN interface. Select the check box to enable this option. 3.5.4.3 PPPoE To configure the WAN interface to use PPPoE, click on the PPPoE link in the left navigation bar, show as below. The screen contains the following details: Filed Description User Name Enter a name to use the PPPoE session. Password Enter the password of login user. Re-Type Password Enter the password to reconfirm. Service Name Enter a service name. 34 MTU Enter the maximum connection units of the PPPoE. The MTU range is 1400 to 1492 bytes, by factory default is 1492. Maximum Idle Time This is the period of time required to keep the connection alive if no packets are transmitted. If no packets are transmitted between LAN port and WAN port or between VC-200M/VC-200S and WAN, the connection is disconnected after the “Maximum Idle Time” If the Auto-reconnect check box is selected, the PPP connection is re-established if there is some data that is received from the upper layers to be transmitted on this link. z Click “CANCEL” to exit from this page without saving the changes. z Click “APPLY” to save the information that has been entered. 3.5.4.4 DNS Domain Name Service (DNS) stores and associates many types of information with domain names. Most importantly, it translates domain names (computer hostnames) to IP addresses. It also lists mail exchanges servers accepting e-mail for each domain. In providing a worldwide keyword-based redirection service, DNS is an essential component of contemporary Internet use. DNS service must translate the name into the corresponding IP address. For example, the domain name www.example.com might translate to 198.105.232.4. To configure the DNS address, click on the DNS link in the left navigation bar, show as below. 35 The screen contains the following details: Filed Description Domain Name Server(DNS) Address Enter the DNS address of the primary DNS server. Secondary DNS Address(optional) Enter the address of the secondary DNS server, if available. z Click “CANCEL” to exit from this page without saving the changes. z Click “APPLY” to save the information that has been entered. 3.5.5 LAN The LAN setting can be viewed in the left navigation bar. The following are the options available under LAN, show as below. z LAN settings z DHCP Client List 36 3.5.5.1 LAN Setting To configure the LAN interface, click on the LAN Setting link in the left navigation bar, show as below. The Dynamic Host Configuration Protocol (DHCP) Server gives out IP addresses when a device is booting up and request an IP to be logged on to the network. It must be set as a DHCP client to obtain the IP address automatically. Note: By factory default, the DHCP is disabled, VC-200M’s default LAN IP address is 192.168.1.100, and VC-200S is 192.168.1.200. The screen contains the following details: Filed Description IP Address Enter the LAN interface IP Address of VC-200M/VC-200S Subnet Mask Enter the LAN Subnet Mask of VC-200M/VC-200S The Gateway acts as DHCP Server Enable or disables the DHCP Server of the of VC-200M/VC-200S. Select the check-box to enable this option. IP Pool Starting Address Enter the starting IP Address of the DHCP server.(When Enable DHCP Server) 37 IP Pool Ending Address Enter the ending IP Address of the DHCP server. (When Enable DHCP Server) Lease Time Select the lease time of the DHCP server. (When Enable DHCP Server) Local Domain Name Enter the Domain Name of the DHCP server. (When Enable DHCP Server) z Click “CANCEL” to exit from this page without saving the changes. z Click “APPLY” to save the information that has been entered. 3.5.5.2 DHCP Client List To view the DHCP client list, click on the DHCP Client List link in the left navigation bar, the screen is displayed to list all DHCP client connection with IP Address and MAC Address, show as below. 3.5.6 NAT Network Address Translation (NAT) allows multiple users at your local site to access the Internet through a single public IP address or multiple public IP addresses. NAT can also prevent hacker attacks by mapping local addresses to public addresses for key services such as the Web or FTP. 38 The NAT Settings can be viewed in the left navigation bar. The following are the options available under NAT, show as below. z Virtual Server z Port Mapping z DMZ 3.5.6.1 Virtual Server You can configure the Router as a virtual sever so that remote users can access services such as the Web or FTP server at your local site via public IP address. These addresses can be automatically redirected to local servers configured with private IP addresses. In other words, depend on the requested service (TCP/UDP port numbers). The Router redirects the external service request to the appropriate server (located at another internal IP address) To configure virtual server, click on the Virtual Sever link in the left navigation bar, show as below. 39 The screen contains the following details: Filed Description Private IP Enter a private IP Address of specified entry. Private Port Enter a private Port number of the specified entry. Type Select virtual server protocol type of the specified entry. Public Port Enter a public Port number of the internet user to access the virtual server. Enabled Enable the specified entry of the virtual server. z Click “CANCEL” to exit from this page without saving the changes. z Click “APPLY” to save the information that has been entered. 3.5.6.2 Port Mapping For some applications, you need to assign a set or a range of port to a specified local machine to route the packets. Router allows the user to configure the needed port mappings to suit such application. To configure Port Mapping, click on the Port Mapping link in the left navigation bar, show as below. 40 The screen contains the following details: Filed Description Server IP Enter the IP Address of a specified local machine. Mapping Port Assign a range of port or specific port number to route the packets. e.g. 8080-8081,21 Enabled Enable a specified entry of the Port Mapping. z Click “CANCEL” to exit from this page without saving the changes. z Click “APPLY” to save the information that has been entered. 3.5.6.3 DMZ A DMZ (de-militarized zone) is a host between a private local network and the outside public network. It prevents outside users from getting direct access to s server that has company data. Users of the public network outside the company can access only the DMZ host. To configure the DMZ, click on the DMZ link in the left navigation bar, show as below. 41 The screen contains the following details: Filed Description Enable Enable or disable the DMZ setting of VC-200M/VC-200S.Select the check box to enable this option. IP Address Enter IP Address of the DMZ host. z Click “CANCEL” to exit from this page without saving the changes. z Click “APPLY” to save the information that has been entered. 3.5.7 Route The Route Settings can be viewed in the left navigation bar. The following are the options available under Route, show as below. z Static Routing z Routing Table List 42 3.5.7.1 Static Route The static routing function determines the path that data follows over your network before and after it passes through your router. You can use static routing to allow different domain users to access the Internet through this Router. To setup Static Routing, click on the Static Routing link in the left navigation bar, show as below. The screen contains the following details: Filed Description Interface Select the direction of WAN or LAN. Destination IP Enter the IP Address of routing entry. Subnet Mask Enter the Subnet Mask of routing entry. Gateway Enter the Gateway address of routing entry. z Click “Add” to add the information that has been entered. z Click “CANCEL” to exit from this page without saving the changes. Example: 43 PC2 can go to Internet through VC-200M/VC-200S, so please reference as below to fill in static routing table. Interface: LAN Destination IP: 203.67.31.0 Subnet mask: 255.255.255.0 Gateway: 192.168.1.3 3.5.7.2 Routing Table List To view the Routing entry table list of VC-200M/VC-200S, click on the Routing Table by link in the left navigation bar, show as below. z Click “Refresh” to update currently routing list of VC-200M/VC-200S. 44 3.5.8 UPnP UPnP (Universal Plug and Play) is a distributed, open networking standard that uses TCP/IP for simple peer-to-peer network connectivity between devices. An UPnP device can dynamically join a network, obtain an IP address, convey its capabilities and learn about other devices on the network. In turn, a device can leave a network smoothly an automatically when it is no longer in use. UPnP broadcasts are only allowed on the LAN. How do I know if I'm using UPnP? UPnP hardware is identified as an icon in the Network Connections folder (in Windows XP & Windows ME). Each UPnP-compatible device that is installed on your network will appear as a separate icon. The UPnP settings can be viewed in the left navigation bar. The following are the options available under UPnP, show as below. z Settings 3.5.8.1 Settings To enable or disable the UPnP settings, click on the Settings link in the left navigation bar, show as below. 45 The screen contains the following details: Filed Description Enable UPnP To enable or disable UPnP Setting. Select the check box to Enable or Disable the UPnP function of VC-200M/VC-200S. z Click “CANCEL” to exit from this page without saving the changes. z Click “APPLY” at any time during configure to save the information that you have been entered. Chapter 4: Operating the VDSL2 System 4.1 Configuration Settings Configure and start the VC-200M and the CPE. z Configuration: As a minimum configuration, usually selecting the profile is required. See Chapter 4.1.3, Profile Configuration z Next, both sides should be activated from the Web UI. See Chapter 4.1.4, Line Activation z The connection status of the link can be monitored. See Chapter 4.1.5, Channel Status 46 4.1.1 Channel Configuration To set direction, Min Data Rate, Max Date Rate, and Max Interleave Delay of channl1, click on the Channel Config in the left navigation bar, show as below. The screen contains the following details: Setting Description Direction To which direction shall the settings apply? z Upstream z Downstream Min Date Rate Minimum Payload Date Rate, by factory default is 64 kbps. Max Date Rate Maximum Payload Date Rate, by factory default is 15000 kbps. Max Interleave Delay Maximum Interleave Delay, by factory default is 10ms. z Click “CANCEL” to exit from this page without saving the changes. z Click “APPLY” at any time during configure to save the information that you have been entered. 47 4.1.2 Line Configuration Signal-to-Noise Ratio, often written S/N or SNR, is a measure of signal strength relative to background noise. The ratio is usually measured in decibels (dB). If the incoming signal strength in microvolts is Vs, and the noise level, also in microvolts, is Vn, then the signal-to-noise ratio, S/N, in decibels is given by the formula S/N = 20 log10 (Vs/Vn) If Vs = Vn, then S/N = 0. In this situation, the signal borders on unreadable, because the noise level severely competes with it. In digital communications, this will probably cause a reduction in data speed because of frequent errors that require the source (transmitting) computer or terminal to resend some packets of data. Ideally, Vs is greater than Vn, so S/N is positive. As an example, suppose that Vs = 10.0 microvolts and Vn = 1.00 microvolt. Then S/N = 20 log10 (10.0) = 20.0 dB This results in the signal being clearly readable. If the signal is much weaker but still above the noise -- say 1.30 microvolts -- then S/N = 20 log10 (1.30) = 2.28 dB This is a marginal situation. There might be some reduction in data speed under these conditions. If Vs is less than Vn, then S/N is negative. In this type of situation, reliable communication is generally not possible unless steps are taken to increase the signal level and/or decrease the noise level at the destination (receiving) computer or terminal. To select the direction and target SNRM of line, click on the Line Confing link in the left navigation bar, show as below. 48 The screen contains the following details: Setting Description Direction Select the target direction of downstream or upstream. Target SNRM Set the required SNR Margin×10(50=5dB), by default is 6dB. z Click “CANCEL” to exit from this page without saving the changes. z Click “APPLY” at any time during configure to save the information that you have been entered. 4.1.3 Profile Configuration VDSL2 was developed and standardized in record time to address the shortcomings of existing access technologies. It servers as the ideal xDSL technology for eliminating last-mile bottlenecks and enable global mass deployment of advance Triple Play services. Unlike its predecessor, which allowed choosing either DMT (Discrete Multitone) or QAM (Quadrature Amplitude Modulation) technology, VDSL2 only uses the DMT line code. DMT is a method of separating a DSL signal so that the usable frequency range is separated into multiple small frequency bands, or tone. It uses up to 4096 tones which are spaced 4 kHz or 8 kHz apart. Each tone can be used for either downstream or upstream. However VC-200M/VC-200S provide 10 VDSL2 profiles: 8a, 8b, 12a, 12b, and 17a frequency bands. 49 Table 1 list 8a, 8b, 21a, 12b, and 17a standard VDSL2 profile about the bandwidth, tones, tone spacing, and line power. <Table 1> To select VDSL2 profile, click on the Profile Config link in the left navigation bar, show as below. The screen contains the following details: Setting Description Profile Select the ten standard VDSL2 profiles. z Click “CANCEL” to exit from this page without saving the changes. z Click “APPLY” at any time during configure to save the information that you have been entered. Note: By factory default is VDSL2 Profile 17a-Bandplan ITU AnnexB_B12. 50 4.1.4 Active To enable or disable VDSL2, click on the Active link in the left navigation bar, show as below. The screen contains the following details: Setting Description Line Activate or deactivate the line. z Click “CANCEL” to exit from this page without saving the changes. z Click “APPLY” at any time during configure to save the information that you have been entered. 4.1.5 Channel Status To view the channel status is about Date Rate, Delay, Error Counters and Impulse Noise Protection. 51 4.1.6 Version Information To view the version information is about Web UI, API Library, Chipset FW, Chipset HW, and DSL Driver. Appendix A: Throughput Test for VDSL2 profiles Router Mode Bridge Mode UP Down UP Down 1 8a-Bandeplan ITU AnnexA_M1_EU32 5M 20M 10M 50M 2 8a-Bandeplan ITU AnnexB_B12 5M 20M 10M 50M 3 8b-Bandeplan ITU AnnexA_M1_EU32 5M 20M 10M 50M 4 8b-Bandeplan ITU AnnexB_B12 5M 20M 10M 50M 5 12a-Bandeplan ITU AnnexA_M1_EU32 15M 15M 30M 50M 6 12a-Bandeplan ITU AnnexB_B12 15M 15M 30M 50M 7 12b-Bandeplan ITU AnnexA_M1_EU32 15M 15M 30M 50M 8 12b-Bandeplan ITU AnnexB_B13 15M 15M 30M 50M No distance 52 9 17a-Bandeplan ITU AnnexB_B08 15M 15M 30M 100M 10 17a-Bandeplan ITU AnnexB_B12 15M 15M 30M 100M 400M UP Down UP Down 1 8a-Bandeplan ITU AnnexA_M1_EU32 5M 20M 10M 50M 2 8a-Bandeplan ITU AnnexB_B12 5M 20M 10M 50M 3 8b-Bandeplan ITU AnnexA_M1_EU32 5M 20M 10M 50M 4 8b-Bandeplan ITU AnnexB_B12 5M 20M 10M 50M 5 12a-Bandeplan ITU AnnexA_M1_EU32 15M 15M 30M 50M 6 12a-Bandeplan ITU AnnexB_B12 15M 15M 30M 50M 7 12b-Bandeplan ITU AnnexA_M1_EU32 15M 15M 30M 50M 8 12b-Bandeplan ITU AnnexB_B13 15M 15M 30M 50M 9 17a-Bandeplan ITU AnnexB_B08 15M 15M 30M 100M 10 17a-Bandeplan ITU AnnexB_B12 15M 15M 30M 100M 1KM UP Down UP Down 1 8a-Bandeplan ITU AnnexA_M1_EU32 5M 20M 10M 30M 2 8a-Bandeplan ITU AnnexB_B12 5M 20M 10M 30M 3 8b-Bandeplan ITU AnnexA_M1_EU32 5M 20M 10M 30M 4 8b-Bandeplan ITU AnnexB_B12 5M 20M 10M 30M 5 12a-Bandeplan ITU AnnexA_M1_EU32 5M 20M 10M 30M 6 12a-Bandeplan ITU AnnexB_B12 5M 20M 10M 30M 7 12b-Bandeplan ITU AnnexA_M1_EU32 5M 20M 10M 30M 8 12b-Bandeplan ITU AnnexB_B13 5M 20M 10M 30M 9 17a-Bandeplan ITU AnnexB_B08 5M 20M 10M 30M 10 17a-Bandeplan ITU AnnexB_B12 5M 20M 10M 30M Appendix B: Glossary DHCP DHCP stands for Dynamic Host Configuration Protocol. This protocol automatically configures the TCP/IP settings of every computer on your home network. DNS Server Address DNS stands for Domain Name System, which allows Internet host computers to have a domain name (such as www.planet.com.tw) and one or more IP addresses (such as 192.34.45.8). A DNS server keeps a database of host computers and their respective domain names and IP addresses, so that when a domain name is requested (as in typing " www.planet.com.tw" into your Internet browser), the user is sent to the proper IP 53 address. The DNS server address used by the computers on your home network is the location of the DNS server your ISP has assigned. DSL Modem DSL stands for Digital Subscriber Line. A DSL modem uses your existing phone lines to transmit data at high speeds. Ethernet A standard for computer networks. Ethernet networks are connected by special cables and hubs, and move data around at up to 100 million bits per second (Mbps). IP Address IP stands for Internet Protocol. An IP address consists of a series of four numbers separated by periods that identifies a single, unique Internet computer host. Example: 192.34.45.8. ISP Gateway Address (See ISP for definition). The ISP Gateway Address is an IP address for the Internet router located at the ISP's office. This address is required only when using a cable or DSL modem. ISP Internet Service Provider. An ISP is a business that provides connectivity to the Internet for individuals and other businesses or organizations. LAN Local Area Network. A LAN is a group of computers and devices connected together in a relatively small area (such as a house or an office). Your home network is considered a LAN. MAC Address MAC stands for Media Access Control. A MAC address is the hardware address of a device connected to a network. 54 NAT Network Address Translation. This process allows all of the computers on your home network to use one IP address. The NAT capability of the Device, allows you to access the Internet from any computer on your home network without having to purchase more IP addresses from your ISP. Network Address Translation can be used to give multiple users access to the Internet with a single user account, or to map the local address for an IP server(such as Web or FTP) to a public address. This secures your network from direct attack by hackers, and provides more flexible management by allowing you to change internal IP addresses without affecting outside access to your network. NAT must be enabled to provide multi-user access to the Internet or to use the Virtual Server function. PPPoE Point-to-Point Protocol over Ethernet. Point-to-Point Protocol is a method of secure data transmission originally created for dial-up connections. PPPoE is for Ethernet connections. Subnet Mask A subnet mask, which may be a part of the TCP/IP information provided by your ISP, is a set of four numbers configured like an IP address. It is used to create IP address numbers used only within a particular network (as opposed to valid IP address numbers recognized by the Internet. TCP/IP Transmission Control Protocol/Internet Protocol. This is the standard protocol for data transmission over the Internet. WAN Specify the WAN connection type required by your Internet Service Provider, then click "Apply" to provide detailed configuration parameters for the selected connection type. Specify one of the first five options to configure a WAN connection through the RJ-45 port. 55