1
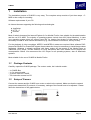
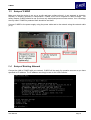
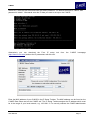
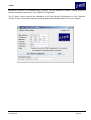
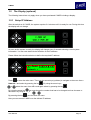
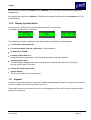
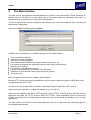
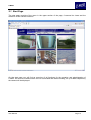
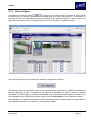
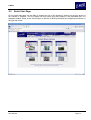
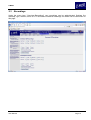
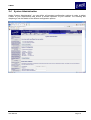
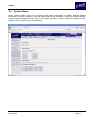
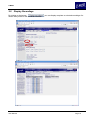
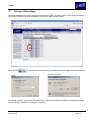
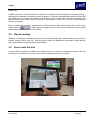
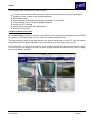
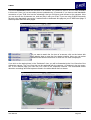
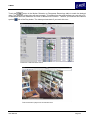
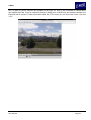
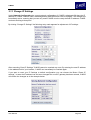
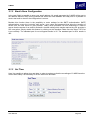
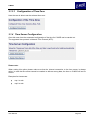
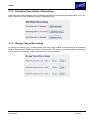
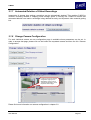
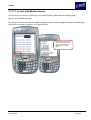
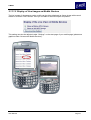
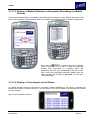
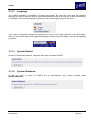
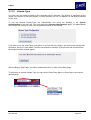
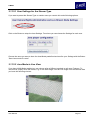
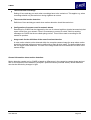
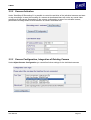
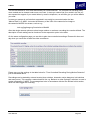
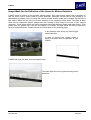
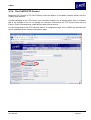
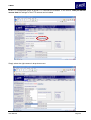
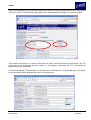
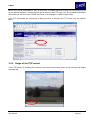
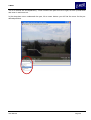
User Manual Instructions for C-MOR Video Surveillance Version 2.04 C-MOR Introduction Dear customer, Thank you for choosing the C-MOR video server. The quality product you have purchased is state-of-the-art and complies with European and national directives. The declaration of compliance has been confirmed and all necessary documents are deposited with the manufacturer. To ensure the best results and long-term satisfaction and to ensure safe operation, the instructions in this manual must be followed. In case of questions, please contact your specialist dealer. The video server C-MOR is used for the surveillance of objects. The video signals recorded during surveillance are digitally transferred over the connected network from your camera to C-MOR. The software installed on the hardware enables simultaneous recordings of max. 15 connected video signals. Data saving underlies country-specific guidelines. You are able to access installed cameras and servers (secured by password and encryption) over your web browser from all over the world. In case of technical problems or questions on installation and setup of C-MOR, please contact our hotline. Please find more information on www.c-mor.us (or please see contact data in the appendix of this manual). Before putting into operation The use of surveillance systems may be prohibited or regulated by law in certain countries. C-MOR has not only been developed for high performance use over the internet, but can also be part of a flexible surveillance facility. Before putting the system into operation the user has to make sure that surveillance is carried out within regulatory framework. Before the installation, please make sure that the package content is complete. In order to avoid damage by incorrect connection or wrong configuration, please read the manual carefully before using this device, follow the instructions and keep the manual for future use. Following the instructions ensures that the device will be correctly put into operation. Please visit our forum for solutions on www.c-mor.com for FAQ on configuration errors. In case you encounter problems during the setup of your system, please visit the forum as a first step for finding a solution. User Manual Page 2 C-MOR Table of Contents 1 Installation 1.1 Package Contents ...................................................................................... Page - 05 1.2 Setup of Camera ........................................................................................ Page - 05 1.3 Setup of C-MOR ......................................................................................... Page - 06 1.4 Setup in Existing Network ........................................................................... Page - 06 1.5 The Display................................................................................................. Page - 07 1.5.1. Setup IP Address................................................................................ Page - 07 1.5.2. Display System Status........................................................................ Page - 08 1.6 Support ....................................................................................................... Page - 08 2 The Web Interface ............................................................................................ Page - 09 2.1 Start Page................................................................................................... Page - 10 2.1.1 Camera Pages ......................................................................................... Page - 11 2.2 Quick Start Page ........................................................................................ Page - 12 2.3 Recordings ................................................................................................. Page - 13 2.4 System Administration ................................................................................ Page - 14 2.5 System Status ............................................................................................ Page - 15 2.6 Display Recordings ..................................................................................... Page - 16 2.7 Saving of Recordings.................................................................................. Page - 17 2.8 Play Recordings ......................................................................................... Page - 18 2.9 Control with the iPad................................................................................... Page - 18 3 Administration ................................................................................................. Page - 23 3.1 System Administration ................................................................................ Page - 23 3.1.1 Change IP Settings.............................................................................. Page - 24 3.1.2 Configuration Email Alarm ................................................................... Page - 26 3.1.3 Time Adjustment ................................................................................. Page - 26 3.1.3.1 Configuration Time Zone .................................................................. Page - 27 3.1.4 Configuration Time Server ................................................................... Page - 27 3.1.5 Activation/Deactivation of Recordings ................................................. Page - 28 3.1.6 Adjust Storage Time ............................................................................ Page - 28 3.1.7 Automated Deletion of Oldest Recordings ........................................... Page - 29 3.1.8 Adjust Camera Configuration .............................................................. Page - 29 3.1.9 User Administration ............................................................................. Page - 30 3.1.9.1 Setup User, Stream and Permissions............................................... Page - 30 3.1.10 FTP-Server Configuration .................................................................. Page - 33 3.1.11 Image Size for Mobile Page .............................................................. Page - 33 3.1.11.1 Access with Mobile Devices ........................................................... Page - 34 3.1.11.2 Display of Live Images on Mobile Devices ..................................... Page - 35 3.1.11.3 Display of Motion Detection or Permanent Recordings on Mobile Devices .......................................................................... Page - 36 3.1.11.4 Display of Live Images on the iPhone ............................................ Page - 36 3.1.12 Language .......................................................................................... Page - 37 3.1.13 System Restart .................................................................................. Page - 37 3.1.14 System Shutdown.............................................................................. Page - 37 3.1.15 Stream-Type ...................................................................................... Page - 38 3.1.15.1 User Settings for the Stream Type ................................................. Page - 39 3.1.15.2 Java Mode in Live View .................................................................. Page - 39 User Manual Page 3 C-MOR 3.2 Camera Configuration................................................................................. Page - 41 3.2.1 General Description of Configuration Options ..................................... Page - 41 3.2.2 Camera Activation ............................................................................... Page - 45 3.2.3 Camera Configuration, Integration of Existing Camera ....................... Page - 45 3.2.4 The C-MOR PTZ-Control..................................................................... Page - 52 3.2.5 Usage of the PTZ-Control.................................................................... Page - 55 4 Legal Information ............................................................................................. Page - 57 4.1 Disclaimer ................................................................................................... Page - 57 4.1.2 Warranty .............................................................................................. Page - 57 5 GNU Public License, GPL ............................................................................... Page - 58 5.1 Preamble .................................................................................................... Page - 58 5.2 Terms and Conditions for Copying, Distribution and Modification ............. Page - 58 6 Appendix – Contact Information ....................................................................... Page - 60 User Manual Page 4 C-MOR 1 Installation The installation process of C-MOR is very easy. The complete setup consists of just three steps - CMOR is then ready for recording. Software requirements of your PC: An Internet browser supporting the following web technologies: JavaScript HTTP 1.1 Cookies Most of today's browsers like Internet Explorer 9.0 or Mozilla Firefox 4 are suitable for the administration and the use of C-MOR. The majority of operating systems include Java VM (Virtual Machine). In case your operating system does not support Java VM, for viewing live streams of the camera it will be necessary to install a Java runtime environment (e.g. Java Runtime Environment, JRE by Oracle). For the playback of video recordings, MPEG-2 and MPEG-4 codecs are required. Most software DVDplayers like WinDVD or PowerDVD support these codecs but it may be necessary to install these codecs separately. Windows is already equipped with these codecs by the means of the Media Player or VideoLAN (VLC) player. Current versions of Linux derivatives also offer suitable movie players with correspondent codecs. We recommend the VLC Player for all operating systems, also on Macintosh systems. Most suitable for the use of C-MOR is Mozilla Firefox. 1.1 Package Contents Carefully unpack the C-MOR package. The content varies, but it should contain: - 1x C-MOR-Box - 1x 2 m network cable - 1x power cable for C-MOR - This instruction manual on CD 1.2 Setup of Camera Connect the camera and the C-MOR over router or switch to the network. Make sure that the network components transmit all IP protocols. If necessary, settings of the firewall have to be adjusted. Please follow the instructions of the graphic below. User Manual Page 5 C-MOR 1.3 Setup of C-MOR Make sure that the device is set up on a safe and even surface where it is not exposed to intensive humidity or extreme variations in temperature. C-MOR must not be exposed to direct sunlight. For safety reasons C-MOR should be set up where only authorized personnel has access. Your recordings are only safe if C-MOR is protected from demolition and theft! Connect C-MOR to the power supply using the power cable and to the network using the network cable (2 m). 1.4 Setup of Existing Network Connect the LAN of C-MOR with your network. C-MOR will be ready for operation as soon as you have specified an IP address. The IP address can simply be set on the VGA Console: User Manual Page 6 C-MOR Select No. 2 from the text menu and enter the admin password. The default username is “admin” and password is “admin”. Afterwards enter the IP data you want to set up on the C-MOR. Alternatively you can download the Free IP setup tool (http://www.c-mor.com) and set the IP parameters with this tool: from the C-MOR homepage Enter the MAC address of your C-MOR in the IP Setup Toolbox. The MAC address can be found on the C-MOR Data Sheet and on the C-MOR self. The IP Setup Toolbox assigns the IP address which must be in the range of your local network, e.g. 192.168.1.2. For security reasons the C-MOR administrator User Manual Page 7 C-MOR password is required. The standard login is "admin" and the password is "admin". Simply enter your network information and click on "Set C-MOR IP Configuration". The IP Setup Toolbox requires the installation of the Java Runtime Environment on your Computer. Therefor it can be used on all common operating systems like Windows, Mac OS, Linux or Solaris. User Manual Page 8 C-MOR 1.5 The Display (optional) The following instructions only apply when you have purchased C-MOR including a display. 1.5.1 Setup IP Address After the switch-on of C-MOR, the system requires 3-4 minutes until it is ready for use. During this time the display will not change. As soon as the system is ready, the display will change every 3 seconds showing current system information. You can now start with the definition of the IP address. Please follow the instructions below to define the required IP address: Menü >Network > Press to enter the main menu. Then use the arrow keys (up/down) to navigate to the menu item > Network > and select by pressing the key or . By using the arrow keys select the menu item >IP > and again select by pressing the key . By using the arrow key you can now choose the number that has to be changed and can increase or decrease it by using the keys or . By pressing the key you will leave the menu. Now you can access C-MOR over the defined IP address. User Manual Page 9 C-MOR By choosing the menu item >Subnet > and >Gateway > you can enter corresponding IP address or change them. By selecting the menu item >Reboot > C-MOR can be restarted and by selecting >Shutdown > it can be switched off. 1.5.2 Display System Status During service C-MOR shows current system information on its display. The display changes every 3 seconds. Tue 14:27:56 Mar 1 2005 eth0 192.168.1.2 System 0.23 Load 0.77 Avg 0.40 The information is always displayed in the same order and includes the following data: Current date and system time Current messages from the system log (in case available) IP address of C-MOR Capacity of hard disk in % In case the status exceeds 90%, old recordings should be archived or deleted. Average system load The three figures displayed show the average system load during the last minute, the past 5 minutes and the past 15 minutes. Current CPU and system load System uptime The time of C-MOR since the last restart. 1.6 Support In case of unexpected problems during the C-MOR installation please contact our support by the help of the online support form under http://www.c-mor.com. Please also check out the support forum on our homepage where you can find many cases that might answer your questions. User Manual Page 10 C-MOR 2 The Web Interface The main tool for the operation and administration of C-MOR is the web interface. Enter the default IP address such as 192.168.1.2 into the address bar of your web browser as described under step 2. A window will pop up asking for your user name and password. The unit is supplied with one pre-configured Administrator user name and password, set to operate and administrate, respectively. User name: admin, standard password admin C-MOR is be controlled by your individual settings over your web browser: Time-controlled recordings View of live stream by camera Sensitivity of motion detection User administration: distribution of rights, creation of new user etc. Call, search and display old recordings either as video files or single frames Archiving of recordings FTP transfer of recordings to a server Deletion of recordings for the release of free disk space Integration of own cameras (when supported by the system) And many more More information can be found in chapter “Administration“. Besides HTTP connections that are transferred over the Internet without encryption C-MOR also offers encrypted access over HTTPS. In order to use this so-called SSL connection, enter https instead of http in the URL, such as https://c-mor.your-domain.us. or https://IP-address (e.g. 192.168.1.2). Apart from the standard ports 80 for HTTP and port 443 for HTTPS, C-MOR can also be used over the alternative port 9000 (for HTTP) and port 9443 (for HTTPS). These alternative ports are used when C-MOR is accessed over a firewall and the respective ports on the firewall are already in use by other applications. The web surface is divided into 6 main web pages that are built on each other and individual pages for the corresponding camera: User Manual Page 11 C-MOR 2.1 Start Page The start page consists of the menu in the upper section of the page, 6 camera live views and the reference to the camera functions. On the start page you will find an overview of all functions for the operation and administration of C-MOR. As soon as a camera within the net is activated and starts recording, an up-to-date snapshot by the camera will be displayed. User Manual Page 12 C-MOR 2.1.1 Camera Pages In example by clicking the button you will get to the “Camera Page” of Camera 2. Here you will be able to see a live image of your camera - provided there is an active connection to it. Furthermore on this page you have the possibility to play the recordings of the respective camera, to save, to get to the page where the camera can be configured and to view a live stream in a separate window. Over the following link you can access the camera’s configuration interface: The settings there will be directly saved in the camera which might lead to problems accessing the camera, especially in case of changes of the network configuration. In order to make the camera accessible for C-MOR again, you have to immediately enter all changes of the IP address, the port or the user settings into the C-MOR web interface under the item “Configuration” of the respective camera. After changes in the camera configuration it might be possible that the camera has to be deactivated on the C-MOR web interface for a short time. Then activate it again. User Manual Page 13 C-MOR 2.2 Quick Start Page On the quick start page you are able to choose the size of the stream by clicking on the play button of the camera in question. The live stream will then open and start playing in the requested size in a separate window. Either in the JAVA Player or with the C-MOR pull stream as configured and shown in the right top corner. User Manual Page 14 C-MOR 2.3 Recordings Under the menu item “Overview Recordings” your recordings can be administrated. Settings like start/stop, type, deletion, save via FTP and select individual recordings for delete can be carried out on this page. User Manual Page 15 C-MOR 2.4 System Administration Under “System Administration” you can define all important configuration settings in order to adjust C-MOR to your requirements and ensure a smooth operation in your network. The following sub chapters go into the details of the different configuration options. User Manual Page 16 C-MOR 2.5 System Status Under “System Status” there is an overview listing status information of C-MOR. Besides detailed information on system utilization, used disk space and camera availability, a large text window displays system status messages that can sent to the support by email in case of questions. Using this help, problems can be solved quickly and efficiently. User Manual Page 17 C-MOR 2.6 Display Recordings By clicking on the button certain time period for the cameras selected. User Manual you can display complete or selected recordings of a Page 18 C-MOR 2.7 Saving of Recordings Selected recordings can either be played or saved as a video. In order to carry out the requested action choose the number of scenes recorded so far that you want to play or save. After clicking Firefox the browser will ask whether you would like to save or play all selected scenes. Microsoft Internet Explorer By clicking “save as” the browser will either offer to save the selected recording to a requested storage location on your computer or to play the recording. User Manual Page 19 C-MOR Please note: C-MOR is trying to control the browser so that there is always the choice between saving and opening – meaning that recordings can either be saved or played. In case the corresponding selection screen does not appear there is a customized setting in the browser itself on what will be executed concerning the data. In such a case please check the manual of the browser in order to find out how to deactivate the function (if desired). Each recording that has been recorded due to motion detection also offers single frames of the event. Please click on in order to get to the page where you can view the complete series of single frames and download them as a ZIP archive. 2.8 Play Recordings Playback of recordings is basically carried out as saving recordings. But instead of selecting “save as” as browser function select “open file”. After clicking the option the application connected to video data will open automatically and directly play the recordings. 2.9 Control with the iPad You can use all functions of C-MOR with an iPad just like you can do with a desktop computer. But with the iPad you are mobile and you have your video surveillance always at your hand. User Manual Page 20 C-MOR The following points characterize the iPad functions: Live view of many different camera models, even if the camera self has no direct iPad support Playback of motion videos or fast forward recordings Watch single frames Motion Detection: Watch what was going on yesterday or even earlier Just get started. There is no App installation required Control your PTZ cameras Receive alarm emails with video attachments And many, many more! The Web Interface of the iPad On the Start Page you find the overview of all functions for the operation and administration of C-MOR. If a camera is in recording mode, the Live View of the camera will appear here. The web interface is same as the web interface of a normal web browser on your PC. Also, all features are available and the C-MOR web page is almost the same as you are used to with your PC. In the Start Menu, you can see an overview of all installed cameras that can be accessed by C-MOR. You can touch on the camera live picture to select a single camera and watch the live view in a bigger picture or playback recordings. User Manual Page 21 C-MOR The menu Quickstart shows the overview of all cameras, too. However, there is no Live View available in this menu. Here you just see static pictures updated every 15 seconds. If you have a small bandwidth connection of your iPad, this has the advantage, that you still have good access to the cameras. Here you can choose the Livestream too, and can play it with your iPad. If you are using C-MOR frequently through a low bandwidth connection it makes sense to bookmark this page as your C-MOR start page. It starts up faster then the other pages. If you want to watch the live view of a camera, click on the button with the display size to open the live stream window. Here you can select between the different resolution in which the live view is displayed. If you click on the static picture in the “Quickstart” view, you will be forwarded to the Live View site of the respective camera. The Live View site can be reachead with the camera 1-15 buttons in the top menu, too. In the camera page you have the Live View of the respective camera. The associated motion detection recordings and time-lapse are listed in the tables below the live stream. User Manual Page 22 C-MOR Touch the button in the Motion Detection or Permanent Reocorings table to watch the desired video. The playback of the video will start promptly. This differs from the web interface you use with a PC or Macintosh since the iPad does not cover a “Mouse-over-Function”. Therefor you finde the little camera symbol left of the Play button. The video preview starts if you touch this icon. Preview a a selected video scene Video download an playback of the selected scene User Manual Page 23 C-MOR All PTZ (pan, tilt, zoom) functions are available for the iPad, too. Even if the connected IP camera does not support the iPad, it can be controlled through C-MOR since C-MOR acts as interface between the iPad and the IP camera. Further information about the PTZ Control you can find under Point 3.2.4 and 3.2.5. User Manual Page 24 C-MOR 3 Administration 3.1 System Administration Under System Administration the user can define all important configuration settings in order to adjust C-MOR for a smooth operation in the network. The following settings can be carried out over the system administration: Live View Method for the user admin Carry out network or/and IP settings Configuration of E-Mail Adress for global system alerts Configuration of email address for global system alerts Set time Configure time server Start/stop recordings (activate/deactivate camera) Define storage time for recordings per camera Auto delete in case of low storage space Setup the camera configuration of each camera User administration Configure Camera Rights and Stream Method for users FTP backup of recordings Image width of mobile devices Setup Stream Method for mobile devices Setting standard language (German or English) Presentation of the Start Page, size of each Stream System reboot License Upgrade If activated, Barionet Alarm connection The following sub chapters describe the details of the different configuration options. User Manual Page 25 C-MOR 3.1.1 Change IP Settings Under Network Configuration the current network configuration of C-MOR is displayed OK there the IP address of C-MOR, network mask, standard gateway and DNS server can be changed. The changes are immediately active, meaning that you can only reach C-MOR over the newly defined IP address. C-MOR continues working at that point! By clicking “Change IP Settings” the following entry mask appears for adjustment of IP settings: After executing “Save IP Settings” C-MOR cannot be reached any more. By entering the new IP address in the address field of your browser, C-MOR can immediately be reached again. If you want to reset your IP Settings to default configuration you can choose the Button “Reset IP settings”. In case the IP address has not been changed but a new IP gateway has been entered, C-MOR will confirm the changes as in the example below: User Manual Page 26 C-MOR Please take your time when changing the IP address! C-MOR will immediately continue working under the new IP address! Uncontrolled activation/deactivation can lead to data loss and other failures! User Manual Page 27 C-MOR 3.1.2 Email Alarm Configuration In the next field it is possible to enter your email address. All emails generated by C-MOR will be sent to the address defined. After having entered and saved an email address and relay host it is possible to send a test mail to check if the configuration is correct. Besides this function there is the possibility to enter settings for the SMTP authentication. SMTP authentication covers the incoming mail server, user name and password that allow the sending of emails over the mail server of your provider. Many email providers use this technology in order to ensure that the sender of an email is authentic. Another setting which maybe required by your provider is SSL encryption. Simply enable this feature by clicking on the checkbox. Make sure the select TCP-Port is set correctly. The standard port for not encrypted emails is 25. The standard port for SSL emails is 465. 3.1.3 Set Time Here it is possible to adjust time and date. In order to make sure that the recordings of C-MOR have the correct time stamp it is necessary to set the exact time and date. User Manual Page 28 C-MOR 3.1.3.1 Configuration of Time Zone Here the user is able to set the relevant time zone. 3.1.4 Time Server Configuration Over this menu item the automated configuration of the time for C-MOR can be carried out. The supported time protocol is Network Time Protocol (NTP). Please note: When setting this option please make sure that the internet connection to the time server is always active. In case the time server cannot be reached or delivers wrong data, the time on C-MOR will not be correct. Examples for timeservers: ·ntp-1.vt.edu ·ntp-2.vt.edu User Manual Page 29 C-MOR 3.1.5 Activation/ Deactivation of Recordings Under this menu item recordings for the individual cameras can be activated and deactivated. This is the same function as on the respective camera configuration page. 3.1.6 Storage Time of Recordings By setting the storage time it is defined after how many days C-MOR recordings will be automatically deleted. Deletions by C-MOR are carried out at night-time. The deletion includes all types of recordings, motion detection recordings, single frames and fast motion recordings. User Manual Page 30 C-MOR 3.1.7 Automated Deletion of Oldest Recordings Irrespective of storage time settings, recordings can be automatically deleted. This enables C-MOR to continue recording instead of stopping when storage space is running low. Please be aware that automated deletion can lead to recordings being deleted too early and important video material getting lost. 3.1.8 Change Camera Configuration For each individual camera an own configuration page is available where parameters can be set. In order to access that page, please click on the button the requested camera and then the link “Camera Configuration”. In order to access the camera configuration page you can alternatively click on the link “Camera Configuration” on the respective camera page. Please find more information on camera configuration in chapter 3.2. User Manual Page 31 C-MOR 3.1.9 User Administration Under this section it is possible to create and delete different users and create and change passwords. By clicking the respective button you will be forwarded to the user administration page where it is possible to enter the password. Please note: Only administrators are able to delete recordings or change the settings of the C-MOR configuration. 3.1.9.1 Setup User Settings and Permissions Please Note: For every created user you can setup different configurations. As desired by the administrator, users can change the configuration of the System Administration or not. The following paramaenters can be chaned by the user, if a user is selected to configure the own profile: The user is able to change the own password The user is able to view the Quickstart page The user is able to view the Recordings page The user is able to view the Systemstatus page The user is able to view the link to the camera The user is able to setup the stream mode The user is able to setup the speed of the Script-Stream Mode User Manual Page 32 C-MOR Access to the single camera views and to the recordings can be restricted to single users. Different user can have access to different cameras and/or camera recordings. The live stream type, Java stream, MJPEG stream or script stream, can be set by the user self if permitted by the administrator. In the System Administration menu under User Camera Rights Administration and Live Stream Mode Settings the administratior can setup the camera and stream permissions. Select the user to modify and click User Configuration. User Manual Page 33 C-MOR The menu which opens allows making the settings for the selected user: The lower part of the User Configuration page: User Manual Page 34 C-MOR Further you can set up the live stream Speed, the camera rights and the stream type for the choosen user. Select the cameras that can be accessed by the user. If a camera is completely locked for the user, the access to the recordings is locked, too. If the user should have access to the live view of the camera but not to the recordings, disable the mark in Permit Recording Access at the relevant camera. 3.1.10 FTP Server Configuration By the use of the so-called File Transfer Protocol (FTP) recordings can be automatically copied to a FTP server. A FTP server can be a desktop PC with Windows operating system and FTP server software. By the help of FTP long-term storage or tape backup can be carried out. Besides easy FTP server storage, C-MOR can also delete recordings after the copy process. 3.1.11 Image Size for Mobile Page C-MOR offers the possibility to access video recordings and live images via mobile devices such as handhelds, smart phones and mobile phones – provided that these devices provide Internet access (e.g. UMTS or GPRS). As there are big differences between different displays this menu item enables the user to set the image size of the live image. Videos are always played in the size they have been originally recorded. User Manual Page 35 C-MOR 3.1.11.1 Access with Mobile Devices In order to set up access to C-MOR for your mobile devices, please visit the following page: http://<your IP address>/mobile By clicking on the link “Settings” the page for adjusting your personal settings will open up, enabling you to define the necessary values for your mobile device. Please adjust the settings for your mobile device here. By clicking on “Overview” you will get back to the start page. User Manual Page 36 C-MOR 3.1.11.2 Display of Live Images on Mobile Devices The live images of the cameras under mobile can be either displayed as freeze image with manual reload or as motion JPEG stream. Here you are able to select the option requested. This setting can also be adjusted under “Settings” on the start page of your mobile page (please see graphics under “Access with Mobile Devices”). User Manual Page 37 C-MOR 3.1.11.3 Display of Motion Detection or Permanent Recordings on Mobile Devices Under mobile please find the recordings made during motion detection under “Motion” and under “Time Lapse” the recordings that have been made on the basis of the settings under “Camera Configuration”. By clicking on a window will pop up, offering either to save or to open files. In case the data has already been connected to a specific player, the application will then open automatically and you will be able to view the recordings. Otherwise please open the video manually. By clicking on Overview you will return to the main page. 3.1.11.4 Display of Live Images on the iPhone In C-MOR Software Version 3.60 there is a separate interface available for the iPhone, to display live streams and videos on mobile Devices. If you are owner of an iPhone please use following link to show the Live Images: http://<your IP address>/iphone User Manual Page 38 C-MOR 3.1.12 Language The C-MOR application is available in German and English. By using this menu item the standard language can be set, which will then be used automatically as soon as you log into C-MOR. Alternatively it is possible to choose the language by clicking on the country flags top right in the menu. If you want to temporarily change the language you can go to the upper right side of the Start Page. Here you will find the flags of the supported languages. Choose one of the flags to choose the language you prefer. 3.1.13 System Restart In case of unexpected problems, using this menu item can restart C-MOR. 3.1.14 System Shutdown In case you have to switch off C-MOR due to administrative work, please proceed under System Shutdown. User Manual Page 39 C-MOR 3.1.15 Stream-Type For each user the display method of the Livestream can be selected. This Setting is significant for the usage over Internet or the local network, or which browser you use. In addition it is not always possible to use Java. To use the desired Stream-Type, the Administrator can setup the Settings in the System Administration or the user self, if the user selecs the System Administration page. The administrator can change this settings for each user as described earlier in this manual. If you want to use the Java-Player, just select “Live View with Java-Player” and confirm the settings with the Button “Save Live View Mode”. Now the Java-Mode is activated. If the process was successful the following Information should appear: With the Button “Start Page” you will be redirected to the Live View on the Start Page. To short-term to another Stream-Type you can use the Drop Down Menu on Start Page to choose the desired Mode. User Manual Page 40 C-MOR 3.1.15.1 User Settings for the Stream Type If you want to preset the Stream-Type on certain users you can do this under following options: Click on the Button to setup the Java Settings. From here you can choose the Settings for each user. Choose the users you want to have the Java-Mode predefined and confirm your Settings with the Button “Save Java mode for users”. 3.1.15.2 Java Mode in Live View If you have JAVA-Mode enabled you can choose a list of different symbols to call more Features. To view this list, simply move the mouse, e.g. on the Start Page, over the Live image from the camera. Now you have the following choices: User Manual Page 41 C-MOR Restore the default Live View Zoom out the current Live Image Zoom in the current Live Image Direction control for zoomed Live Image Displays information about the current Live Image Weblink to the C-MOR Video Homepage User Manual Page 42 C-MOR 3.2 Camera Configuration 3.2.1 General Description of Configuration Options In order to configure a camera the following settings can be carried out: Define description of the camera’s location Activate / deactivate recordings Define camera network data Configuration of camera type (Axis, Mobotix, Panasonic, Sony, etc.) Threshold for motion detection Parameters for motion detection. Different values have to be defined depending on the image. camera Fast Motion Permanent Recording Besides motion detection it is possible to create a permanent recording. This mode generates a movie with images that are recorded in the given interval. Recording mode for timelapse recordings This parameter defines the time and days after a new recording will be started for timelapse recordings. Creation of JPEG images with motion detection Apart from MPEG files with motion detection there are also single JPEG images recorded. These images can be easily saved with a ZIP archive. Record single JPEG pictures beside timelapse permanent recordings Enable permanent single picture recordings beside timelapse permanent recordings. The images can be easily saved as ZIP archive. Intervall for Permanent Single Picture Recording Single Picture Recordings for permanent pictures are recorded in the specified interval. Number of images Pre-Recording Number of images that are placed at the beginning of the movie in case of motion detection. Number of images after Recordings Number of images that will be added to the movie after the motion during motion detection User Manual Page 43 C-MOR Intervall of images for motion detection recordings Number of images per second during the recording with motion detection. Please select this parameter carefully as a too high number of frames with a very high resolution can overload the system. Rotation of Image Please choose the recording mode. A 180 degrees recording makes e.g. sense in case the cam is installed on the ceiling down sided. Maximum Time of recording for Motion Detection This value shows how long a movie with motion detection may last (maximum). This makes sense in case of a query via internet as individual movies can be displayed much faster due to a lower download data. Display Frame around changed Pixels This parameter defines whether a frame will be displayed around changed pixels. This is very helpful in case the threshold for the motion detection for the cam image is defined. Display Text with time and date in cam image Feature for the activation and deactivation of the display of time and date in the cam image. Automatic E-Mail alarm during Motion Detection Feature for the activation and deactivation of the E-Mail alarm in case motion has been detected by the cam. A plain text E-Mail will be sent (excluding image or movie attachment). Please note: in case of a lot of motion and many recordings that are effected during motion detection your mailbox might reach its storage limit very fast and cannot receive emails any more! E-Mail address for alarm E-Mails This is the E-Mail address alarm mails are sent to. Attach Motion Detection recordings to alarm E-Mail Set this to on if recordings of events should be send as attachment of alarm E-Mails. Direct Cam Link Network Cams might be linked directly over C-MOR. This setting is needed when network cameras are not located at the same location and are only accessible behind a router through the internet. User Manual Page 44 C-MOR Text on left side in cam picture This optional text will show up in the left lower corner of the camera picture. If this field is empty no text will be shown. Show picture text in double size The text in the camera picture can be shown in double size. This is useful for big pictures or special usage of the pictures. Web camera picture quality Picture quality in percent for the data transfer of the camera picture to C-MOR. The default value is 50%. Changing this parameter may cause a high system load which can cause system failures. JPG picture quality Single picture quality in percent for the JPEG images which are saved on C-MOR. The default value is 100%. Time between two events Time in seconds without motion, after a new motion movie will be recorded. Bitrate of picture transfer from camera The bitrate factor defines the variable bandwidth for the picture transfer from the camera to CMOR. The value 2 is the fastest with the best quality. For pictures with high amount of data this value has to be rised to avoid C-MOR gets overloaded and stops recording. High values also reduce the picture quality. Minimum number of pictures with changes for Motion Detection The number of pictures with changes to detect motion. The value 1 is capable in the most cases. This means only one picture is compared to detect motion. Sudden light intensity Ignore sudden massive light intensity changes given as a percentage of the picture area that changed intensity. User Manual Page 45 C-MOR Time-controlled recordings Setting of hour and day per week when recordings have to be carried out. This applies e.g. when recordings should only be carried out during nighttime at a store. Time-controlled motion detection Definition of hour and day per week when motion detection should be carried out. Configuration of camera event for network alarms Recordings by C-MOR can be triggered by the use of external switches (special accessories) that report events over your network. Here it is necessary to use an IP switch, which is sending messages to C-MOR via the so-called syslog service. This will then start a recording for the camera in question. Image mask for the definition of the area of motion detection In case motion should not be detected within the complete camera image the area where motion should be detected (white area) can be defined by a black & white mask. The defined black area will not trigger motion detection. The size of the image mask has to be identical to the size of the camera image. General information about motion detection: Motion detection carried out by C-MOR is based on differences in the respective camera image and not due to conventional motion detectors (exception: special accessory external switch). Motion detection can also be effected by changes in light. User Manual Page 46 C-MOR 3.2.2 Camera Activation Under “Start/Stop Of Recordings” it is possible to control the activities of the individual cameras and start or stop recordings. In case the recording of a camera is deactivated there will not be any saved video recordings of this camera. Depending on the camera configuration in case of an activated camera, permanent recordings and/or motion detection is saved in individual files. 3.2.3 Camera Configuration, Integration of Existing Camera Under Adjust Camera Configuration you can define further settings for the individual cameras. User Manual Page 47 C-MOR Under Network Data the following data is displayed: the current IP address of the camera, the TCP port, the user name and the password C-MOR is accessing the camera with. When you change any data in this section you also have to change it on the individual camera with its own configuration program or over the web interface of the camera. Otherwise C-MOR is no longer able to access the camera and thus no longer able to record. In case you already have a camera that is supported by C-MOR, you can integrate it by entering the IP address, the port, the user name and the password of your camera. The same settings have to be done for the camera itself. Under “Configuration Camera” Type you can select the camera type that is most suitable for your camera. C-MOR currently supports all cameras with the standard JPG and MJPG. Currently supported models: Airlink 101 Wireless IP Security Camera, AIC250 Airlink 101 Wireless IP Security Camera, AIC205W Allnet 2272, wireless, pan/tilt, infrared night vision camera Allnet 2281, wireless, infrared night vision camera Allnet 2282, wireless, pan/tilt, infrared night vision camera Allnet 2297, dome camera Arecont Vision 3100 Axis 205 Axis 206 Axis 206W Axis 207 Axis 207W Axis 207MW Axis 2100 Axis 210 Axis 210A Axis 211 Axis 211A User Manual Page 48 C-MOR Axis 213 PTZ Axis 215 PTZ with PTZ control Axis Dome camera 216FD Axis Dome camera 232D Axis 241S analog digital converter Axis 2411 analog digital converter Axis M1011 Axis M1031 Axis P3344 Dome Camera Axis Q1755 Axis Q1919 Thermal Network Camera Axis Q6032 PTZ with PTZ control D-Link DCS-900 D-Link DCS-900W D-Link DCS-G900 WLAN Camera D-Link DCS-1000W Digi-Lan TV7203 LevelOne FCS-0010 LevelOne FCS-0020 with PT control LevelOne FCS-1010 with PT control LevelOne FCS-1040 with PTZ contol LevelOne FCS-1070 LevelOne FCS-1081 LevelOne FCS-3000 dome camera LevelOne FCS-3021 dome camera LevelOne FCS-5011 night vision LevelOne FCS-5030 night vision LevelOne FCS-7011 analog digital video converter LevelOne WCS-0010 LevelOne WCS-2010 with PT control LevelOne WCS-2040 with PTZ control Linksys PVC2300 Linksys WVC210 Logilink WC2002 Mobotix M10 Security Night/Day Mobotix M22M-Sec User Manual Page 49 C-MOR Mobotix M22M IT Panasonic BL-C1A Panasonic BL-C30A Panasonic BL-C131A Panasonic KX-HCM230 Panasonic KX-HCM270 Panasonic KX-HCM280 Panasonic WV-NS202AE Panasonic WV-NP240/G Secplan Cameras Sony SNC-DS10 Sony SNC RZ25P PTZ Sony SNC RZ30P PTZ Trendnet TV-IP100 Trendnet TV-IP110 Trendnet TV-IP100W Trendnet TV-IP200 Trendnet TV-IP201W Trendnet TV-IP300 Trendnet TV-IP301W Trendnet TV-IP312W Trendnet TV-IP400W Trendnet TV-IP422W Trendnet Veo IP1100 Vivotek IP7133 Vivotek IP7138 Vivotek IP7139 Vivotek PT3112 incl. PT control Vivotek PZ6114 incl. PTZ control Vivotek PZ6124 Vivotek SD7151, Dome PTZ Camera Vivotek WDR FD 7141, Fixed Dome Camera Y-Cam Black Y-Cam Knight Y-Cam White Zonet Wireless ZVC7630W User Manual Page 50 C-MOR Zonet IP9100A 4-Port Analog digital converter Following cameras should work with C-MOR due to manufacturer information: All Axis models All Arecont vision models Mobotix D12D-Sec Mobotix M12D-Sec Mobotix M12D-Sec-Night Vivotek PT3122 4XEM W45 4XEM W80 4XEM WPTZ 4XEM WLPTZ User Manual Page 51 C-MOR This list was created in June 2008 and shows just a small selection. The complete list including many more models can be viewed under www.c-mor.com. In case you cannot find your model in the list you can request the support of your model either by email or telephone, we will then give you all the details you need. In case your camera is not listed but supported it can easily be connected under the item “Manual Path” in C-MOR. Just enter the directory of the URL of the camera’s live image or the camera’s MJPEG live stream, such as e.g. /axis-cgi/jpg/image.cgi?resolution=640x480 After that single camera options such as image rotation or maximum recording time can be defined. The description of each setting can be found next to the respective option in the table. On the same configuration page you are able to plan time-controlled recordings. Please click time and day when you would like to start the video surveillance. Please carry out the settings in the table below for “Time Controlled Recording During Motion Detection” just as described above. Recordings can be started by external events (door switches, ultrasonic motion detectors, bell switches and many more). This requires a network switch, like e.g. Barionet or other Syslog-IP switches, to send a system message to C-MOR. The message has to be in accordance with the line defined in this section, which will then trigger the recording. User Manual Page 52 C-MOR Image Mask for the Definition of the Areas for Motion Detection C-MOR reacts to motion in the complete camera image. This might require some kind of limitation so that not every kind of motion leads to motion detection. Examples for that can be cars driving by or pedestrians at property lines. By using this function a black & white mask can be loaded. By the help of this mask C-MOR will only carry out motion detection in the respective white areas. The black & white mask can be created as follows: please start with creating a white image of the size of your camera resolution. Those areas where no motion detection should be effected, please add black layers. Then please save the graphic as a JPG file and upload it to C-MOR. All black areas will then be ignored in terms of motion detection. Please also see the information on the following page. In this example cars driving by would trigger motion detection. In order to prevent this, please create a mask of the same size and upload it to your C-MOR. C-MOR then lays the mask over the image section. The black area will now be ignored during motion detection. User Manual Page 53 C-MOR 3.2.4 The C-MOR PTZ-Control Behind the PTZ-Control (PTZ: Pan/Tilt/Zoom) stand the Motion of moveable cameras directly with the C-MOR Web Interface. A great advantage of the PTZ-Control is the consistent interface for all camera types. Also no software has to be installed on the PC to manage the cameras. Furthermore the PTZ control works with the iPhone, iPod or iPad and other mobile devices with internet function. For the configuration of the PTZ-Cameras there is a configuration page in the C-MOR web interface that can be reached from the camera configuration page. User Manual Page 54 C-MOR In the PTZ configuration page all known PTZ cameras are available. In the section Load pre-defined camera data the settings for the PTZ camera can be loaded. Simply select the right camera in drop-down menu. User Manual Page 55 C-MOR If the PTZ configuration of the selected camera was loaded, the second step follows for the configuration of the PTZ control: The setup of the login data for the camera and the setting for the camera rotation. If the camera was fixed on a ceiling, which has the effect, that the camera is upside down, the PTZ control has to be configured with the rotation of 180 degrees. Otherwise the PTZ commands will navigate to the wrong direction. Of course the loaded PTZ commands can be adjusted. If a camera has a configurable pan or tilt setting, so the command can be adjusted with your own requirements. User Manual Page 56 C-MOR Next to the control commands for pan, tilt and zoom, moveable cameras usually own the function to set up pre-defined positions. These positions can be stored in the PTZ menu, too. The pre-defined positions commands you will find in the C-MOR web forum or by asking the C-MOR support team. If the PTZ commands are configured, at least you have to activate the PTZ control over the camera Menu. 3.2.5 Usage of the PTZ control If the PTZ function is activated for a camera, the control icons will be shown on the camera web pages automatically. User Manual Page 57 C-MOR The PTZ buttons are self-explanatory. These functions are pan from left to right, tilt from up and down and zoom in and zoom out. In the drop-down menu underneath the pan, tilt an zoom buttons you will find the menu for the predefined positions. User Manual Page 58 C-MOR 4 Legal Information The software of C-MOR is a bundle consisting of free and commercial software. The free program sections are licensed according to GPL and can be freely used, copied and distributed. By purchasing C-MOR the purchaser obtains a user license for the complete software package but is not allowed to copy it. 4.1 Disclaimer The software in use with the device is basically a combination of free software, open source, that is licensed by the authors without any occurring cost. As far as not stated explicitly in the license of the individual software packages, the following disclaimer is valid: za-internet GmbH does not assume any liability or warranty for the program as far as it is legally permissible. Unless otherwise confirmed in written form, the copyright owners and/or third parties provide the program “as it is” without any warranty. Neither explicitly, nor implicitly, including –but not limited to - marketability or usability for a particular aim. The full risk of quality and capability lies with the user. In case the program turns out to be erroneous, the costs for required service, repairing or correction have to be borne by the user. Neither the copyright owner, nor any third party who has modified and distributed the program as allowed above, is liable for any damages – the use of this program is at your own risk unless there is no valid applicable law or written agreement. This applies for any general or specific damages, damages by side effects or consequential damages that result from the use or uselessness of the program (including – but not limited to – loss of data, erroneous data processing, losses that have either to be covered by you or others or the inability of the program to work together with other programs), even when the copyright owner or a third party was informed of the possibility of such damages. 4.1.2 Warranty The distributor where the devices have been purchased (za-internet GmbH or specialized seller), issues a 2-year warranty for material and workmanship for products with undamaged seal of quality from the day of delivery. In the first instance the purchaser has a right to supplementary performance. The supplementary performance either provides rectification or delivery of conforming goods. Replaced parts or devices will pass into the property of the seller. In case supplementary performance cannot be carried out, the purchaser can either claim abatement of the purchaser’s price or withdraw from the purchase contract. As far as it is a defect the seller is responsible for, the purchaser can claim compensation or refund of vain expenses The purchaser has to announce obvious defects immediately. Verification of warranty claim has to be adduces with proper purchase certificate (sales receipt or invoice). All damage which has arisen due to improper treatment, operation, storage as well as force majeure or other external influences are excluded under the warranty. In case of an assumed warranty case, please contact our support during business hours. Please find contact details in the appendix. User Manual Page 59 C-MOR 5 GNU Public License, GPL Copyright (C) 1989, 1991 Free Software Foundation, Inc. 51 Franklin Street, Fifth Floor, Boston, MA 02110-1301, USA Everyone is permitted to copy and distribute verbatim copies of this license document, but changing it is not allowed. 5.1 Preamble The licenses for most software are designed to take away your freedom to share and change it. By contrast, the GNU General Public License is intended to guarantee your freedom to share and change free software--to make sure the software is free for all its users. This General Public License applies to most of the Free Software Foundation's software and to any other program whose authors commit to using it. (Some other Free Software Foundation software is covered by the GNU Lesser General Public License instead.) You can apply it to your programs, too. When we speak of free software, we are referring to freedom, not price. Our General Public Licenses are designed to make sure that you have the freedom to distribute copies of free software (and charge for this service if you wish), that you receive source code or can get it if you want it, that you can change the software or use pieces of it in new free programs; and that you know you can do these things. To protect your rights, we need to make restrictions that forbid anyone to deny you these rights or to ask you to surrender the rights. These restrictions translate to certain responsibilities for you if you distribute copies of the software, or if you modify it. For example, if you distribute copies of such a program, whether gratis or for a fee, you must give the recipients all the rights that you have. You must make sure that they, too, receive or can get the source code. And you must show them these terms so they know their rights. We protect your rights with two steps: (1) copyright the software, and (2) offer you this license which gives you legal permission to copy, distribute and/or modify the software. Also, for each author's protection and ours, we want to make certain that everyone understands that there is no warranty for this free software. If the software is modified by someone else and passed on, we want its recipients to know that what they have is not the original, so that any problems introduced by others will not reflect on the original authors' reputations. Finally, any free program is threatened constantly by software patents. We wish to avoid the danger that redistributors of a free program will individually obtain patent licenses, in effect making the program proprietary. To prevent this, we have made it clear that any patent must be licensed for everyone's free use or not licensed at all. The precise terms and conditions for copying, distribution and modification follow. 5.2 Terms and Conditions for Copying, Dustribution and Modification §0. This License applies to any program or other work which contains a notice placed by the copyright holder saying it may be distributed under the terms of this General Public License. The "Program", below, refers to any such program or work, and a "work based on the Program" means either the Program or any derivative work under copyright law: that is to say, a work containing the Program or a portion of it, either verbatim or with modifications and/or translated into another language. (Hereinafter, translation is included without limitation in the term "modification".) Each licensee is addressed as "you". Activities other than copying, distribution and modification are not covered by this License; they are outside its scope. The act of running the Program is not restricted, and the output from the Program is covered only if its contents constitute a work based on the Program (independent of having been made by running the Program). Whether that is true depends on what the Program does. §1. You may copy and distribute verbatim copies of the Program's source code as you receive it, in any medium, provided that you conspicuously and appropriately publish on each copy an appropriate copyright notice and disclaimer of warranty; keep intact all the notices that refer to this License and to the absence of any warranty; and give any other recipients of the Program a copy of this License along with the Program. You may charge a fee for the physical act of transferring a copy, and you may at your option offer warranty protection in exchange for a fee. §2. You may modify your copy or copies of the Program or any portion of it, thus forming a work based on the Program, and copy and distribute such modifications or work under the terms of Section 1 above, provided that you also meet all of these conditions: 1. You must cause the modified files to carry prominent notices stating that you changed the files and the date of any change. 2. You must cause any work that you distribute or publish, that in whole or in part contains or is derived from the Program or any part thereof, to be licensed as a whole at no charge to all third parties under the terms of this License. 3. If the modified program normally reads commands interactively when run, you must cause it, when started running for such interactive use in the most ordinary way, to print or display an announcement including an appropriate copyright notice and a notice that there is no warranty (or else, saying that you provide a warranty) and that users may redistribute the program under these conditions, and telling the user how to view a copy of this License. (Exception: if the Program itself is interactive but does not normally print such an announcement, your work based on the Program is not required to print an announcement.) These requirements apply to the modified work as a whole. If identifiable sections of that work are not derived from the Program, and can be reasonably considered independent and separate works in themselves, then this License, and its terms, do not apply to those sections when you distribute them as separate works. But when you distribute the same sections as part of a whole which is a work based on the Program, the distribution of the whole must be on the terms of this License, whose permissions for other licensee very part regardless of who wrote it. Thus, it is not the intent of this section to claim rights or contest your rights to work written entirely by you; rather, the intent is to exercise the right to control the distribution of derivative or collective works based on the Program. In addition, mere aggregation of another work not based on the Program with the Program (or with a work based on the Program) on a volume of a storage or distribution medium does not bring the other work under the scope of this License. User Manual Page 60 C-MOR §3. You may copy and distribute the Program (or a work based on it, under Section 2) in object code or executable form under the terms of Sections 1 and 2 above provided that you also do one of the following: 1. Accompany it with the complete corresponding machine-readable source code, which must be distributed under the terms of Sections 1 and 2 above on a medium customarily used for software interchange; or, 2. Accompany it with a written offer, valid for at least three years, to give any third party, for a charge no more than your cost of physically performing source distribution, a complete machine-readable copy of the corresponding source code, to be distributed under the terms of Sections 1 and 2 above on a medium customarily used for software interchange; or, 3. Accompany it with the information you received as to the offer to distribute corresponding source code. (This alternative is allowed only for noncommercial distribution and only if you received the program in object code or executable form with such an offer, in accord with Subsection b above.) The source code for a work means the preferred form of the work for making modifications to it. For an executable work, complete source code means all the source code for all modules it contains, plus any associated interface definition files, plus the scripts used to control compilation and installation of the executable. However, as a special exception, the source code distributed need not include anything that is normally distributed (in either source or binary form) with the major components (compiler, kernel, and so on) of the operating system on which the executable runs, unless that component itself accompanies the executable. If distribution of executable or object code is made by offering access to copy from a designated place, then offering equivalent access to copy the source code from the same place counts as distribution of the source code, even though third parties are not compelled to copy the source along with the object code. §4. You may not copy, modify, sublicense, or distribute the Program except as expressly provided under this License. Any attempt otherwise to copy, modify, sublicense or distribute the Program is void, and will automatically terminate your rights under this License. However, parties who have received copies, or rights, from you under this License will not have their licenses terminated so long as such parties remain in full compliance. §5. You are not required to accept this License, since you have not signed it. However, nothing else grants you permission to modify or distribute the Program or its derivative works. These actions are prohibited by law if you do not accept this License. Therefore, by modifying or distributing the Program (or any work based on the Program), you indicate your acceptance of this License to do so, and all its terms and conditions for copying, distributing or modifying the Program or works based on it. §6. Each time you redistribute the Program (or any work based on the Program), the recipient automatically receives a license from the original licensor to copy, distribute or modify the Program subject to these terms and conditions. You may not impose any further restrictions on the recipients' exercise of the rights granted herein. You are not responsible for enforcing compliance by third parties to this License. §7. If, as a consequence of a court judgment or allegation of patent infringement or for any other reason (not limited to patent issues), conditions are imposed on you (whether by court order, agreement or otherwise) that contradict the conditions of this License, they do not excuse you from the conditions of this License. If you cannot distribute so as to satisfy simultaneously your obligations under this License and any other pertinent obligations, then as a consequence you may not distribute the Program at all. For example, if a patent license would not permit royalty- free redistribution of the Program by all those who receive copies directly or indirectly through you, then the only way you could satisfy both it and this License would be to refrain entirely from distribution of the Program. If any portion of this section is held invalid or unenforceable under any particular circumstance, the balance of the section is intended to apply and the section as a whole is intended to apply in other circumstances. It is not the purpose of this section to induce you to infringe any patents or other property right claims or to contest validity of any such claims; this section has the sole purpose of protecting the integrity of the free software distribution system, which is implemented by public license practices. Many people have made generous contributions to the wide range of software distributed through that system in reliance on consistent application of that system; it is up to the author/donor to decide if he or she is willing to distribute software through any other system and a licensee cannot impose that choice. This section is intended to make thoroughly clear what is believed to be a consequence of the rest of this License. §8. If the distribution and/or use of the Program is restricted in certain countries either by patents or by copyrighted interfaces, the original copyright holder who places the Program under this License may add an explicit geographical distribution limitation excluding those countries, so that distribution is permitted only in or among countries not thus excluded. In such case, this License incorporates the limitation as if written in the body of this License. §9. The Free Software Foundation may publish revised and/or new versions of the General Public License from time to time. Such new versions will be similar in spirit to the present version, but may differ in detail to address new problems or concerns. Each version is given a distinguishing version number. If the Program specifies a version number of this License which applies to it and "any later version", you have the option of following the terms and conditions either of that version or of any later version published by the Free Software Foundation. If the Program does not specify a version number of this License, you may choose any version ever published by the Free Software Foundation. §10. If you wish to incorporate parts of the Program into other free programs whose distribution conditions are different, write to the author to ask for permission. For software which is copyrighted by the Free Software Foundation, write to the Free Software Foundation; we sometimes make exceptions for this. Our decision will be guided by the two goals of preserving the free status of all derivatives of our free software and of promoting the sharing and reuse of software generally. NO WARRANTY §11. BECAUSE THE PROGRAM IS LICENSED FREE OF CHARGE, THERE IS NO WARRANTY FOR THE PROGRAM, TO THE EXTENT PERMITTED BY APPLICABLE LAW. EXCEPT WHEN OTHERWISE STATED IN WRITING THE COPYRIGHT HOLDERS AND/OR OTHER PARTIES PROVIDE THE PROGRAM "AS IS" WITHOUT WARRANTY OF ANY KIND, EITHER EXPRESSED OR IMPLIED, INCLUDING, BUT NOT LIMITED TO, THE IMPLIED WARRANTIES OF MERCHANTABILITY AND FITNESS FOR A PARTICULAR PURPOSE. THE ENTIRE RISK AS TO THE QUALITY AND PERFORMANCE OF THE PROGRAM IS WITH YOU. SHOULD THE PROGRAM PROVE DEFECTIVE, YOU ASSUME THE COST OF ALL NECESSARY SERVICING, REPAIR OR CORRECTION. §12. IN NO EVENT UNLESS REQUIRED BY APPLICABLE LAW OR AGREED TO IN WRITING WILL ANY COPYRIGHT HOLDER, OR ANY OTHER PARTY WHO MAY MODIFY AND/OR REDISTRIBUTE THE PROGRAM AS PERMITTED ABOVE, BE LIABLE TO YOU FOR DAMAGES, INCLUDING ANY GENERAL, SPECIAL, INCIDENTAL OR CONSEQUENTIAL DAMAGES ARISING OUT OF THE USE OR INABILITY TO USE THE PROGRAM (INCLUDING BUT NOT LIMITED TO LOSS OF DATA OR DATA BEING RENDERED INACCURATE OR LOSSES SUSTAINED BY YOU OR THIRD PARTIES OR A FAILURE OF THE PROGRAM TO OPERATE WITH ANY OTHER PROGRAMS), EVEN IF SUCH HOLDER OR OTHER PARTY HAS BEEN ADVISED OF THE POSSIBILITY OF SUCH DAMAGES. User Manual Page 61 C-MOR 6 Appendix - Contact Information C-MOR by za-internet GmbH Lotzenäcker 4 72379 Hechingen, Germany Support and Headquarters: Tel.: +49 74 71 / 93 01 99-0 Fax.: +49 74 71 / 93 01 99-99 Support via Email: [email protected] or under http://www.c-mor.de/kontakt.pml Direct Contact: Tel.: +49 74 71 / 93 01 99-22 Fax.: +49 74 71 / 93 01 99-92 Information on the Internet: www.c-mor.com www.com.de VAT ID: DE812900780, Commercial register: Stuttgart HRB 420820, Management board: Michael Reuschling, Peter Steinhilber C-MOR INC. 23785 ELTORO RD 226 LAKE FOREST, CA 92630 Support and Headquarters: Tel. (949) 680-8979 Support via web: http://www.c-mor.com/supportform.pml User Manual Page 62