1
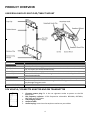
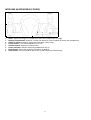
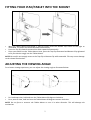
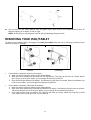
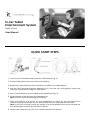
In-‐Car Tablet Entertainment System Model: ITIP-‐444 User Manual QUICK START STEPS 1. Firmly screw the Headrest Mount onto the Tablet Mount (Fig. 1). 2. Clip the Tablet Mount onto the back of your headrest. 3. Release the Top and Bottom Clips and place your tablet in the Tablet Mount. 4. Plug the FM Transmitter/Cigarette Adapter (Fig. 2) into your car’s 12V/cigarette socket and insert the 3.5mm Audio-‐In Plug into your tablet. 5. Insert 2 x AAA batteries (not included) in the Headphones (Fig. 3). 6. Set the volume to low and turn the headphones on. Note: Excessive sound may damage your hearing. 7. Press and hold the scan button on your Headphones to search for the FM channel that matches your FM Transmitter. Use the channel with the least static and clearest sound. Note: If you hear no sound, ensure the volume is set to an audible level or press and hold the scan button again to search for the correct channel. 8. You are now ready to enjoy your In-‐Car Tablet Entertainment System! TABLE OF CONTENTS Precautions...................................................................................................................................................................... 2 Important Safety Instructions ......................................................................................................................................... 2 Copyright ......................................................................................................................................................................... 3 Product Overview............................................................................................................................................................ 4 Assembling The iPad/Tablet Mount ................................................................................................................................ 6 Fastening To The Back Of Your Headrest ........................................................................................................................ 6 Fitting Your iPad/Tablet Into The Mount ........................................................................................................................ 7 Adjusting The Viewing Angle ........................................................................................................................................... 7 Removing Your iPad/Tablet............................................................................................................................................. 8 Transmitting Signals ........................................................................................................................................................ 9 Using The Wireless Headphones ..................................................................................................................................... 9 Specifications................................................................................................................................................................. 10 Troubleshooting ............................................................................................................................................................ 10 FCC Statement............................................................................................................................................................... 11 Warranty ....................................................................................................................................................................... 12 PRECAUTIONS Danger: This is not a toy. Keep the unit & accessories out of reach from children or pets. Clip contains small parts that may pose a choking hazard. Warnings: The battery shall not be exposed to excessive heat such as sunshine, fire or the like. Caution: Keep the unit away from any interference appliance, such as metals and magnets. Caution: Use of controls and adjustments or performance of procedures other than those specified herein may result in unexpected damage. Locations: To reduce the risk of electric shock, fire or injury: 1. Do not use the unit in places that are extremely hot, cold, dusty or humid. 2. Do not place the unit under direct sunlight nor near any heat sources, such as open flame sources and items that produce heat. 3. Do not place any objects that are filled with liquids, such as vases on top of the unit. 4. Keep the unit away from places where the item may be exposed to dripping or splashing. IMPORTANT SAFETY INSTRUCTIONS • • • • • • • • • • • • • • • • Read Instructions -‐ All the safety and operating instructions should be read before the product is operated. Keep Instructions -‐ The safety and operating instructions should be retained for future reference. Heed Instructions -‐ All warnings on the product and in the operating instructions should be adhered to. Follow Instructions -‐ All operating and user instructions should be followed. Do not use this product near water -‐ The appliance should not be used near water or moisture. Clean only with a dry cloth. Do not block any ventilation openings. Install in accordance with the manufacturer’s instructions. Do not install near any heat sources such as radiators, heat registers, stoves, or other apparatus (including amplifiers) that produce heat. Before using the product with the approved power adapter provided, ensure the electric power supply is compatible with the voltage rating of the provided power adapter. Protect the power adapter from being walked on or pinched particularly at the plugs, convenience receptacles, and at the point where they exit from the apparatus. The electric plug is used as the disconnect device. The disconnect device shall remain readily operable. Remove the power adaptor from the electric outlet if the product is not in use for a long time. Never try to disassemble batteries. The battery shall not be exposed to excessive heat such as sunshine, fire or the like. Only use attachments/accessories specified by the manufacturer. Refer all servicing to qualified service personnel. Servicing required when the unit does not operate normally or has been damaged in any way such as the power adaptor is damaged, liquids spilled into 2 the unit, any hard object has fallen on the unit, the unit has been dropped, the unit has been exposed to rain or moisture. Attention should be drawn to the environmental aspects of battery disposal. Use the unit in moderate climates. • • Warnings: • Listening to uncomfortable sound levels for prolonged periods could adversely affect your hearing. • If using a line input or direct plug in, jack MUST be fully inserted into the correct socket and the volume turned to the lowest level before turning the unit on. Failure to do so can result in high sound levels and could adversely affect your hearing. • Please make sure that the volume knob is in the LOWEST position. Notice the indication on the headphone. Warning: Changes or modifications to this unit not expressly approved by the party responsible for compliance could void the user’s authority to operate the equipment. NOTE: This equipment has been tested and found to comply with the limits for a Class B digital device, pursuant to Part 15 of the FCC Rules. These limits are designed to provide reasonable protection against harmful interference in a residential installation. This equipment generates, uses and can radiate radio frequency energy and, if not installed and used in accordance with the instructions, may cause harmful interference to radio communications. However, there is no guarantee that interference will not occur in a particular installation. If this equipment does cause harmful interference to radio or television reception, which can be determined by turning the equipment off and on, the user is encouraged to try to correct the interference by one or more of the following measures: • Reorient or relocate the receiving antenna. • Increase the separation between the equipment and receiver. • Connect the equipment into an outlet on a circuit different from that to which the receiver is connected. • Consult the dealer or an experienced radio/TV technician for help. This device complies with Part 15 of the FCC Rules. Operation is subject to the following two conditions: (1) this device may not cause harmful interference, and (2) this device must accept any interference received, including interference that may cause undesired operation. This device complies with Industry Canada license-‐exempt RSS standard(s). Operation is subject to the following two conditions: (1) this device may not cause interference, and (2) this device must accept any interference, including interference that may cause undesired operation of the device. Under Industry Canada regulations, this radio transmitter may only operate using an antenna of a type and maximum (or lesser) gain approved for the transmitter by Industry Canada. To reduce potential radio interference to other users, the antenna type and its gain should be so chosen that the equivalent isotropically radiated power (e.i.r.p.) is not more than that necessary for successful communication. Battery Warnings: * Danger if battery is heated or exposed to direct sunlight or high temperature (over 80 centidegrees). * Do not short circuit the batteries. * Never disassemble or reconstruct battery. * Do not expose the battery to water or any liquids. * Dispose of battery if it is broken, leaked, or deformed. COPYRIGHT All logos and registered trademarks belong to their owners. iPad is a trademark of Apple Inc., registered in the U.S. and other countries. 3 PRODUCT OVERVIEW UNIVERSAL BACK-‐OF-‐SEAT iPAD/TABLET MOUNT Descriptions Tablet Mount Top Clip Top Clip Switch Bottom Clip Bottom Clip Switch Headrest Mount Screw Goose Neck Headrest Hook Headrest Hook Clip Extend to fit tablet snugly. Do not force – this may damage the release mechanism. Press to release the Top Clip, the slider will extend automatically. Extend to fit tablet snugly. Slide and hold the switch to the right to release the width clip, the slider will extend automatically. Joins the Headrest Mount with the Tablet Mount. Flexible to adjust the Tablet Mount angle within 25 degrees. Do not force – this may damage the goose neck. Grasps the back of headrest. Fastens the Headrest Hook onto the headrest. 12V VEHICLE / CIGARETTE ADAPTER AND FM TRANSMITTER 1. Cigarette power plug: Fit in the car cigarette socket to power on the FM transmitter. 2. FM frequency selector: 4 FM frequencies selectable: 88.1MHz, 88.7MHz, 106.7MHz and 107.5MHz. 3. USB charging socket 4. Audio-‐In cable 5. Audio-‐In plug: Insert into the earphone socket on your tablet. 4 WIRELESS HEADPHONES (2 PAIRS) 1. Slider: Adjust the length of headband to make the headphones fit snugly. 2. Battery compartment: Requires 2 x AAA size batteries (not included) to power the headphones. 3. Audio-‐in socket: Accepts a connector cable with 3.5mm plug. 4. Power switch: Turn the headphones on or off. 5. Volume control: Adjust the volume level. 6. Power indicator: Indicate when the headphones are on. 7. Reset button: Reset the reception frequency to default. 8. Scan button: Press and hold to search for an FM frequency automatically. 5 ASSEMBLING THE iPAD/TABLET MOUNT There are 2 screw holes at the back of the Tablet Mount. Firmly screw the Headrest Mount onto the Tablet Mount. The product is now ready to mount onto your headrest. FASTENING TO THE BACK OF YOUR HEADREST Release both of the Headrest Hook Clips and adjust the distance to match the back of your headrest. Place the Headrest Hooks onto your headrest and latch the Headrest Hook Clips. The Tablet Mount is now ready to use. 6 FITTING YOUR iPAD/TABLET INTO THE MOUNT • • • With the Tablet Mount positioned in portrait mode, press the Bottom Clip Switch to the right as illustrated. The slider will extend leftward automatically. Press the Top Clip Switch to extend the slider upward automatically. Place your tablet into the Tablet Mount. Next, press the Top Clip downward and Bottom Clip rightward to fit your device snugly into the Tablet Mount. NOTE: Be careful not to apply stress to the Top Clip or Bottom Clip while extended. This may cause damage to the release mechanisms. ADJUSTING THE VIEWING ANGLE For a better viewing experience, you can adjust the viewing angle as illustrated below: • For landscape view, hold and turn the Tablet Mount 90 degrees clockwise. • For a portrait view, hold and turn the Tablet Mount 90 degrees counter-‐clockwise. NOTE: Do not force or overturn the Tablet Mount or turn it in other direction. This will damage the mechanism. 7 You can also tilt the Tablet Mount with the goose neck. Hold and tilt the Tablet Mount within 25 degrees slightly up or down, or left or right. NOTE: Do not force or tilt the goose neck or you will damage the goose neck. REMOVING YOUR iPAD/TABLET To take out your tablet safely, we suggest you hold your tablet while the clip is releasing, otherwise your tablet may drop or damage. • • Portrait Landscape If your tablet is placed in portrait orientation: 1. With one hand, hold your tablet in the Tablet Mount. 2. With your other hand press and hold the Top Clip Switch. The Top Clip will start to release. When the Top Clip is off of your tablet, you can let go of the Top Clip Switch. 3. Press and hold the Bottom Clip Switch. The Bottom Clip will start to release. When the Bottom Clip is off of your tablet, you can let go of the Bottom Clip Switch. If your tablet is placed in landscape orientation: 1. With one hand, hold your tablet in the Tablet Mount. 2. With your other hand press and hold the Bottom Clip Switch. The Bottom Clip will start to release. When the Bottom Clip is off of your tablet, you can let go of the Bottom Clip Switch. 3. Press and hold the Top Clip Switch. The Top Clip will start to release. When the Top Clip is off of your tablet, you can let go of the Top Clip Switch. 8 TRANSMITTING SIGNALS Sound from your tablet will be transmitted through the FM Transmitter/Cigarette Adapter to your wireless headphones. Note: Your car’s FM radio does not need to be turned on in order for the headphones to function. To power the FM Transmitter/Cigarette Adapter Insert the Cigarette Adapter power plug into your in-‐car 12V/cigarette socket. Connecting your tablet Insert the Audio-‐In plug into the earphone or line out 3.5mm jack on your tablet. To maintain good performance, always keep the audio cable uncoiled and fully extended. Selecting the channel There are 4 channels available on your FM transmitter: FM 88.1MHz, 88.7MHz, 106.7MHz and 107.5MHz. Set the FM frequency selector to the proper channel position required. NOTE: Select the channel with the least static and clearest sound. Charging your tablet Your tablet can be charged via the USB port on the Cigarette Adapter. Use your tablet’s USB charging cable (not included) to plug your tablet into the Cigarette Adapter’s USB charging port. NOTE: • The operation distance between the signal transmitter (Cigarette Adapter) and the receiver is 16.4 feet. Move closer to the signal transmitter when you feel the sound is not clear. • If you hear no sound, check if the volume on the receiver is turned down too low, or set the receiver to search for the correct channel. USING THE WIRELESS HEADPHONES Each pair of headphones are powered by 2 x AAA batteries (not included). Replace the batteries when you find the sound to be strange or distorted. • • • • • Unclip the battery cover. Insert 2 x AAA size batteries (not included) according to the correct polarity. Replace the battery cover. To turn the headphones on or off, set the Power switch to the appropriate position. When the headphones are on, the power indicator will light up. Put on your headphones. Adjust the headband length so that the headphones fit snugly. Adjust the volume with the Volume control. NOTE: Excessive sound may damage your hearing. Press and hold the Scan button to search for the correct channel from the Cigarette Adapter. NOTE: The headphones may also receive some radio stations. NOTES: • The operation distance between the signal transmitter (Cigarette Adapter) and the receiver (headphones) is 16.4 feet. Move closer to the signal transmitter when you feel the sound is not clear. • If you hear no sound, please check the volume is turned up, or press and hold the Scan button again to search for the correct channel. • If the headphones do not work properly, switch them off and then on, and re-‐connect the transmitter. 9 Using your wireless headphones as wired headphones You can also use the headphones as a wired unit with an 3.5mm auxiliary cable (not included). Your headphones will then receive signals from your tablet directly. • Insert the 3.5mm plug of the auxiliary cable into the audio-‐in socket on the headphones. • Next, insert the other end of the cable into the 3.5mm earphone or line-‐out jack of your tablet. • Put on your headphones. Adjust the length of headband so that the headphones will fit snugly. • Before you put on your headphones, reduce the volume level of your external tablet. NOTE: • When the auxiliary cable is plugged into the audio-‐in socket of the headphones, the headphones will automatically cut the signal from the transmitter. • Excessive sound may damage your hearing. SPECIFICATIONS TABLET MOUNT Compatible tablet dimensions: (width x height x depth) 12V VEHICLE/CIGARETTE ADAPTER Power supply: Power consumption: FM frequency channels: S/N ratio: Operation range: WIRELESS HEADPHONES Power supply: FM frequency channels: Minimum: 8.66in x 6.29in x 0.35in Maximum: 10.629in x 7.874in x 0.55in 12Vdc 1W 15W when it is charging 88.1MHz, 88.7MHz, 106.7MHz and 107.5MHz 45dB 16.4 feet in open area 2 x AAA size batteries (not included) 87.5MHz to 108.1MHz TROUBLESHOOTING Problem Headphones are not working and/or no sound. No reception. Sound is not very clear. Possible Cause No batteries or batteries have died. The headphones may be turned off. Volume control may be turned down (to minimum). You may be out of the operating range of the transmitter. The connection of the transmitter and the tablet may be loose. The channel being used on the transmitter and the receiver do not match. There is an interfering appliance being used nearby. Poor reception. 10 Solution Fit new batteries into the headphones. Turn the headphones on with the Power switch. Adjust the volume control. Move closer to the transmitter to keep the distance within 16.4 feet. Check the connection of the transmitter and the tablet. Press and hold the Scan button on the headphones to search for the correct channel. Turn off the interfering appliance. Change to another channel. FCC STATEMENT Warning: Changes or modifications to this unit not expressly approved by the party responsible for compliance could void the user authority to operate the equipment. NOTE: This equipment has been tested and found to comply with the limits for Class B digital device, pursuant to part 15 of the FCC Rules. These limits are designed to provide reasonable protection against harmful interference in a residential installation. This equipment generates, uses and can radiate radio frequency energy and, if not installed and used in accordance with the instructions, may cause harmful interference to radio or television reception, which can be determined by turning the equipment off and on, the user is encouraged to try to correct the interference by one or more of the following measures: -‐Reorient or relocate the receiving antenna. -‐Increase the separation between the equipment and the receiver. -‐Connect the equipment into an outlet on a circuit different from that to which the receiver is connected. -‐Consult the dealer or an experienced radio/TV technician for help. INDUSTRY CANADA This device complies with Industry Canada licence-‐exempt RSS standard(s). Operation is subject to the following two conditions: (1) this device may not cause interference, and (2) this device must accept any interference, including interference that may cause undesired operation of the device. Under Industry Canada regulations, this radio transmitter may only operate using an antenna of a type and maximum (or lesser) gain approved for the transmitter by Industry Canada. To reduce potential radio interference to other users, the antenna type and its gain should be so chosen that the equivalent isotropically radiated power (e.i.r.p.) is not more than that necessary for successful communication. CALIFORNIA PROP 65 WARNING "WARNING" This product contains a chemicals known to the State of California to cause birth defects or other reproductive harm. For more information on these regulations and a list of chemicals, log on the following website address : http://www.oehha.ca.gov/prop65.html 11 WARRANTY Innovative Technology Electronics Corp. Limited Warranty: 90 Days Labor, One Year Parts Innovative Technology Electronics Corp. (IT) warrants the product to be free from “Defects” in materials under normal use for a period of “One Year” from the date of the original purchase. The Warranty is “Not” transferable. IT agrees, within the initial “90 Day” period, to repair or replace the product if it is determined to be defective at “No Charge”. It is further agreed that IT will cover the cost to repair or replace damaged “Parts” only for a total period of “One Year” from the date of the original purchase. The warranty does not cover cosmetic damage, antennas, AC cords, cabinets, headbands, ear-‐pads, or damage due to line power surges, connection to improper voltage supply or settings, misuse, mishandling, accident, acts of God or attempted repair by an unauthorized service agent. To obtain service, the purchaser MUST present an original sales receipt / proof of purchase. Please contact us at www.ithomeproducts.com to request an RMA (Return Material Authorization) number to return products for service or replacement. Returns without an RMA number on the package will be refused and returned to sender. Upon receipt of the returning item and our full inspection (IT) may issue a replacement to customer for the same item or of one that has equivalent value and features. To return an item, supply full name, return address, phone number, item purchased, receipt of purchase and reason for return to obtain RMA number. All returns must be in the original packaging or reasonable substitute to prevent damage. Customer “Must” include full name, shipping address and telephone number inside of package. No return will be shipped back to a PO Box or APO address. Please include your check or money order in the amount of • USD$5.00 for items $10.00 to $39.99 (Price Paid Per Unit) • USD$10.00 for items $40.00 to $99.99. (Price Paid Per Unit) • USD$16.00, for items $100.00 and up. (Price Paid Per Unit) • Shipping fees are non-‐refundable to be payable to Innovative Technology Electronics Corp.(for handling and return shipping charges) (IT) will not be responsible for delays or unprocessed claims resulting from a purchaser’s failure to provide any / all of the necessary information. Send all inquiries or RMA request via our website www.ithomeproducts.com/support. Innovative Technology Electronics Corp. 1 Channel Drive Port Washington, NY 11050 Toll free: 1-‐877-‐483-‐2497 Website for support: www.ithomeproducts.com/support There are no express warranties except as listed above. REPAIR OR REPLACEMENT AS PROVIDED UNDER THIS WARRANTY IS THE EXCLUSIVE REMEDY OF THE CUSTOMER, (IT) SHOULD NOT BE LIABLE FOR ANY INCIDENTAL OR CONSEQUENTIAL DAMAGES FOR BREACH OF ANY EXPRESS OR IMPLIED WARRANTY ON THIS PRODUCT EXCEPT TO THE EXTENT PROHIBITED BY APPLICABLE LAW. ANY IMPLIED WARRANTY OF MERCHANTABILITY OR FITNESS FOR A PARTICULAR PURPOSE ON THIS PRODUCT IS LIMITED IN DURATION TO THE DURATION OF THIS WARRANTY. Some states do not allow the exclusion or limitation of incidental or consequential damages, or limitations on how long an implied warranty lasts, so the above exclusions or limitations may not apply to you. This warranty gives you specific legal rights and you may also have other rights, which vary from state to state. 12 444120500E 13