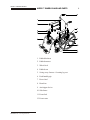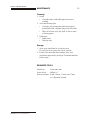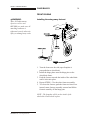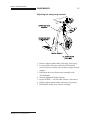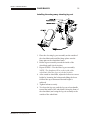
1
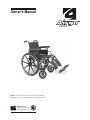
Owner’s Manual
Dealer: this manual must be given to the user of the wheelchair
User: before using, read this manual and save for future reference
AMG Medical Inc.
Montreal, QC H4T 1V5
www.amgmedical.com
MONTREAL
AIRGO™ OWNER’S MANUAL
TABLE OF CONTENTS
2
Table of contents . . . . . . . . . . . . . . . . . . . . . . . . . . . . . . . . . 2
Read before use. . . . . . . . . . . . . . . . . . . . . . . . . . . . . . . . . . 3
Choosing the right chair . . . . . . . . . . . . . . . . . . . . . . 3
Review this manual often . . . . . . . . . . . . . . . . . . . . . 3
Your Airgo™ wheelchair and it's parts . . . . . . . . . . . . . . . . 4
Airgo™ wheelchair specifications . . . . . . . . . . . . . . . . . . . 5
Basic safety precautions . . . . . . . . . . . . . . . . . . . . . . . . . . . 6
General warnings. . . . . . . . . . . . . . . . . . . . . . . . . . . . . . . 6-7
Safety / handling of wheelchair . . . . . . . . . . . . . . . . . . . . . 8
Folding and unfolding the wheelchair. . . . . . . . . . . . 8
Stability and balance . . . . . . . . . . . . . . . . . . . . . . . 8-9
Transferring . . . . . . . . . . . . . . . . . . . . . . . . . . . . . . . . 9
Tilting . . . . . . . . . . . . . . . . . . . . . . . . . . . . . . . . . . . . 9
Tilting - Ramps & inclines . . . . . . . . . . . . . . . . . . . 10
Maintenance. . . . . . . . . . . . . . . . . . . . . . . . . . . . . . . . . 11-13
Required tools . . . . . . . . . . . . . . . . . . . . . . . . . . . . . 13
Chair basics . . . . . . . . . . . . . . . . . . . . . . . . . . . . . . . . . 14-19
Installing the swing-away footrest . . . . . . . . . . . . . 14
Adjusting the swing-away footrest . . . . . . . . . . . . . 15
Installing the swing-away elevating leg rest . . . . . . 16
Adjusting the swing-away elevating leg rest. . . . . . 17
Adjusting armrest height . . . . . . . . . . . . . . . . . . . . 18
Removing 3-in-1 armrest and/or flip-back armrest. 18
Seat and back . . . . . . . . . . . . . . . . . . . . . . . . . . . . . . . . 19-20
Adjusting backrest height . . . . . . . . . . . . . . . . . . . . 19
Replacing the back upholstery . . . . . . . . . . . . . . . . 20
Replacing the seat upholstery . . . . . . . . . . . . . . . . . 20
NOTE: All illustrations and
specifications in the manual
are based on the latest
product information
available at the time of
publication.
AMG Medical Inc. reserves
the right to make changes at
any time, without notice.
AMG Medical Inc • www.amgmedical.com
Rear wheels . . . . . . . . . . . . . . . . . . . . . . . . . . . . . . . . . 21-22
Front casters . . . . . . . . . . . . . . . . . . . . . . . . . . . . . . . . . . . 23
Seat-to-floor height . . . . . . . . . . . . . . . . . . . . . . . . . . . . . . 24
Anti-tippers . . . . . . . . . . . . . . . . . . . . . . . . . . . . . . . . . . . . 25
Wheel locks. . . . . . . . . . . . . . . . . . . . . . . . . . . . . . . . . . . . 26
Limited warranty. . . . . . . . . . . . . . . . . . . . . . . . . . . . . . . . 27
AIRGO™ OWNER’S MANUAL
READ BEFORE USE
3
A. CHOOSING THE RIGHT CHAIR
Airgo™ offers many wheelchair accessories options and
configurations to meet the needs of the individual user.
However, the final selection of options, accessories and
adjustments should be made together by you, with your
health care advisor and/or Airgo™ dealer. Selecting the
best Airgo™ wheelchair configuration depends on such
things as:
1. Your level of physical strength, balance and
coordination.
2. The types of hazards you must overcome in the
environments in which you will use the
wheelchair (home, work and other places you
frequent regularly).
3. The options needed for your comfort and safety.
B. REVIEW THIS MANUAL OFTEN
Before using this wheelchair, you and each person who
may assist you, should read this manual carefully and
follow all instructions. Review the warnings and
precautions often until you are fully familiarized with them.
AMG Medical Inc • www.amgmedical.com
AIRGO™ OWNER’S MANUAL
AIRGO™ WHEELCHAIR AND PARTS
1. Padded backrest
2. Padded armrest
3. Wheel-lock
4. Padded seat
5. Swing-away footrest / elevating leg rest
6. Push handle grip
7. Rear wheel
8. Hand rim
9. Anti-tipper device
10. Side frame
11. Front fork
12. Front caster
AMG Medical Inc • www.amgmedical.com
4
AIRGO™ OWNER’S MANUAL
AIRGO™ WHEELCHAIR SPECIFICATIONS
Seat width 16, 18, 20 or 22-inches
Seat depth 16 or 18-inches
Seat-to-floor 17 ¾ or 19 ¾ inches
Overall width 23, 25, 27 or 29 inches
Overall depth
(without front rigging)
30 ½ inches or 32 ½ inches
Back style Adjustable
Back height 16, 17 & 18-inches in 1-inch increment
Arm style Flip-back, detachable desk arm with height adjustment
Flip-back, detachable full arm with height adjustment
Flip back, detachable desk arm with fixed height
Front rigging Swing-away Footrests and Elevating Leg rests
Rear axle Dual Position
Rear wheels 24” Polyurethane (PU) Airless or Pneumatic
Hand rims Composite or Aluminium
Wheel locks Pull to Lock
Front casters 8” PU Solid or Pneumatic
Upholstery Black Nylon
Weight capacity The 16” and 18” seat width wheelchair models have a
weight limitation of 250 lbs. (114 kg).
The 20” and 22” seat width wheelchair models have a
weight limitation of 350 lbs. (159 Kg).
Limited warranty Limited Lifetime
AMG Medical Inc • www.amgmedical.com
5
AIRGO™ OWNER’S MANUAL
BASIC SAFETY PRECAUTIONS
6
Before using your wheelchair, please read and keep in mind
the following safety precautions. Failure to do so could
result in personal injury and/or damage to your wheelchair.
•
•
•
•
•
•
•
•
•
Before using, you should receive training in the safe use
of a wheelchair from an authorized dealer and/or health
care advisor.
After engaging the wheel locks, practice bending,
reaching and transferring, taking into account the limit
of your abilities.
NEVER try new manoeuvres on your own until you are
sure you can do so safely.
Familiarize yourself with the areas where you plan to
use your wheelchair.
Look for hazards and learn to how to avoid them.
Use of anti-tippers is recommend for added safety.
Ensure that the wheelchair rolls smoothly and that all
parts are working properly.
Check for noise, vibration or a change in ease of use.
which may indicate loose fasteners, or damage to your
wheelchair.
Always consult an authorized Airgo™ dealer to find
and correct any problems or if you have any doubt
about the condition of your wheelchair.
GENERAL WARNINGS
•
•
•
•
AMG Medical Inc • www.amgmedical.com
Do not exceed the weight limit listed on the product.
The listed weight limit is for the combined weight of
rider and all items carried. Exceeding the listed weight
limit risks damage to the wheelchair, a fall, tip-over or
loss of control which can cause severe injury to the user
or others.
Do not attempt to operate your wheelchair on roads,
streets or highways.
Do not operate your wheelchair in hilly or overly rough
terrain, sandy, oily, wet or icy surfaces.
Unauthorized modification of your wheelchair or the
use of non-AMG replacement parts may change the
AIRGO™ OWNER’S MANUAL
GENERAL WARNINGS
•
•
•
•
•
•
•
•
•
•
•
•
•
•
AMG Medical Inc • www.amgmedical.com
7
structure of the wheelchair and may cause a safety
hazard and will void the warranty.
Do not attempt ANY inclines or declines greater
than 9°.
Do not attempt inclines without anti-tippers installed
Do not attempt to ride over curbs or obstacles. This
may cause your wheelchair to tip over risking personal
injury and/or a damage to your wheelchair.
Do not use on an escalator. Serious injury may occur.
Do not attempt to reach objects if you have to move
forward in the seat.
Do not lean over the top of the back upholstery. This
will change your center of gravity and may cause your
wheelchair to tip over risking personal injury and/or
damage to your wheelchair.
Do not try to pick up an object from the floor by
reaching down between your knees. You are less likely
to tip if you reach over the side of your chair.
Wheelchair users should NOT be transported in a
vehicle while in the wheelchair unless the vehicle is
properly equipped to do so.
Do not tie down or attach any thing to the wheels. This
may cause your wheelchair to tip over risking personal
injury and/or damage to your wheelchair.
Do not stand or step on the footplates while
transferring.
Never lift your wheelchair by any of its detachable
parts.
WHEEL LOCKS ARE NOT BRAKES. Do not use the
wheel locks to slow down or to stop your wheelchair
while it is still moving.
Always engage the wheel locks when transferring,
resting or using a wheelchair lift.
Check pneumatic tire pressure regularly to ensure
proper air pressure. Failure to do so could result in the
malfunction of the wheel locks, and may cause serious
injury.
AIRGO™ OWNER’S MANUAL
SAFETY / HANDLING OF WHEELCHAIR
8
FOLDING AND UNFOLDING THE WHEELCHAIR
WARNING:
DO NOT place your hands or
fingers between seat rail and
side panel. DO NOT sit or
transfer into the wheelchair
unless it is fully open and the
seat frame rails are fully
seated into the frame saddles.
Unfolding
1. Tilt the wheelchair toward you far enough to take
the weight off the opposite wheel.
2. Push down on the top of the seat rail closet to you
until the wheelchair is fully open.
3. Make sure seat rails are fully seated into frame
saddles.
Folding
1. Fold up the footplates and ensure that the swingaway footrests / leg rests are in locked position in
front of the wheelchair.
2. Standing at one side of the chair, use both hands
to grasp the middle of the seat upholstery at the
front and back edge and lift up.
3. Standing at one side of the chair, use both hands
to grasp the armrest furthest from you and pull the
armrests towards you until the wheelchair folds.
STABILITY AND BALANCE
Your wheelchair has been designed and engineered to
maintain balance during normal daily activity as long as you
do not move beyond the center of gravity. To assure stability
and proper operation of your wheelchair, you must at all
times maintain proper balance.
WARNING:
DO NOT attempt to reach
objects if you must move
forward in the seat or if you
must reach down between
your knees. DO NOT shift
your weight in the direction
you are reaching.
AMG Medical Inc • www.amgmedical.com
Reaching, leaning and bending
Although it is not recommended, you might occasionally
lean, bend or reach while sitting in your wheelchair. Consult
with your health care advisor and/or authorized dealer for
assistance in developing safe techniques suited to your
abilities and limitations.
Forward or sideward
1. Operate the wheelchair as close as possible to the
object you wish to reach.
2. Rotate the front casters fully forward.
3. Engage both wheel locks.
AIRGO™ OWNER’S MANUAL
SAFETY / HANDLING OF WHEELCHAIR
WARNING:
DO NOT lean over the top of
the back upholstery. DO NOT
engage the wheel locks.
If you shift your weight while
reaching, it is better to roll
backwards than to tip over.
WARNING:
Before attempting a transfer,
always engage both wheel
locks. DO NOT step on the
foot-plates, as this could
cause the wheelchair to tip
over.
WARNING:
DO NOT attempt to tilt
your wheelchair without
assistance. Tilting the
wheelchair backward beyond
its balance point can be
dangerous and may result in
injuries.
AMG Medical Inc • www.amgmedical.com
9
Reaching, leaning and bending (contd.)
Backward
1. Operate your wheelchair as close as possible to
the object.
2. Rotate front casters fully forward. Reach only as
far as your arm will extend without changing
your sitting position. If in doubt, reposition the
wheelchair or ask for help.
TRANSFERRING
1. Position the wheelchair as closely as possible
along side the seat to which you are transferring.
2. Remove or flip back the armrest.
3. Engage wheel locks.
4. Shift body weight into the seat with transfer.
TILTING
Tilting should only be performed with the assistance of an
attendant.
1. Grasp the push handles securely and ensure that
handgrips are firmly attached.
2. Make sure the occupant's feet are secure on the
footplates and that arms, hands and fingers are
clear of wheels and/or pinch points.
3. Advise the occupant prior to tilting the
wheelchair backward.
4. Place one foot on the tipping lever (located on
the rear bottom of the wheelchair) and apply
downward force until the balance point is
reached (approximately 30°).
5. Lower the front end slowly.
AIRGO™ OWNER’S MANUAL
SAFETY / HANDLING OF WHEELCHAIR
10
WARNING:
DO NOT attempt inclines or
declines without anti-tipper
installed. DO NOT attempt
any incline or decline of more
than nine degrees. During
decent, the lowest part of the
footrest should be no closer
to the ground than 2-1/2
inches to permit proper
clearance.
TILTING – RAMPS & INCLINES
Ascent
Lean the upper part of your body slightly forward as you
propel up an incline. If it becomes necessary to stop, avoid
any abrupt or sudden forward movement as this could
cause tipping.
WARNING:
DO NOT allow the
wheelchair to drop off the
curb edge. DO NOT attempt
to lift the wheelchair by any
detachable armrest, leg rests
or other removable parts.
DO NOT attempt to step over
a high curb without two
attendants. ALWAYS check
the hand grips to make sure
that they are secure and are
not rotating or slipping off.
Curbs & steps
NOTE - This should only be performed with the assistance
of an attendant.
Going up (method 1)
1. Tilt the wheelchair backward to its “balance
point” and move forward until the front casters
pass over the top of the curb or the step.
2. Lower the front casters slowly on top of the
curb.
3. Lift the wheelchair and push it forward until the
rear wheels roll up and over the curb.
4. Ensure the wheelchair is completely cleared of
the curb and cannot roll backwards.
Descent
NOTE - This should only be performed with the assistance
of an attendant.
Always face forward when going down a ramp, but DO
NOT lean forward as this could cause the wheelchair to tip.
Leaning backward can increase the stability slightly. It is
critical to keep the wheelchair under control at all times and
to handle the wheelchair slowly.
Going up (method 2)
1. Turn the wheelchair backward until the rear
wheels are against the curb or step.
2. Tilt back to its “balance point” and pull up the
wheelchair over the curb.
3. Lower down front casters only once the
wheelchair is far enough from the edge of the
curb.
AMG Medical Inc • www.amgmedical.com
AIRGO™ OWNER’S MANUAL
SAFETY / HANDLING OF WHEELCHAIR
11
Curbs & steps (contd.)
NOTE - This should only be performed with the assistance
of an attendant.
Going down
1. Turn the wheelchair backward and carefully
step down to the next step.
2. Hold the wheelchair securely and pull the
wheelchair to where the rear wheels reach the
curb edge.
3. Slowly roll the rear wheels down onto the lower
level.
4. Tilt back to its “balance point” and turn face
forward.
5. Carefully lower the front casters by placing one
foot on the tipping lever until the wheelchair is
completely cleared of the curb/step.
WARNING:
Wheelchairs are especially
prohibited on escalators.
It is extremely dangerous and
should never be attempted.
Stairways
Never use the wheelchair on stairs UNLESS you have
someone to help you. Ramps or elevators are
recommended.
MAINTENANCE
NOTE – Every six months take your wheelchair to a
qualified dealer for a thorough inspection and servicing.
Regular cleaning will reveal loose or worn parts and
enhance the smooth operation of your wheelchair. To
operate properly and safely, your wheelchair must be cared
for just like any other vehicle. Routine maintenance will
extend the life and efficiency of your wheelchair.
Initial adjustments should be made to suit personal body
structure and preference.
AMG Medical Inc • www.amgmedical.com
AIRGO™ OWNER’S MANUAL
MAINTENANCE
12
Initially, all the following points should be checked. Thereafter we recommend that you follow
these maintenance procedures:
To check...
Weekly Monthly Periodically
General
•
Wheelchair rolls straight (no excess drag or pull to one side)
Ö
Ö
Frame and crossbraces
•
Inspect for loose or missing hardware
•
Inspect for bent frame or cross braces
Ö
Ö
Seat and back
•
Inspect for rips or sagging
•
Inspect for loose or broken hardware
•
Inspect cane hand grips for wear/looseness/deterioration
Ö
Ö
Ö
Rear wheels
•
Ö
No excessive side movement when lifted and spun
Hand rims
•
Ö
Inspect for signs of rough edges or peeling
Spokes
•
Inspect for broken spokes
Ö
Front casters / forks
•
Inspect axle assembly for proper tension by spinning caster.
Caster should come to a gradual stop
•
Check hardware for tightness
•
Wheel bearings are clean and free of moisture
Ö
Ö
Ö
CAUTION: As with any vehicle, the wheels and tires should be
Ö
checked periodically for cracks and wear, and should be replaced.
Tires
•
Inspect for cracks or wear
•
If pneumatic, check for proper inflation
Ö
Ö
Ö
CAUTION: As with any vehicle, the wheels and tires should be
Ö
checked periodically for cracks and wear, and should be replaced.
Wheel locks
•
Do not interfere with tires when rolling
•
Pivot points free of wear and looseness
•
Wheel locks easy to engage
•
Wheel locks prevent wheelchair from moving when engaged
AMG Medical Inc • www.amgmedical.com
Ö
Ö
Ö
Ö
AIRGO™ OWNER’S MANUAL
MAINTENANCE
13
Cleaning
1. Frame
• Clean the frame with mild soap at least once
a month.
2. Axle and Moving Parts
• Clean the area around axles and moving parts
periodically with a slightly damp (not wet) cloth.
• Wipe off or blow away any fluff, or dirt on axles
or moving parts.
3. Upholstery
• Hand-wash.
• Drip-dry only.
Storage
1. Store your wheelchair in a clean, dry area.
If you fail to do so, parts may rust or corrode.
2. If stored for more than three months, have your
wheelchair inspected by an Airgo™ authorized dealer
before using.
REQUIRED TOOLS
Allen keys:
4 mm and 6 mm
Screw driver:
Philips # 2
Socket wrenches: 8 mm, 10 mm, 13 mm, and 17 mm
or 1 adjustable wrench
AMG Medical Inc • www.amgmedical.com
AIRGO™ OWNER’S MANUAL
CHAIR BASICS
14
FRONT RIGGING
WARNING:
After ANY adjustments,
repair or service and
BEFORE use, make sure all
attaching hardware is
tightened securely otherwise
injury or damage may result.
Installing the swing-away footrest
1. Turn the footrest to the side (open footplate is
perpendicular to wheelchair).
2. Install the hinge plates onto the hinge pins on the
wheelchair frame.
3. Push the footrest towards the inside of the wheelchair
until it locks into place.
4. Repeat STEPS 1-3 for the other footrest assembly.
5. To release the footrest, push the footrest release lever
inward, rotate footrest assembly outward and lift the
footrest assembly off the hinge pins.
NOTE - The footplate will be on the inside of the
wheelchair when locked in place.
AMG Medical Inc • www.amgmedical.com
AIRGO™ OWNER’S MANUAL
CHAIR BASICS
15
Adjusting the swing-away footrest
1. Remove impact guards and/or calf strap, if necessary.
2. Loosen, but do not remove the bolt & locknut that
secure the lower footrest sub-assembly to upper footrest
support.
3. Reposition the lower footrest sub-assembly to the
desired height.
4. Securely tighten the bolt & locknut.
5. Repeat STEPS 1- 4 for the other footrest, if necessary.
6. Replace impact guards and/or calf strap, if necessary.
7. Reinstall the swing-away footrest assembly.
AMG Medical Inc • www.amgmedical.com
AIRGO™ OWNER’S MANUAL
CHAIR BASICS
16
Installing the swing-away elevating leg rest
1. Place the elevating leg rest assembly on the outside of
the wheelchair and install the hinge plates onto the
hinge pins on the wheelchair frame.
2. Rotate leg rest assembly toward the inside of the
wheelchair until it locks in place.
3. Repeat STEPS 1-2 for the other leg rest assembly.
NOTE - The footplate will be on the inside of the
wheelchair when the leg rest is locked in place.
4. After seated in wheelchair, adjust the footrest to correct
height by loosening the locknut and sliding the lower
footrest tube up or down until desired height is
achieved.
5. Tighten locknut securely.
6. To release the leg rest, push the leg rest release handle
toward the inside of the wheelchair (facing the front of
the wheelchair) and swing the leg rest assembly to the
outside of the wheelchair.
AMG Medical Inc • www.amgmedical.com
AIRGO™ OWNER’S MANUAL
CHAIR BASICS
17
Adjusting the swing-away elevating leg rest
1. To adjust the elevating leg rest, raise legs until the
desired height is obtained.
2. To reposition leg rest to normal position, support leg
with one hand and push release handle downward with
the other hand.
3. To adjust the calf pad, turn the pad towards the outside
of the wheelchair.
4. Slide the calf pad up or down until the desired position
is obtained.
5. To secure the calf pad, turn the calf pad towards the
inside of the wheelchair.
AMG Medical Inc • www.amgmedical.com
AIRGO™ OWNER’S MANUAL
CHAIR BASICS
18
WARNING:
After ANY adjustments,
repair or service and
BEFORE use, make sure all
attaching hardware is
tightened securely otherwise
injury or damage may result.
Adjusting armrest height
WARNING:
Make sure the height
adjustment knob is securely
in locked position BEFORE
using the wheelchair.
1. Unlock the armrest by pulling the height adjustment
knob horizontally.
2. Slide armrest up or down until the desired position is
obtained.
3. Lock the armrest by releasing the height adjustment
knob and having knob end positioned into key seat of
the armrest.
4. Repeat STEPS 1-3 for other armrest.
Removing 3-in-1 armrest and/or flip-back armrest
WARNING:
Make sure the armrest is
securely locked BEFORE
using the wheelchair.
AMG Medical Inc • www.amgmedical.com
1.
2.
3.
4.
Press the flip-back release lever located on the armrest.
Flip the armrest back.
Pull the rear knob and remove the armrest.
To install the armrest, reverse above procedure.
AIRGO™ OWNER’S MANUAL
CHAIR BASICS
WARNING:
After ANY adjustments,
repair or service and
BEFORE use, make sure all
attaching hardware is
tightened securely- otherwise
injury or damage may result.
SEAT AND BACK
Adjusting backrest height
BOLT
1. Remove the knob and bolt from both sides.
2. Slide backrest up and down to the desired height.
3. Securely tighten the screw and knob on both sides
AMG Medical Inc • www.amgmedical.com
19
AIRGO™ OWNER’S MANUAL
CHAIR BASICS
20
Replacing the back upholstery
BACK
CANES
KNOB &
SCREW
1. Remove the knob and bolt on both sides.
2. Pull the back cane off the wheelchair frame.
3. Remove the four (4) mounting screws and washers that
secure the existing back upholstery to the back canes.
4. Pull the existing back upholstery off the back cane.
5. Install the NEW back upholstery over the back canes.
6. Secure the NEW back upholstery to the back canes with
the existing mounting screws and washers.
7. Secure the back cane to the wheelchair frame with knob
and bolt.
AMG Medical Inc • www.amgmedical.com
AIRGO™ OWNER’S MANUAL
CHAIR BASICS
21
Replacing the seat upholstery
1. Remove the eight screws & washers (16” depth) or ten
screws & washers (18” depth) that secure seat
upholstery to the cross braces.
2. Remove the existing seat upholstery from the rails of
the cross braces.
3. Install the new upholstery by reversing above procedure.
REAR WHEELS
WARNING:
After ANY adjustments,
repair or service and
BEFORE use, make sure all
attaching hardware is
tightened securely - otherwise
injury or damage may result.
Removing / installing rear wheels
1. For 16” & 18” frames, remove the hub cap, locknut and
hex bolt that secures the rear wheel to the wheelchair.
2. Repeat STEP 1 for the other rear wheel.
3. To reinstall the rear wheel onto the wheelchair, reverse
step 1 of the above procedure.
AMG Medical Inc • www.amgmedical.com
AIRGO™ OWNER’S MANUAL
REAR WHEELS
22
Replacing rear wheel hand rim
WARNING:
Replacement of rear wheel
tire or tube must be
performed by a qualified
technician.
CAUTION:
As with any vehicle, the
wheels and tires should be
checked periodically for
cracks and wear, and should
be replaced.
AMG Medical Inc • www.amgmedical.com
1. Remove the rear wheel from the wheelchair.
2. For a composite hand rim, remove the screws &
washers that secure the hand rim to the rear wheel.
For an aluminium hand rim, remove the screws,
washers and spacers that secure the hand rim to the rear
wheel.
3. Remove the existing hand rim.
4. To install the new hand rim, reverse above procedures.
5. Repeat STEPS 1-3 for the other rear wheel if necessary.
AIRGO™ OWNER’S MANUAL
FRONT CASTERS
WARNING:
After ANY adjustments,
repair or service and
BEFORE use, make sure all
attaching hardware is
tightened securely - otherwise
injury or damage may result.
23
Installing/replacing front casters and forks
1. Remove the fork cap.
2. Remove the locknut
that secures the fork
stem to the caster head tube.
3. Drop the front caster and fork
out of the caster head tube.
WARNING:
Replacement of the front
caster must be performed by
a qualified technician.
Replacing/repairing front caster
CAUTION:
As with any vehicle, the
wheels and tires should be
checked periodically for
cracks and wear, and should
be replaced.
1. Remove the bolt, spacers and locknuts that secure the
front caster to the fork.
2. Install the new front caster onto the wheelchair and
replace the bolt, spacer and locknuts as before.
3. Repeat STEPS 1-2 for the other front caster if
necessary.
AMG Medical Inc • www.amgmedical.com
AIRGO™ OWNER’S MANUAL
SEAT-TO-FLOOR HEIGHT
24
WARNING:
After ANY adjustments,
repair or service and
BEFORE use, make sure all
attaching hardware is
tightened securely - otherwise
injury or damage may result.
Changing seat-to-floor height
NOTE – The manufacturer
recommends that the
following procedure be
performed by an authorized
dealer or by a qualified
technician.
1. Remove the rear wheels from the wheelchair. Refer to
REMOVING/INSTALING THE REAR WHEELS in
the “REAR WHEELS” section of this manual.
2. Remove the front casters from the wheelchair. Refer to
INSTALLING/REPLACING FRONT CASTERS AND
FORKS in the “FRONT CASTERS” section of this
manual.
3a. To obtain a 17 3/4” seat-to-floor height, mount the
front caster at the TOP position and the mount the 24”
rear wheel also at the TOP position.
3b. To obtain a 19 3/4” seat-to-floor height, mount the
front caster at the BOTTOM position and the mount the
24” rear wheel also at the BOTTOM position.
4. Reinstall the front casters onto the wheelchair. Refer to
INSTALLING/REPLACING FRONT CASTERS AND
FORKS in the “FRONT CASTERS” section of this
manual.
5. Reinstall the rear wheels onto the wheelchair. Refer to
REMOVING/INSTALLING THE REAR WHEELS in
the “REAR WHEELS” section of this manual.
6. Adjust anti-tippers according to NEW seat-to-floor
height. Refer to ADJUSTING ANTI-TIPPERS
HEIGHT in the “ANTI-TIPPERS” section of this
manual (next page).
WARNING:
When changing the seat-tofloor height, the height of the
anti-tippers must be adjusted
accordingly.
AMG Medical Inc • www.amgmedical.com
AIRGO™ OWNER’S MANUAL
ANTI-TIPPERS
WARNING:
After ANY adjustments,
repair or service and
BEFORE use, make sure all
attaching hardware is
tightened securely - otherwise
injury or damage may result.
Anti-tippers MUST be fully
engaged.
25
NOTE – Anti-tippers are strongly recommended as an
additional safeguard for the wheelchair user.
Installing anti-tippers
PLUG
LOCATION
WARNING:
Ensure that the release button
of the anti-tipper fully
protrudes out of the hole on
the bottom of the wheelchair
frame. Ensure both antitippers are adjusted to the
same height.
1. Remove plug (not shown) from the end of rear frame
tubing.
2. Press the release button in and insert the anti-tippers
with the anti-tipper wheels pointing toward the
ground/floor into the rear frame tubing until the release
button locks in place.
3. Measure the distance between the bottom of the antitipper wheels and the ground/floor.
NOTE: A 1-1/2 to 2- inch clearance between the bottom
of the anti-tipper wheels and the ground/floor MUST be
maintained at all times.
4. If the distance between the bottom of anti-tipper wheels
and the ground/floor is not 1-1/2 to 2-inches, adjust
anti-tippers (see below).
Adjusting anti-tippers height
1. Press the release adjustment buttons on the wheeled
portion of the anti-tipper and slide it up or down to
achieve the 1-1/2 to 2-inches clearance.
2. Check to make sure that the release buttons are fully
engaged in adjustment holes.
AMG Medical Inc • www.amgmedical.com
AIRGO™ OWNER’S MANUAL
WHEEL LOCKS
WARNING:
After ANY adjustments,
repair or service and
BEFORE use, make sure all
attaching hardware is
tightened securely - otherwise
injury or damage may result.
26
NOTE – Before adjusting or replacing the wheel-lock subassemblies, ensure that the pneumatic tires are inflated to
the recommended 45 – 50 PSI (3.1 – 3.4 atm) on the
sidewall of the tire.
1/4” - 13/32”
(6.4 - 10.3 mm)
1. Ensure the wheel-lock is in the open (unlocked)
position.
2. Loosen the bolt and locknut that secure the wheel-lock
to the wheelchair frame.
3. Adjust the position of wheel-lock until the
measurement between the rear wheel and the wheellock shoe is between 1/4 and 13/32 inches.
4. Securely tighten the bolt and locknut.
5. Engage the wheel-lock and push against the wheelchair
to determine if wheel-lock engages the wheel-lock shoe
enough to hold the wheelchair.
6. Repeat the above procedures until the wheel-lock holds
the wheelchair.
AMG Medical Inc • www.amgmedical.com
AIRGO™ OWNER’S MANUAL
LIMITED WARRANTY
27
Warranty period. Three year warranty on the side frame
and "X" brace of the wheelchairs. Six month warranty is
offered on all other metal parts. Upholstery, plastic, and
rubber parts are warranted for three months. The warranty
period for the consumer begins on the date of purchase
from the dealer. If the product is not sold to the consumer,
but is rented, etc., the warranty period commences on the
invoice date.
Limitations: This warranty covers only defects in material
and workmanship. Products subjected to improper
maintenance, improper transport, negligence, abuse or
misuse are not covered by this warranty. If the serial
number is removed or defaced, the wheelchair will not be
covered by this warranty. If the wheelchair has been
structurally altered or equipped with parts not distributed
by AMG Medical Inc., the wheelchair will not be covered
by this warranty.
This warranty applies only to the original purchaser. If you
want to claim warranty service, contact the store where you
purchased the chair, who will notify AMG, to determine the
proper course of action to take, or call 1-800-363-2381. All
products shipped to AMG for warranty service must have
prior authorization from AMG Medical Inc..
Please ensure you provide us with the following
information when you call:
Date of Purchase:____________
Serial Number (located on crossbrace) :________________
Once you have a return authorization number, the unit
should be shipped prepaid to:
AMG Medical Inc., 8505 Dalton, Montreal, QC H4T 1V5
Include a copy of the original bill of sale and a money order
of $10.00 to cover cost of insurance and return
transportation.
AMG Medical Inc • www.amgmedical.com
AMG Medical Inc.
Montreal, QC H4T 1V5
www.amgmedical.com
REV. 2 0104
MONTREAL