1
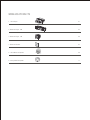
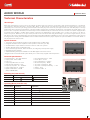
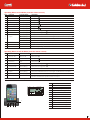
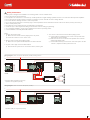
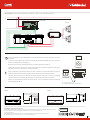
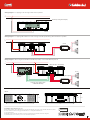
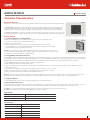
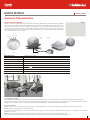
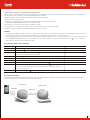
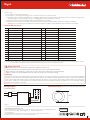
WIRELESS PRODUCTS 1. I-Dock Player 01 2. Bluetooth Player - 8M 03 3. Bluetooth Player - 2M 05 4. Bluetooth Receiver 07 5. I-Rock Bluetooth Speaker 09 6. Galaxy RGB LED Speaker 11 ILLUMINATING IDEAS S W I T C H E S & S Y S T E M S AUDIO WORLD Instruction Sheet Technical Characteristics i-Dock Player Music has myriad effects on your mood. It can energize as well as calm your senses. It can provide a deep emotional experience; it can distract your mind from unpleasant thoughts or provide solace. Music is without doubt, the single most effective way to connect with your mood. The I-Dock Player from Curve lets you charge your iPhone/iPod as well as play music stored on your Apple devices and other MP3 players. The high quality finish and contemporary appearance of the I-Dock Player ensures that your iPhone and iPod have a permanent and stylish place in your home or office. Compact in dimension, the I-Dock Player can be installed directly into a flush box with Curve modular cover plates. Equipped with an in-built stereo amplifier, it enables direct speaker connection. An additional line output enables you to connect your music to any Hi-Fi or multi-room systems. While the 3.5 mm jack socket provided on the unit ensures that along with listening to your music on Apple devices, you can also listen to the music on any MP3 player. The I-Dock Player along with the Bluetooth FM Player is part of the Curve Audio World* system that can be integrated into existing electrical installations and combined with external music players. Explore the options available in Curve Audio World* to truly experience the world of music. Special Features: • • • • • • • The system can be installed in a flush box with standard Curve modular plates. Designed with built-in stereo amplifier for direct speaker connection (up to 3W). An additional line output enables connection to Hi-Fi or multi-room systems. A built-in infrared sensor provides IR control. The connected Apple devices, iPhone and iPod, are charged by internal power supply. Retrofitting is quick & simple. Additional analog AUX input is available for other MP3 players and music sources. 104281 *Integration with Curve Audio World system allows you to create a truly magical musical experience. Technical Specifications • • • • • • • • Power SupplyAc : 100~240V 50/60 Hz Output power : 4W X 2 RMS Load : 4 S Output impedance line out : 32 S Total Harmonic Distortion : 0.6% Frequency response : 30 ~ 20000Hz Output voltage line out : 1000mV Signal to Noise Ratio: ≥60dB (1KHz, A-WEIGHTED) • • • • • • • • Input impedance line in : 10K S Line-In Input : 3.5 mm Input voltage line in : 1000mV IR sensor frequency : 38kHz AC power consumption : 22W AC power consumption Standby : ≥ 1W Weight : 155 g Protection Class : II 104280 Switching On (from the unit) Function Operation Turn on Long press for 2 seconds Light on Turn off Long press for 2 seconds Light off LED indicator Operating Music (from the unit) Current status Function Operation Music playing Pause Short press, Music pause Play Short press, Music playing Volume up Short press or long press + button Music playing Volume down Short press or long press – button Music playing Switch on speaker output Short press S/L button; S button light on indicates speaker output Music playing Switch on line output Short press S/L button; L button light indicates line out output Music playing Switch on both speaker Short press S/L button, S and L buttons on at the same time & line output indicates simultaneous speaker and line out output 01 ILLUMINATING IDEAS S W I T C H E S & S Y S T E M S Operating Music in iPod Mode (from the remote control) Key Function Current status Operation 4 Turn on / off Turn on / off Short press 1 Pause Music playing Short press 1 Play Music paused Short press 2 Previous song Music playing Short press 6 Next song Music playing Short press 2 Fast rewind Music playing Long press 6 Fast forward Music playing Long press 5 Volume up Music playing Short press or long press 7 Volume down Music playing Short press or long press 3 Switch audio Music playing Short press SOURCE button; S button light on indicates speaker output 3 output Music playing Short press SOURCE button; L button light on indicates line out output Music playing Short press SOURCE button, S/L button lights on at the same time 3 indicates speaker and line out output 8 Menu Short press MENU button to return to previous menu and then Music playing press button or menu Finally press button to move the cursor to select button to confirm. Operating Music in AUX IN Mode (from the remote control) Key Function Current status Operation 4 Turn on / off Turn on / off Short press 1 Mute Sound on Short press 1 Sound on Mute Short press 5 Volume up Music playing Short press or long press 7 Volume down Music playing Short press or long press 3 Switch audio Music playing Short press SOURCE button; S button light on indicates speaker output 3 output Music playing Short press SOURCE button; L button light on indicates line out output Music playing Short press SOURCE button; S and L button lights on at the same time 3 indicates simultaneous speaker and line out output Note : Forward, Rewind & Menu keys will not work when the unit is connected to AUX IN (3.5mm jack) Cu ve 104281 Supply Voltage : 110-240 V~ 50Hz Aux in Function : 3.5 mm Inbuilt Stereo Amplifier : 2 x 5W, 4 Charging Output : 5V=1000 mAh Charger Function : ipod & iphone 6 mm SPEAKER REGD. DEGN L 7 6 N 8 UP + LINE OUT LEFT RIGHT _ 9 _ + LEFT RIGHT _ + _ 10 1 AUX IN (3.5 mm) 2 Volume down 3 Volume up 4 Power on / off, pause / play 5 S/L button. Switching audio + output (line out / speaker) 6 iPod / iPhone connector 7 Live 8 Neutral 9 Speaker connection (right / left channel) 10 1 2 3 4 5 Line out connection (right / left channel) 02 ILLUMINATING IDEAS S W I T C H E S & S Y S T E M S Safety Instructions • • • • • • • • • • • This system is designed for installation on mounting plates of Curve modular series. Do not exceed the rated power level. Use speaker out connectors for connection up to 3W speaker & for higher wattage speakers use line out connections with separate amplifiers. Do not expose the speaker to liquid, moisture or humidity to prevent internal circuit from being affected. Don't use abrasive cleaning solvents to clean the speaker. Do not expose the unit/I-Dock to extremely high or low temperatures as this will shorten the life of electronic devices, destroy the battery or distort certain plastic parts. Don't dispose of the speaker in a fire as it will result in an explosion. Avoid sun rays or direct light beam falling on the infrared receivers during programming. On completing installation, power up the appliance and check its operating status. Can be installed on normally flammable surfaces. FAQs 1. System cannot play music. a) Make sure the current status is playing music not pause; b) Ensure the volume is not too low or mute. 4. The remote control doesn't function when playing music. a) Ensure that the signal light of the remote control points at the LED indicator of the speaker; b) Make sure the remote control and the speaker are in effective working and angle range; c) Ensure that the battery of the remote control has power. In case it doesn’t, replace the battery with a new one. 2. Remote does not work when playing music. a) Make sure the speaker and iPod/iPhone are well connected. 3. System cannot play music from iPhone/iPod a) Ensure that the system is not connected to line in (3.5mm) jack Wiring Diagram / When connected to 2M speaker (102306) & ceiling speaker * L N Cu ve Cu ve Load Rating : 3W Impedance : 4 102306 104281 Supply Voltage : 110-240 V~ 50Hz Aux in Function : 3.5 mm Inbuilt Stereo Amplifier : 2 x 5W, 4 Charging Output : 5V=1000 mAh Charger Function : ipod & iphone Cu ve 6 mm SPEAKER REGD. DEGN Load Rating : 3W Impedance : 4 LINE OUT LEFT RIGHT 102306 LEFT RIGHT UP UP REGD. DEGN L N UP + _ _ + _ _ + + REGD. DEGN 102306 Amplifier TRE BAS VOL * Speakers (2M), Amplifier & Hi-Fi 2 way speakers are supplied separately Wiring Diagram / When connected to 2M speaker (102306) * L N Cu ve Cu ve Load Rating : 3W Impedance : 4 102306 104281 Supply Voltage : 110-240 V~ 50Hz Aux in Function : 3.5 mm Inbuilt Stereo Amplifier : 2 x 5W, 4 Charging Output : 5V=1000 mAh Charger Function : ipod & iphone Cu ve 6 mm SPEAKER REGD. DEGN Load Rating : 3W Impedance : 4 LINE OUT LEFT RIGHT REGD. DEGN 102306 LEFT RIGHT UP UP L N UP + _ _ + _ + _ + REGD. DEGN 102306 * Speakers (2M) are supplied separately 03 ILLUMINATING IDEAS S W I T C H E S & S Y S T E M S Wiring Diagram / When integrated with Bluetooth FM Player (8M) - Curve Audio World System ® L N I-Dock Player Cu ve 6 mm SPEAKER REGD. DEGN N _ + UP LINE OUT LEFT RIGHT L 101311 104281 Supply Voltage : 110-240 V~ 50Hz Aux in Function : 3.5 mm Inbuilt Stereo Amplifier : 2 x 5W, 4 Charging Output : 5V=1000 mAh Charger Function : ipod & iphone _ + LEFT RIGHT _ + _ + To line in of Bluetooth FM Player 101320 Amplifier TRE LINE OUT RIGHT LEFT + + _ _ LEFT + + _ _ LINE IN RIGHT BAS VOL Connection Only the iPod/iPhone series listed within technical specifications can be charged via the Dock Connector. Control / operate the iPod / iPhone devices exclusively via the APPLE REMOTE control. The unit is inserted vertically into the charging tray. Restrictive functions are possible depending on the iPod / iPhone generations. A Other audio sources can only be connected for playing via a separate cable with a 3.5mm jack plug (line-out) at the socket (line-in) located on the side. Apple, the Apple logo, iPod, iPad classic, iPod nano and iPod touch are trademarks of Apple Inc. which are registered in the USA and other countries. iPhone is a trademark of Apple Inc. “Made for iPod” means that an electronic accessory has been designed to connect specifically to iPod and has been certified by the developer to meet Apple performance standards. _ VOL + S L AUX IN B Apple is not responsible for the function of this device or for its compliance with safety standards and regulative standards. A = Dock connector B = MP3 Player, 3.5mm external Line in Dimensions (mm) Elevation and side view show the over all dimensions and flush depth 104281 104280 111.6 mm 111.6 mm 38 mm 38 mm _ VOL + S ON/OFF L AUX IN _ VOL GOLDMEDAL ELECTRICALS PVT. LTD. 22/23, Shubh Building, Sagar Manthan Ind. Complex, Bhoidapada, Vasai (E), Thane-401208, Maharashtra, India. For more details, email us at [email protected] www.goldmedalindia.com © Copyright 2003 by Goldmedal Unless otherwise specified, the products illustrated in this Leaflet have been designed by Goldmedal and are covered by one or more international patents. AUX IN + Customer Care Toll Free No. 1800 209 0234 X F 04 ILLUMINATING IDEAS S W I T C H E S & S Y S T E M S AUDIO WORLD Instruction Sheet Technical Characteristics Bluetooth Player with FM Radio - 8M Simple to use and completely wire-free, Bluetooth technology enables you to transfer data between compatible devices. The Bluetooth Player with FM Radio is part of Goldmedal's Audio World system that harnesses the power and beauty of this technology to make music an integral part of your life! Compact in dimension, the player can be installed directly into a flush box with Curve modular cover plates. Once installed, you can listen to the music from your iPhone or any Bluetooth-enabled device, including cell phones. A 3.5 mm jack socket provided on the unit ensures that apart from Bluetooth devices, you can also listen to the music on any other music system. The device is equipped with in-built high quality stereo speakers while an additional line output enables you to connect your music to any Hi-Fi or multi-room systems. The device is also an extremely efficient FM player! So listening to your favourite music channels becomes both a pleasure and a convenience. The Bluetooth Player with FM along with the I Dock Player is part of the Curve Audio World system. Explore the options available in Curve Audio world to truly experience the magic of music. Special Features • The system can be installed in a flush box with standard Curve modular plates. • It is equipped with in-built stereo speakers. • An additional line output enables connection to Hi-Fi or multi-room systems. • You can listen to FM radio or music from any Bluetooth-enabled MP3 device including iPhones and other cell phones. • Retrofitting is quick and simple. • An analog AUX input (3.5mm jack) is available for other MP3 players and music sources. • Line-in connection at the back allows you to connect the player with other external music systems. Integration with Curve Audio World system opens up interesting possibilities. 108274 Technical Specifications Type Bluetooth Player Model 108274 Power supply Ac100~240V 50/60Hz Output power: 2.5W*2 RMS Load 4Ω Output impedance line out 32Ω Total Harmonic Distortion 0.6% Frequency response 30~18000Hz Output voltage line out 1000mV Signal to Noise Ratio ≥60dB (1KHz,A-WEIGHTED) Input impedance line in 10K Input voltage line in 1000mV Protection class Class II + _ FM L1 L2 AUX IN FM L1 L2 AUX IN Bluetooth FM L1 L2 (I) Switching to different modes Slide switch mode Function LED indicator Colour FM Connects to FM Purple L1 Connects to external music source through 3.5 mm jack Blue L2 Connects to external music sources from the back of the unit Red Bluetooth Connects to the paired Bluetooth device Blue (flashes) 05 ILLUMINATING IDEAS S W I T C H E S & S Y S T E M S (II) FM SETTINGS Settings for FM Mode Function Operation Turn on Long press for 2 seconds Light on Light off LED indicator Turn off Long press for 2 seconds Mute/cancel mute Short press button Volume up Short press or long press + button LED flashes when it is max Volume down Short press or long press – button LED flashes when it is minimum Auto scan and save all 1.Long press Red and Blue LED indicator will flash channels The Red and Blue LED will flash alternately. The device will search and or and together for 2 seconds at the same time. slowly save the channels in a whole frequency (it can store 16 channels at most). Note: Device will exit mode if the search fails after 1 minute. Select FM channel manually 1.Short press and at the same time 2.Short press or button. Frequency will go up or down 3.Short press button to confirm channel and exit Purple LED indicator will flash slowly Note: Device will exit mode if there is no operation in 10 seconds Select last stored channel Short press LED flashes once Select next stored channel Short press LED flashes once Search channel automatically Long press or LED flashes quickly Note: Make sure your device is switched to FM mode (use slide switch on the player). (III) AUX SETTINGS (L1 & L2) Operating Music in AUX IN Mode (for 3.5mm jack & line in from the back of the unit) Function Current status Operation Turn on / off Off / on Long press Mute Sound on Short press Sound on Mute Short press Volume up Music playing Short press or long press + Volume down Music playing Short press or long press – Note : Forward & Rewind keys will not work when the unit is in AUX IN mode (L1 & L2) (IV) BLUETOOTH SETTINGS A. Pairing with Bluetooth device Make sure the external music device (cell phone, Mp3 player, etc.) is Bluetooth-enabled. Specific pairing steps may vary for different devices. Please refer to the user manual of your Bluetooth music device for further information. The general pairing steps are as follows: 1. Make sure slide switch is in Bluetooth mode. Keep your external music device within 1 meter of the player when pairing. 2. Long press the button until the LED flashes Red and Blue with a double beep (Note: Please do not leave the button when the device emits a single beep before the double beep). The double beep indicates that the player is ready to pair with the external music device. If pairing doesn’t happen within 2 minutes, the device will exit the pairing mode. 3. Activate the Bluetooth function of the external music device and search for Bluetooth devices within range. Then select GOLDMEDAL008 from the list of devices shown. 4. Enter password or PIN No. as: “0000” 5. If prompted by the external music device to connect, select “Yes”. This will vary among devices. 6. After successful connecting, the LED will flash twice every 4 seconds Note: Once paired, there is no need to pair the device again. The Bluetooth player can remember up to 8 paired devices. B. Power on / Power off Function Current status of player Operation Power on Power off Long press about 3-4 seconds Power off Connected to external Bluetooth device Long press about 3-4 seconds Power on (Bluetooth device not connected) Long press about 3-4 seconds 06 ILLUMINATING IDEAS S W I T C H E S & S Y S T E M S C. Pairing and connection Function Device status Operation Enter pairing mode Power off Press for about 7-9 seconds until LED flashes with single beep and later with double beep. If pairing doesn’t happen within 2 minutes, the device will exit the pairing mode. Connect Power on Switch on previously paired external Bluetooth music device within operational distance Connect external Bletooth on, but not Short press Bluetooth music connected to external device if it was paired previously. device Bluetooth device Connect to paired External Bluetooth device is When device is back within operational distance, it will automatically connect to the paired Bluetooth device out of operational distance device. Note: The device should be back within 5 minutes else the device will exit the automatically again button. Player automatically connects to the external Bluetooth music pairing mode. Erase all pairings Power off Long press , + button for about 7-8 seconds, the Blue & Red LED flashes every 1.5 seconds D. Bluetooth Music Controls Function Device status Operation Volume up Playing music Short press or long press + button Volume down Playing music Short press or long press – button Previous song Playing music Short press button Next song Playing music Short press button Pause Playing music Short press button Play Pause music Short press button Stop Pause music Long press button E. Points to remember Pairing password 0000 Bluetooth 2.1 If the version of paired device is also Bluetooth 2.1, it needn't enter password during paired. Paired list It can remember 8 paired devices. Once paired, there is no need to pair the device again. No device connected If no device is connected for 30 minutes, the speaker will switch off to save power. Safety instructions Example of use • This system is designed for installation on Curve modular cover plates. • Do not exceed the rated power level. • Do not expose the player to liquid, moisture or humidity to ensure internal circuits are not affected. • Don't use abrasive cleaning solvents to clean the speaker. • Do not expose the unit to extremely high or low temperatures as this will shorten its life, destroy the battery or distort certain plastic parts. • Do not dispose the player in a fire as it may result in an explosion. • On completing installation, power up the appliance and check its operating status. • It can be installed on normally flammable surfaces. Safety instruction • Electrical equipment must be installed and fitted by a qualified electrician only. • The electronic switches are single pole switches and disconnect only one pole when they are OFF. • Before working on the appliance, to prevent electric shock, disconnect both the poles of the main supply. • Failure to observe any of the installation instruction may result in fire and other safety hazards. Warranty All electronic devices are warranted against manufacturing defects for two years from the date of purchase. In the event of defects, Goldmedal will repair or, at its discretion, replace the warranted product if delivered to a Goldmedal authorized dealer along with a duly stamped guarantee card or sales receipt that shows the date of purchase along with the serial no. of the product. This warranty excludes defects due to abnormal load, abuse, or failure to use the product in accordance with the instructions. Goldmedal shall not be liable for any other damages, whether incidental, consequential or otherwise. 07 ILLUMINATING IDEAS S W I T C H E S & S Y S T E M S Wiring Diagram - For playing music through in-built stereo speakers L N Antenna (for strong FM reception) Supply Voltage : 110-240 V~ 50Hz Inbuilt Stereo Speaker : 2 x 3W, 4 Bluetooth V2.1 FM Radio Function Aux in Function : 3.5 mm Cu ve 108274 REGD. DEGN 6 mm UP 108274 Wiring Diagram - For playing FM or Bluetooth music through external speaker along with in-built stereo speaker L N 101320 Amplifier TRE LINE OUT LEFT RIGHT LEFT + _ _ + + _ _ LINE IN RIGHT + BAS VOL 108274 Wiring Diagram - When integrated with Bluetooth FM Player (8M) - Curve Audio World System ® L N Bluetooth Player - 8M (108274) Cu ve 104281 Supply Voltage : 110-240 V~ 50Hz Aux in Function : 3.5 mm Inbuilt Stereo Amplifier : 2 x 5W, 4 Charging Output : 5V=1000 mAh Charger Function : ipod & iphone 6 mm _ _ + LEFT RIGHT _ + _ LINE IN + RIGHT + _ 101311 LINE OUT LEFT + _ RIGHT LEFT + + _ UP + N LINE OUT LEFT RIGHT L _ SPEAKER REGD. DEGN I-Dock Player (104281/ Antenna (For strong FM reception) Amplifier TRE BAS VOL From line out of I-Dock to line in of Bluetooth FM Player 101320 Dimensions (mm) Elevation and side view show the over all dimensions and flush depth 108274 + 55.5mm 51 mm 42 mm GOLDMEDAL ELECTRICALS PVT. LTD. 22/23, Shubh Building, Sagar Manthan Ind. Complex, Bhoidapada, Vasai (E), Thane-401208, Maharashtra, India. For more details, email us at [email protected] www.goldmedalindia.com © Copyright 2003 by Goldmedal Unless otherwise specified, the products illustrated in this Leaflet have been designed by Goldmedal and are covered by one or more international patents. + _ + 180mm _ RIGHT LEFT _ + LINE OUT LEFT RIGHT + LINE IN AUX IN _ _ FM L1 L2 180mm Customer Care Toll Free No. 1800 209 0234 X F 08 ILLUMINATING IDEAS S W I T C H E S & S Y S T E M S AUDIO WORLD Instruction Sheet Technical Characteristics Bluetooth Receiver Welcome to use this stereo Bluetooth receiver BTR001. Please read this user manual carefully before using it. 102207 1. About BTR001: BTR001 is a stereo Bluetooth receiver especially designed for i-Pod docking stations, it supports A2DP and AVRCP. You can use an i-Pod docking station for playing back any stereo Bluetoothenabled device's music after plugging in BTR001. Simple plug & play, no external power supply needed. 2. System requirements: The i-Pod docking station must have a 30 Pin i-Pod connector port. The i-Pod docking station needs to be able to charge i-Pod in order to supply BTR001 with power when it is plugged in. Getting started 1. Connecting BTR001 to a docking station Please connect BTR001 to your i-Pod docking station according to the following steps: 102550 1) Connect the docking station to standard AC power; 2) Turn on the docking station; 3) Select i-Pod as audio source (Please refer to the docking station's user's manual); 4) Connect BTR001 to the docking station's 30 Pin i-Pod Connector. BTR001's indicator light will start flashing when it is properly connected. Remark: You can use the receiver with battery-powered i-Pod docking stations. If the receiver is connected but the indicator light does not light as bright as usual, be advised to connect the i-Pod docking station to AC power instead of using batteries. 2. Pairing BTR001 with a Bluetooth device When BTR001's indicator light flashes after plugging it into the i-Pod docking station, it has already entered pairing mode. Now you can search with your Bluetooth device (e.g. Bluetooth transmitter or Bluetooth cell phone) for BTR001 and pair with it. Specific pairing steps may vary with different Bluetooth devices. Please refer to your Bluetooth device's user manual for further information. The general pairing steps are as follows: 1) Ensure BTR001 has entered pairing mode (the indicator light flashes). 2) Keep BTR001 and Bluetooth device within 1meter. 3) Turn on the Bluetooth device's Bluetooth function and search for Bluetooth device. After the search is completed, select “BTR001” from the Bluetooth device list. 4) According to the indication, enter password or PIN No: ”0000”, and press “Yes” or “confirm” 5) After successful pairing, select “BTR001” from Bluetooth device list and press “connect”. 6) After successful connecting, the indicator light of BTR001 will be on. Remark: When the indicator light is on, BTR001 is connected to a Bluetooth device. If you want to pair it with other devices, please switch off the Bluetooth function of the last connected devices first and pair BTR001 with the new device according to steps 1~6 mentioned above. 3. Turning off BTR001 To turn off BTR001 all you need to do is simply unplugging it from the docking station. 4. Music playback and control After BTR001 and your Bluetooth device connected successfully, the music will be transmitted to the docking station. You can remotely control the pause, play, last song and next song functions on the docking station or with its remote control if the following two conditions are met: Condition 1: The i-Pod docking station has the function to remotely control pause, play, last song and next song. Condition 2: The Bluetooth device paired with BTR001 also supports AVRCP. LED indicator LED indicator Status of BTR001 Blue LED flashes quickly Pairing mode or not connected to a Bluetooth device Blue LED is on Already connected to a Bluetooth device Specifications Bluetooth version Bluetooth V2.1 Bluetooth profiles A2DP and AVRCP Bluetooth frequency range 2.4GHZ-2.4835GHZ Effective range 10 meters Class II Dimensions 36×32.5×6mm Weight 6.5g 09 ILLUMINATING IDEAS S W I T C H E S & S Y S T E M S Care and maintenance Please Read the following recommendations before using SB2008. Following these you will be able to enjoy our product for many years. Keep it dry and don't take it to damp places to avoid the product's internal circuit being affected. • Keep the product away from direct sunlight or hot places. • High temperatures will shorten the life of electronic devices, destroy the battery or distort certain plastic parts. • Don't expose the product to cold areas. It may damage the internal circuit board. • Don't try to disassemble the product as it may get damaged if you are not professional. • Don't let it fall down onto the floor or other hard surfaces. The internal circuit might get damaged. • Don't use intensive chemical products or detergent to clean the product. • Don't scratch the surface with sharp things. • In case the product doesn't function properly, send it to the store you bought it. The staff will help you to solve the problem. FAQs 1. What to do when BTR001 can't be turned on after plugging it into the docking station (the indicator light is not bright)? a) Ensure the docking station can charge i-Pods; b) Make sure you have connected the docking station to the AC power outlet. 2. What to do when BTR001 can't pair and connect to a Bluetooth device? a) Ensure the Bluetooth device supports A2DP; b) Make sure the Bluetooth device is placed within 5 meters; c) Ensure BTR001 has entered pairing mode (the indicator light flashes). Notes : 1. This device complies with Part 15 of the FCC Rules. Operation is subject to the following two conditions: (1) this device may not cause harmful interference, and (2) this device must accept any interference received, including interference that may cause undesired operation. 2. Changes or modifications not expressly approved by the party responsible for compliance could void the user's authority to operate the equipment. Safety instruction • Electrical equipment must be installed and fitted by a qualified electrician only. • The electronic switches are single pole switches and disconnect only one pole when they are OFF. • Before working on the appliance, to prevent electric shock, disconnect both the poles of the main supply. • Failure to observe any of the installation instructions may result in fire and other safety hazards. Warranty All electronic devices are warranted against manufacturing defects for two years from the date of purchase. In the event of defects, Goldmedal will repair or, at its discretion, replace the warranted product if delivered to a Goldmedal authorized dealer along with a duly stamped guarantee card or sales receipt that shows the date of purchase along with the serial no. of the product. This warranty excludes defects due to abnormal load, abuse or failure to use the product in accordance with the instructions. Goldmedal shall not be liable for any other damages, whether incidental, consequential or otherwise. GOLDMEDAL ELECTRICALS PVT. LTD. 22/23, Shubh Building, Sagar Manthan Ind. Complex, Bhoidapada, Vasai (E), Thane-401208, Maharashtra, India. For more details, email us at [email protected] www.goldmedalindia.com © Copyright 2003 by Goldmedal Unless otherwise specified, the products illustrated in this Leaflet have been designed by Goldmedal and are covered by one or more international patents. Customer Care Toll Free No. 1800 209 0234 X F 10 ILLUMINATING IDEAS S W I T C H E S & S Y S T E M S AUDIO WORLD Instruction Sheet Technical Characteristics I-Rock Bluetooth Speaker Simple to use and completely wire-free, Bluetooth technology enables transfer of data between compatible devices. The I-Rock Bluetooth Speaker from Goldmedal is a marvelous example of using this technology to bring the magic of music into your life. Stylish, extremely easy to use and packed with enough power to fill a decent-sized room with pulsating sound, the I-Rock Bluetooth Speaker will occupy pride of place in your home. We congratulate you on buying this speaker and welcome you to read the instructions that will help you enjoy this device to the maximum. ON/OFF P 102207 VOL - VOL + 3.5mm Line-in 101351 Charging Jack Power Supply Specifications Bluetooth version Bluetooth V2.1+EDR Bluetooth profiles A2DP and AVRCP Bluetooth frequency range 2.40GHz-2.480GHz Operating distance 10 meters, class II Working time One speaker: About 16 hours Charging time About 3 hours Charging input DC 12V Dimensions Speaker diameter: 137.5mm Weight Speaker: 725.5g Two speakers used together: About 8 hours 1.5A Charging dock: 201.4×198.4×69.7mm Charging dock: 238.2g Example of use (I) Charging the speaker The I-Rock Bluetooth Speaker comes with an in-built rechargeable battery. It is recommended that you charge the battery fully before using it for the first time. To charge, connect the 12V power source to the charging jack and put the speaker on the charging dock. The Red LED will be on while charging. It takes about 3 hours to charge the battery fully. When charging is completed, the Red LED switches off. Points to remember 1)When the device is on and the battery becomes low, the Red LED flashes once and the speaker emits “Ding-Ding” tones every 30 seconds. Please recharge the battery fully as described above. 2) The battery will discharge if you don't use the speaker for a long time. In such a situation, it will take around 30 minutes of charging for the Red LED indicator to come on. 3)The battery is sealed inside. Please do not attempt to take the battery out on your own as it will damage the unit. 4)Batteries (battery pack or batteries installed) should not be exposed to excessive heat such as strong sunlight, fire, etc. 11 ILLUMINATING IDEAS S W I T C H E S & S Y S T E M S (II) Pairing with cell phone or other Bluetooth enabled devices Please make sure your cell phone is Bluetooth-enabled. Specific pairing steps may vary with different cell phones. Please refer to your cell phone's user manual for further information. The general pairing steps are as follows: 1) Keep the speaker and your Bluetooth cell phone within 1 meter when pairing 2) Enter the speaker's pairing mode 3) Activate your cell phone's Bluetooth function and search for Bluetooth devices within range. Then select “GOLDMEDAL007” from the list of devices shown 4) According to the indication, enter password or PIN No.: “0000” 5) If prompted by your cell phone to connect, select “Yes” (this will vary among cell phone models) 6) After successful connecting, the Blue LED will flash twice every 4 seconds. Remarks • The pairing mode will last 2 minutes. If no device is connected within 2 minutes, the speaker will return back to the not-paired mode. If you want to continue pairing, please turn off the speaker first and then try re-pairing according to steps 1 6 described above. • After pairing is successful, the speaker and your cell phone will remember each other. There’s no need to re-pair at next use. For some cell phones, such as SAMSUNG D900/I8320 and so on, if you want to pair the speaker with them, you have to simultaneously press and <P> buttons. In these cases, you’ll have to do the pairing every time. (III) Using one speaker (basic operation) Function Operation Power on Press and hold button for about 3 seconds and release it until the LED flashes Blue Blue LED flashes once every 1 second Power off Press and hold button for about 3 seconds and release it until you hear an indication tone Red LED is on for about 1 second LED Indicator Enter pairing mode Make sure the speaker is off. Press and hold button for about 5-6 seconds and release Red and blue LEDs flash alternately it until the Red and Blue LEDs flash alternately Short press Play / pause button once Volume adjustment Short or long press + button or – button Auto-connection Every time the speaker is turned on, it will connect to the last connected device automatically Manual connection Disconnect the 3.5mm jack from the device and short press the Cancel pairing list Make sure the speaker is off. Simultaneously press and hold the button once button and – button for about 6 seconds and release them until LED flashes purple. The speaker will cancel pairing and will then go off. Reset Simultaneously short press button and + button (IV) Using two speakers The speaker adopts advanced Bluetooth technology. When using two speakers together, the speaker connected with your cell phone becomes the left channel while the other speaker becomes the right channel. Left Channel Right Channel Bluetooth Bluetooth 12 ILLUMINATING IDEAS S W I T C H E S & S Y S T E M S Using two speakers ( basic operation) Function Operation Cell phone connects with one speaker Please refer to “Using one speaker” Two speakers connect with each other 1. Pause the music of the speaker connected with Bluetooth cell phone 2. Press and hold the P button of the speaker connected with the cell phone until the LED flashes Blue 3. Turn on the other speaker and press and hold the P button of this speaker until the LED flashes Blue 4. The two speakers will now be connected. Pause / play Short press button on any one of the two speakers Volume adjustment Short or long press + button or – button on any one of the two speakers Cell phone connects with the speaker again 1. Every time the speaker is turned on, it will connect to the last connected cell phone. 2. If it doesn’t connect to the cell phone, please short press button of the speaker once; the speaker will connect to the cell phone automatically. Two speakers connect with each other again 1. If a speaker has not been connected to a cell phone before, then every time it is turned on, it will connect to the speaker connected to a cell phone. 2. When two speakers don't connect with each other, please short press P button of one of two speakers. Points to remember • You can connect a speaker to another speaker only when the speaker connected to the cell phone is not playing music. • The pairing time of two speakers is 2 minutes, if they cannot pair with each other within 2 minutes, they will exit pairing mode. • For some Bluetooth cell phones, you may need to connect two speakers first, and then connect with cell phone. After the speaker successfully connects with the cell phone, it will try to connect to the other speaker. • If Bluetooth cell phone is connected to just one speaker, the speaker functions as a stereo. (V) Connecting to 3.5mm jack 3.5mm Line-in Line-in mode Function Operation Power on Plug 3.5mm audio cable and then press and hold Power off Press and hold Volume adjustment Short or long press + button or – button button for about 3 seconds and release it until Blue LED is on button for about 3 seconds and release it until Blue LED is off Switching to Line-in and Bluetooth Mode switch Operation Status of Speaker Bluetooth to Line-in Plug 3.5mm audio cable Line-in mode Line-in to Bluetooth Unplug 3.5mm audio cable Bluetooth is activated Points to remember: When the 3.5mm audio cable is plugged in, the Bluetooth function will not be available. When the 3.5mm audio cable is unplugged, Bluetooth function is available and the speaker will connect to the last connected device. But it will not play music automatically; you need to operate the device. If the speaker cannot connect to the cell phone via Bluetooth within 10 minutes, it will turn off automatically in order to save power. (VI) LED indicator a. When the speaker is in charging mode LED indicator Status of Speaker Red LED is on Charging in progress Red LED is off Charging completed 13 ILLUMINATING IDEAS S W I T C H E S & S Y S T E M S b. When the Speaker is in Bluetooth mode LED indicator Operation or status LED flashes Red and Blue alternately Pairing mode LED flashes Blue Two speakers are pairing LED flashes Blue once every 1 second Not connected with any devices LED flashes Blue twice every 4 seconds Cell phone connected with one speaker LED flashes Blue twice every 4 seconds Two speakers connected LED flashes Blue three times every 4 seconds Cell phone connected with two speakers c. When the speaker is in 3.5mm Line-in mode Indication tone Operation Blue LED is on Plug 3.5mm audio cable Unchanged Play/pause d. Understanding Indication tone Indication tone Status of Speaker Emits “Ding-Ding” tone every 30 seconds Low power Remark: The speaker emits low power indication tone only under the Bluetooth mode (VII) Care and maintenance Read the following recommendations before using the I-Rock Bluetooth Speaker. Following these, you will be able to enjoy this product for many years. • Keep it dry and don't take it to damp places to avoid the product's internal circuit being affected. • Keep the product away from direct sunlight or hot places. High temperatures will shorten the life of electronic devices, destroy the battery or distort certain plastic parts. • Don't expose the product to cold areas. It may damage the internal circuit board. • Don't try to disassemble the product as it may get damaged if you are not a professional in this field. • Don't let it fall down onto the floor or other hard surfaces. The internal circuit might get damaged. • Don't use intensive chemical products or detergent to clean the product. • Don't scratch the surface with sharp things. • Please take out the batteries from the product if you don't use it for a long time. In case the product doesn't function properly, send it to the store you bought it from. The staff will help you to solve the problem. FAQs 1.What to do when the I-Rock Bluetooth Speaker can't pair with my cell phone? a) Make sure the speaker has entered pairing mode, b) Ensure the speaker is in the effective working range. 2.What to do when two speakers can't pair with each other? a) Ensure two speakers are in pairing mode and in effective working range, b) Make sure the speaker connected with cell phone is not playing music. 3. How far is the effective range between two speakers? a) The effective range is 10 meters. But it varies with different environments and paired cell phones. Notes: 1. This device complies with Part 15 of the FCC Rules. Operation is subject to the following two conditions: (1) this device may not cause harmful interference, and (2) this device must accept any interference received, including interference that may cause undesired operation. 2. Changes or modifications not expressly approved by the party responsible for compliance could void the user's authority to operate the equipment. GOLDMEDAL ELECTRICALS PVT. LTD. 22/23, Shubh Building, Sagar Manthan Ind. Complex, Bhoidapada, Vasai (E), Thane-401208, Maharashtra, India. For more details, email us at [email protected] www.goldmedalindia.com © Copyright 2003 by Goldmedal Unless otherwise specified, the products illustrated in this Leaflet have been designed by Goldmedal and are covered by one or more international patents. Customer Care Toll Free No. 1800 209 0234 X F 14 Ni on S W I T C H E S & S Y S T E M S AUDIO WORLD Instruction Sheet Technical Characteristics Galaxy RGB LED Speaker 2-way Hi-Fi design recessed speaker, ideal for music reproduction in villas, restaurants, lobbies, doctor’s offices / legal practices, The R 240 LED is fitted with a 166 mm woofer and coaxial tweeter arrangement. There are two variants available : The R 240 LED-8 is equipped with a 230V power supply, a wireless radio receiver and a RGB-LED controller. The white glass screen can be brought thus in different colors to shining. The color processes is controlled via the radio remote control contained in the scope of supply. The “R 240 LED-8 Slave” is available with RGB LED’s and can only be operated in connection with one “R 240 LED-8 Controller”. Max 9 “Slaves” can be operated with one “Controller”. Technical Data R 240-8 LED Controller R 240-8 LED Slave Load Rating / Music Power 40/50 W 40/50 W Impedance 8 Ohm 8 Ohm SPL 1W/1m 89 dB 89 dB SPL PNenn/1m 105 dB 105 dB SPL PNenn/1m/f 111 dB/15 kHz 111 dB/15 kHz Frequency Range (-3 dB) 100 - 20000 Hz 100 - 20000 Hz Frequency Range (-10 dB) 50-22000 Hz 50-22000 Hz Transmission Angle 1/2/4/8 kHz (-6 dB) 180/-/90/40° 180/-/90/40° Component Set 1x PM 166/2 FW, 110-230V-power supply, 1x PM 166/2 FW, RGB-LEDs 103244 controlling with eadio receiver, RGB-LEDs Material baffle : plastic, grille : metal, frame : white- baffle : plastic, surface housing,grille : metal, glass frame : white-glass Cut Out Ø 214 mm Ø 214 mm Depth 120 76 Net Weight 3 kg 2.8 kg Colors white glass, grille white, change of colours white glass, grille white, change of colours adjustable by remote control. adjustable by remote control. Accessories AG R 240 : surface housing, flush housing company Kaiser 1. Technical Parameters(remote control) : a) Power supply : AAA battery * 3pcs b) Cover material : ABS c) Fabrication processing : multi-colour printing & UV varnish 2. Technical Parameters(controller) : a) Working voltage : DC12V/24V (optional b) Output control : 3 circuits (R/G/B) c) Control current : 6A/circuit d) Connecting method : common anode e) Dimension : L85*W64*H24 f) Receiving range : 20meters 3. Functions of Keys a) Key 1 : on/off b) Key 2 : light changing mode(15 modes) c) Key 3 : color light/white light switching mode d) Key 4 : turn up(brightness/speed) e) Key 5 : turn down(brightness/speed) 15 Ni on S W I T C H E S & S Y S T E M S 4. How to use a) Press Key 1 to turn on/off in any state. b) Press Key 2 to activate light changing mode, a new mode each press,15 modes in total. c) Press Key 3 once to activate white light mode, changing brightness by pressing Key 4/Key 5. Press Key 3 twice to activate color light mode, changing brightness by pressing Key 4/Key 5 or changing light color by touching the color ring. d) Resume function. The previous settings will be resumed while power on again. e) Matching code Press Key 4 once within 3 seconds when power on again, the light will blink 3 times if matching is successful. Clearing Code : Press Key 4 five times within 3 seconds when power on again, the light will blink 6 times if clearing is successful. Feature chart for Key 2 1 Auto color changing 2 three colors jumps 8 grades of speed to adjust by to change pressing Key 4 or Key 5 8 grades of brightness to adjust by pressing Key 4 or Key 5. 9 seven colors jumps 3 10 three colors jumps to 11 seven colors jumps to 12 red color jumps to 8 grades of brightness to adjust by change pressing Key 4 or Key 5. Blue color jumps to 7 13 14 Cyan color jumps to white color jumps to Red/blue light twinkles 8 grades of speed to adjust by alternately pressing Key 4 or Key 5. Green/blue light twinkles alternately change 8 by pressing Key 4 or Key 5. Yellow color jumps to change gradual change 6 change change gradual change 5 8 grades of brightness to adjust change to change 4 Green color jumps to 15 Purple color jumps to Red/green light twinkles alternately change 5. Caution : Please don't touch or press the color ring while loading the batteries to protect the sensitiveness. Please use the remote controller 3 seconds after the batteries are loaded. Please reload the batteries when you find the color ring is not sensitive. Safety instruction • Electrical equipment must be installed and fitted by a qualified electrician only. • The electronic switches are single pole switches and disconnect only one pole when they are OFF. • Before working on the appliance, to prevent electric shock, disconnect both the poles of the main supply. • Failure to observe any of the installation instructions may result in fire and other safety hazards. Warranty All electronic devices are warranted against manufacturing defects for two years from the date of purchase. In the event of defects, Goldmedal will repair or, at its discretion, replace the warranted product if delivered to a Goldmedal authorized dealer along with a duly stamped guarantee card or sales receipt that shows the date of purchase along with the serial no. of the product. This warranty excludes defects due to abnormal load, abuse, or failure to use the product in accordance with the instructions. Goldmedal shall not be liable for any other damages, whether incidental, consequential or otherwise. Wiring Diagram Dimensions (mm) Side view shows overall dimensions & flush depth. 6. Connecting Chart AC + AC TO DC DC 12V POWER1 POWER2 + R G 240mm B 102114 GOLDMEDAL ELECTRICALS PVT. LTD. 22/23, Shubh Building, Sagar Manthan Ind. Complex, Bhoidapada, Vasai (E), Thane-401208, Maharashtra, India. For more details, email us at [email protected] www.goldmedalindia.com © Copyright 2003 by Goldmedal Unless otherwise specified, the products illustrated in this Leaflet have been designed by Goldmedal and are covered by one or more international patents. Customer Care Toll Free No. 1800 209 0234 X F 16