1
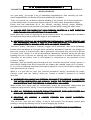
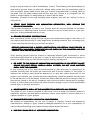
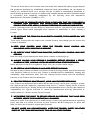
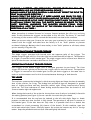
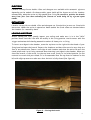
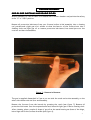
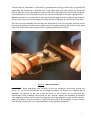
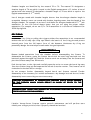
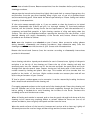
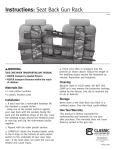
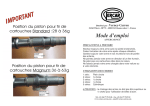
USER'S MANUAL
AZUR
Barrel
Hinge
pin
Barrel
lugs
Chamber
Top lever
Muzzle
Safety
Forearm
iron
Forearm
lug
Forearm
latch
Forearm
Receiver
Trigger
Buttstock
IT IS YOUR RESPONSABILITY
FAILURE TO HEED ANY OF THE FOLLOWING WARNINGS COULD RESULT IN SERIOUS
INJURY OR DEATH.
As a gun owner, you accept a set of demanding responsibilities. How seriously you take
these responsibilities can be the difference between life and death.
There is no excuse for careless or abusive handling of any firearm. At all times handle this
firearm and all other firearms with intense respect for their power and potential danger.
Please read and understand all of the cautions, warnings, notices, proper handling
procedures and instructions outlined in this owner’s manual before using your new firearm.
A. ALWAYS KEEP THE MUZZLE
MUZZLE OF YOUR FIREARM POINTED
POINTED IN A SAFE DIRECTION
DIRECTION
EVEN THOUGH YOU ARE CERTAIN IT IS UNLOADED.
UNLOADED.
Never point any firearm at anything you do not intend to shoot. Be extremely alert and aware
of all persons and property within the range of your ammunition.
B. NEVER RELY TOTALLY ON
ON YOUR FIREARM’S MECHANICAL
MECHANICAL “SAFETY” DEVICE.
DEVICE. LIKE
ANY MECHANICAL DEVICE,
DEVICE, A “SAFETY” CAN SOMETIMES
SOMETIMES FAIL; IT
IT CAN BE JARRED
OR INADVERTENTLY MANIPULATED
MANIPULATED INTO AN UNSAFE
UNSAFE CONDITION.
The word “safety” describes a firearm’s trigger block mechanism, sear block mechanism,
hammer block mechanism or firing pin block mechanism. Mechanical “safeties” are designed to
place your firearm in a safer status, and no guarantee can be made that the firearm will not
fire even if the “safety” is in the on safe position. Mechanical “safeties” merely aid safe gun
handling and are no excuse for pointing your firearm’s muzzle in an unsafe direction. See
“Operation of the Safety” later in this manual for instructions on the operation of this
firearm’s “safety.”
Remember, safe gun handling does not stop with your firearm’s mechanical “safety” devices, it
starts there. Always treat this firearm with the respect due a loaded, ready-to-fire firearm.
It is critical to read and understand the owner’s manual for every firearm which explains the
safe operation of the firearm.
While it is a good idea to “test” your firearm’s mechanical “safety” periodically for proper
function, never test the “safety” while your firearm is loaded or pointed in an unsafe
direction.
C. WHENEVER YOU HANDLE ANY FIREARM, OR HAND IT TO SOMEONE, ALWAYS
ALWAYS OPEN
THE ACTION IMMEDIATELY
IMMEDIATELY AND VISUALLY CHECK
CHECK THE FIREARM’S CHAMBERS
CHAMBERS TO
MAKE CERTAIN THAT THE
THE FIREARM IS COMPLETELY
COMPLETELY UNLOADED.
Make certain the firearm does not inadvertently contain any ammunition. Always keep the
chambers empty and the “safety” in the on safe position unless shooting is imminent.
D. KEEP ALL FIREARMS UNLOADED
UNLOADED DURING
DURING TRANSPORT, EVEN
EVEN WHEN STORED IN A
GUN CASE, SCABBARD OR
OR OTHER CONTAINER.
E. DROPPING OR JARRING A LOADED FIREARM CAN CAUSE ACCIDENTAL
DISCHARGE.
This can occur even with the “safety” in the on safe position. Be extremely careful while
hunting or during any shooting activity to avoid dropping any firearm.
F. HUNTING FROM ELEVATED
ELEVATED SURFACES SUCH AS TREESTANDS
TREESTANDS IS DANGEROUS.
DANGEROUS.
1
Doing so may increase the risk of mishandling a firearm. The following rules should always be
observed by you and those you hunt with. Always make certain that the stand being used is
safe and stable. Always make certain that your firearm is unloaded when it is being taken up
and down from the stand. Always make certain that your firearm is not dropped from the
stand, or dropped while it is being taken up or down from the stand.
Remember, a loaded firearm may discharge when dropped, even with the “safety” in the on
safe position.
G. STORE YOUR FIREARM AND
AND AMMUNITION SEPARATELY,
SEPARATELY, WELL BEYOND THE
THE
REACH OF CHILDREN.
Take prudent safeguards to ensure your firearm does not become available to untrained,
inexperienced or unwelcome hands. Store all firearms in secure, locked cases or a gun safe.
Keep your firearm unloaded when not in use.
H. BEWARE OF BARREL OBSTRUCTIONS.
OBSTRUCTIONS.
Mud, snow and an infinite variety of other objects may inadvertently lodge in a barrel bore. It
only takes a small obstruction to cause dangerously increased pressures that can damage your
firearm and cause serious injury to yourself and others.
BEFORE CHECKING FOR A BARREL OBSTRUCTION,
OBSTRUCTION, BE CERTAIN YOUR FIREARM
FIREARM IS
COMPLETELY UNLOADED, THERE ARE NO LIVE SHELLS
SHELLS IN THE CHAMBERS AND THE
“SAFETY” IS IN THE ON
ON SAFE POSITION.
After assuring yourself that the firearm is completely unloaded, open the breech or action
and look through the barrel to be sure it is clear of obstructions. If an obstruction is seen, no
matter how small it may be, clean the bore with a cleaning rod and patch.
I. BE ALERT TO THE SIGNS
SIGNS OF AMMUNITION MALFUNCTION.
MALFUNCTION. IF YOU DETECT
DETECT AN OFF
SOUND OR LIGHT RECOIL
RECOIL WHEN A SHELL IS FIR
FIRED, DO NOT LOAD ANOTHER
SHELL INTO THE CHAMBER.
CHAMBER.
If your firearm fails to fire, keep the muzzle pointed in a safe direction for a minimum of 30
seconds. Carefully open the action and remove the shell from the chamber. If the primer is
indented, the defective shell should be disposed of in a way that cannot cause harm. If the
primer is not indented, your firearm should be examined by a qualified gunsmith and the cause
of the malfunction corrected before further use. Glance down the barrel to make sure that no
obstructions remain in the barrel. Completely clear the barrel before loading and firing again.
Failure to follow these instructions can cause extensive damage to your firearm and possible
serious injury to yourself and others.
J. NEVER INSERT A SHELL OF THE
THE INCORRECT CALIBER INTO ANY FIREARM.
The caliber of your firearm is marked on the barrel. Store all shells of different calibers in
completely separate and well-marked containers. Never store shells of mixed calibers in a
common container or in your pockets.
K. EXAMINE EVERY SHELL YOU PUT IN YOUR
YOUR FIREARM.
We assume no responsibility for the use of unsafe or improper firearm and ammunition
combinations or damage or injury caused by damaged ammunition. It is your responsibility to
read and heed all warnings in this owner’s manual and on ammunition boxes.
L. USE ONLY SAAMI OR C.I.P. APPROVED AMMUNITION.
2
The barrel and action of this firearm have been made with substantial safety margins beyond
the pressures developed by established commercial loads. Nevertheless, we can assume no
liability for incidents which occur through the use of shells of nonstandard dimensions or
which develop pressures in excess of commercially available ammunition which has been loaded
in accordance with standards established by the Sporting Arms and Ammunition
Manufacturers’ Institute (SAAMI) or C.I.P.
M. MAKE SURE OF ADEQUATE
ADEQUATE VENTILATION IN THE AREA THAT YOU DISCHARGE
DISCHARGE A
FIREARM. LEAD EXPOSURE
EXPOSURE CAN OCCUR FROM DISCHARGING
DISCHARGING FIREARMS IN
IN
POORLY VENTILATED AREAS,
AREAS, CLEANING FIREARMS
FIREARMS OR HANDLING AMMUNITION.
AMMUNITION.
Lead is a substance that has been known to cause birth defects, reproductive harm and other
serious injury. Wash hands thoroughly after exposure to ammunition or after cleaning a
firearm.
N. DO NOT SNAP THE FIRING
FIRING PIN ON AN EMPTY CHAMBER;
CHAMBER; THE CHAMBER MAY NOT
BE EMPTY!
Treat every firearm with the respect due a loaded firearm, even though you are certain the
firearm is unloaded.
O. KEEP YOUR FINGERS AWAY
AWAY FROM THE TRIGGER WHILE LOADING AND
UNLOADING UNTIL SHOOTING
SHOOTING IS IMMINENT.
P. BE SURE OF YOUR TARGET
TARGET AND BACKSTOP, PARTICULARLY
PARTICULARLY DURING LOW LIGHT
PERIODS.
Know the range of your ammunition. Never shoot at water or hard objects.
Q. ALWAYS UNLOAD YOUR FIREARM’S
FIREARM’S CHAMBERS BEFORE
BEFORE CROSSING A FENCE,
FENCE,
CLIMBING A TREE, JUMPING
JUMPING A DITCH OR NEGOTIATING
NEGOTIATING OTHER OBSTACLES.
Never place your firearm on or against a fence, tree, car or other similar object.
R. BE CERTAIN YOUR FIREARM
FIREARM IS UNLOADED BEFORE
BEFORE CLEANING.
Because so many firearm accidents occur when a firearm is being cleaned, special and extreme
care should be taken to be sure your firearm is unloaded before disassembly, cleaning and
reassembly. Keep ammunition away from the cleaning location. Never test the mechanical
function of any firearm with live ammunition.
S. PRACTICE PERIODIC MAINTENANCE,
MAINTENANCE, AVOID UNAUTHORIZED
UNAUTHORIZED SERVICING.
Your firearm is a mechanical device which will not last forever, and as such, is subject to wear
and requires periodic inspection, adjustment and service. L'Atelier Verney-Carron firearms
should be serviced by a L'Atelier Verney-Carron Recommended Service Facility. We assume no
responsibility for injuries suffered or caused by unauthorized servicing, alterations or
modifications of L'Atelier Verney-Carron firearms.
T. WE RESERVE THE RIGHT TO REFUSE SERVICE ON FIREARMS THAT HAVE BEEN
BEEN
ALTERED, ADDED TO OR SUBSTANTIALLY
SUBSTANTIALLY CHANGED.
Removal of metal from the barrel, or modifications of the firing mechanism and/or operating
parts, may lead to a refusal of service on such firearms. We will charge you for parts and
labor to return the firearm to original specifications.
DO NOT, UNDER ANY CIRCUMSTANCES,
CIRCUMSTANCES, ALTER THE
THE TRIGGER, SAFETY OR
OR OTHER
PARTS OF THE FIRING MECHANISM OF THIS OR ANY OTHER FIREARM.
3
THE WARNINGS AND ADVICE GIVEN IN THIS
MANUAL ARE FOR YOUR PROTECTION AS WELL
AS THE SAFETY OF OTHERS. DISREGARDING
INFORMATION IN THIS MANUAL MAY RESULT IN
SERIOUS INJURY OR DEATH.
GENERAL SPECIFICATIONS
L’Atelier Verney-Carron Azur model double rifles and shotguns are two barreled firearms
with the barrels aligned side by side with the sighting rib positioned between the barrels,
and are typically equipped with two triggers each of which correspond to its respective
barrel.
OPERATION OF THE DOUBLE RIFLE “SAFETY” MECHANISM
The double rifle safety mechanism is located on the tang of the receiver assembly just in
front of the buttstock on the top side (see figure 5).
The firearm is in the “Safe” position when the safety is moved fully rearward and the letter
“S” appears on the receiver tang directly in front of the safety. In this position sear
engagement is blocked to prevent discharge under non-firing conditions.
Figure 5 – Azur safety mechanism
4
WARNING ! SAFETIES ARE MECHANICAL DEVICES THAT MAY FAIL OR
MALFUNCTION LIKE ANY OTHER MECHANICAL DEVICE !
ALWAYS HANDLE THE RIFLE CAREFULLY AND DO NOT PERMIT THE RIFLE TO
POINT
POINT IN AN UNSAFE DIRECTION !
ALWAYS TREAT THE RIFLE AS IF IT WERE LOADED AND READY TO FIRE !
ALWAYS OBSERVE SAFETY RULES WHEN HANDLING THE RIFLE ! THE SAFETY
SHOULD ALWAYS BE IN THE “SAFE” POSITION EXCEPT WHEN THE SHOOTER
IS ACTUALLY FIRING THE GUN. THE SAFETY
SAFETY SHOULD BE MOVED TO THE
“SAFE” POSITION,
POSITION, WHENEVER THE SHOOTER CEASES FIRING, EVEN
TEMPORARILY. KEEP THE MUZZLE OF THE FIREARM POINTED IN A SAFE
DIRECTION AT ALL TIMES !
When the safety is indexed forward to its most forward position the rifle is in its firing
mode. In this condition the triggers can be pulled to fire the rifle. The letter “S” inscribed
on the tang of the receiver will be covered and obscured from view in this condition.
When you are not using your firearm, be sure your gun is pointed in a safe direction, avoid
contact with the trigger and make sure the safety is in its “Safe” position to prevent
accidental discharge. Maintain the firearm safety in the “Safe” position at all times, unless
you are actually firing the rifle.
OPERATION OF SINGLE
SINGLE TRIGGER FIREARM
The single trigger operates both barrels with two separate pulls of the trigger. The
standard single trigger will fire first the right barrel and than the left barrel. The operation
of trigger is reversed on left handed guns. The single trigger can be offered as a selective
option so that the user can select which barrel fires first.
OPERATION OF DOUBLE TRIGGER FIREARM
Each trigger on the double trigger rifle or shotguns operates its own barrel. The front
trigger will fire the right barrel and the rear trigger will fire the left barrel. The operation
of trigger is reversed on left handed guns. Do not pull both triggers at the same time in
order to avoid excessive recoil or kick from simultaneous discharge of both barrels.
TOP LEVER
The top lever operates the locking bolt, which securely aligns and clasps the barrel assembly
shut to the receiver for firing. The locking bolt and barrel lugs are designed for gradual
wear of locking surfaces and may therefore exhibit tight fitting characteristics during
initial use. The close tolerances of these locking surfaces ensure that the breech of the
firearm remains tight throughout use.
When closing the breech of the action let the top lever move freely to its locked (in line with
the safety) position (see figure 6). Do not restrain its travel with your thumb.
It is recommended that the top lever be indexed to the left with slight finger or thumb
pressure to make sure that the bolt is fully closed. The operation of top lever is reverse on
left handed guns. If the bolt does not fully close it is possible that dirt or debris has
accumulated to a level preventing full closure of the breech. In this condition, open the
action and unload the firearm. Carefully inspect the action and remove any dirt or foreign
matter. Keep the polished breech surface clean and lightly lubricated.
5
EJECTORS
L’Atelier Verney-Carron double rifles and shotguns are available with automatic ejectors
depending on the models. On these models, spent shells will be thrown out of the chamber
automatically, when the action is fully opened after firing. Be careful to position the breech
away from your face when unloading the firearm to avoid being hit by ejected spent
rounds.
EXTRACTORS
L’Atelier Verney-Carron double rifles and shotguns not fitted with ejectors are fitted with
extractors. When the action is opened on these models the fired cases are elevated above
the chamber for removal by hand.
LOADING AND FIRING
Before loading the rifle, visually inspect your safety and make sure it is in the “Safe”
position. Never load the rifle with the safety in the firing position. Avoid contact with the
trigger mechanism while loading ammunition and at all times prior to firing.
To insert cartridges in the chamber, move the top lever to the right with the thumb of your
firing hand and open the breech. Inspect the chambers and barrel bores to be sure they are
free of any obstruction. Insert a cartridge in each chamber and close the action. Be sure the
round primer and rim is facing rearward when inserting cartridges in the chamber. When you
close the breech of the action, let the top lever move freely to its locked position. Do not
restrain its travel with your thumb. It is recommended that the top lever be indexed to the
left with slight pressure to make sure that the bolt is fully closed (See figure 6).
Figure 6 – Closing the breech
6
FIREARM ASSEMBLY
SIDESIDE-BYBY-SIDE SHOTGUNS AND DOUBLE RIFLES
Before assembly, be certain there is no ammunition in either chamber and position the safety
in the “S” or “Safe” position.
Remove all protective lubricants from your firearm before initial assembly. Use a cleaning
rod, patches and a light gun oil or solvent to clean the interior of the firearm bore. Use a
cleaning cloth and light gun oil to remove protective lubricants from metal parts on the
receiver and barrel assemblies.
Figure 7 – Removal of forearm
The gun is supplied dismantled in 2 parts, on one side the stock and action assembly, on the
other side the barrels and fore-end assembly.
Remove the forearm from the barrels by pressing the catch (see figure 7). Remove all
protective lubricants from the exposed metal surfaces with light gun oil and a cleaning cloth.
After cleaning, place a couple of drops of gun oil on the metal bearing surfaces of the hinge,
barrel lugs and on the forearm bracket (see figure 1).
7
The barrels are attached to the action by grasping the stock grip with the firing hand and
supporting the buttstock in between the firing elbow and body (see figure 8). Grasp the
barrels with the non-firing hand and connect the barrel lug hinge with the receiver hinge pin.
Use the thumb of the firing hand to move the top lever sideways to its most right position.
Maintain pressure on the barrels to keep the hinge pin aligned with the barrel lug hinge pin
recess, and rotate the barrels upward to close the action. Release the top lever at this time.
Pivot the fore-end assembly onto the barrels. Align the fore-end in its proper position on the
barrels and push the forearm lever upward into its housing pressing the catch at the same
time. This locks the forearm back into its original position on the barrels.
Figure 8 – Barrel assembly
ATTENTION ! While assembling your firearm, do not use excessive force when closing the
action ! If the action and barrels are not aligned properly, excessive force applied during
assembly can deform or mar the fitted surfaces of the firearm. If you perceive any
interference while installing the barrels to the receiver repeat the assembly procedures
from beginning, and be extra careful to align the barrel lug hinge pin recess and the receiver
hinge pin properly. If you continue to experience difficulty in the assembly of your firearm,
call L’Atelier Verney-Carron or seek assistance from a qualified gunsmith.
8
GAUGE, CALIBER, CHAMBER LENGTH AND CHOKE DESIGNATION
It is most important that the correct ammunition is used with your firearm. Use of
incorrect ammunition with your firearm could cause injury or death to the shooter and
damage to the firearm. Never use ammunition that does not match the corresponding
gauge or caliber of the firearm.
For example, do not use 20 gauge ammunition in a 12 gauge gun. In addition, do not use rounds
with chamber lengths that exceed the chamber length of the firearm barrel.
DANGER – AMMUNITION WARNING !
SERIOUS INJURY OR DEATH OR PROPERTY DAMAGE MAY RESULT FROM ANY
CONDITION WHICH CONTRIBUTES TO THE GENERATION OF EXCESSIVE PRESSURE,
OR THE UNCONTROLLED RELEASE OF GAS, WITHIN A FIREARM. THE FOREGOING
ADVERSE CONDITIONS
CONDITIONS CAN BE CAUSED BY BORE OR CHAMBER
CHAMBER OBSTRUCTIONS,
PROPELLANT POWDER
POWDER OVERLOADS, OR BE DEFECTIVE, INCORRECT CALIBER,
GAUGE OR LENGTH, OR IMPROPERLY LOADED AND ASSEMBLED AMMUNITION
COMPONENTS. IT IS EXTREMELY DANGEROUS TO USE AMMUNITION WHOSE
PRESSURE IS GREATER
GREATER THAN THAT DEVELOPED BY AMMUNITION LOADED TO
FACTORY STANDARDS. EVEN THE STRONGEST FIREARM CAN BE BLOWN UP AS A
RESULT OF EXCESSIVE PRESSURE.
The following information describes the identification system used to designate the gauge,
chamber length or caliber on your L’Atelier Verney-Carron firearm. Be sure you understand
this identification system before loading your firearm, and only use the correct ammunition.
Firearm gauge and chamber or caliber designations are engraved on the underside of the
barrels where they interface the breech block of the receiver (See figure 9). A typical
example of a gauge / chamber length designation would be 12/76 which identifies a firearm
bore diameter of 12 gauge and 76 mm (3 inch) chamber length. Bore diameters are available
in 12, 16, 20, 28 gauge, and .410 bore.
Figure 9 – Buttom of Azur barrel showing location of serial number, prouf, caliber or gauge
9
Chamber lengths are identified by the numeral 70 or 76. The numeral 76 designates a
chamber length of 76 mm which is equal to the English measurement of 3 inches. A barrel
marked with the numeral 70 designates a chamber length of 70 mm which is equal to the
English measurement of 2 3/4 inches.
Use of shotgun rounds with chamber lengths shorter than the shotgun chamber length is
acceptable. However, never use rounds with chamber lengths greater than the length of the
shotgun chamber. For example, do not use 3 inch shells in a shotgun chambered for 2 3/4 inch
ammunition. In the rifle barrel always insure that you are using the proper caliber
ammunition. For example, do not use 9,3 x 74 R ammunition in a rifle barrel chambered for
30/06 Springfield.
DRY FIRING
ATTENTION ! Dry firing or pulling the triggers without live ammunition is not recommended
without the use of snap caps. Snap caps absorb the inertia of the firing pins and protect
internal parts from the full impact force of the hammers. Continuous dry firing can
potentially damage the internal parts and render the gun inoperable.
DISASSEMBLY
Remove loaded ammunition from the chamber before disassembling the firearm. To
disassemble the firearm, grasp the firearm barrel with the non-firing hand and rest the
buttstock against the upper leg. Push the forearm catch out and away from the forearm and
pivot the forearm away from the barrels.
Push the top lever to the right and carefully open the action to rotate the barrel lug away
from the receiver hinge pin and separate the barrels from the receiver. The forearm can be
reattached to the barrels for storage.
Do not attempt further disassembly beyond barrel and forearm removal! Further
disassembly is not necessary for routine maintenance. Any damage incurred due to further
disassembly is not covered by your service warranty.
FURTHER DISASSEMBLY
DISASSEMBLY BY UNQUALIFIED PERSONS COULD CAUSE DAMAGE
TO THE FIREARM WHICH COULD RESULT IN INJURY OF DEATH TO THE
SHOOTER.
HAMMERS AND FIRING
FIRING PINS SHOULD BE IN COCKING POSITION AND NOT IN
FIRED POSITION FOR DI
DISASSEMBLY.
CLEANING
L’Atelier Verney-Carron firearms require periodic maintenance and will perform more
reliably over a longer period of time if properly cleaned and serviced.
10
NEVER clean a loaded firearm. Remove ammunition from the chambers before performing any
cleaning procedures.
Always wipe the barrels and action with a lightly lubricated cloth to remove fingerprints, dirt
and moisture from the gun after handling. Keep a light coat of gun oil on polished metal
surfaces and moving parts. Clean inside the barrels periodically to remove fouling and residue
caused by fired ammunition.
If the action seems unusually tight or if you are unable to close the breech to its locked
position, disassemble the firearm and give it a thorough cleaning. If functional problems
continue, call the L’Atelier Verney-Carron Service Department or seek the assistance of a
competent and qualified gunsmith. A light cleaning consists of oiling and wiping down the
firearm. This can be accomplished without removing the barrels from the receiver. A full
detailed cleaning will require disassembly of the barrels and forearm. General cleaning
procedures are outlined as follows.
Make sure the chambers are unloaded on your firearm. Wear protective safety glasses
during assembly, disassembly and cleaning procedures. Keep ammunition away from the
cleaning area. NEVER test the function of your firearm with live ammunition.
Remove the barrels and forearm from the receiver according to disassembly instructions
provided in this manual.
Use a cleaning rod with a tip and patch suitable for use in firearm bores. Lightly oil the patch
and place it on the tip of the cleaning rod. Insert the tip of the cleaning rod with the
attached patch into the chamber end of the barrels and push the patch back and forth
through both barrels several times. Inspect the bores from both ends of the barrels for
residue caused by leading and plastic shot cups. This residue will form streaks that run
parallel to the inside of the bore. Slight residue streaks are common place and will not
affect the performance of your firearm.
If lead or plastic residue appears to be excessive it can be removed by brushing the bores
with a brass brush attached to the cleaning rod.
First apply gunpowder solvent to the brush end of the cleaning brush. Insert the cleaning rod
into the chamber end of the bores. Push the brush completely through the firearm bore
before pulling it backwards to avoid breaking the bristles on the brush. Continue this
scrubbing action until the bores are clean.
When all fouling and residue is removed, push a clean dry patch through both bores with the
cleaning rod to remove any remaining debris or solvent. When the bores are free of all
solvent and debris, insert a lightly oiled patch and lubricate the bores.
Wipe the metal surfaces of the barrels, forearms and receiver with a clean rag. Lightly oil
the metal parts on the receiver hinge, and barrel lugs and the forearm brackets.
11