1
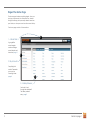
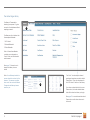
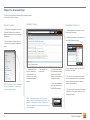
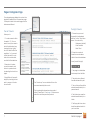
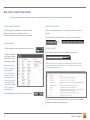
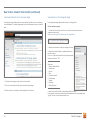
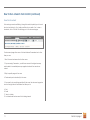
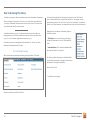
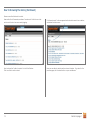
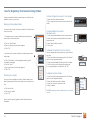
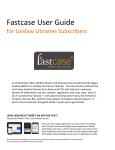
User Guide
This user guide to Casemaker is designed to familiarize you with
its different pages and provide instruction on how to use its various
search capabilities, browsing features, organizing components and
tools.
Contents:
Pages
The Home Page. . . . . . . . . . . . . . . . . . . . . . .
The Overview Page . . . . . . . . . . . . . . . . . . . . .
The Categories Page . . . . . . . . . . . . . . . . . .
The Document Page . . . . . . . . . . . . . . . . . . .
page 2
page 6
page 7
page 8
How To
Run a Search, Beginning to End . . . . . . . . . . .
Browse The Library . . . . . . . . . . . . . . . . . . . . . . .
Organizing Your Research Using Folders . . .
Create, Post, Hide, and Delete Notes . . . . .
History . . . . . . . . . . . . . . . . . . . . . . . . . . . . . . .
Set a Client . . . . . . . . . . . . . . . . . . . . . . . . . . .
Print a Document . . . . . . . . . . . . . . . . . . . . . .
Using Casemaker+ . . . . . . . . . . . . . . . . . .
page 9
page12
page14
page15
page16
page17
page18
page19
Casemaker is available on the web at:
www.casemakerlegal.com
For more assistance in using Casemaker,
live customer support is available Monday
through Friday, 8 a.m. to 8 p.m. Eastern:
Call: 1-877-659-0801 or
Email: [email protected]
Need more help? Sign-up for a training webinar
by clicking on “webinar” in the “help” tab.
Casemaker supports the following browsers:
IE 8+, Firefox F3+, Safari4+, Chrome 10.
Pages: The Home Page
The home page is where everything begins. Here you
can type a new search into the search box, browse
through the library, pull up recently viewed cases from
your folders, or view your search and document history.
The home page consists of three sections:
1
1. A Search Bar
A google-like
search engine
makes creating a
search simple and
stress free. page 3
2
2. My Accounts
Everything that
makes Casemaker
yours can be
found right here.
page 4
3
2. A Library Browser
Just want to look
through the database?
The Library makes it
easy. page 5
2
Return to page 1
3
1
2
The Home Page: Search Bar
The search bar is a consistent part of Casemaker’s user interface and
makes creating a new search, viewing search history, or accessing your
folders at anytime during the research a simple process.
2. A Jurisdiction Drop Down Menu
Select a jurisdiction to search with the drop down menu.
The default setting is “All States and related federal.”
To change this setting:
The search bar has 3 consistent features.
A. Click on the drop down menu.
1. The Search Box
Create a search quickly in the search box. Click on “show advanced
search” below the search box and specify the type of search. Search by
keyword, citation, party, section, or docket.
Tip: Auto Correct
The Search box is equipped with auto correct capabilities for misspelled
citations. E.G. If you put the citation 270ne2d436 in the search box, it will
recognize the misspelled citation and correct it to 270 N.E.2d 436
B. Check the box beside the state you want to search within.
C. Then select whether you want to also search through “Selected
Related Federal” Documents - these include only documents related to
the selected jurisdiction’s circuit- or “All Federal” documents.
D. Save your settings at the bottom of the window.
NOTE: Once your jurisdiction is set, Casemaker will remember the selection
for your next visit.
3. A Navigation Panel Use the search tips to be more specific in your search. This tool gives
phrasing tricks that make your searches more productive.
NOTE: You’ll notice that important features are added to the search bar
throughout the search process to make organization faster and easier.
3
Located at the very top of the search bar, the navigation panel can return you to the home page, allow you to view your folders, check your
history, or get you help. It will also display the name of the client you are
currently working for.
For more about using folders, refer to page 14.
To learn more about the “client” button see page 17.
Return to page 1
The Home Page: My Accounts.
The “My Accounts” on the homepage takes everything that makes
Casemaker yours and puts it on the front page.
Easily view and create new custom folders, go back to recent and
saved searches, or create an advanced search.
See page 6 to learn how to save a search.
4
Return to page 1
The Home Page: Library
The library is Casemaker’s
browsing component. It gives
access to the database without
requiring a search.
1
The library section is broken into
three separate libraries:
1. All Content
2 Federal Materials
3. State Materials
Each of these three libraries
contains core categories or
“books” that can be selected
and browsed.
See page 12 to learn how to
browse the library in more
detail.
Note: You will always be able to
narrow down the content in the
browser. This means no matter
how much the content is filtered,
Casemaker will always have a
result for you.
2
3
“Your Tools” is a subscription-based
package of premium products called
Casemaker+. They can be viewed in
the “All Content” section of the library.
If you have a subscription that covers
Casemaker+, the boxes beside these
tools will be checked when you log in.
See page 19 for more information about
Casemaker+ and to learn how each
tool works.
5
Return to page 1
Pages: The Overview Page
This is the first page encountered after creating a search.
It is broken into two columns:
The Left Column
The Right Column
Special Tabs and Icons
1. Results are categorized in books.
They are listed by the number of
pulled documents they contain for
the search.
1. Save a selected document to your
folder from this page:
A. Select your folder, or create a new
folder from the search bar.
2. The numbers coincide with the
number of documents under each
book.
1. Numbered results
contain important
meta data such as
citation, court, date
decided and party
names.
2. Two results from
each book.
3. Text excerpts below
the meta data display
four contextually relevant occurrences of
the search terms.
- These are highlighted
with the search terms
for easy recognition.
NOTE: This column can be collapsed
using the black tab to make more
room for viewing results.
B. Click, drag and drop the title of the
result into the folder.
C. Or, click on the check box beside
the document then click on the folder
icon to select the folder you wish to
save the document in.
2. To access your folders from this page
- Select the “My Folders” tab from the
Navigation Panel.
NOTE: To save the search, click on “save
search” below the jurisdiction drop-down. Even
though a confirmation doesn’t appear, your
search is saved in the “saved searches” tab on
the homepage.
6
Return to page 1
Pages: Categories Page
The categories page displays the content of a
single book selected from the overview page.
The layout is similar to the results page, but the
features are different.
The Right Column
The Left Column
1. Choose how you want
the results to be displayed
with the “sort by” drop down
menu.* You can sort by:
- Relevance (default)
- Date Decided
- Most Cited
Allows you to:
1. To make a search within
the results. E.G. To run a
search for only the cases in
which the defendant was
found guilty, type “guilty”
into the “search within the
results box” or, if you want
to filter the results to coincide with a certain date,
use the Date Decided box.
2. Shows the number of
times the case has been
cited in the whole database.
Icons (from left to right):
2. Keep track of where
you are in a search and
return to a previous book
by selecting the check box
again.
3. Apply filters to the results
simply by checking the box
next to anyone of the facets on the left.
1. The page icon eliminates
text excerpts from the titles.
2. The printer icon will send
the selected results to print.
The “thumbs up” icons coincide with how the
case was viewed by later courts.
This is a subscription based premium product
called “CaseCheck+”. See page 19 to learn more
about this and other premium products.
3. The mail icon will email the
selected results directly to a
personal email.
4. The folders icon saves the
selected results directly to a
folder.
5. The floppy disk icon downloads the selected results to
your hard drive.
7
Return to page 1
Pages: The Document Page
The Document page contains features that help you
determine a document’s importance to your case and
organize any useful information. The tool bar gives you
access to all these features.
The Tool Bar
1
2
3
4
5
1. Return to the results page at any time.
2. Move through multiple documents without leaving
the document page.
3. Jump to the place where your search term appears.
4. Skip to specific pages within the document.
5. Post notes to the document.
The Notes Feature
Citing References: Formerly known as CaseCheck in
Casemaker 2.2, Citing References is able to display the
cases that cite the selected case.
Digest: Coming Soon! In the near future if you have
subscribed to either CasemakerDigest or Casemaker+
and the case has a digest summary, you’ll be able to
access the summary here.
Negative Treatment: Formerly known as CaseCheck,
Negative treatment is now part of the functionality of
CaseCheck+. To learn more about this tool see page 19.
The icons are consistent with
those of the previous page.
Here you are able to:
1. Print
2. Email
3. Save to a folder
4. And download
the document that is being
viewed.
The Notes feature allows you to write comments and
post them directly to the document that is being
viewed.
See page 15 to learn how.
8
Return to page 1
How To: Run a Search from Scratch
Note: Since the search bar is a consistent component of the interface, a search can be run from any page inside Casemaker.
Set the Search Parameters
Set the type of search
If you’re logging into Casemaker for the first time, you will
need to set a jurisdiction for the search. Once set,
Casemaker will remember the selection for your next visit.
Click on “show advanced search” to set the type of search you want to
create.
You can search by keyword, citation, party, section, or docket number.
To set the jurisdiction:
1. Select the jurisdiction drop down menu in the search bar.
2. Select the individual
state, states or federal
jurisdictions you want
Casemaker to search.
Note: once a state is
selected, the default
for federal materials is “Select Related
Federal.” This means
that the results from
the search will include
related federal documents such as Federal
Court of Appeals for
the related circuit.
Create a Search
Once the search type is set, create the search in the search box.
NOTE: The quality of your results is not inhibited by your ability to provide
proper punctuation in a citation. Auto Correct is built into the search box
so you always get good results.
3. Save the selections at the bottom right of the window.
Use the “Search Tips” button directly under the search button to find specific
phrasing to maximize the search relevancy.
9
Return to page 1
How To: Run a Search from Scratch (continued)
View Search Results on the Overview Page
View Results on the Categories Page
The overview page displays the two most relevant results for each core library
in the database. To make things easier, a list of the libraries is shown on the left
side.
The categories page displays the content of a single book.
On the categories page:
1. Locate the thumbs up or down icon to see how the document was
viewed by later courts.
Note: icons are a part of Casemaker+, sold separately.
2. Select a document to view by clicking on its title.
3. Narrow the results further by adding a filter from
the left column.
To do so: type the information into the appropriate
filter box and click “GO.”
1. Scroll down the page to get a feel for the content.
2. Click on a document’s title to open the document page.
3. Select a book from the left to look deeper into its content.
10
Filters are:
1. Search Within Results
2. Jurisdiction
3. Courts
4. Cite
5. Docket Number
6. Case Name
7. Judge
8. Attorney
9. Date Decided
4. Narrow the results further by searching within the results.
For example, to see only cases where the defendant was found guilty type
“guilty” into the “search within results” box.
Return to page 1
How To: Run a Search from Scratch (continued)
View the Document
After running a search and filtering through the results, hopefully you’ve found
what you’re looking for. If not, add more filters to your results. If so, to view a
document, click on it’s title. This will bring you to the document page.
The document page offers some of the best features Casemaker has to offer.
Here you can:
1. See if the case has been cited in other cases.
2. If you are using Casemaker+, you will have access to the digest summary
and be able to immediately see any negative treatment the case has received.
3. Skip to specific pages of the case.
4. Create and post notes directly to the case.
5. If you want to do something specific with the case, the document page has
icons on the right side of the window that allow you to:
A. Print
B. Email
C. Save to a folder
D. And download the document that is being viewed
11
Return to page 1
How To: Browsing The Library
The library component allows a systematic browse of Casemaker’s databases.
Before browsing, it is important to know that no matter how many selections
you make, Casemaker will always have content to show you. This means that
you will never be left with a blank screen.
As briefly described on page 5, the library is broken down into similar core
categories that you find in the jurisdiction drop down tab on the search bar
(page 3), or the overview page inside a search (page 6).
In the library, these core categories will be referred to as “books” and their
subsequent subcategories as “sections.”
The “All Content” Library
Notice that immediately after clicking on any section in the “All Content”
book, Casemaker asks you to specify the jurisdiction. This request only appears under sections in the “All Content” book. The other books: “Federal Materials” and “State Materials,” are already broken down into these jurisdictions.
Keeping with our example, Casemaker gives two
jurisdiction options:
1. All Federal (in our case, clicking on this option
would ask Casemaker to look up All Federal Statutes).
2. Individual States (All 50 are listed alphabetically;
also includes District of Columbia).
We’ll examine the process behind browsing the library titled “All Content,”
By clicking on either Federal or an individual State,
you’re asking Casemaker to bring back information
pertaining to that specific jurisdiction.
Here we’ll pick Ohio.
- Continued on next page.
and look under the book titled ”Statutes.”
12
Return to page 1
How To: Browsing The Library (Continued)
We are now at the first level of content.
Here we find that Casemaker provides a “bread-crumb” trail to show us the
section and the book we are currently viewing.
The “bread-crumb” trail now appears both above the search box as before,
and below the state name.
Next, we have the “table of contents” for the Ohio Statutes.
Click on a title to see its content.
Here you are able to view the sections in each chapter. To go back to the
previous page, click the back button on your web browser.
13
Return to page 1
How To: Organizing Your Research Using Folders
To Save a Single Document to Your Folder
Using a personalized folder makes it easier to revisit the most
relevant content of your case.
1. Make sure your folder is selected.
2. Click, drag and drop the document’s title into the
folder.
Making a Personalized Folder
In order to use a folder, it must be created. This can be done
one of two ways.
1. The easiest way to create a folder is by using the drop
down menu on the search bar.
To Save Multiple Documents
Simultaneously
1
a. Click on “New Folder”
b. Type a name into the box that appears
c. Click “OK.”
2. Another way to create a folder is by entering the folders
main page.
a. Click “My Folders” on the navigation panel to get to
the folders main page
b. Click on “New”
c. Type a name into the box that appears
d. Click “OK.”
Selecting Your Folder
1. Check the boxes beside the title of the document.
2. Select the Folder icon directly below the folders
drop down tab.
3. Select which folder to save to.
4. Click save.
To Delete Documents From Your Folder
2
You can delete select documents from your folder at
any time.
1. Enter the folders main page using the “My Folders”
button on the navigation panel.
2. Check the box beside the titles you wish to delete.
3. Click the trash can icon below the search bar.
4. A warning will ask for confirmation. Hit “OK.”
To Delete an Entire Folder
Once you have created your folder. Make it easily accessible by selecting it with the drop down menu on the search
bar.
1. Enter the folders main page using the “My Folders”
button on the navigation panel.
2. Select the folder you wish to delete.
3. Open the “options” drop down tab.
4. Select “delete.”
a. Click on the tab.
b. Click on your folder.
c. Click “OK.”
CAUTION: Deleting a folder will delete all of its content
as well.
Now it can be used to organize content while inside the
database.
14
Return to page 1
How To: Create, Post, Hide, Delete and Print Notes
Posting notes directly to a document nearly eliminates the back and forth
between Casemaker and a word processor.
In order to do anything with notes, you must be viewing a document. See
page 8 if you want to make sure you’re in the right place.
To Create a Note
To Hide a Posted Note
To Delete a Posted Note
1. Select the “Notes” drop down tab from the
tool bar on the document’s page.
1. Select the “Notes” drop down tab from
the tool bar on the document’s page.
1. Click on the “x” icon located next to
the pen icon on the far right of the note.
2. Click “Add Note”
2. A warning message will ask for a confirmation. Click “OK.”
2. Click “Hide Notes”
3. Write your note in the pop up window
Caution: Deleting a note is a permanent
action. Once you delete, you cannot get
it back.
To Edit a Posted Note
1. Click on the pen icon located
on the far right of the note.
2. Make the edit on the pop up window
that appears.
The pop up window can contain a maximum
of 255 characters. The counter on the bottom
of the window counts the number of characters in the note. If the counter turns red, the
note has exceeded the maximum number
and the note will not save.
3. Save the change by clicking on
the “Save” button at the bottom of
the window.
4. Save your note. NOTE: Once you save your
note, it will appear below the document title.
15
Return to page 1
How To: The History
The history feature automatically keeps track of your most recently run
searches and viewed documents.
Under the “history” button on the navigation panel, the history is
organized into two categories.
There are a few ways to access the history.
1. Recent Searches
2. Recent Documents
1. Click the “History” button on the navigation panel.
2. Or, access recent searches directly from the “My Accounts” section
of the homepage.
Both pages carry a similar design which contains the description of
the case viewed or the search that was created, while also giving
the date, the time, and the Client ID -if a client was selected before
creating the search.
16
Return to page 1
How To: Set a Client
If you are working for a specific client, the client feature is a convenient
way of keeping track of the hours spent, searches made, and documents
viewed for that client. Each time you log into Casemaker, you will have
to set the client if you want Casemaker to keep track. This is simple to do.
Setting up a client
1. Click on “Client” on the navigation panel of the search bar.
If you already have clients added, click on the drop down menu under
the term “Client Name” and select the client. Then, click continue.
2. If you do not have any clients added or would like to add a new client,
click “Add,” enter the client name in the pop up, and click “OK.”
3. Set a unique “Matter Number.” This allows you to work on more than
one case for a specific client, without having to enter a different name.
4. Once the two fields are filled, click “Continue” and you will be returned
to the home page.
Once you have selected a client, the client’s name will appear on the
navigation panel in place of “Client.” From this point on, Casemaker will
keep track of the time you spend under that client.
When you are done working for a selected client and want to view the
report of hours worked, you will need to sign out of Casemaker. The report
will come up after you have signed out and will offer the option to print
the report, sign back into Casemaker, or go back to your state bar’s website.
17
Return to page 1
How To: Print a Document
From the Overview and categories page
From the Document Page
You’ll find the print icon directly underneath
the folder drop down tab on the top right of
every page. The only exception is the homepage.
The print icon on the document
page gives the same options
under “The Basics” tab. But also
adds an option to print only
pages that contain “hit terms.”
With this selected, only the pages
with your search terms will print.
NOTE: While the icons are the same on every
page, the print options vary depending on the
page being viewed.
On the overview page (the first page in a
search) and the categories page (the second
page in a search) clicking the print icon brings
up a pop up window with a few specific options for these pages:
1. “List of items” will print a list of the documents as they appear on the screen.
2. “Documents” will print each document in
the list in the order that they appear.
No matter where the print options are being
viewed, there’s always an option to print a
cover page with personalized comments.
Under the “options” tab there are two options:
1. “Term Highlighting” will print the list of items or
documents with the search terms highlighted.
2. “Display Hyperlinks” will print the list of items or
documents with Hyperlinks highlighted.
18
Under the “options” tab there are several more options.
“Page Layout” will print
the document with two
columns per page.
“Notes” will print the
document with any
posted notes.
“Content to Append”
will add to the document any relevant
material to the selected
document.
After selecting from the options, click
“print” to print the document.
Return to page 1
CASEMAKER+
2
NOW AVAILABLE AT CASEMAKERLEGAL.COM!
Casemaker+ is a package of premium products designed to enhance
Casemaker’s capabilities, as well as provide new services to the user.
This package is subscription based and does not come built into
Casemaker.
If you have subscribed to Casemaker+, the boxes beside each tool
will have a check mark when you login.
To find out how you can subscribe to Casemaker+ visit
www.casemakerlegal.com.
How the Tools Work
1. CaseCheck+/ Negative Treatment
CaseCheck+ works like Shepherd’s® and KeyCite® at a fraction of
the cost.
CaseCheck+ validates your research and identifies whether or not
your case law citations are still good law. CaseCheck+ returns both
positive and negative treatments instantly as you research. Link to
negative treatments and quickly review the citation history for both
state and federal cases.
It works so well with the interface that it doesn’t require extra steps in
order to use.
1
19
After making a search, look for the thumbs up or thumbs
down icons on the left side of the case citation.
3
A thumbs up
means that the
case is good law.
A thumbs down
means it was
viewed negatively by a later
court.
If a case has had negative treatment, when you enter the document
page, the details of the treatment will be shown at the very top of the
document.
2. CasemakerDigest
CasemakerDigest provides a first look into the most recent decisions
handed down by state and federal courts.
Cases are summarized as soon as they become available and you
can easily create your own areas of interest to receive notifications
through RSS feed and / or email of the cases most relevant to your
practice.
To use with Casemaker: if a case has a CasemakerDigest summary,
an orange paper icon will appear below the negative treatment icon
(thumbs up / thumbs down). You can either click on the icon to view
the summary, or view the summary at the top of the document page
once the document is opened.
3. CiteCheck
A personal cite checker for a pleading, brief or other document.
Simply upload it in MS word, text or searchable PDF and Casemaker
analyzes every citation and provides you with a report of good law,
negative treatments, and potential citation format errors.
Return to page 1