1
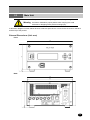
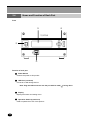
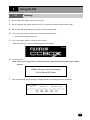
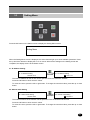
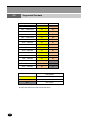
OPERATING INSTRUCTIONS IMAGE PROCESSING SYSTEM IS-100 First Edition Ref.No. 01ISC0001A For the customers in the U.S.A. CAUTION: Changes or modifications not expressly approved by the party responsible for compliance could void the user's authority to operate the equipment. NOTE: This equipment has been tested and found to comply with the limits for a Class A digital device, pursuant to Part 15 of the FCC Rules. These limits are designed to provide reasonable protection against harmful interference when the equipment is operated in a commercial environment. This equipment generates, uses, and can radiate radio frequency energy and, if not installed and used in accordance with the instruction manual, may cause harmful interference to radio communications. Operation of this equipment in a residential area is likely to cause harmful interference in which case the user will be required to correct the interference at his or her own expense. For the customers in Canada This Class A digital apparatus complies with Canadian ICES-003. Cet appareil numérique de la classe A est conforme à la norme NMB-003 du Canada. FUJIFILM Corporation does not guarantee the operation of this product used in the network configurations other than those specified in this manual. 1 The product and product specifications described in this document are subject to change without notice due to reliability, function, and improvements in design. 2 This document, in whole or in part, may not be reprinted or copied without direct permission from FUJIFILM Corporation 3 FUJIFILM Corporation does not assume responsibility for any damage, direct or indirect, caused by the use of this product. 4 This document does not authorize the use of patent or any other rights of FUJIFILM Corporation or any third party. 5 Proper names mentioned in this document, such as the name of products, are registered trademarks of each manufacturer. 2 WARNING: In the USA or Canada, use the AC power cord according to the recommendations as below, in order to comply with UL60950-1 and CAN/CSA C22.2 No. 60950-1-03. Connect to the 120 V receptacle of the room or the host equipment. The AC power cord should be UL or CSA approved and consist of the followings: - Type SVT, size 16 or 18AWG, length 2 m or shorter cord - IEC60320-1/C13 type, 125 V 10 A or higher rating connector - NEMA 5-15 type, 125 V 10 A or higher rating plug Use the AC power cord as specified above. If you use other cables, it may cause interference with radio and television reception. ATTENTION: Aux USA ou au Canada, utilisez le cordon d'alimentation CA en accord avec les recommandations ci-dessous, de façon à respecter les normes UL60950-1 et CAN/CSA C22.2 No. 60950-1-03. Connexion à une prise 120 V dans la chambre ou sur le générateur de l'hôte. Le câble d'alimentation électrique ca doit être agréé UL ou CSA et doit répondre aux caractréristiques suivantes: - Câble d'alimentation électrique de type SVT, taille 16 ou 18 AWG, de 2 m de long ou moins - Connecteur type IEC60320-1/C13, de valeur nominale 125 V 10 A - Prise type NEMA 5-15, de valeur nominale 125 V 10 A Toujours utiliser un câble d'alimentation électrique du type spécifié ci-dessus. Tout autre type de câble risque d'entraîner des parasites dans les réceptions radio et télévision. WARNING: In Europe, use the AC power cord according to the recommendations as below, in order to comply with EN60950-1. Connect to the 230 V receptacle of the room or the host equipment. The AC power cord should be VDE approved and consist of the followings: 2 - Core size 0.75mm or bigger, length 2 m or shorter cord - IEC60320-1/C13 type, 250 V 10 A or higher rating connector - CEE(7)VII type, 250 V 10 A or higher rating plug Use the AC power cord as specified above. If you use other cables, it may cause interference with radio and television reception. WARNUNG: Verwenden Sie in Europa ein Netzkabel in Übereinstimmung mit den unten aufgeführten Empfehlungen, damit der Norm EN60950-1 entsprochen wird. Schließen Sie das Netzkabel an einen dementsprechenden 230 V-AC (Wechselspannung) Anshluß an. Das Netzkabel muss VDE-zugelassen sein und die folgenden Eigenshaften aufweisen: 2 - Ein Leitungsquershnitt von 0,75 mm oder größer, mit einer Länge von maximal 2 m - Anshlusstyp IEC60320-1/C13, mit einer Nennkapazität von 250 V/10 A oder höher - Steckertyp CEE(7)VII, mit einer Nennkapazität von 250 V/10 A oder höher. Das Wechselspannungs-Netzkabel darf nur für den oben beschriebenen Zweck verwendet werden. Die Verwendung von anderen kabeln kann Interferenzen beim Radio- und Fernsehempfang verursachen. ATTENTION: En Europe, veuillez utiliser le cordon d'alimentation CA en accord avec les recommandations ci-dessous, de façon à respecter les normes EN60950-1. Connexion à une prise 230 V dans la chambre ou sur le générateur de l'hôte. Le câble d'alimentation électrique ca doit être agréé VDE et doit répondre aux caractéristiques suivantes : 2 - Câble d'alimentation électrique à âme de diamètre 0,75mm ou plus et de 2 m de long ou moins - Connecteur type IEC60320-1/C13, de valeur nominale 250 V 10 A ou plus - Prise type CEE(7)VII, de valeur nominale 250 V 10 A ou plus Toujours utiliser un câble d'alimentation électrique du type spécifié ci-dessus. Tout autre type de câble risque d'entraîner des parasites dans les réceptions radio et télévision. ADVERTENCIA: En Euorpa, ulilice el cable de alimentación de CA de acuerdo a las recomedaciones siguiente, con el fin de cumplir con el EN60950-1. Conecte al receptáculo de 230 V de la habitación o del equipo anfitrión. El cable de alimentación de CA debe tener la homolgación VDE y constar de lo siguiente: 2 - Cable con un núcleo del tamaño de 0,75 mm o mayor y una longitud de 2 m o menos - Conector del tipo IEC60320-1/C13 de 250 V y 10 A o mayor amperaje - Clavija del tipo CEE (7) VII de 250 V y 10 A o mayor amperaje Emplee el cable de alimentación de CA como se ha especificado anteriormente. Si emplea otros cables, pueden producirse interferencias en la recepción de radio y de televisión. 3 Introduction Before using this product, carefully read this manual to thoroughly understand how to set up and use IS-100. Follow the Safety Precautions during use. After reading this manual, keep it in location where it can be easily accessed when needed. For Safe Use This product has been manufactured with special attention to safety. However, since this is an electrical product, misuse may result in fire or electric shock, which may lead to death or severe injury. Please follow the precautions in this manual and use the product as directed. In Case of Failure, Discontinue Use In case of a failure with the product, discontinue use, and contact the service center or a sales staff. In Case of Abnormality In Case of Smoke, Abnormal Smell, or Abnormal Noise Immediately turn off the switch and disconnect the power cable from the electrical outlet. Disconnect any other electrical cables connected to the electrical outlet, and contact the service center. In Case of Fire Immediately turn off the switch and disconnect the power cable from the electrical outlet, or trip the breaker, and quickly extinguish the fire. Then, contact the service center promptly. Warranty of This Product A written warranty containing information regarding repair service and warranty regulations are attached to this product. Thoroughly read and verify the contents, and keep this warranty in a secure place. In the event of an accident within the terms of this warranty, repairs will be made according to the warranty regulations. Application to Radio Frequency Regulation This product is for business purposes, and is not subject to radio frequency regulations. Radio frequency regulations do not apply. 4 Contents 1 2 3 4 5 6 Safety Precautions .................................................................................................. 6 1.1 Meaning of the Warning Signs.................................................................................................... 6 1.2 Precautions during Use .............................................................................................................. 7 1.3 Precautions regarding the Power Supply ................................................................................... 8 1.4 Precautions regarding Installation and Transport ....................................................................... 9 1.5 Precautions during Cleaning..................................................................................................... 10 Installation ............................................................................................................. 11 2.1 Installation Conditions............................................................................................................... 11 2.2 Unpacking ................................................................................................................................. 12 2.3 Main Unit................................................................................................................................... 13 2.4 Name and Function of Each Part.............................................................................................. 14 2.5 Connecting and Disconnecting Cables..................................................................................... 16 2.5.1 Connecting Cables............................................................................................................ 16 2.5.2 Connecting the Electrical Cable ........................................................................................ 17 2.5.3 Disconnecting Cables ....................................................................................................... 18 Using IS-100 ......................................................................................................... 19 3.1 Starting...................................................................................................................................... 19 3.2 Status Information ..................................................................................................................... 20 3.3 Setting Menu............................................................................................................................. 21 3.4 Shutdown .................................................................................................................................. 23 Maintenance.......................................................................................................... 24 4.1 Cleaning.................................................................................................................................... 24 4.2 Regular Checking ..................................................................................................................... 24 Specifications ........................................................................................................ 25 5.1 Product Specifications .............................................................................................................. 25 5.2 Supported Formats ................................................................................................................... 26 Troubleshooting..................................................................................................... 27 5 1 Safety Precautions This user manual uses the following warning and caution signs for the safe use of this product. Please thoroughly understand the signs before reading this manual. 1.1 Meaning of the Warning Signs Warning Ignoring this warning or the misuse of this product may result in death or severe injury. Caution Ignoring this warning or the misuse of this product may result in injury or property damage. Fire Hazard Ignoring this warning may result in fire. Electrical Hazard Ignoring this warning or the misuse of this product may result in electrical shock. Do not Disassemble Disassembly of the product is prohibited in order to avoid electrical shock or failure of the product. Specific Actions Actions are specified to ensure safety. Prohibited Actions Specific actions are prohibited in order to avoid an electrical shock, failure of the product, or injury. 6 1.2 Precautions during Use Do not Disassemble or Modify Do not disassemble or modify the product, unless directed in this manual. To do so may result in injury, electrical shock, fire, or failure of the product. Do not insert or drop objects into the ports Do not insert or drop any metal or flammable objects into the intake or exhaust ports. This may result in electrical shock, fire, or failure of the product. Use under normal conditions In the event a foreign object or liquid such as water gets inside the product, or internal condensation builds up, stop using it. This may result in electrical shock, fire, or failure of the product. Do not use if the fan stops working Using the product while the fan is not working will increase the internal temperature and may result in fire. In the event the fan stops working, contact the service center or a member of the sales staff. Follow the instructions Only use this product in the manner directed in this manual. Misuse may result in electrical shock, fire, or failure of the product. Do not block the air vent Do not block the air vent. This will increase the internal temperature and may result in fire. 7 1.3 Precautions regarding the Power Supply Use under the correct power supply and voltage Do not use the power supply and voltage other than those specified for the product. Otherwise, an electrical shock, fire, or failure of the product may result. Do not damage the power cable Avoid the following when handling the power cable as they may result in electrical shock, fire, or failure of the product. 8 Modify or damage the power cable. Place heavy objects on the power cable. Forcefully bend, twist, or pull the power cable. Heat, or place the power cable near a heating source. Handle the power cable with wet hands. Use a damaged power cable. 1.4 Precautions regarding Installation and Transport Do not install under conditions which may result in failure of the product This product is manufactured with precision electronic components. Do not install or store in the following places, as these may result in malfunction or failure of the product. Also, if the product is not to be used for a long period, store it in the original package after use. In direct sunlight In a dusty place In a place with highly variable temperature or humidity Near fires In a wet place Near volatile materials Near an air conditioner or heater In a place exposed to shock, vibration, magnets or static electricity Connect the safety ground Connect the power cable to a grounded outlet to avoid electrical shock. In case a 3P-2P converter plug is used to connect a single-phase two-cable system electric power, use an adapter to ground the cable. Install in a stable area If the product is installed in an unstable area, it may fall, resulting in injury or failure of the product. If the product is not to be used for a long period, disconnect the electrical plug from the electrical outlet If the product is not to be used for a long period, disconnect the electrical plug from the electrical outlet for safety. Disconnect all the cables and the electrical plug before moving Before moving this product, be sure to turn off the power, and disconnect the electrical plug from the outlet as well as all cables. Otherwise, the cable may entangle a person's feet, resulting in injury. Use care when transporting This product is heavy. Carry with great care, firmly holding it from the bottom. Do not carry alone, as this may result in backache or dropping of the product, causing injury. Also, turning the product upside down or on its side during transport may result in failure. Disconnect the electrical plug before wiring or cleaning Wiring or cleaning without disconnecting the electrical plug may result in electrical shock. 9 1.5 Precautions during Cleaning Regularly disconnect the electrical plug from the outlet and clean Regularly disconnect the electrical plug from the outlet and clean the base pins and the space between them. If the electrical plug is left connected to the outlet for a long period, dust may accumulate at the base pins and may result in fire due to short circuit. Turn off the power before wiring or cleaning Wiring or cleaning with the power on may result in electrical shock. 10 2 Installation 2.1 Installation Conditions Fire Hazard Do not block the air vent of this product. This will increase the internal temperature and may result in fire. Pay special attention to the installation conditions. Installation and Caution long-term use of the product in highly variable temperatures, dusty, or high humidity may result in failure of the product. 1) Temperature Operating Temperature: 5 to 35°C (Temperature variation up to 20°C per hour, no condensation) Storage Temperature: -20 to 60°C (No condensation) 2) Humidity Operating Humidity: 20 to 80% RH (Humidity variation up to 20% per hour, no condensation) Storage Humidity: 5% to 95% RH (No condensation) 3) Installation Conditions Install this product on a level and stable area. Leave a space 20 cm or more for the air vents on the back and the top of the product. Air should be well ventilated around the product and temperature should remain within operating temperature range. Do not jolt the product while in operation. Especially, do not install under the following conditions. In direct sunlight In a dusty place In a place with highly variable temperature or humidity Near fires In a location where it is likely to get wet Near volatile materials Near an air conditioner or heater In a place exposed to shock, vibration, magnets, or static electricity 11 2.2 Unpacking Specific Use the packing materials for the product or those with equivalent Actions or higher quality, while transporting. This product is heavy. Carry with great care, firmly holding it from Warning the bottom. Maintain a proper posture when carrying it to avoid backache or dropping of the product causing injury or damage to the product. Warning Do not put heavy materials (5 kg or more) on this product, as this may result in failure or damage. Transport the product still packed, and unpack on a level place near the installation site. 1) Check the contents Before installation, confirm that a complete set of the following items have been packed. In the event any item is missing, contact a member of the sales staff. [Contents] 1) IS-100: main unit×1 Size: 210 × 400 × 129.5 mm (w × d × h) (not including projections) Weight: 5.0 kg 2) User Manual × 1 This manual Note: Do not throw away the packing material. When transporting IS-100, packing cartons and cushioning materials are required. Keep the original material for future use. The device and software to be used as a controller are not supplied with the IS-100. To obtain such a device and software, refer to the Fujifilm’s website or pamphlet, or contact a member of the sales staff. 12 2.3 Main Unit This product is heavy. Carry with great care, firmly holding it from Warning the bottom. Maintain a proper posture when carrying it to avoid backache or dropping of the product causing injury. A dimension diagram is shown below. Be sure to leave a space 20 cm or more for the air vents on the back and the top of the product. External Dimensions (Unit: mm) Front Back 13 2.4 Name and Function of Each Part Front Function of each part ① Power Switch Controls the power to this product. ② USB Port (2 sockets) Connects to USB storage device. Note: Plug the USB connector into the port with its mark ( ) facing down. ③ Display Displays the status and setting menu. ④ Operation Switch (6 positions) Used to operate the menu of this product. 14 Back Function of each part ① AC input ② AC Fuse Note: Not user serviceable. For replacement, contact the service center. ③ Main Power Source Switch ④ HD-SDI Video Input Connecter (Ach Bch) ⑤ HD-SDI Video Loop Through Output Connecter (Ach Bch) ⑥ HD-SDI Video Output Connecter (Ach Bch) ⑦ USB Port (2 sockets) ⑧ Ethernet Interface Connecter 15 2.5 2.5.1 Connecting and Disconnecting Cables Connecting Cables Before operation, be sure that the main power source switch on Caution the back is OFF. Not doing so may result in electrical shock or injury. This product is heavy. Use special care when handling this Caution product. Dropping this product may result in injury. Electrical Do not operate with wet hands, as this may result in electrical shock or failure of the product. Hazard 2 1 1 3 Connecting the HD-SDI Video Output Cable Connect the HD-SDI Video Output Connecter or HD-SDI Supported Monitor with a BNC75Ω coaxial cable. 2 Connecting the HD-SDI Video Input Cable Connect devices such as cameras or HD-SDI Video Input Connecter with a BNC75Ω coaxial cable. 3 Connecting the Ethernet Cable Connect networking devices with an RJ45 type LAN cable. (Use a cable with a length of 10m or shorter) Connect the power cable to a grounded outlet to avoid electrical Caution shock. In case a 3P-2P converter plug is used to connect a single-phase two-cable system electric power, use an adapter to ground the cable. 16 2.5.2 Connecting the Electrical Cable Electrical Never touch the power supply unit with wet hands, as this may result in electric shock. Hazard Fire Hazard Converting the power supply voltage with the electrical plug connected to the outlet may result in fire. 1 1 Connect the electrical plug to the AC unit on the back of the product. 2 Connect the electrical plug of the product into the electrical outlet. Amount of AC Power Supply Power Supply Voltage: AC100V – 240V Power Supply Frequency: 50/60Hz Power Consumption: 300W Max. Normal operating conditions. 17 2.5.3 Disconnecting Cables Before operation, be sure that the main power source switch on Warning the back is OFF. Not doing so may result in electrical shock or injury. Caution This product is heavy. Use special care when handling this product. Dropping this product may result in injury. Electrical Do not operate with wet hands, as this may result in electrical shock or failure of the product. Hazard 1 Turn off the power switch on the front of the product. 2 Confirm that IS-100 is not in operation. Then, turn off the main power source switch on the back of the product. 3 Disconnect the LAN cables or USB cables, if connected. 4 Disconnect the HD-SDI Input / Output Cable. 5 Disconnect the electrical plug from the electrical outlet, and then disconnect the power cable from the product. 18 3 Using IS-100 3.1 Starting 1 Be sure that each cable is correctly connected. 2 Be sure that the main power source switch is off. Connect the electrical plug into the outlet. 3 Be sure that the electrical plug is correctly connected to the outlet. 4 Turn on the main power source switch on the back of the product. *IS-100 does not start at this point. 5 Turn on the power switch on the front of the product. When the power is on, the logo below appears on the display. 6 IS-100 will start. Note: Do not turn off the power or remove the power cable from the outlet during the startup process. CCBOXX System Check Processing Do Not Switch Off Power 7 When the following screen showing the status appears, the startup process is completed. 1080 / 23.98P 4:2:2 CCBOXX : 192.168.11.14 Controller : 192.168.11.109 TC 00:00:30:15 19 3.2 Status Information (1) 1080 / 23.98P 4:2:2 CCBOXX : 192.168.11.14 Controller : 192.168.11.109 TC 00:00:30:15 (4) (1) Format of HD-SDI source (Scanline, framerate, color format) (2) IP address of IS-100 (If the IP address is not specified, “No setting” is displayed.) (3) IP address of currently connected controller (If no controller is connected, “No setting” is displayed.) (4) Time code of HD-SDI source (If the time code is not embedded in the HD-SDI, it is created in the IS-100.) 20 (2) (3) 3.3 Setting Menu Press the OK button on the Status screen to display the Setting Menu screen. Setting Menu When the Setting Menu screen is displayed, the active buttons light up to show available operations. Press the up and down buttons to display the 01 to 07 menus. When all the settings on the Setting screen are completed, the display returns to the Status screen. 01: IP Address Setting OK : Set : Cancel 01 : IP Address Setting 192.168.11.14 OK : Apply : Cancel 01 : IP Address Setting 192.168.11.14 The static IP address for the IS-100 can be specified. Enter the desired IP address. Press the OK button to enter numeric values. To move the cursor, press the left or right button. To change the numerical value, press the up or down button. 02: Subnet mask Setting OK : Set : Cancel 02 : Subnet mask Setting 255.255.255.0 OK : Apply : Cancel 02 : Subnet mask Setting 255.255.255.0 The subnet mask for the IP address can be specified. Enter the desired subnet mask. Press the OK button to enter numeric values. To move the cursor, press the left or right button. To change the numerical value, press the up or down button. 21 03: DHCP Setting OK : Set : Cancel 03 : DHCP Setting OK : Apply : Cancel 03 : DHCP Setting Enable Enable The IP address for the IS-100 can be specified automatically. Select Enable or Disable. 04: CCBOXX System Restart OK : Yes : Cancel 04 : CCBOXX System Restart The CCBOXX System of the IS-100 can be restarted. 05: Disconnect Controller OK : Yes : Cancel 05 : Disconnect Controller IP : 192.168.11.109 The communication between the IS-100 and the connected controller can be disconnected. When receiving a request of connection from a controller different from the one currently connected, this screen is displayed. As the IS-100 can communicate with only one controller, disconnection from the currently connected controller is necessary to connect a different one. 06: Dimmer OK : Set : Cancel 06 : Dimmer OK : Apply : Cancel 06 : Dimmer 4 4 The panel brightness can be adjusted in 6 levels. 07: Initialize OK : Set : Cancel 07 : Initialize OK : Apply : Cancel 07 : Initialize Initialize? All the data created in the IS-100 can be deleted to restore the state at the time of shipment. 22 3.4 Shutdown If the product is not to be used for a long period, turn off the main Caution power source switch on the back of the product and then disconnect the electrical plug from the electrical outlet. 1 Turn off the power switch on the front of the product. CCBOXX System Shutdown Processing 2 After a while, the display turns off and the product stops operating. Caution: Be sure to confirm that the product has stopped operating. 3 Turn off the main power source switch on the back of the product. 23 4 4.1 Maintenance Cleaning Regularly wipe any dust off the product with a piece of soft cloth. Do not use organic solvents (benzene, acetone, etc.), which may Caution deform plastic. Also, be sure that no liquid such as solvent gets inside the product. 4.2 Regular Checking Check the following every six months. ● Remove any dirt or dust in the intake port and fan. ● Check for any blockage of the intake and exhaust ports by any objects such as piled packages, etc. Before checking, turn off the power switch on the front and the Caution main power source switch on the back of the product, disconnect the power cable on the back, and confirm that the product is not in operation. 24 5 Specifications 5.1 Product Specifications Item Specifications Type Image Processing System Model IS-100 Interface USB2.0 LAN 10/100/1000Base-T HD-SDI Input BNC Connecter ×2 1system input Supported Standard SMPTE292, 372M, 425 (LEVEL A) only HD-SDI Loop Through BNC Connecter ×2 Output HD-SDI input signal to be output. (No output when power is OFF) HD-SDI Output BNC Connecter ×2 1 system output Supported Standard SMPTE292, 372M, 425 (LEVEL A) only External Dimensions 210mm(W) × 400mm(D) × 129.5mm(H) Device Weight 5.0Kg (excluding cables) Power Supply Voltage and Frequency Power Consumption AC 100V to 240V 50/60Hz Voltage Automatic Switchover 300W 25 5.2 Supported Formats Input Format 4:2:2 4:4:4 1920 × 1080/23.98PsF SL DL 1920 × 1080/24PsF SL DL 1920 × 1080/25PsF SL DL 1920 × 1080/29.97PsF SL DL 1920 × 1080/30PsF SL DL 1920 × 1080/23.98P SL DL 1920 × 1080/24P SL DL 1920 × 1080/25P SL DL 1920 × 1080/29.97P SL DL 1920 × 1080/30P SL DL 1920 × 1080/50I SL DL 1920 × 1080/59.94I SL DL 1920 × 1080/60I SL DL 1920 × 1080/50P DL N/A 1920 × 1080/59.94P DL N/A 1920 × 1080/60P DL N/A HD-SDI Input/Output Description SL 1.5G HD-SDI Single Link DL 1.5G HD-SDI Dual Link N/A Not support Input and Output format should be the same. 26 6 Troubleshooting If no image is displayed on the connected monitor, check the following. 1: Is the IS-100 turned on and operating? Is the status appearing on the display? 2: Is the HD-SDI input/output cable connected to the IS-100 properly? 3: Does the IS-100 settings match the format of the input source? If the operation of the CCBOXX System is abnormal, perform the following. 1: With Setting Menu, restart the CCBOXX System. 2: Turn off the power of the IS-100 and restart it. If the IS-100 cannot be turned on, check the following. 1: Is the power cable connected properly? 2: Is electricity supplied to the outlet? If no problem regarding the above is found, the AC fuse may have been blown or the power supply of the IS-100 may have a problem. Contact the service center. 27 FUJIFILM Corporation 7-3, Akasaka 9-chome, Minato-ku, Tokyo 107-0052, Japan Ref.No.01ISC0001A 12.01-FP