1
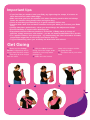
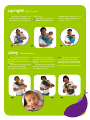
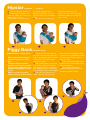
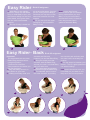
wearing
your
baba sling
+ 61 7 544 29597
Important tips
• If you feel like you need to hold your Baby try tightening the straps, it is better to
have them shorter rather than longer
• Make sure that you hear the audible click when fastening each buckle and always
fasten the smaller safety buckle when using the sling
• Check to see that your Baba Sling is in good condition before use
• Practice with a doll first and have someone assist you when you first use your Baba
Sling
• Change shoulders periodically - when you do exchange the adjustment straps
• Ensure that Baby is secure when bending over
• Experiment with the different positions, be flexible, if Baby wants a change of
position, simply maneuver into another - you do not need to take Baba out to do this
• If it a position doesn’t feel quite right - try maneuvering the fabric around to fit better,
maybe Baba might like to have their head and/or feet out
• Try your Baba Sling when you and Baby are both calm and relaxed
Get Going
1) Make sure the Safety
Buckle is clipped up and is
longer than the other straps
2) One strap is to be longer
than the other
1
3) With the label forward
facing, have the longer strap
closest to your body when
putting it on
4) Make sure the bottom
3
2
4
strap is the longest and the
top strap shortest
5) The label sits at your collar
bone
5
upright
Birth – 2 years
1) Hold Baby on shoulder with
hand through the Baba Sling,
take Baba’s feet through the
Upright
Baba Sling
2) Glide Baba into position
3) Make sure the bottom
Birth – 2
1) Hold Baba on shoulder with
hand through the Baba Sling,
take Baba’s feet through the
Baba Sling
1
Joey
3) Make sure the bottom railing
comes to
Baba’s knees and the upper
railing to the armpits or neck
3
2
2 months and up
1) From Upright and keeping
Baby between you and the
Baba Sling turn baby around to
face out
2) Put Baby up on the shoulder
opposing the Baba Sling
shoulder pad. Hold Baby’s
1
2) Glide Baba into position
railing comes to Baby’s knees
and the upper railing to the
armpits or neck
feet together with one hand
and push them towards Baby’s
stomach, creating a frog leg
effect
3) Pull the bottom railing down
and over Baby’s feet and right
up to Baby’s bottom
2
note The upper railing comes
up to Baby’s armpits, make
sure that Baba is leaning back
towards you and the shoulder
pad rather than leaning forward
3
Hipstar
4 months – 2 years +
1) Start in Upright position
2) Glide Baby around onto
your hip. Make sure that the
label stays at your
collar bone. You can have
1
the upper railing under
Baby’s armpits or you can
pull the railing up to Baba’s
neck
3) An option is to slide the
2
Piggy Back
Important tips for Piggy Back:
•B
aby must be big enough to
wrap their legs around your
hips
•T
he Baba Sling should be
pulled in as firmly as possible
•T
he top railing must be pulled
tighter to bring Baba in closer
to you
•M
ake sure that the bottom
railing comesup to their knees
shoulder pad onto your
upper arm (this will stop the
shoulder pad from riding up
your neck)
3
6 months & up
1) Instead of having the label at
the front, start with the buckle sitting on the shoulder and the label
at the back. The bottom strap
should be longer
2) Baby sits securely on your hip.
The bottom railing comes up to
their knees and the top railing to
their armpits or neck. Make sure
that the Baba Sling is pulled tight
3) Take your arm up and over
Baby. Grip the shoulder pad
with one hand and with the other
reach down to hold Baby’s bottom
and then slide him/her around
onto your back
4) Pulling the shoulder pad down
towards your front will help to get
Baby into position
5) You can bring the front of
the Baba Sling in between your
breast for greater comfort
3
1
2
4
5
Easy Rider
Birth till outgrown
1) With Baby in the upright
position, reach into the Baba
Sling to hold Baby’s hips, pull
the bottom railing out with the
other hand, then guide them
into the most comfortable
position
2) The tip of baby’s head will
sit at the collar bone. You can
put the railing behind Baby’s
neck and pull up some of the
hammock material for head
support
3) Or you can pull the upper
railing up to accommodate
Baby’s head
1
2
3
Easy Rider- Back
Important
• Get acquainted with the other
Baba Sling positions before
using this position
• Practice with a doll first
• Have someone else assist you
the first few times
1) Start with Baby securely in
Easy Rider on your front
2) Holding onto Baby slide your
1
4
Note) It may be of more
comfort not to pull the bottom
railing up between you and
Baby, or to pull extra fabric
around their head. It’s best to
have any excess fabric
gathered beneath Baby
Birth till outgrown
shoulder pad free arm
between you and the Baba Sling
3) Bring the straps onto that
shoulder, with the Baba Sling
around your neck, now hold Baby
with your other arm
4) Bring what was the shoulder
pad arm through the Baba Sling
5) The shoulder pad is now on
the other shoulder, by holding
note look in the mirror once you
have Baby on your back to see
they are in the correct position
3
2
5
the shoulder pad and baby with
the other hand, hoist baby into
position
6) Pull the straps in between your
breast – This is a great position to
use when cooking!
6
Hammock Style
1) Start in Upright
2) Take Baby’s feet towards
the shoulder pad and head
in the opposite
1
Birth – 2 years
direction, lie Baby fully
down. You can support
Baby’s head with your arm
3) Alternatively, you can
pull the railing up over their
head for support.
This is also the Hammock
Style Breastfeeding
1
1
breastfeeding
off shoulder
Place the shoulder padding onto the
upper arm to bring Baby’s head to
level of your breast
under arm
Glide Baba Sling with
Baby to other breast
hammock
The hammock position as shown above is
perfect for breastfeeding