1
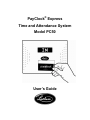
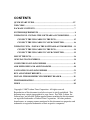
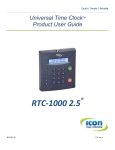
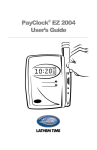
888 534-5994
PayClock Express
USER MANUAL
PayClock® Express
Time and Attendance System
Model PC50
User’s Guide
THIS EQUIPMENT COMPLIES WITH FCC CLASS-B REQUIREMENTS
PURSUANT SUBPART J OF PART-15
This device complies with Part 15 of the FCC Rules. Operation is subject to the following two
conditions: (1) this device may not cause harmful interference, and (2) this device must accept
any interference received, including interference that may cause undesired operation.
WARNING: Changes or modifications to this product not expressly approved by the party
responsible for compliance could void the user’s authority to operate this equipment.
NOTE:: This equipment has been tested and found to comply with the limits for a Class B digital
device, pursuant to Part 15 of the FCC Rules. These limits are designed to provide reasonable
protection against harmful interference in a residential installation. This equipment generates, uses,
and can radiate radio frequency energy and, if not installed and used in accordance with the
instructions, may cause harmful interference to radio communications. However, there is no
guarantee that interference will not occur in a particular installation. If this equipment does cause
harmful interference to radio or television reception, which can be determined by turning the
equipment off and on, the user is encouraged to try to correct the interference by one or more of the
following measures:
- Reorient or relocate the receiving antenna.
- Increase the separation between the equipment and receiver.
- Connect the equipment into an outlet on a circuit different from that to which the receiver is
connected.
- Consult the dealer or an experienced radio TV technician for help.
This Class B digital apparatus complies with Canadian ICES-003.
Cet appariel numerique de la classe B est conforme a la norme NMB-003 du Canada.
Lathem Time Corporation
200 Selig Drive, SW
Atlanta, Georgia USA 30336
(800) 241-4990
(404) 691-0400
www.lathem.com
P/N: USG0058B
CONTENTS
QUICK START GUIDE..................................................................................IV
WELCOME........................................................................................................ 1
PACKAGE CONTENTS................................................................................... 7
SYSTEM REQUIREMENTS ........................................................................... 8
WINDOWS XP - INSTALL THE SOFTWARE & PC50 DRIVERS ........... 9
CONNECT THE USB CABLE TO THE PC50 ..................................... 15
CONNECT THE USB CABLE TO YOUR COMPUTER .................... 16
WINDOWS VISTA - INSTALL THE SOFTWARE & PC50 DRIVERS .. 21
CONNECT THE USB CABLE TO THE PC50 ..................................... 28
CONNECT THE USB CABLE TO YOUR COMPUTER .................... 29
MOUNT THE PC50 ........................................................................................ 36
OPEN PAYCLOCK EXPRESS...................................................................... 38
CONFIGURE PAYCLOCK EXPRESS ........................................................ 41
ADD EMPLOYEES AND ASSIGN BADGES .............................................. 48
NAVIGATING PAYCLOCK EXPRESS ...................................................... 52
RUN AND EXPORT REPORTS.................................................................... 77
INSTALL THE BIOMETRIC FINGERPRINT READER ......................... 83
TROUBLESHOOTING .................................................................................. 87
INDEX .............................................................................................................. 89
Copyright © 2007 Lathem Time Corporation. All rights reserved.
Reproduction of this document in whole or in part is strictly prohibited. This
document may contain typographical or copy errors. PayClock, Lathem, the
Lathem logo, and all other Lathem product names mentioned in this document
are registered trademarks of Lathem Time Corporation. All other products,
brand names, or company names mentioned in this document are properties and
trademarks or registered trademarks of their respective companies.
Quick Start Steps
1
Verify the contents of your system
(pg. 7)
2
Verify your computer meets the
Minimum System Requirements
listed on pages 3 of this User Guide
(pg.8)
3
Install the PayClock Express
Software and PC50 Driver (pg. 9)
NOTE
You may install the PC50 terminal on a different computer from
the one which contains your PayClock Express software. To do so,
first perform a full install of the software on computer you will run
PayClock Express. Then install the PC50 Driver on the computer
you will use to connect the PC50. When the install begins, select
Only Install PC50 Drivers from the Install Type Window and
continue following instructions.
4
Connect the USB Cable to the
PC50. Note: Make sure the cable
“snaps” firmly into place (pg. 15)
5
Connect the USB Cable to your
computer and install the required
software drivers (pg.16)
6
Using the instructions on page 36,
mount your PC50 to the wall where
you would like employees to punch
in and out
7
Open the PayClock Express
software by clicking on the
PayClock Icon (pg. 38)
8
Configuring your software
preferences by using the Setup
Icon in the Home Screen (pg.
41)
9
Add employees and assign
badges using the Employee Icon
(pg. 48)
P A Y C L O C K
E X P R E S S
U S E R ’ S
G U I D E - 1
Welcome
Product Overview
Congratulations on the purchase of your new Lathem PayClock
Express Time and Attendance System. This system will allow you
to record and manage employee attendance records with ease and
simplicity.
Included in packaging is the PayClock Express software, which you
will use to manage data. This software will allow you to view, edit,
sort, and print attendance records within one window. Should you
desire software upgrades or system accessories in the future,
information is available at www.lathem.com.
The PC50 utilizes a proximity badge system, meaning that
employees will punch in and out by waving a badge in front of the
clock’s sensor. The PC50 is “real-time”, so there is no polling this
device. When an employee punches In or Out, the punch is
immediately added to the database.
IMPORTANT
The PC50 must be connected to the computer and the computer
must be powered on for the unit to be operational. The PC50 will
stop functioning when it is unplugged from the computer.
The PC50 also offers a backlit LCD screen to display important
attendance information. Upon receiving a punch, the screen will
display the employee’s name, In/Out status, and total hours worked
for the pay period. You may also elect to add custom text and
audio messages to play for individual (or all) punches.
PayClock Express uses an “open schedule” to calculate employee
time and attendance. This means that an employee’s schedule
begins with his/her first punch and ends a set number of hours
2 - P A Y C L O C K
E X P R E S S
U S E R ’ S
G U I D E
later. The employee is able to punch in and out freely during
his/her schedule. So, using a 14 hour maximum work day, if an
employee clocks in at 8:00am, his/her schedule remains open for
punches until 10:00pm.
System Features
The PC50 is the latest innovation in automated time and
attendance systems. Combined with the PayClock Express software,
managing time records is quick and efficient. Your new system
offers a number of unmatched features:
x
Simple proximity badge system to clock in and out for up
to 50 employees
x
Connects to the computer through a single plug-n-play USB
cable
x
Capable of playing audio and text messages
x
Utilizes a large, easy-to-read backlit LCD display
x
Green LED light confirms punch and Red LED light
indicates a failure
x
Real-time system requires no polling
x
Ability for employees to view total hours worked for the
pay period.
x
Single screen software menu allows you to get the
information you need easily.
x
“Express Timecard” gives quick and concise views
x
Simple payroll export process
x
Comprehensive support agreements minimize technical
difficulties
x
Numerous Accessory options (see page 3) further enhance
the functionality of your PC50 terminal
P A Y C L O C K
E X P R E S S
U S E R ’ S
G U I D E - 3
Upgrades
If you find that you need to accommodate more employees in your
system or if you would like enhanced software capabilities, consider
purchasing a software upgrade for your system. Lathem’s two
upgrade packages, PayClock EZ and PayClock Pro offer the
following enhanced features.
x
Increased employee capacity (EZ up to 150, Pro up to 1000)
x
Scheduling and shift capabilities
x
Increased reporting options (EZ up to 22, Pro up to 45)
x
Vacation and Holiday Time capabilities
x
In/Out board (for quick view of whole workforce)
x
Additional payroll program interface options
x
Multi-user capabilities (EZ up to 6 concurrent users, Pro up
to 24 concurrent users)
x
Exceptions-capable (late-in, long lunch, early out, etc)
x
Optional Paid Break Settings
Upgrading is as easy as visiting http://shop.lathem.com or the
Information Center of the Home Screen and selecting the
software you would like to purchase. Download your software
upgrades and instantly activate upon receipt of online payment.
Accessories
Lathem offers a number of accessories to further enhance your
PC50 system. Visit http://shop.lathem.com to purchase any of the
accessories listed below.
x
Extended USB cables
x
Fingerprint sensor attachment
4 - P A Y C L O C K
E X P R E S S
x
Additional Badges
x
Cables and Connectors
U S E R ’ S
G U I D E
Getting Help
You can access technical support and answers to your issues in a
number of different ways. In addition to resources within the
PayClock Express software, assistance may be accessed online, via
email, via telephone, or through your Lathem dealer. Don’t forget
that Lathem also offers annual support contracts.
PayClock Interactive Help System Viewer
The Interactive Help System Viewer allows you to search through
an index of help topics to locate the answer you need.
To launch the Interactive Help System Viewer, select Help from
the Ribbon Bar or select the
button next to an unfamiliar
term.
P A Y C L O C K
E X P R E S S
U S E R ’ S
G U I D E - 5
Troubleshooting
For answers to Frequently Asked Questions, refer to the
Troubleshooting section of this User Guide on page 87.
Online and Email Support
Lathem.com provides access to numerous support resources that
will allow you maximize your use of PayClock Express. Help may
be accessed by visiting the following link:
http://support.lathem.com
On the Support page, you may also submit a question through our
online knowledgebase and one of our technicians will respond to
your inquiry within 24 hours. Email support is free to all
registered users of Lathem products.
Telephone Support
Lathem offers technical support between the hours of 8am and
7pm Monday through Friday. Please call (800) 241-4990 to speak
with our support team. You will receive free technical support for
the first 30 days after your initial call. After that period, you may
purchase an Annual Support Agreement, which will cover all calls
for one year, or you may pay a per-call fee.
Annual Support Agreements
Lathem support contracts are designed to keep your PC50 and
PayClock software working seamlessly. For a single annual fee,
your Support Agreement offers the following advantages:
6 - P A Y C L O C K
E X P R E S S
U S E R ’ S
G U I D E
x
Unlimited toll-free telephone support (versus a per-call fee)
and priority status for calls
x
Unlimited access to Lathem’s extensive library of web-based
tips and FAQs
x
Free software updates and version upgrades during the
Support Period, giving you free access to the most current
software features
x
Quick exchanges for damaged or broken clocks, thereby
reducing downtime
x
Extended parts and labor warranty helps you to save money
on repairs needed after the regular product warranty has
expired
To learn more about Lathem support contracts and to make a
purchase, contact us at (800) 241-4990 or visit
http://www.lathem.com/news/supportplan.shtml
P A Y C L O C K
E X P R E S S
U S E R ’ S
G U I D E - 7
Package Contents
Please verify that your package includes ALL of the following items.
If your package is missing an item, please call Lathem technical
support at (404) 691-1065.
x
PC50 Terminal
x
Fifteen (15) Radio Frequency ID (RFID) badges
x
PayClock Express Software CD
x
15’ USB Cable
x
PC50 User’s Guide
x
Three (3) wall mount screws and anchors
x
Securing clip, screw and anchor
8 - P A Y C L O C K
E X P R E S S
U S E R ’ S
G U I D E
System Requirements
You must verify that your system meets ALL of the minimum
requirements listed below in order to run PayClock Express on
your computer. If your system does not meet these minimum
requirements, do not run the software!
Minimum Requirements:
x
Microsoft Windows XP (Pro or Home) or Vista
x
Windows XP - 300mhz Pentium processor or better.
x
Windows Vista - 1Ghz processor or better.
x
Windows XP - 128 Megabytes of RAM
x
Windows Vista - 512 Mb of RAM (Home Basic), 1 Gb of
RAM (Home Premium, Business, Ultimate)
x
Hard disk with at least 200 Megabytes of free space
x
256 Color 800 x 600 or higher resolution display
x
Mouse or other pointing device
x
An available USB port (USB 1.1 compliant. The port must
be able to supply a minimum of 500mA)
x
Internet Explorer 5.0 or higher
Recommended Requirements:
x
A PC with a 900mhz Pentium processor or better (XP)
x
256 Megabytes of RAM (XP)
x
Hard disk with 500 Megabytes of free space
x
An available USB port (USB 2.0 compliant)
x
Hi-Speed Internet Connection
P A Y C L O C K
E X P R E S S
U S E R ’ S
G U I D E - 9
Windows XP - Install the PayClock
Express Software and PC50 Drivers
CAUTION
Before proceeding with your PayClock Express installation, verify
that your PC meets ALL of the System Requirements listed on page
8!
1. Prepare your computer
x
Select the computer you will use to manage the PC50
system
x
Close all programs, including virus protection software
2. Insert the PayClock Express CD
x
Insert the PayClock Express CD into your computer’s CD
ROM drive
x
The Setup program should run automatically. If it does
not, follow the steps below:
¾ Click Start | Run from the Windows taskbar
¾ At the command line, type d:\Payclock\PCSetup.exe
where d: is the letter of the drive for your CD-ROM
¾ Click OK
NOTE
PayClock Express software MUST be installed for hardware to
function.
1 0 - P A Y C L O C K
E X P R E S S
U S E R ’ S
G U I D E
3. Select Install Type
x
Select Install Full PayClock Express and click OK
x
Note: You will only select Only Install PC50 Drivers when
you are installing the PC50 to a different computer. See
page 14 for further instructions on this step
4. Begin Setup
x
After you have read the screen, click Next to move forward.
P A Y C L O C K
E X P R E S S
U S E R ’ S
G U I D E - 1 1
5. Read the License Agreement
x
Select I Accept to accept the terms to move forward.
6. Select a Destination Folder
1 2 - P A Y C L O C K
E X P R E S S
U S E R ’ S
G U I D E
x
The default location for PayClock Express to be installed is
the C:PAYCLOCK folder
x
To change where PayClock Express will be installed on your
computer click Browse to locate your preferred folder.
x
Once you have specified a destination folder, click Next to
move forward.
7. Start Install
x
To start the installation process, click Next.
x
The installation will begin and the following windows will
appear:
P A Y C L O C K
x
E X P R E S S
U S E R ’ S
G U I D E - 1 3
The PayClock Server Connection Manager and PayClock
Terminal Service Manager icons will appear, indicating
that PayClock has been successfully installed. These icons
will display when you log in to Windows, but the PayClock
Server and PayClock Terminal Service will run without
being logged in to Windows.
8. Finish Install
x
Select Finish to complete the installation and to close the
install window. Note: Reboot the computer if prompted.
1 4 - P A Y C L O C K
E X P R E S S
U S E R ’ S
G U I D E
9. OPTIONAL: Install the PC50 terminal on a separate computer
from the one which contains the PayClock Express software.
The second computer MUST be on the same Local Area
Network (LAN) as the full PayClock Express Software
installation.
x
After installing PayClock Express on your computer, install
the PC50 drivers on the computer you will use to connect
the PC50 terminal.
x
Once you reach the Install Type window, select Only
Install PC50 Drivers. Click OK.
x
Continue, following the same installation instructions
outlined above. You will then be ready to connect the
PC50 to the second computer.
NOTE
If installing both Express and the PC50 on the same computer only
run the “Install Full PayClock Express with the PC50 Drivers”.
P A Y C L O C K
E X P R E S S
U S E R ’ S
G U I D E - 1 5
Connect the USB cable to the PC50
To begin setting up the terminal, first connect the 15ft USB cable
to the rear side of the PC50 as shown below.
NOTE
Be aware of the orientation of the USB cable to the port. Be sure
to insert the USB cable with the “THIS SIDE UP” label facing up
into the USB port (see diagram). Make sure the cable “snaps”
securely into place.
1 6 - P A Y C L O C K
E X P R E S S
U S E R ’ S
G U I D E
Connect the USB Cable to the
Computer
After connecting the USB cable to the PC50, connect the other end
of the cable to an available USB port on your computer, as shown
below.
NOTE
You can increase the distance between the PC50 terminal and your
computer’s USB port by purchasing USB cable extenders directly
from Lathem at http://shop.lathem.com or through an authorized
reseller. You may need to use a Lathem PC-50 Power Adapter if the
badge reader works intermittently, see the Troubleshooting section
You may add up to four 16ft USB Extension Cables (P/N:
USBCABLE16)
-orYou may add one 150ft Super Extender Cable (P/N:
USBEXTENDER)
The computer will automatically begin installation of the required
software drivers. Follow these instructions to successfully complete
the installation of the software drivers. Note: The PayClock Express
CD should be left in the CD-Rom drive until you have loaded
these drivers.
P A Y C L O C K
E X P R E S S
U S E R ’ S
G U I D E - 1 7
These two software drivers must be installed for the PC50 to
operate properly: USB Device and Lathem TouchStation
Two separate “Found New Hardware Wizards” will appear in
succession. You must complete both Wizards. Please note that it
may take up to one minute for each Wizard to automatically
appear. Please be patient.
1. After successfully connecting the PC50 hardware to your
computer the message, “Found New Hardware” will show
in the Notification Area with the USB icon .
2. The “Found New Hardware Wizard” will display. Select
“Yes, this time only” or “Yes, now and every time I
connect a device” and click “Next >”.
Note:
Up to 1
minute
may pass
before the
message
displays,
please be
patient.
1 8 - P A Y C L O C K
E X P R E S S
U S E R ’ S
G U I D E
3. Select “Install the software automatically
(Recommended)” and click “Next >”.
4. When the driver is located, this message will display. Click
“Continue Anyway”.
Important:
Do NOT select
“STOP Installation”
or your PC50 will
not operate!
5. Click Finish to complete the process of loading the first
driver.
P A Y C L O C K
E X P R E S S
U S E R ’ S
G U I D E - 1 9
6. Another “Found New Hardware Wizard” will display.
Select “Yes, this time only” or “Yes, now and every time I
connect a device” and click “Next >”.
Note:
Up to 1
minute
may pass
before the
message
displays,
please be
patient.
7. Select “Install the software automatically
(Recommended)” and click “Next >”.
2 0 - P A Y C L O C K
E X P R E S S
U S E R ’ S
G U I D E
8. When the driver is located, this message will display. Click
“Continue Anyway”.
Important:
Do NOT select
“STOP Installation”
or your PC50 will
not operate!
9. Click Finish to complete the process of loading the first
driver.
10. Following the completion of installing the drivers, the PC50
should light up, displaying the current time and date.
P A Y C L O C K
E X P R E S S
U S E R ’ S
G U I D E - 2 1
Windows Vista - Install the PayClock
Express Software and PC50 Drivers
CAUTION
Before proceeding with your PayClock Express installation, verify
that your PC meets ALL of the System Requirements listed on page
8!
1. Prepare your computer
x
Select the computer you will use to manage the PC50
system
x
Close all programs, including virus protection software
2. Insert the PayClock Express CD
x
Insert the PayClock Express CD into your computer’s CD
ROM drive
x
The Setup program should run automatically, select Run
PcSetup.exe. If it does not, follow the steps below:
2 2 - P A Y C L O C K
E X P R E S S
U S E R ’ S
G U I D E
If AutoPlay does not run, follow the steps below:
¾ Click Start | All Programs | Accessories | Run from
the Windows taskbar
¾ At the command line, type d:\Payclock\PCSetup.exe
where d: is the letter of the drive for your CD-ROM
¾ Click OK
NOTE
PayClock Express software MUST be installed for hardware to
function.
x
Select Allow on the User Account Control window.
P A Y C L O C K
E X P R E S S
U S E R ’ S
G U I D E - 2 3
1. Select Install Type
x
Select Install Full PayClock Express and click OK
x
Note: You will only select Only Install PC50 Drivers when
you are installing the PC50 to a different computer.
1. Begin Setup
x
After you have read the screen, click Next to move forward.
2 4 - P A Y C L O C K
E X P R E S S
U S E R ’ S
G U I D E
5. Read the License Agreement
x
Select I Accept to accept the terms to move forward.
6. Select a Destination Folder
P A Y C L O C K
E X P R E S S
U S E R ’ S
G U I D E - 2 5
x
The default location for PayClock Express to be installed is
the C:PAYCLOCK folder
x
To change where PayClock Express will be installed on your
computer click Browse to locate your preferred folder.
x
Once you have specified a destination folder, click Next to
move forward.
7. Start Install
x
To start the installation process, click Next.
x
The installation will begin and the following windows will
appear:
2 6 - P A Y C L O C K
x
E X P R E S S
U S E R ’ S
G U I D E
The PayClock Server Connection Manager and PayClock
Terminal Service Manager icons will appear, indicating
that PayClock has been successfully installed. These icons
will display when you log in to Windows, but the PayClock
Server and PayClock Terminal Service will run without
being logged in to Windows.
8. Finish Install
x
Select Finish to complete the installation and to close the
install window. Note: Reboot the computer if prompted.
P A Y C L O C K
E X P R E S S
U S E R ’ S
G U I D E - 2 7
9. OPTIONAL: Install the PC50 terminal on a separate computer
from the one which contains the PayClock Express software.
The second computer MUST be on the same Local Area
Network (LAN) as the full PayClock Express Software
installation.
x
After installing PayClock Express on your computer, install
the PC50 drivers on the computer you will use to connect
the PC50 terminal.
x
Once you reach the Install Type window, select Only
Install PC50 Drivers. Click OK.
x
Continue, following the same installation instructions
outlined above. You will then be ready to connect the
PC50 to the second computer.
2 8 - P A Y C L O C K
E X P R E S S
U S E R ’ S
G U I D E
Connect the USB cable to the PC50
To begin setting up the terminal, first connect the 15ft USB cable
to the rear side of the PC50 as shown below.
NOTE
Be aware of the orientation of the USB cable to the port. Be sure
to insert the USB cable with the “THIS SIDE UP” label facing up
into the USB port (see diagram). Make sure the cable “snaps”
securely into place.
P A Y C L O C K
E X P R E S S
U S E R ’ S
G U I D E - 2 9
Connect the USB Cable to the
Computer
After connecting the USB cable to the PC50, connect the other end
of the cable to an available USB port on your computer, as shown
below.
NOTE
You can increase the distance between the PC50 terminal and your
computer’s USB port by purchasing USB cable extenders directly
from Lathem at http://shop.lathem.com or through an authorized
reseller
You may add up to four 16ft USB Extension Cables (P/N:
USBCABLE16)
-orYou may add one 150ft Super Extender Cable (P/N:
USBEXTENDER)
The computer will automatically begin installation of the required
software drivers. Follow these instructions to successfully complete
the installation of the software drivers. Note: The PayClock Express
CD should be left in the CD-Rom drive until you have loaded
these drivers.
3 0 - P A Y C L O C K
E X P R E S S
U S E R ’ S
G U I D E
These two software drivers must be installed for the PC50 to
operate properly: USB Device and Lathem TouchStation
Two separate “Found New Hardware Wizards” will appear in
succession. You must complete both Wizards. Please note that it
may take up to one minute or more for each Wizard to
automatically appear. Please be patient.
1. After successfully connecting the PC50 hardware to your
computer the message, “Found New Hardware” will
display. Select “Locate and install driver software
(recommended)”.
Note:
Up to 1
minute
may pass
before the
message
displays,
please be
patient.
2. The “Windows needs your permission to continue”
message will display. Select “Continue”.
P A Y C L O C K
E X P R E S S
U S E R ’ S
G U I D E - 3 1
3. The “Found New Hardware – Unknown Device” message
will display. Select “Browse my computer for driver
software (advanced)”.
4. The “Browse for driver software on your computer”
message will display. Click the “Browse” button.
3 2 - P A Y C L O C K
E X P R E S S
U S E R ’ S
G U I D E
5. The “Browse for folder” window will display. Click on
“Computer”, the list will expand. Next, select the CD-Rom
or DVD indicator in the list and click “OK”.
6. The “Browse for driver software on your computer”
message will display with the drive indicator for the selected
CD-Rom or DVD. Click the “Next” button.
Note:
Up to 1
minute may
pass before
the next
message
displays,
please be
patient.
P A Y C L O C K
E X P R E S S
U S E R ’ S
G U I D E - 3 3
7. The “Windows can’t verify the publisher of this driver
software” message will display. Select “Install this driver
software anyway”.
Important:
Do NOT select “Don’t install this driver software”
or your PC50 will not operate!
8. Click Close to complete the process of loading the first
driver.
3 4 - P A Y C L O C K
E X P R E S S
U S E R ’ S
G U I D E
9. Another “Found New Hardware” will display, click
“Next”.
10. The “Windows can’t verify the publisher of this driver
software” message will display. Select “Install this driver
software anyway”.
Important:
Do NOT select “Don’t install this driver software”
or your PC50 will not operate!
P A Y C L O C K
E X P R E S S
U S E R ’ S
G U I D E - 3 5
11. Click Close to complete the process of loading the second
driver.
12. A message will display notifying you the drivers have
successfully installed.
3 6 - P A Y C L O C K
E X P R E S S
U S E R ’ S
G U I D E
Mount the PC50
Select a site to install your PC50 terminal that will be convenient to
employees clocking in and out. The included USB cable is 15 feet
long. It may be extended using Lathem’s USB Extension Cables.
When planning the necessary cable length between the PC50 and
host computer, remember to consider the vertical drops between
the PC50 and the computer.
The PC50 terminal derives its power from the USB Port of its host
computer. No other power source is required for basic operation.
Future add-on enhancements to the PC50 family may require the
addition of an AC Power Adapter. To prepare your installation for
the future inclusion of these new features, it is suggested that the
PC50 be mounted in close proximity to an AC outlet.
After selecting the appropriate installation site, use masking tape to
hold the included Mounting Template onto the wall, at a suggested
height from the floor to the bottom drill-hole of 4ft, 6in. For
sheetrock walls, drill a 3/16” diameter hole through each of the
four locations indicated on the template; each approx 1-1/2” deep.
Remove the Template from the wall and install the plastic
“anchors” included in the installation kit. The smaller anchor goes
into the bottom hole. The three larger anchors go into the holes
P A Y C L O C K
E X P R E S S
U S E R ’ S
G U I D E - 3 7
above. Screw-in three larger screws into their corresponding
anchors, allowing the screw heads to have a gap of approximately
3/16“ to the wall. Do not tighten all the way.
Insert the small “L”-shaped security bracket into the slot at the
bottom-rear of the PC50, so that the tab with the hole points
downward, away from the keyhole slot that can be seen
immediately above.
Hang the Terminal on the wall, aligning the three keyholes on the
rear of the enclosure with the three protruding screw heads, and
then pressing downward on the Terminal housing until it lowers
onto the screws.
Screw the small Screw into the hole of the tab from the small “L”shaped bracket at the bottom of the enclosure. This will fasten the
PC50 to the wall, and keep it from being easily removed.
3 8 - P A Y C L O C K
E X P R E S S
U S E R ’ S
G U I D E
Open PayClock Express
Open the PayClock Express software by clicking on the PayClock
Icon located on your desktop.
Log In
To begin using PayClock Express, you must first Log In to the
system at the Log In Window. PayClock has one default user: the
Administrator. The Administrator has full access to system,
information, and functions.
NOTE
You may add additional concurrent users by upgrading to
PayClock EZ or PayClock Pro. Refer to page 3 of this User’s
Guide for information on purchasing software upgrades.
1. From the Log In window, choose Administrator from the User
List
2. Enter the default password: “lathem”
3. Click OK and the software will open. A welcome tone will let
you know that PayClock is ready for use.
P A Y C L O C K
E X P R E S S
U S E R ’ S
G U I D E - 3 9
Create and Change Your Password
You should create your own unique password to protect sensitive
payroll data.
1. At the Log In screen, click the Change button.
2. Type in your Old Password (remember, the default is “lathem”)
3. Type in your New Password (the one you would like to create)
4. Confirm your new password by typing it in
5. Click OK to finalize the change
NOTE
Passwords are NOT case sensitive and may be up to 11 characters
Register Your PayClock Express/PC50
You may register your system anytime within 30 days of installing
the software. If after 30 days you haven’t registered your system,
you will be required to do so before continuing to use the software.
There are three ways to register your software:
x
Complete the Registration Wizard that appears upon login. Select Register Now to fill in the requested information
4 0 - P A Y C L O C K
E X P R E S S
U S E R ’ S
G U I D E
and submit. If you do not have an internet connection,
select Print at the end of the wizard to print and fax your
information to Lathem at 1-800-252-2208
x
Call Lathem at 1-800-241-4990 and select option number 1
from the telephone menu to speak with a sales
representative.
x
Visit www.lathem.com/register and follow the steps
outlined
P A Y C L O C K
E X P R E S S
U S E R ’ S
G U I D E - 4 1
Configure PayClock Express
Create Company Profile and Setup Pay Period
The General Tab will allow you to define your company name and
your company’s pay period. You will enter when your pay period
begins, what type of pay period your company uses, etc.
To begin configuring your payroll preferences:
1. Click on the Setup Icon within the Ribbon Bar
2. Select the General Tab
3. Enter your Company Name (this is the name that will be
displayed on report headers)
4. Select your company’s Pay Period Type among the options (for
semi-monthly, you will be asked to enter the two dates, First
and Second, which is the starting date of each pay period)
4 2 - P A Y C L O C K
E X P R E S S
U S E R ’ S
G U I D E
5. Using the pull-down calendar, select the date on which your
pay period begins (or began)
6. To set the Maximum Hours Out to Start New Shift, enter the
number of hours an employee must be punched out before
PayClock will assume a new shift has started
7. To set the Maximum Work Day Length, enter the maximum
number of hours an employee can work in one day. It is
recommended you leave this setting at the default of 14 hours.
8. If you would like lunch breaks to be automatically deducted
from punched time, check the Auto Deduct box. Then, enter
the Worked Hours to Qualify (the number of hours worked
before the deduction will be taken). You then enter the Length
of time automatically deducted for this break.
NOTE
Automatic break deductions are optional. What is setup applies to
all employees in the software. Instead, you may prefer to have
employees punch in and out for breaks.
9. Click OK to save settings
P A Y C L O C K
E X P R E S S
U S E R ’ S
G U I D E - 4 3
Create Overtime Rules
In The Overtime Tab, you can set up how the software calculates
overtime hours. You may define up to two overtime levels.
1. If employees receive overtime pay on a daily basis, check the
first box.
x
For Overtime Level (1), select the rate at which employees
are paid for overtime work and the number of hours
worked (Limit) needed to earn this overtime
x
For Overtime Level (2), select the additional rate at which
employees are paid for additional overtime work on a daily
basis and the number of hours worked (Limit) needed to
earn this overtime
x
If an option is not applicable, choose “Not Selected”.
2. If employees receive overtime pay on a weekly basis, check the
second box.
x
For Overtime Level (1), select the rate at which employees
are paid for overtime work and the number of hours
worked (Limit) needed to earn this overtime
4 4 - P A Y C L O C K
E X P R E S S
U S E R ’ S
G U I D E
x
For Overtime Level (2), select the additional rate at which
employees are paid for additional overtime work on a daily
basis and the number of hours worked (Limit) needed to
earn this overtime
x
If an option is not applicable, choose “Not Selected”.
3. Select Daily OT Overrides Level 1 Weekly OT if your
employees will continue to receive Daily overtime after Weekly
overtime has been reached (this is not available if multiple
levels of weekly overtime are set up). Note: This option is
selected by default.
4. Choose your Weekly OT Start Day, select the day on which
you would like the overtime counter to reset back to zero (0).
Typically, this is the same as the starting day of your pay period
5. Click OK to save your settings.
Select Rounding Rules
Rounding rules allow you to define how your punch minutes will
be rounded. Specifically, rounding refers to the increments in
which the punches will be calculated. The point at which the
software will decide to adjust a punch time forward or backward is
known as the Break Point.
P A Y C L O C K
E X P R E S S
U S E R ’ S
G U I D E - 4 5
PayClock Express allows you to select one of three rounding
options:
No Rounding
Punches will be calculated to-the-minute.
x
If an employee punches in at 7:08am, the software will
calculate the time of entry as 7:08am
x
If an employee punches out at 5:23pm, the software will
calculate the time of departure as 5:23pm
¼ hour rounding
15 minute rounds with a 7 minute break point
x
Time is calculated in increments of 15 minutes: :00, :15, :30,
or :45
x
If an employee punches in at 7:08am, the software will
calculate the time of entry as 7:15 because :08 is after the
seven minute break point at 7:00
x
If an employee punches out at 5:20pm, the software will
calculate the time of departure as 5:15 because :20 is before
the seven minute break point at 5:15
1/10 hour rounding
6 minute rounds with a three minute break point
x
Time is calculated in increments of 6 minutes: 00, :06, :12,
:18, :24, :30, :36, :42, :48, :54
x
If an employee punches in at 7:08am, the software will
calculate the time of entry as 7:06 because :08 is before the
three minute break point after 7:06
4 6 - P A Y C L O C K
x
E X P R E S S
U S E R ’ S
G U I D E
If an employee punches out at 5:23pm, the software will
calculate the time of departure as 5:24 because :23 is after
the three minute break point after 5:18
To finalize your Rounding Rules, select the rule setting you prefer
and click OK.
Format Time And Date
The format tab allows you to decide how PayClock Express will
display dates and times within the software.
Software Time Settings: determines how time will be displayed:
x
12-Hour: displays time in increments of twelve hours
(12:00, 1:00, 2:00, etc)
x
24-Hour: displays time in increments of 24 hours (12:00,
13:00, 14:00, etc)
Software Date Settings: determines how dates will be displayed.
For the date of December 1, 2006, the following display options
exist:
x
MM/DD/YY: displays date as 12/01/06
P A Y C L O C K
E X P R E S S
U S E R ’ S
x
DD/MM/YY: displays date as 01/12/06
x
YY/MM/DD: displays date as 06/12/01
G U I D E - 4 7
Show Express Time Card in Black and White: check this box if
you would like the Express Timecard displayed in black and white,
rather than in yellow and green.
Hide Day of Week (DOW) column in Express Time Card: check
this box if you do not want the day of week column to display on
the Express Timecard.
x
Click OK to save your settings
4 8 - P A Y C L O C K
E X P R E S S
U S E R ’ S
G U I D E
Add Employees and Assign Badges
The Employees Icon is used to add, edit, delete, and filter
employees.
P A Y C L O C K
E X P R E S S
U S E R ’ S
G U I D E - 4 9
Add New Employees
1. Within the Employee Icon, click Add New.
2. Assign each employee a badge to use for punching in and out.
Each badge contains a unique ten digit badge number on the
back (see example below). The number of the badge assigned
to an employee must match the number entered in the
Badge Number field in that employee’s profile.
3. Insert the employee’s personal information in the appropriate
blanks.
4. You may include Base Pay rate in the employee’s profile in
order to allow PayClock to calculate gross pay on the timecard.
5 0 - P A Y C L O C K
E X P R E S S
U S E R ’ S
G U I D E
5. Use the pull down calendar to select a Date of hire for each
new employee.
6. To declare Inactive or to Terminate an employee from the
software, check ( ) the box next to the desired selection. This
will allow you to enter in the date of Inactivation or
Termination.
7. You may then use the pull down calendar to select a date of
Inactivation or of Termination.
8. To Add Sounds or Add Custom Messages for employees to
hear upon punching in or out, you must first check ( ) the
box that reads “On any Punch Play:”
x
For Sounds, scroll through the drop down menu to the
desired greeting.
x
To preview a greeting, press the
drop down menu.
x
To create your custom text message, simply type in the
message you would like displayed for that employee upon
punching in or out. Finally, select a number from the
drop-down menu “How many times should this message
play?”
9. Click OK to keep your changes
button next to the
P A Y C L O C K
E X P R E S S
U S E R ’ S
G U I D E - 5 1
Using the Clock and Badges
Move the badge towards the illuminated oval target area on the
front of the PC50. When the badge is in close proximity to the
PC50, a confirmation beep will sound, a text message will appear, a
custom audio message may be played, and the oval target area will
turn either green or red indicating a good or bad transaction.
If you scan a badge that has not yet been assigned to a specific
employee in PayClock Express, the terminal will display an error
message along with the badge number that was read.
NOTICE: The PC50 utilizes an internal antenna to read the
employee badges. Make sure these badges are stored at least 6”
away from the PC50 when not in use to avoid accidental badge
reads.
5 2 - P A Y C L O C K
E X P R E S S
U S E R ’ S
G U I D E
Navigating PayClock Express
Now that your software is installed and your PC50 is connected to
your PC, you may begin configuring your preferences within
PayClock Express. All of the PayClock Express functions are
contained within The Home Screen. Within the Home Screen,
there are four sections: the Ribbon Bar, the Express Timecard,
the Employee List, and the Information Center.
The Home Screen
Use the scroll buttons (circled) to move through pay periods.
Highlighting an employee will display his/her time card in the
Express timecard
PayClock
System Button
Ribbon Bar
Employee List
Express Timecard
Information Center
P A Y C L O C K
E X P R E S S
U S E R ’ S
G U I D E - 5 3
x
Ribbon Bar: use to navigate within the software and locate
functions
x
Express Timecard: use to edit and view individual punch
data
x
Employee List: use to view pay period summaries for all
employees
x
Information Center: use to find help and purchase
software upgrades and accessories
Changing the Display
PayClock Express allows you to re-size windows within the Home
Screen so that you may adjust the screen display as needed.
Sample Home Screen Displays:
You may adjust screen displays by using your mouse to click on
and resize windows
5 4 - P A Y C L O C K
E X P R E S S
U S E R ’ S
G U I D E
The PayClock System Button
The PayClock System Button, located at the top left-hand corner
of the Home Screen allows quick access to a number of important
tools. Use the PayClock System Button to access the following
critical functions:
x
Backup Data
x
Archive Data
x
Reopen the Last Pay Period
x
Recalculate
x
Refresh
x
Upgrade PayClock
x
Exit
To access these functions, click on the PayClock System Button
and highlight the desired function from the drop-down menu
P A Y C L O C K
E X P R E S S
U S E R ’ S
G U I D E - 5 5
The Ribbon Bar
Instead of a menu and toolbar, the Ribbon Bar allows you to
manage and edit your settings, as well as create reports, within one
comprehensive area.
The Setup Icon
x
create and edit your pay period rules
x
set overtime rules
x
set rounding rules
x
set formatting options
x
create an export link to your payroll program
5 6 - P A Y C L O C K
E X P R E S S
U S E R ’ S
G U I D E
The Employees Icon
x
Add and terminate employees
x
Edit employees’ personal information
x
Edit base pay
x
Create and assign custom messages or sounds
The Audio Icon
x
manage audio settings for the PC50
x
setup global messages to be played to all employees.
The Reports Icon
x
generate, preview, and print a Period Totals Report or an
individual Employee Timecard Report
x
view All Timecards in alphabetical order
P A Y C L O C K
E X P R E S S
U S E R ’ S
G U I D E - 5 7
The Export Icon
x
export pay period data into the payroll program previously
established
The Close Icon
x
Close the selected pay period to future editing. (after you
close a pay period, you may not go back to edit the data
within that period)
The Backup Icon
x
Back up pay period data to a specified file on their PC
5 8 - P A Y C L O C K
E X P R E S S
U S E R ’ S
G U I D E
The Help Icon
x
Opens the PayClock Express Interactive Help Viewer, which
acts as a reference for any questions or issues that may arise
as you use PayClock Express
The Finger Sensor Icon
x
Opens the Finger Template Management Wizard when a
Lathem Fingerprint Reader is connected to the PC50. This
allows you to register employee fingerprints into PayClock
Express (see page 3 for information on purchasing this and
other accessories).
The Employee List
The Employee List displays the list of active employees, the pay
period data for each employee, and is used to select employees in
order to edit or update data or to run individual reports.
P A Y C L O C K
E X P R E S S
U S E R ’ S
G U I D E - 5 9
Express Timecard
The Express Timecard gives you a quick view of individual punch
information and allows you to add, edit, or delete data as is
necessary. Use the Express Timecard Toolbar to add punches and
non-work time, as well as delete punches, and find missing
punches. The Timecard displays Base Hourly Pay and Gross Pay,
as well as total regular, overtime, and non-worked hours worked for
the selected pay period.
1. Select the desired employee from the Employee List
2. The employee’s Timecard will appear in the Express Timecard
area next to the Employee List.
6 0 - P A Y C L O C K
E X P R E S S
U S E R ’ S
G U I D E
Add Punch Icon
x
This button lets you add a new punch, as well as the date
and time for the new punch
Add Time Off Icon
x
This button lets you add time off for an employee and
select the date, time, and pay code category for the absence
P A Y C L O C K
E X P R E S S
U S E R ’ S
G U I D E - 6 1
Delete Icon
x
This button allows you to delete punches already on the
Time Card
The Refresh Icon
x
This icon will refresh the data in the timecards to reflect the
most recent activity
The Find Missing Icon
x
This button will locate any missing punches within an
Employee Timecard. PayClock looks for an even number
of punches. When an odd number of punches is found,
PayClock assumes that a punch is missing (an employee
punched In, but not Out, or vice versa).
6 2 - P A Y C L O C K
E X P R E S S
U S E R ’ S
G U I D E
The Time Card Table
The timecard table functions much like the cells in a spreadsheet.
By clicking on a desired cell, you may edit it as needed.
Date
Displays
the date of
punches
recorded in
the table
In / Out
Displays
the time of
an In or
Out punch
on a given
day
In / Out
Displays
the time of
an In or
Out punch
on a given
day
Hours
Displays
total hours
worked or
applied
time off for
a given day
The Information Center
The Information Center contains information on PayClock
software, including links to software help and support, user tips,
upgrades, and accessories. Clicking on a link will open a new
window.
P A Y C L O C K
E X P R E S S
U S E R ’ S
G U I D E - 6 3
View and Edit Employee Information
1. Select the desired employee from the Employee List and click
the Employees Icon from the Ribbon Bar
-orSelect an employee from the Employee List by double-clicking
on the employee’s name.
2. The Employee Window will open and you may edit any of the
information in the window.
3. Click OK to save any changes
Filter Employees
PayClock Express allows you to filter employees either by hiding
inactive or hiding terminated employees.
1. To filter employees, click the Filter option from the Employee
Icon within the Ribbon Bar
6 4 - P A Y C L O C K
E X P R E S S
U S E R ’ S
G U I D E
2. Use the arrow to select either Hiding Terminated Employees
or Hiding Inactive Employees
Employee List Pop-Up Menu
The Employee List Pop-Up Menu allows you to access both
individual and group information quickly, by right-clicking within
the Employee List. A menu will open with a number of options.
1. Select an employee within the Employee List
2. Right click on the row containing the employee’s information
3. Select among the menu options to perform the desired task. A
separate window will open.
x
Edit this employee: select this menu item to edit an
employee’s name, badge number, base wage, messages, etc
x
Add a new employee: select this menu item to add a new
employee to the system
P A Y C L O C K
E X P R E S S
U S E R ’ S
G U I D E - 6 5
x
Delete the employee: select this menu item to delete the
selected employee from the system (important: this cannot
be undone!)
x
Go to this employee’s Timecard: select this menu item to
move to the first cell of the employee’s timecard in the
Express Timecard area
x
Show the Employee’s Totals Report: this menu item will
display a Totals report for the selected employee
x
Show this Employee’s Timecard Report: this menu item
will display a Timecard Report for the selected employee
x
Show Period Totals Report: this menu item will display a
Period Totals report
Edit Timecards
You may edit an employee’s Timecard data in the Express
Timecard area of the Home Screen.
Add Punches
6 6 - P A Y C L O C K
E X P R E S S
U S E R ’ S
G U I D E
To add a punch to an employee’s timecard:
1. Select an employee from the Employee List
2. Click the Add Punch Icon
3. The Registration Edit screen will pop-up. Enter the Time and
Date you wish to enter for this punch
4. Click OK to add the punch. You will see your new punch
displayed on the Employee Time Card
Add Time Off
To add time off to an employee’s timecard:
1. Select an employee from the Employee List
2. Click the Add Time Off Icon
3. The Registration Edit screen will pop-up. Enter the Time and
Duration (number of hours) you wish to enter for the Time
Off
4. Select the Date on which you would like the Time Off applied
and the Pay Code (label you would like to give the absence).
P A Y C L O C K
E X P R E S S
U S E R ’ S
G U I D E - 6 7
5. Click OK to add the time off. You will see your new entry
displayed on the Employee Time Card.
Delete Punches
To delete a punch from an employee’s timecard:
1. Select an employee from the Employee List to view his/her
timecard
2. Select the cell that contains the punch you would like to delete
3. Click the Delete Punch Icon
4. A pop-up screen will ask “Are you sure you want to continue
with this deletion?” If you would like to continue, click Yes. If
not, click No
5. You will no longer see the deleted punch displayed on the
Employee Time Card.
6 8 - P A Y C L O C K
E X P R E S S
U S E R ’ S
G U I D E
Refresh Data
To refresh your data, simply click the Refresh Data Icon. Any
updates will automatically upload into the data.
Find Missing Punches
1. Select an individual Employee Timecard from the Employee
List
2. In the Express Timecard screen, select the Find Missing Icon.
3. If there are missing punches, correct them one-at-a-time. If
there are no missing punches, PayClock will display the
message: “No Exceptions Found”.
P A Y C L O C K
E X P R E S S
U S E R ’ S
G U I D E - 6 9
Show Unused Punches
In the Express Timecard, you may view any punches that have been
recorded by the PC50 terminal, but deleted in the Express
Timecard. In addition, this box will show any punches which fell
outside of the allotted work day. To change maximum work day
settings, select the General Tab from the Setup Icon and adjust the
hours entered in Maximum Work Day Length. Note: Making a
change to the Maximum Work Day Length will be applied to all
employees.
Check the Show Unused Punches box. If there are no unused
punches, this checkbox will display: “There are NO unused
punches for this employee”. All unused punches will be displayed
in list format, along with a description of the punch.
Close A Pay Period
The Close Icon allows you to close out the current pay period.
You cannot edit data from a closed pay period, although you may
7 0 - P A Y C L O C K
E X P R E S S
U S E R ’ S
G U I D E
still run reports and exports. Make sure that you are finished
making changes to the data for a pay period before closing it.
1. Click the Close Icon in the Ribbon Bar. The Close Pay
Period window will appear.
2. Under PayClass, you will see the date that the pay period was
last closed.
3. Click Apply. The Confirm Close dialog box will appear.
Make sure that the dates listed in this window are the dates that
you would like to close out.
4. Confirm the close by typing ‘Yes’ in the box and clicking OK
Reopen a Pay Period
Reopening a previously-closed pay period will allow you to view
and edit employee timecards, just like before the pay period was
P A Y C L O C K
E X P R E S S
U S E R ’ S
G U I D E - 7 1
closed. Reopening the last pay period will display the punch
records from that period and reset the pay period settings for that
period, but will not restore the rules for that pay period.
1. Select Reopen Last Pay Period from the drop-down menu
within the System Button. The Reopen Last Pay Period
window will appear
2. Under Pay Class, choose Standard
3. Type Yes in the box to confirm that you want to reopen the
last pay period
4. Click Apply to complete the reopen
Recalculate Data
Selecting Recalculate from the System Button option will
instantly update the data calculations for all employees in the
software.
Refresh Data
Selecting Refresh from the System Button option will instantly
update and reload the screen.
7 2 - P A Y C L O C K
E X P R E S S
U S E R ’ S
G U I D E
Backup Data
It is important to backup your data to protect your records in the
event of a disaster. The Backup function makes a complete copy of
all of your files in the Database folder and then compresses them
into one file.
1. Select Backup Data from the drop-down menu under the
System Button.
2. The Database Backup Manager window will open
3. PayClock automatically locates your data and displays the
location under Database to Backup. Under File Name, select
the name you want to give your backup file (the default is
simply Database). Backups have the file extension TDK. If you
give your backup file the same name each time you backup, the
file will be updated with the latest information. Your file will
not be written over.
4. In the Note space, you may add a description of your file (this
is optional).
P A Y C L O C K
E X P R E S S
U S E R ’ S
G U I D E - 7 3
5. Locate the destination for your backup file under Write the
Backup to this location section. If you would like to make
this destination file as your default, select Save as my Default
Backup Location.
6. To simply backup current and next pay period data (and not
closed pay period data), select Exclude History Data.
7. To create the backup file, click Create. When the backup
process is complete click Close.
Archive Data
Archiving your data will allow you to free up space on your hard
drive. You may only archive closed pay periods.
To Archive Data, select the option from the drop-down menu
under the System Button. The following window will appear.
1. PayClock automatically locates your data and displays the
location under the Database to Archive field.
7 4 - P A Y C L O C K
E X P R E S S
U S E R ’ S
G U I D E
2. Select the pay periods you would like to archive from the
Historical Pay Period field. Check Select All to select all of
the listed pay periods.
3. Select a name for your file and type it in the File Name field.
All archived files have a TDA extension.
4. You may write a description of the file in the Note field.
5. Locate the destination for your archive file under Write the
Archive to this location section. If you would like to make
this destination file as your default, select Save as my Default
Backup Location.
6. To create the archive file, click Create. When the archive
process is complete click Close.
Upgrade PayClock
After using your PayClock system, you may find that you want to
upgrade to allow for more employees or software features. It is as
simple as selecting the features and entering a credit card number;
you will be able to download software and upgrade your system
with the desired features. Note: for instant credit card activation, an
internet connection is required. To upgrade PayClock Express to
PayClock EZ or Pro:
x
Click the System Button in the upper left hand corner and
select Upgrade PayClock… from the menu
x
A window will open outlining the upgrade process. Select
the desired features and follow the on-screen instructions to
make your purchase and upgrade your system
Exit PayClock Express
There are three ways to exit the software:
P A Y C L O C K
E X P R E S S
U S E R ’ S
G U I D E - 7 5
x
In the upper right hand corner of the Home Screen, select
x
To exit and log out from PayClock Express, select Exit
from the scroll down menu under the System Button.
x
You may also use the System Button to quickly close the
software, by double-clicking on the icon.
Adjust Audio Settings for the PC50
1. Click the Audio icon from the Ribbon bar
2. Set the volume level you prefer for the PC50
3. If you’d like to set the clock up to play a specific greeting for
In and Out punches, select Play a sound for In/Out punches.
By default employee In punches will play “Badged In” and
employee Out punches will play “Badged Out”
4. To select a message to be played for all In punches, check the
box next to On all In Punches play. Next, use the scroll down
menu to select the sound you prefer. You may play sounds by
clicking the test sound button to the right of the selection field.
Repeat these steps to select a sound for all Out punches by
checking the box next to On all Out Punches play.
7 6 - P A Y C L O C K
E X P R E S S
U S E R ’ S
G U I D E
5. Select Play a sound for a range of punches to choose what
audio sound and/or message plays on the PC50 terminal for all
punches during a specific period of time.
NOTE:
You have the option of setting up messages for In punches, Out
punches, or both.
P A Y C L O C K
E X P R E S S
U S E R ’ S
G U I D E - 7 7
Run Reports and Exports
Reports are accessible in the Reports Icon within the Ribbon Bar.
Use the date navigation buttons or select a pay period button to
choose the desired pay period
7 8 - P A Y C L O C K
E X P R E S S
U S E R ’ S
G U I D E
You may change your formatting preferences by clicking the
Options button within a report and edit your data and display
formats
Employee Timecard Report
The Employee Timecard Report provides individual employees’
Name, ID number, total regular, overtime, and miscellaneous nonworked hours for the pay period, as well as automatic meal
deductions for that individual.
P A Y C L O C K
E X P R E S S
U S E R ’ S
G U I D E - 7 9
1. Using the scroll buttons or Select a Pay Period button, choose
the pay period for which you would like to generate a report.
2. Select the desired employee from the Employee List
3. Select Employee Timecard from the Report Icon in the
Ribbon Bar
4. The Employee Timecard Report will appear. You may now
print and review the report
Period Totals Report
The Period Totals Report provides a summary view of all
Employees’ total hours and total gross pay for the pay period
8 0 - P A Y C L O C K
E X P R E S S
U S E R ’ S
G U I D E
1. Using the scroll buttons or Select a Pay Period button, choose
the pay period for which you would like to generate a report
2. Select Period Totals Report from the Reports Icon in the
Ribbon Bar
3. The Period Totals Report will appear. You may now print and
review the report
All Timecards Report
Choosing All Timecards from the Reports Icon will pull up all
employee timecards, arranged in alphabetical order. You may scroll
to the next employee by using the Forward button or the previous
employee using the Back button
1. Using the scroll buttons or Select a Pay Period button, choose
the pay period for which you would like to generate a report
2. Select All Timecards from the Reports Icon. Timecards will
appear in alphabetical order
P A Y C L O C K
E X P R E S S
U S E R ’ S
G U I D E - 8 1
NOTE:
For all reports, you may use the Print Icon in the report toolbar to
print the report. Click Close to exit the report
Export Payroll Data
Payroll Export Wizard
The Payroll Wizards Tab helps you setup your data for export
into a format your payroll service can read. PayClock Express can
export data into QuickBooks, Paychex, and ADP payroll software.
You can also export data into ASC II format
To run an export wizard:
1. Select the Setup Icon from the Ribbon Bar
8 2 - P A Y C L O C K
E X P R E S S
U S E R ’ S
G U I D E
2. Select the Payroll Wizards tab, then highlight the payroll
program your company uses
3. Click Setup to run the Payroll wizard
4. The wizard will take you through the setup for your particular
payroll program. Fill in the requested information in each step
and click Finish
5. Your payroll export will now be available in the list of Payroll
Interfaces
Create a Payroll Export File
After completing the payroll wizard setup, PayClock Express can
export your time and attendance data directly into your payroll
system. The Export Icon creates a separate file that your payroll
program can read.
1. Select the Export Icon from Ribbon Bar
2. The Export Payroll Data window appears
3. Under Payroll Interfaces, select the export option you would
like to create
4. Under Period to Export from, choose which pay period you
want to export
5. Click the Export button; You will see a window indicating that
your file is being processed, followed by a window indicating
that your file has been created.
P A Y C L O C K
E X P R E S S
U S E R ’ S
G U I D E - 8 3
Install the Wall Mount Fingers
Sensor Attachment
With the TS-WFS (Wall Mount Finger Sensor) attached to your
PC50 terminal, employees can punch in and out by scanning their
finger instead of using their badge. When an employee places their
finger on the sensor, the PC50 terminal will scan the fingerprint
and compare it to the stored fingerprints. When the fingerprint is
matched, a record of the punch will be added to the database and
will show In or OUT on the PC50 display, along with the employee
name and total hours for the pay period.
Note: The Biometric Fingerprint Reader is available for purchase
at
http://shop.lathem.com
1. Connect the TS-WFS (the Biometric Fingerprint Reader
Attachment) to one of the two additional USB ports on your
PC50. In the Notification Area of your computer, next to the
USB icon, the following message will appear: “Found New
Hardware”. The driver will be loaded automatically
2. Reboot your computer
3. When the computer finishes the reboot process, the sensor
window on the TS-WFS attachment will illuminate, indicating
that it is ready for use
4. You are now ready to begin using the Biometric Fingerprint
Reader attachment with your PC50 and PayClock Express
Note: A Lathem PC-50 Power Adapter is included with a (TSWFS) Wall Mount Finger Sensor attachment. It is highly
recommended to use the power adapter when connecting the finger
sensor.
8 4 - P A Y C L O C K
E X P R E S S
U S E R ’ S
G U I D E
Enroll Fingerprints
1. Select the Finger Sensor Icon from the Ribbon Bar
2. Select the employee you would like to enroll from the drop
down menu. You can also assign employees to work stations by
selecting the corresponding button
3. Select the finger(s) the employee will use for enrollment
4. At this point, you may change default security levels. Adjust the
security level to meet your company’s needs and click Next
P A Y C L O C K
E X P R E S S
U S E R ’ S
G U I D E - 8 5
NOTE
The higher the security level, the more sensitive the fingerprint
reader is (refer to glossary under “Security” for more detailed
information on setting security levels)
5. Click Begin Registration. Follow the step-by-step instructions
displayed in the Instruction box to scan fingerprints. Each
fingerprint must be scanned four times to be successfully
registered and one time to be verified.
8 6 - P A Y C L O C K
E X P R E S S
U S E R ’ S
G U I D E
6. When finished, click Next. You may choose to Enroll another
finger for this employee, Enroll another employee, or Close
the wizard. Select the desired option or click Close.
P A Y C L O C K
E X P R E S S
U S E R ’ S
G U I D E - 8 7
Troubleshooting
If you cannot locate an answer to your question or issue within the
troubleshooting section, please contact Lathem support by
telephone at 1-800-241-4990 (charges may apply if you do not have
a support agreement) or refer to the support section of our website
at http://support.lathem.com
Hardware
Q. When I present a badge, it does not record and the clock
does not signal any errors.
A. Make sure you swiped the badge correctly. Pass the badge
within range of the terminal, within 3 to 4 inches of the front
of the terminal.
Q. The badge reader works intermittently:
A. Your computer’s USB port is low on power which is needed to
run the terminal. You will need to purchase an external power
supply to increase the power available to run the unit. It is
recommended that you use only a Lathem PC-50 Power
Adapter (a “Regulated” 5vDC, 2.0 Amp Adapter that has been
tested for this purpose) rather than a generic power adapter.
Use of other Adapters may damage the Terminal and will
void your Warranty
To purchase this product, visit http://shop.lathem.com
(Reference Part# VIE2764 5vDC / 2.0Amp Regulated Power
Adapter)
Note: A Lathem PC-50 Power Adapter is included with a (TSWFS) Wall Mount Finger Sensor attachment. It is highly
recommended to use the power adapter when connecting the finger
sensor.
8 8 - P A Y C L O C K
E X P R E S S
U S E R ’ S
G U I D E
P A Y C L O C K
E X P R E S S
Index
A
Accessories, 3
Add a new employee, 48
Add Punch Icon, 60
Add Time Off Icon, 60
All Timecards Report, 80
Archive Data, 73
Audio Settings, 75
B
Backup Data, 72
Backup Icon, 57
Base Pay, 49
C
Close A Pay Period, 69
Close Icon, 57
Company Profile, 41
D
Date of hire, 50
Date Settings, 46
Delete Icon, 61
Delete Punches, 67
E
Edit employee information, 63
Employee List, 58
Employee Timecard Report, 78
Employees Icon, 56
U S E R ’ S
G U I D E - 8 9
9 0 - P A Y C L O C K
E X P R E S S
Enroll Fingerprints, 84
Export Icon, 57
Export Payroll, 82
Express Timecard, 59
F
Filter Employees, 63
Find Missing Punches, 68
Finger Sensor Icon, 58
Fingerprint Reader, 83
Forward button, 80
H
Help, 4
Help Icon, 58
Home Screen, 65
I
Inactive, 50
Information Center, 53, 62
L
Logging In, 38
M
Messages, 50
Mounting The PC50, 36
O
Options button, 78
Overtime, 43
U S E R ’ S
G U I D E
P A Y C L O C K
P
Password, 38
Pay Period, 41
Payroll Wizards Tab, 81
Period Totals Report, 79
R
Recalculate Data, 71
Refresh Data, 71
Registering, 39
Reopen a Pay Period, 70
Reports, 77
Reports Icon, 56
Ribbon Bar, 55
Rounding Rules, 44
S
Setup Icon, 55
System Button, 54
System Requirements, 8
T
Terminate, 50
The Find Missing Icon, 61
Time Card Table, 62
Time Settings, 46
Troubleshooting, 87
U
Upgrades, 3
E X P R E S S
U S E R ’ S
G U I D E - 9 1
9 2 - P A Y C L O C K
E X P R E S S
U S E R ’ S
V
View and edit employee information, 63
G U I D E
Printed in USA
USG0058B