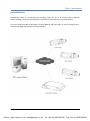
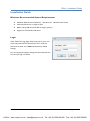
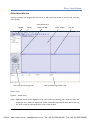
1
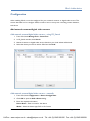
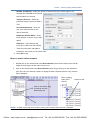
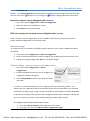
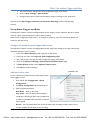
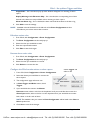
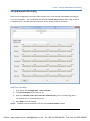
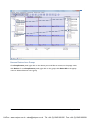
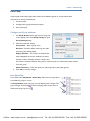
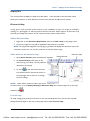
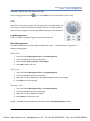
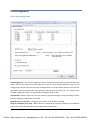
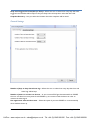
Grandstream Networks, Inc. GSurf User Manual VoIPon www.voipon.co.uk [email protected] Tel: +44 (0)1245 808195 Fax: +44 (0)1245 808299 GSurf – Contents Contents Introduction 3 Installation 4 Minimum Recommended Requirements Login 4 Main Window 5 Menu Items 5 Toolbar Items 6 Play Bar Items 7 4 Configuration 8 Add network cameras/ digital video servers 8 How to watch video stream 9 Remove network cameras/ digital video servers 10 Edit the settings of network cameras/ digital video servers Set up alarm triggers and rules 11 Set up auto recording 13 Create groups 14 Patrol play 15 Replay tool 16 Electronic map 16 Pan Tilt Zoom (PTZ) 17 Log Management 17 User Management 17 Local Configuration 18 Firmware 1.0.0.28 10 Page 2 of 20 VoIPon www.voipon.co.uk [email protected] Tel: +44 (0)1245 808195 Fax: +44 (0)1245 808299 GSurf – Introduction Introduction Grandstream GSurf is a monitoring and recording system for up to 36 cameras. GSurf supports remote viewing, control and recording from anywhere on the Internet or corporate network. This user manual provides a description of GSurf features and instruction on how to integrate your cameras and digital video servers with this software. Firmware 1.0.0.28 Page 3 of 20 VoIPon www.voipon.co.uk [email protected] Tel: +44 (0)1245 808195 Fax: +44 (0)1245 808299 GSurf – Installation Guide Installation Guide Minimum Recommended System Requirements Windows 2000 Server Professional, Windows XP, Windows Vista 32 bits CPU: Intel Pentium 4 or higher, 2 GHz RAM: 1 GB (3 GB recommended for larger systems) Support for DirectX 8.0 and above Login Open GSurf. The login page will prompt you for your user name and password. The administrator user name and password are both set to admin at the factory default settings. For security purpose, please change the password after the first time you log in to GSurf. Firmware 1.0.0.28 Page 4 of 20 VoIPon www.voipon.co.uk [email protected] Tel: +44 (0)1245 808195 Fax: +44 (0)1245 808299 GSurf – Main Window GSurf Main Window The user interface was designed for ease-of-use to offer quick, easy access to cameras and recording in the system. MENU Toolbar PTZ control and view groups View Devices and Electronic Map Video Display Play bar View operation log and alarm log Menu items System - Switch users. View - Different panels can be displayed in the main window by selecting your preference from the dropdown menu. GSurf can display the Toolbar, Device Browser, Map Browser, Alarm List, Log List, PTZ console and Group Browser on the main window. Firmware 1.0.0.28 Page 5 of 20 VoIPon www.voipon.co.uk [email protected] Tel: +44 (0)1245 808195 Fax: +44 (0)1245 808299 GSurf – Main Window Configuration Time Schedule - Add, edit and remove auto recording time schedules. Event Configuration – Add, edit and remove alarm triggered event rules. Device Configuration – Add, edit and remove digital video servers or network cameras. Local Configuration – Establish recording settings for one or more cameras. Play Mode Free Play – In free play mode, the user can define where to watch the video streams. Patrol Play – In patrol play mode, GSurf plays video streams from different groups in a loop. Manage Tool User Management – Add, edit and remove users. Log Management – View and search operation logs and alarm logs. Replay Tool – Browse and view recorded video streams. Search Tool – Search the Grandstream digital video servers and network cameras in the same LAN. Help – Information about Grandstream GSurf Toolbar items Lets you browse and manage the connected DVS or cameras. Lets you manage all electronic maps. Right Click to add a new map. GSurf supports the grouping of connected DVS units or cameras. This panel allows users to manage their groups. PTZ controller. Click this icon to open/close the login logs. Click this icon to open/close the alarm logs. Click this icon to choose the number of channels that will be displayed on the main window. Click this icon to open the play bar in each video display window. Click this icon to broadcast audio through the speakers Click this icon to display the GSurf software version number. Firmware 1.0.0.28 Page 6 of 20 VoIPon www.voipon.co.uk [email protected] Tel: +44 (0)1245 808195 Fax: +44 (0)1245 808299 GSurf – Main Window Play Bar Items Stops the displayed video in the channel. Records the video in the channel. The icon will display service changes, if GSurf is recording the videos, the icon will turn . The recorded video file will be saved in C:\GS_Record. Takes a snapshot from the video in the channel. By default, the captured image will be saved in C:\GS_Capture. Toggles the sound channel On / Off. At factory default settings, the sound is off. The icon will display service changes, if the sound is on, the icon will turn . Establish or close two-way audio in the channel. At factory default settings, there is no audio connection. The icon will display service changes, if the two-way audio is established, the icon will turn Firmware 1.0.0.28 . Page 7 of 20 VoIPon www.voipon.co.uk [email protected] Tel: +44 (0)1245 808195 Fax: +44 (0)1245 808299 GSurf – Add a device Configuration After installing GSurf, it must be configured for your network cameras or digital video servers. This section describes how to configure GSurf, as well as how to set up auto recording, motion detection, and alarms. Add network cameras/digital video servers Add network cameras/digital video servers – using GS_Search 1. From GSurf, click Manage Tool > Search Tool. 2. In GS_Search window, click Search. 3. Network cameras or digital video servers found on your local subnet will be listed. 4. Select the device you want to add to GSurf and click Add. Add network cameras/digital video servers – manually 1. From GSurf, click Configuration > Device Configuration. 2. Click Add to open the Add a Device dialog. 3. Enter the required information. Device Name – Enter a name for the device. Model – Select the device type, DVS or IP Camera. Firmware 1.0.0.28 Page 8 of 20 VoIPon www.voipon.co.uk [email protected] Tel: +44 (0)1245 808195 Fax: +44 (0)1245 808299 GSurf – How to play video stream Number of Channels – Select the number of channels that your device supports. For example, the GXV3504 has 4 channels and GXV3601 has 1channel. Transport Protocol – Select the preferred transport protocol, UDP or TCP. User Name/password – Enter the user name and password for the device’s web GUI. IP Address/ Domain Name – Enter the IP address or domain name of the device. RTSP Port – If the device’s web access port is 80, enter 554 as RTSP Trans-Port, otherwise, add 2000 to the device’s web access port and enter here. 4. Click OK to save. How to watch video streams 1. Double click on the device listed in the Device Browser panel; the live video stream will be display in the first pane of the video monitor area. 2. Click on the device listed in the Device Browser panel; drag it and drop to the destination pane. The users can determine where to display the video channels and how many channels will be displayed. GSurf is playing video of the channel Channel is idle Click on the device, drag it and drop it to the destination pane NOTE: If GSurf cannot play the live video stream, please double check the host, credentials Firmware 1.0.0.28 Page 9 of 20 VoIPon www.voipon.co.uk [email protected] Tel: +44 (0)1245 808195 Fax: +44 (0)1245 808299 GSurf – Remove/Edit a device and RTSP ports. NOTE: In the Device Browsers panel, the device icon displays service changes. If the channel is idle, the icon will show as . And the icon will change to if GSurf is playing video from that channel. Remove network cameras/digital video servers 1. From GSurf, click Configuration > Device Configuration. 2. Select the device you would like to remove. 3. Click Delete to remove the device. Edit the settings of network cameras/digital video servers After a network camera or digital video server is added to GSurf, the user may need to perform greater software configurations to meet their needs. Edit basic settings To change the host name, device name, RTSP, transport protocol, user account credential and device description: 4. From GSurf, click Configuration > Device Configuration 5. Click on the device/channel you want to configure. The configuration window will come out. 6. Change the setting properly; Click Save to save all the changes. Choose a Stream - primary stream or secondary stream 1. From GSurf, click Configuration > Device Configuration 2. Click on the device/channel you want to configure. The configuration window will appear 3. In the Stream Mode dropdown list, select the stream you prefer In order to conserve bandwidth, users can configure primary and secondary streams. For instance, the user might like to watch the live video stream from the web GUI in low resolution mode while recording a copy in high resolution mode due to the limitation of internet bandwidth. In this case, for example, primary stream can be configured to have better resolution, and then the users can use primary stream to record while watching secondary video streams. To configure the primary and secondary stream 1. From GSurf Device Browser panel, right click on the device. 2. In the pop out menu, click Open the web configuration pages. Firmware 1.0.0.28 Page 10 of 20 VoIPon www.voipon.co.uk [email protected] Tel: +44 (0)1245 808195 Fax: +44 (0)1245 808299 GSurf – Set up Alarm Triggers and Rules 3. Your web browser will open the web configuration pages of the device. 4. Click on Basic Settings > Video & Audio. 5. Configure the primary stream and secondary stream according to your preference. Instructions for Alarm Triggers and Rules and Automatic Recording will be in the following sections. Set up Alarm Triggers and Rules Grandstream’s network cameras and digital video servers support motion detection and alarm events. They can report motion detection or alarm events to GSurf. GSurf can be configured to take actions – to notify such events to users. The instructions below will assist you with this set up. Configure the network cameras/digital video servers Grandstream’s network cameras and digital video servers need to be configured to report the motion detection and alarm events to GSurf. 1. From GSurf Device Browser panel, right click on the device. 2. In the pop out menu, click Open the web configuration pages. 3. Your web browser will open the web configuration pages of the device. 4. Click on the Advanced Settings > Motion Detection/Alarm Events page. 5. In Alarm Actions Section, check Upload to Alarm Center. 6. Click Save to save the changes. Add alarm action rules Available rules A rule is described of what actions to take when certain alarm triggers occurs. 1. From GSurf, click Configuration > Event Configuration. 2. The Event Configuration window will pop up. 3. Enter required information Rule Name – Enter a rule name. Play Sound – If it is checked, GSurf will play a sound when receiving an alarm report. Make sure to select a sound file and the duration in which it will be played. Record – If it is checked, GSurf will record the video upon receiving an alarm report. Users can also establish the duration of the recording. Firmware 1.0.0.28 Page 11 of 20 VoIPon www.voipon.co.uk [email protected] Tel: +44 (0)1245 808195 Fax: +44 (0)1245 808299 GSurf – Set up Alarm Triggers and Rules Popup Video – If it is checked, a pop up video window will appear on receiving an alarm report. Display Warning in the Electronic Map – If it is checked, the corresponding icon of that channel in the electronic map will flash red on receiving an alarm report. Write into Alarm Log – If it is checked, the alarm event will be written to the alarm log 4. Click Add to save the settings. NOTE: Available rules will be listed on the left side of the Event Configuration window. GSurf allows you to have various alarm actions. Edit alarm action rules 1. From GSurf, click Configuration > Event Configuration. 2. The Event Configuration window will pop up. 3. Select the rules you would like to edit. 4. Enter the required information. 5. Click Edit to save the changes. Remove alarm action rules 1. From GSurf, click Configuration > Event Configuration 2. The Event Configuration window will pop up. 3. Select the rules you would like to remove. 4. Click Delete to remove the rule. Configure the GSurf to take actions on alarm report 1. From GSurf, click Configuration > Device Configuration. Check Triggers and select a rule 2. Select the device you would like to monitor the alarm reports. 3. The configuration page will comes out. 4. In Alarm Triggers and Rules section, check Triggers. 5. If you would like the monitor the Motion Detection events, select a rule from the dropdown list. If you would like the monitor the Alarm Input events, select a rule for it in the dropdown list. If you would like to monitor both, select a rule for each of them. NOTE: The available rules you created in Event Configuration will be listed in the Select a Rule dropdown list. 6. Click Save to save all the changes. Firmware 1.0.0.28 Page 12 of 20 VoIPon www.voipon.co.uk [email protected] Tel: +44 (0)1245 808195 Fax: +44 (0)1245 808299 GSurf – Set up Automatic Recording Set up Automatic Recording GSurf can be configured to record the video streams from some channels automatically according to some time schedules. The recorded file will be saved in C:\GS_Record. Follow these steps to set up a schedule. Once a schedule has been entered, it can be reused as often as necessary. Add Time Schedules 1. From GSurf, click Configuration > Time Schedule 2. The Time Schedule window will pop up. 3. Enter the schedule name, date, start time and end time, you can scroll through the 15 minute time slots to select period blocks. 4. Click Add to save the settings NOTE: Available rules will be listed on the top of the Time Schedule window. Firmware 1.0.0.28 Page 13 of 20 VoIPon www.voipon.co.uk [email protected] Tel: +44 (0)1245 808195 Fax: +44 (0)1245 808299 GSurf – Create Groups Edit Time Schedules 1. From GSurf, click Configuration > Time Schedule 2. The Time Schedule window will pop up. 3. Select the schedule you would like to edit 4. Enter the required information 5. Click Edit to save the changes Remove Time Schedules 1. From GSurf, click Configuration > Time Schedule 2. The Time Schedule window will pop up. 3. Select the schedule you would like to remove 4. Click Delete to remove the schedule Configure the GSurf to record automatically 1. From GSurf, click Configuration > Device Configuration Check Start Automatic Recording and select a schedule 2. Select the device from which you would like to record the videos 3. The configuration page will appear. 4. In Automatic Recording section, check Start Automatic Recording, and select a schedule for it. NOTE: The available schedule you created in Time Schedule will be listed in the Select a Schedule dropdown list. 5. Click Save to save all the changes. Create Groups GSurf allows classifying network cameras/ digital video servers to up to 10 groups, which helps to manage the devices. For example, you can place network cameras in the same monitored area in to the same group. Add Devices to Groups From Device Browser panel, click on the device, drag it and drop it to the destination Group in Group browser panel. Firmware 1.0.0.28 Page 14 of 20 VoIPon www.voipon.co.uk [email protected] Tel: +44 (0)1245 808195 Fax: +44 (0)1245 808299 Remove Devices from Groups On Group Browser panel, right click on the device you would like to remove; on the popup menu, click Delete. Or on Group Browser panel, right click on the group; click Delete All on the popup menu to delete all devices in the group. Firmware 1.0.0.28 Page 15 of 20 VoIPon www.voipon.co.uk [email protected] Tel: +44 (0)1245 808195 Fax: +44 (0)1245 808299 GSurf – Patrol Play Patrol Play In patrol play mode, GSurf plays video streams from different groups in a loop. Follow these instructions to set up the patrol play. 1. Create Groups. 2. Configure the groups attributes properly. 3. Start patrol play. Configure the Group attributes 1. On Group Browser panel, right click on the group; on the popup menu, click Group Settings to open Group Settings dialog. 2. Enter the preferred settings. Group name – Enter a group name. Duration – Duration defines how long the video from this group will be played. Display windows – The number of channels that will be displayed on the main window. It is better that the number of display windows is larger than the number of devices added to the group to make sure you can watch all the video streams from the group. Allow Patrol Play – Check this option to add the group to patrol play groups. 3. Click OK to save the changes. Start Patrol Play From GSurf, click Play Modes > Patrol Play. GSurf starts to play videos from different groups in a loop. In Group Browser panel, the group icon will display status changes. The group changes to become Otherwise, the group icon is Firmware 1.0.0.28 , if GSurf is playing video streams from it. . Page 16 of 20 VoIPon www.voipon.co.uk [email protected] Tel: +44 (0)1245 808195 Fax: +44 (0)1245 808299 GSurf – Replay Tool & Electronic Map Replay Tool This tool provides the ability to replay recorded videos. It also provides a search function which allows you to perform a search based on the start time, end time, IP address, and channel. Electronic Map A map gives a visual overview of the cameras in your installation. A map is an image, for example a drawing or a photograph, on which you place cameras and views. GSurf supports an electronic map that lets you identify the locations of your cameras and the status of their alarms. Add an Electronic Map 1. Right click on the Electronic Map Browser; click on the Add a map on the popup menu. 2. Choose an image. The map will be displayed in the electronic map field. NOTE: The supported image files are: bmp, jpg or gif. GSurf will display the electronic map in full resolution, and the user can use the scroll bars to view the whole image. Add a device to the electronic map 1. Open Device Browser panel and electronic map field. Device Browser Electronic Map 2. On Device Browser panel, click on the channel, drag it and drop it to the preferred destination on the map. with the device name and 3. An icon the channel number will now be shown on the map. Right click on the icon to change the icon settings. NOTE: When GSurf receives an alarm report and the alarm action is set to Display Warning in Electronic Map, the corresponding icon on the map will flash red . Lock the map To avoid changing the positions of cameras on the map accidently, the users can lock the map after adding all devices. Right on the map, in the popup menu, enable Lock the map. Firmware 1.0.0.28 Page 17 of 20 VoIPon www.voipon.co.uk [email protected] Tel: +44 (0)1245 808195 Fax: +44 (0)1245 808299 GSurf GSurf – PTZ–&Local UserConfiguration Management Remove a device from the electronic map On the map, right click on the icon; click Delete to remove the device from the map. PTZ Click PTZ on the toolbar to open the PTZ panel. If the connected devices are PTZ cameras or have a PTZ device connected, users can use the console to adjust the focus, brightness, contrast, speed, IRIS, and also pan / tilt the devices. Log Management Users can search a log by the log type, start time and end time. User Management The GSurf administrator can add, modify and delete users here. The administrator can give users different privilege levels. Add a User 1. From GSurf, click Management Tool > User Management. 2. The User Management window will popup. 3. Enter the user name, password and privileges. 4. Click Add to add a new user. Edit a User 1. From GSurf, click Management Tool > User Management. 2. The User Management window will popup. 3. Select the user you would like the change the settings and enter the changes. 4. Click Edit to save the changes. Remove a User 1. From GSurf, click Management Tool > User Management. 2. The User Management window will popup. 3. Select the user you would like to delete. 4. Click Delete to remove the user. NOTE: Available rules will be listed on the left side of the User Management window. Firmware 1.0.0.28 Page 18 of 20 VoIPon www.voipon.co.uk [email protected] Tel: +44 (0)1245 808195 Fax: +44 (0)1245 808299 Local Configuration Recording Settings Items Recording Drives – This section displays the names, total space and free space of the local disks. This section also lets you select which local disks you can use to store recorded video files. You can also configure the reserve space for each disk. If multiple disks are chosen, GSurf will start from the first disk until the free space equals the reserved space, and then go to the next one. If a network drive has been mapped to the PC running GSURF it will appear there as well. On Disk Full – When a disk is full, users can choose to stop all recordings or keep recording and store them by deleting the oldest files on the disk. Split Files every X minutes – Configures the duration of each video recording. Keep recorded files for X days – Allows the user to decide how many days to keep the recorded files. If you select 0, then the files will always be kept unless the disk is full. Firmware 1.0.0.28 Page 19 of 20 VoIPon www.voipon.co.uk [email protected] Tel: +44 (0)1245 808195 Fax: +44 (0)1245 808299 Keep event triggered recorded files for X days – Allows the user to select how many days the event triggered recorded files will be kept; use 0 if you always want to keep them unless the disk is full. Snapshot Directory – Lets you select the location where the snapshots will be saved. General Settings Number of days to keep alarm/event logs – Allows the user to select how many days the alarm and event logs will be kept. Number of times to reconnect to devices – In case a camera/DVS gets disconnected from GSURF, the user can select how many times should GSURF try to reconnect with the device in order to retrieve the video signal. Run application when windows start – Select this option if you want GSURF to run automatically when windows boots up. Firmware 1.0.0.28 Page 20 of 20 VoIPon www.voipon.co.uk [email protected] Tel: +44 (0)1245 808195 Fax: +44 (0)1245 808299


![Section VII - Technical Specifications [ 920 KB]](http://vs1.manualzilla.com/store/data/005668651_1-8dca2c6e1104d59f56f239e80ee70ed9-150x150.png)