1
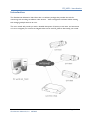
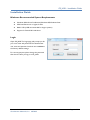
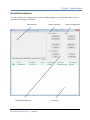
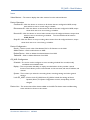
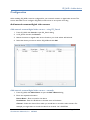
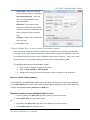
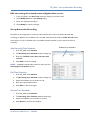
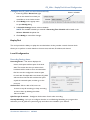
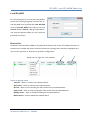
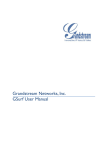
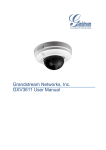
Grandstream Networks, Inc.
GSurf User Manual
GS_NVR – Contents
Contents
Introduction
3
Installation 4
Minimum Recommended Requirements
Login
4
Main Window
5
4
Configuration 7
Add network cameras/ digital video servers
7
How to watch video stream
8
Remove network cameras/ digital video servers
8
Edit the settings of network cameras/ digital video servers
Set up auto recording
9
Replay Tool 10
Local Configuration
10
Lock GS_NVR
11
Device List 11
Firmware 1.0.0.11
Grandstream Networks, Inc. 08/2009
9
Page 2 of 11
GS_NVR – Introduction
Introduction
The Grandstream Networks Video Recorder is a software package that provides the tools for
monitoring and recording surveillance video streams. Video management software enables viewing
and managing multiple cameras at once.
This user manual will provide you with a detailed description of buttons, menu items, and instruction
on how to integrate your cameras and digitals video server with GS_NVR to best satisfy your needs.
Firmware 1.0.0.11
Grandstream Networks, Inc. 08/2009
Page 3 of 11
GS_NVR – Installation Guide
Installation Guide
Minimum Recommended System Requirements
z
Windows 2000 Server Professional, Windows XP, Windows Vista
z
CPU: Intel Pentium 4 or higher, 2 GHz
z
RAM: 1 GB (4 GB recommended for larger systems)
z
Support for DirectX 8.0 and above
Login
Open GS_NVR. The login page will prompt you for
your user name and password. The administrator
user name and password are both set to admin at
the factory default settings.
For security purpose, please change the password
after the first time you log in to GS_NVR.
Firmware 1.0.0.11
Grandstream Networks, Inc. 08/2009
Page 4 of 11
GS_NVR – Main Window
GS_NVR Main Window
The user interface was designed ease-of-use, providing navigation tools that offer quick access to
cameras and recording in the system.
Video Monitor
GS_NVR Configuration
Firmware 1.0.0.11
Grandstream Networks, Inc. 08/2009
Device Operation
Device Configuration
Device List
Page 5 of 11
GS_NVR – Main Window
Items
Video Monitor - The section displays live video streams from the selected devices.
Device Operation
Connect All – Click this button to connect to all devices that are configured in NVR, except
those which are set to record using a schedule.
Disconnect All – Click this button to disconnect all devices that are configured in NVR, except
those which are set to record using a schedule.
Record All – Click this button to record video streams from all configured devices, except those
which are set to record using a schedule. The recorded file will be saved in
C:\GS_Record.
Stop All – Click this button to stop recording video streams from all configured devices, except
those which are set to record using a schedule.
Device Configuration
Search – Click to search other Grandstream DVS or IP Cameras on the LAN.
Add a Device – Click to add a device to NVR.
Delete Device – Click to delete the selected device from NVR.
Delete All – Click to delete all devices from NVR.
GS_NVR Configuration
Schedule – The tool is used to configure an auto recording schedule.You can add, modify
and delete time schedules here.
Replay – This tool provides the ability to replay recorded videos. It also provides a search
function which allows you do a search based on the start time, end time, IP address, and
channel.
System – This is where you select the recording drives, recording settings and other general
settings.
Lock GS_NVR – Click to lock GS_NVR. Once GS_NVR is locked, the settings of Device
Operation, Device, and System Configuration sessions, except Relay, can’t be
changed.
Device List – This section lists all the devices added to the NVR. The device status and Recording
status will also be shown in this section.
Firmware 1.0.0.11
Grandstream Networks, Inc. 08/2009
Page 6 of 11
GS_NVR – Add a device
Configuration
After installing GS_NVR, it must be configured for your network cameras or digital video servers. This
section describes how to configure GS_NVR, as well as how to set up auto recording.
Add network cameras/digital video servers
Add network cameras/digital video servers – using GS_Search
1. From GS_NVR, click Search to open GS_Search dialog.
2. In GS_Search window, click Search.
3. Network cameras or digital video servers found on your local subnet will be listed.
4. Select the device you want to add to GS_NVR and click Add.
Add network cameras/digital video servers – manually
1. From GS_NVR, click Add a Device to open the Add a Device dialog.
2. Enter the required information.
Device Name – Enter a name for the device.
Host Address– Enter the IP address or domain name of the device.
Channel – Select the channel from which you would like to record the video streams. For
example, you might want to record the video from channel 3 of a GXV3504.
Firmware 1.0.0.11
Grandstream Networks, Inc. 08/2009
Page 7 of 11
GS_NVR – Remove/Edit a device
Stream Type– Select the preferred
stream, primary stream or secondary.
User Name/password – Enter the
user name and password for the
device’s web GUI.
RTSP Port – If the device’s web
access port is 80, enter 554 as RTSP
Trans-Port, otherwise, add 2000 to the
device’s web access port and enter
here.
Schedule – Select a time schedule for
auto recording.
3. Click Add to save.
Choose a Stream Type - primary stream or secondary stream
Users may like to watch the live video stream from the web GUI in low resolution mode while
recording a copy in high resolution mode due to the limitation of internet bandwidth. In this case,
for example, the primary stream can be configured to have better resolution. Users can use the
primary stream to record while watching secondary video streams. With GS_NVR.
To configure the primary and secondary stream
1. Login the web configuration pages of the device.
2. Click on Basic Settings > Video & Audio.
3. Configure the primary stream and secondary stream according to your preference.
How to watch video streams
From GS_NVR, in the Device List, double click on the device, the live video stream will be displayed
on the Video Monitor area. If the video cannot be played, please double check the device settings, for
example, the host, user name, password and RTSP port.
Remove network cameras/digital video servers
1. From GS_NVR, in the Device list, select the device you would to remove.
2. Click Delete device to remove the device.
Or
1. GS_NVR, in the Device list, right click on the device you would to remove.
2. Click Delete device in the popup menu.
Firmware 1.0.0.11
Grandstream Networks, Inc. 08/2009
Page 8 of 11
GS_NVR – Set up Automatic Recording
Edit the settings of network cameras/digital video servers
1. From GS_NVR, in the Device list, select the device you would to edit.
2. Click Modify device to open Modify dialog.
3. Enter the required information.
4. Click Modify to save the changes.
Set up Automatic Recording
GS_NVR can be configured to record the video streams from various channels automatically
according to different time schedules. The recorded video file will be saved in C:\GS_Record. Follow
these steps to set up a schedule. Once a schedule has been entered, it can be reused as often as
necessary.
Add Recording Time Schedules
Available Time Schedules
1. From GS_NVR, click Schedule.
2. The Recording Time Schedule window will pop up.
3. Enter the schedule name, date, start time and
end time.
4. Click Add to save the settings.
NOTE:
Available schedule will be listed on the top of the
Recording Time Schedule window.
Edit Time Schedules
1. From GS_NVR, click Schedule.
2. The Recording Time Schedule window will pop up.
3. Select the schedule you would like to edit.
4. Enter the required information.
5. Click Edit to save the changes.
Remove Time Schedules
1. From GS_NVR, click Schedule.
2. The Recording Time Schedule window will pop up.
3. Select the schedule you would like to remove.
4. Click Delete to remove the schedule.
Firmware 1.0.0.11
Grandstream Networks, Inc. 08/2009
Page 9 of 11
GS_NVR – Replay Tool & Local Configuration
Configure the GS_NVR to record automatically
1. From GS_NVR, in Device List, right
Select a schedule
click on the device from which you
would like to record video stream.
2. Click Modify on the popup menu
to open Modify dialog.
3. In Schedule Settings section, select a schedule.
NOTE: The available schedule you created in Recording Time Schedule will be listed in the
Select a Schedule dropdown list.
4. Click Modify to save all the changes.
Replay Tool
This tool provides the ability to replay the recorded videos. It also provides a search function which
allows you to perform a search based on the start time, end time, IP address, and channel.
Local Configuration
Recording Settings Items
Recording Drives – This section displays the
names, total space and free space of the local
disks. This section also lets you select which
local disks will be used to store recorded video
files. You can also configure the reserve space
for each disk. If multiple disks are chosen, GS_NVR
will start from the first disk until the free space
equals the reserved space, and then go to the
next one.
On Disk Full – When a disk is full, users can
choose to stop all recordings or keep recording
and store them by deleting the oldest
files on the disk.
Split Files per X minutes – Configures the duration of each video recording.
Startup Watchdog – Let’s you to configure whether to run Watchdog. Watchdog is a program that
will watch your GS_NVR for system hang ups and reboot it as needed in your absence.
Firmware 1.0.0.11
Grandstream Networks, Inc. 08/2009
Page 10 of 11
GS_NVR – Lock GS_NVR & Device List
Lock GS_NVR
For security purpose, you can lock the GS_NVR to
protect it from being changed by someone else. To
lock GS_NVR, from GS_NVR, click Lock GS_NVR.
Then the Lock GS_NVR button will turn out to be
Unlock. Click the Unlock, a dialog will prompt for
user name and password. Enter you user name and
password to unlock it.
Device List
All devices which have been added to GS_NVR will be listed in this section. The detail information of
the device, for example, the device connection status and recording status, will also be displayed here.
You can also right click on the device to do device configurations.
Popup menu on right click on the devices
Items on popup menu
Connect – Click to connect to the selected device.
Disconnect – Click to disconnect the selected device.
Record – Click to start recording the video stream from the selected device.
Stop record – Click to stop recording the video stream from the selected device.
Modify device – Click to modify the settings of the selected device.
Delete device – Click to delete the selected device.
Firmware 1.0.0.11
Grandstream Networks, Inc. 08/2009
Page 11 of 11