1
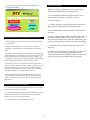
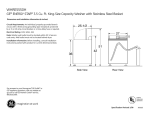
User’s manual of Personalized MP3 Clock
3. Click “Silence” if you want to insert silence between sounds.
Choose the length of silence and click “Select”. The “Free
Space” on the bottom of right hand corner shows the length
available for more sounds.
Installing the DIY Writer program
1. Please download the DIY Writer software from
www.mp3item.com/mp3diy.exe
This software is compatible with Windows 98, ME, 2000, and XP
operating system.
2. After download, please double click the file (mp3diy.exe) to
start installation. Follow the on-screen prompts to complete the
installation of the DIY Writer program onto your computer.
3. Please do NOT connect the clock to PC until the software
installation is done.
Preparing the Clock for recording
1. Remove the battery cover of the Clock.
2. Install 3 "AA" size (1.5V) batteries into the battery compartment and replace the cover.
3. Connect the clock to the USB port of your PC via supplied
USB cable. Windows will show “found new hardware” at the first
time. Let Windows search and install the driver automatically.
Alarm ON/OFF switch
4. After the selection is done, you can click “Preview” to play all
the selected sounds in the same sequence as recorded into the
Clock.
5. If you want to remove any of the selected sound, simply
choose the sound from the “Selected” window and click
“Delete”. If you want to repeat any sound, just select the sound
again (to repeat twice) or select it 3 times (to repeat 3 times) and
so on. Please note the repeat and silence will not occupy the
memory space. It is controlled by program.
6. To load selected sounds into the Clock, click “Record”. The
status bar will show the progress of recording. After the
recording is done, the Clock will play the sounds automatically.
Recording MP3, WAV or music CD into the
Clock
1. Click “DIY Writer” to switch to DIY Writer program.
Setting knob
USB cable Battery compartment Sound Check switch
Recording sounds from the DIY Sound Bank
2. Click “Record”, the open file dialog will pop out.
1. Run the DIY Writer program. There are 4 categories in the
Sound Bank, Soft, Normal, Noisy and Silence. Click “Soft” to
browse sounds in the Soft category. At the end of the name of the
sound, it shows the length of the sound in second. Click any
sound to preview through the speaker of your PC. Click “Select”
to choose the sound to be recorded into the Clock.
2. Follow the same procedures to browse, preview and select
sounds from “Normal” and “Noisy” categories.
3. Select the MP3, WAV or music CD sound track and click
“Open”. It will start recording the sound into the Clock.
4. After the recording is done, the Clock will play the recorded
sound automatically.
-1-
5. If you have more than one CD-ROM, place the music CD into
the Master CD-ROM. Also remember to close any CD player
program.
6. If you want to go back to the DIY Sound Bank, click
the “DIY Sound Bank”.
Troubleshooting
Whenever you have problems about the clock, please
follow the troubleshooting procedures below:
1. Take off batteries. Make sure all the batteries are in
good condition. Also the +/- polarity is correct.
2. Restart your PC.
3. Connect the cable to the PC's USB port and the clock.
Make sure the connections are good on both ends.
4. Run the DIY Writer software and record a sound into
the clock.
5. If the warning message "Please check the cable, it is not
properly connected" shows, there are two casuals. The
first is bad connection. The second one is bad battery (low
power or wrong polarity). Please check again accordingly.
Recording personal message into the Clock
1. Please prepare a microphone and connect to the microphone
port of your PC.
6. After download is complete, it will play sound automatically.
2. Run the "Sound Recorder" program (Start – Programs –
Accessories – Entertainment - Sound Recorder). The dialog
shows.
3. Click the "Record" button (round-red button on the right side
of the dialog) and start speaking to the microphone. Please note
the green horizontal line on the dialog will start vibrating. (If
not, please see section F below.) Once complete, click the "Stop"
button (square-black one next to record button) to stop.
4. To save the voice just recorded, please choose "File" then
"Save" from the command line of the dialog. Then the "Save As"
dialog shows. Change the "Save In" field to ready "Desktop",
type the file name, then press "Save". It saves the sound just
recorded as a WAV file on the desktop of your PC.
5. Run the DIY Writer program. In the dialog box, click the
"Record" button. Choose the WAV file just saved then press
"Open". It starts recording your own voice message into the
MP3 Clock.
Setting time and using alarm
1. To set time, pull out the Setting knob on back of clock. Turn
knob until clock shows correct time.
2. To set alarm, push knob in and turn until smallest arm points
to desired alarm time. Activate alarm by pressing ON/OFF
button on top of clock so button is raised.
3. To turn off alarm, press ON/OFF button down.
-2-
7. If it does not sound, take off all the batteries, make sure
they are good, reinstall batteries, watch the polarity
carefully. Then slide the “SOUND CHECK” switch “ON”
again. If it still does not sound, please record again.