1
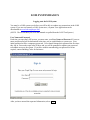
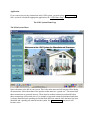
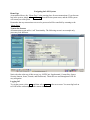
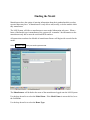
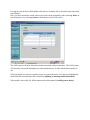
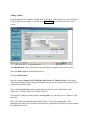
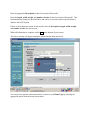
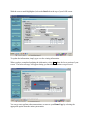
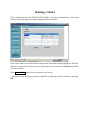
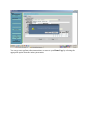
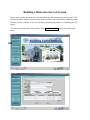
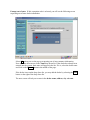
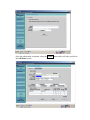
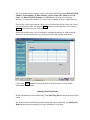
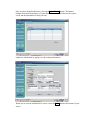
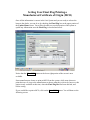
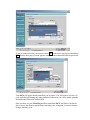
LOIS Manufactured
Structure System
User Manual
For Manufacturers
Updated 6/19/2009
GENERAL INFORMATION
Manufactured Home Ownership Tracking
Effective May 1, 2005, responsibility for maintaining ownership and siting information for
manufactured structures was transferred from Driver and Motor Vehicles (DMV) to the Building
Codes Division (BCD). Homeowners and other interested parties no longer contact DMV with
manufactured structures related questions. Instead, most transactions now take place at the
county taxation/assessment office, which will be acting on behalf of BCD. A second change is
that instead of “titling” a manufactured home like a car, the owner or security interest holder
receives an “Ownership Document”.
LOIS Manufactured Home System
The division has designed a manufactured housing computer system, nicknamed LOIS, to track a
home as it moves from manufacturer to dealer to the owner (and any resale). The system links
the parties to a manufactured structure transaction and maintains a central database of
information. Because LOIS is Web-based, most paperwork and delay will be eliminated for
everyone involved.
LOIS System Features
•
•
•
•
•
Maintains siting and ownership information for manufactured structures sited in Oregon
Provides real-time access to data
Limits access to authorized users and customizes functionality based upon the specific
user group
Generates ownership documents, trip permits, and manufacturers’ certificates of origin
Allows sophisticated data-reporting tools
Benefits of the LOIS System
Depending upon the user, LOIS allows an individual to:
•
•
•
•
•
•
Record ownership information quickly, with less paperwork
Access the system day or night – anywhere there is an Internet connection
Search for ownership and security interest information
Track secured interests online
Purchase and print trip permits online
Generate reports that you can use to track your work
Roles and Responsibilities
Generally, the roles of each of the user groups include:
Building Codes Division
9 Regulates access to ownership system
9 Processes problem transactions and transactions not processed by others
9 Notifies owners and interest holders when ownership changes are made
Manufactured Home Manufacturers
9 Initialize new homes in the system
9 May generate Certificate of Origin
9 May use system-generated form for Federal 302 (HUD) Report
Dealers
9 Record ownership of new and used homes
9 Record siting of new and used homes
9 May purchase trip permits
Lenders
9 Record security interests
9 May release, assign, or subordinate security interests
Title/Escrow
9 May represent dealers, lenders, and private owners and may execute transactions on their
behalf
Transporters
9 Purchase trip permits
9 Report delivery of home
Counties
9 Process any transactions listed above
9 Approve home exemption status
9 Process problem transactions
LOIS SYSTEM BASICS
Logging onto the LOIS System
You must be a LOIS system user before you will be able to conduct any transactions in the LOIS
system. If you are not currently a LOIS system user, a System User Application can be
downloaded at www.bcd.oregon.gov/lois.
(NOTE: The screen shots you see in this manual are pulled from the LOIS Test System.)
User Name and Password
Each time you open the LOIS system, you must enter your User Name and Password. Your user
name and password will be determined at the time you are established as a system user. Your
initial password will be a temporary password. Users should change their password the first time
they log in. Passwords expire after 90 days and you will be prompted to update your password
to maintain access to the system. If you have trouble remembering your password or it has
expired, contact Building Codes for assistance.
After you have entered the requested information, select Login .
Application
If you want to process any transactions in the LOIS system, you must select LOIS Start Page .
Once you have selected the appropriate application, the “LOIS Home Page” will appear.
The LOIS System Home Page
The Main System Menu
Notice the menu at the left of your screen. This is the main menu and will remain visible during
all transactions. Notice that some of the options on this menu are “grayed out”. This means that
these transactions are currently inactive. There must be another transaction performed before
these transactions will become active. For example, trip permits cannot be purchased until there
is a home identified and a pending site for that home has been entered. Once the home has been
identified and a pending site entered into the system, the Permit Purchase transaction will
become active.
The Search Function
The search function has been placed at the top of the menu because most transactions will begin
with a search for the particular home the transaction applies to. Even when adding a new home,
you should first select Search to reduce the possibility of a duplicate data entry. Detailed search
instructions are located by clicking the Help button.
Transactions
The next set of menu options, listed under the heading “Transactions,” will be used to conduct
business within LOIS. These functions will be fully explained later in this manual. To
summarize:
Notice that the first option here is New Home Entry. Once a home has been built into the
system and identified (through the Search option), this option will change to Update Home.
The Permit Purchase function is used to purchase trip permits for movement of Manufactured
Structures.
The OOS Customer function is used to enter out of state dealer information into the system,
which places the dealer in the Out of State Dealer drop-down list which is used when building a
new home into the system.
The Model Entry function is used to add a new model into the Lois System or update an
existing model.
See sections below for more information on these options.
Reports
Several reports have been developed to assist you in tracking your transactions within the LOIS
system. If you need a report that is not already included in the system, contact the Building
Codes Division for assistance.
Help
The Help button will direct you to a web page that contains information about the LOIS system.
From the help screen you will be able to access general information regarding the system as well
as instructions about using the system, search criteria, contact information, and system forms.
Home Page
Selecting the Home Page button from anywhere within LOIS will bring you back to the main
start screen.
WARNING!!!!!
Any transactions not saved or processed before selecting Home Page will be lost. Use this option
with care.
Exit
The last option, Exit , prompts the user to log-off the LOIS system. You should always use the
Exit function when leaving the LOIS System.
User Group
The very last item on the main menu is your user name and the name of the User Group you are
logged in under. If you contact BCD for technical support, the first question you will be asked is
what user group you are in.
Navigating the LOIS System
Home Page
As mentioned above, the “Home Page” is the starting place for most transactions. If you become
lost in the system, simply select Home Page from the main system menu, and the LOIS system
will return you to this point.
Remember that any transactions not saved or processed will be cancelled by returning to the
“Home Page.”
Transaction Screens
All transaction screens utilize “tab” functionality. The following screen is an example only,
yours may look different.
Notice the tabs at the top of this screen (e.g., MFD Unit, Supplemental, Current Site, Owner,
Security Interest, Issues, Permits, and Documents). These tabs are used throughout LOIS for
easy navigation
Logging Off
To exit the system, select Exit , and then select Logout on the next screen. You must log back on
to LOIS before conducting any other transactions.
Finding the Model
Manufacturers have the option of entering information about their standard models to reduce
repeated data entry later. A Manufacturer is only able to add, modify, or delete models which
they manufacture.
The LOIS System will allow a manufacturer to enter model information only once. When a
home of that model type is manufactured, the system will “remember” the information so the
manufacturer only has to enter the serial and HUD numbers.
All transactions conducted on Models of manufactured homes will begin with a search for the
model.
Select Model Entry from your main system menu.
The Manufacturer will default to the name of the manufacturer logged onto the LOIS System.
Use the drop down list to select the Model Name. If the Model Name is not on this list, leave
the field blank.
Use the drop down list to select the Home Type.
Leaving the search criteria fields blank will result in a complete list of all models associated with
your business.
Once you have entered the search criteria, the search can be initiated by either selecting Enter on
your keyboard, or by selecting Search at the bottom of your LOIS screen.
The LOIS system will show only those models associated with your business. The LOIS system
will not show your model information to other manufacturers, or other manufacturer models to
you.
Select the model you want by using the arrows on your keyboard or your mouse to highlight the
model and follow instruction in this manual for updating or deleting model information.
If the model is not on the list, follow instructions in this manual for adding a new model.
Adding a Model
Look through the list of models resulting from your search. If the model you want to add to the
LOIS system does not appear on this list, select Add Model from the lower portion of your
screen.
The Manufacturer Name will default to the manufacturer logged onto the LOIS system.
Select the Home Type from the drop down list.
Enter the Model Name.
Enter the standard Square foot, Wind Zone, Roof Load, and Thermal Zone for this model.
This information may change for specific homes and can be over-written when a specific home
is added to the LOIS System.
Notice that the Start Date has been populated by the LOIS system with the date of the
transaction. This date can be over-written if desired.
If this model is temporary and you know the Stop Date, you can enter it now. Otherwise, skip
this field.
Notice the yellow background in the next four fields. This yellow background is used
throughout the LOIS system to indicate fields that are populated by the LOIS system and cannot
be modified by the user.
Enter an appropriate Description for the first section of this model.
Enter the length, width, weight, and number of axles for the first section of this model. This
information may change for specific homes and can be over-written when a specific home is
added to the LOIS System.
If there is more than one section for this model, enter the description, length, width, weight,
and number of axles for each section.
When all information is complete, select Save at the bottom of your screen.
The below message will appear stating the transaction has been processed.
You can go on to perform other transactions, or return to your Home Page by selecting the
appropriate option from the main system menu.
Updating a Model
Follow instructions above for FINDING THE MODEL. You must go through these search steps
in order to get to the proper screen for updating model information.
With the correct model highlighted, select the Detail tab at the top of your LOIS screen.
To update the information, simply type over the existing information.
When you have completed updating the information, select Save from the lower portion of your
screen. The below message will appear letting you know the transaction was processed.
You can go on to perform other transactions, or return to your Home Page by selecting the
appropriate option from the main system menu.
Deleting a Model
Follow instructions above for FINDING THE MODEL. You must go through these search steps
in order to get to the proper screen for deleting model information.
If the results from your search include a single model, that model will be highlighted. If the list
includes several models, use the arrows on your keyboard or your mouse to highlight the model
you want to delete.
Select Delete Model from the lower portion of your screen.
A message will pop up asking you if you would like to delete this model. Continue by selecting
OK.
You can go on to perform other transactions, or return to your Home Page by selecting the
appropriate option from the main system menu.
Building a Home into the Lois System
Homes must be entered into the Lois System before any other transactions can take place. This
transaction will be used to create the home in the system as a pre-requisite for conducting other
business, such as a change or site or ownership, purchasing trip permits, or completing the 302
report.
To create a new home in the Lois System, select New Home Entry from your main system
menu.
The Home ID is a unique identifying number assigned by the LOIS system. Notice that this
field has a yellow background. This yellow background is used throughout the Lois System to
indicate fields that cannot be modified by the system user. Once all the information is place in on
this screen and saved, the home id field will populate with the home id reference number.
The Manufacturer will default to the manufacturer logged onto the Lois System.
Use the drop down list to select the model of the home being added. Only models associated
with the Manufacturer named above will appear on the list. If the model is not in the Lois
System, type in the model name. You may enter the model information in the system after you
are done building in the home by following the steps in the Adding a Model section of this
manual.
Now that the model is selected, notice that the Square Footage, Roof Load, Wind Zone,
Thermal Zone, Length, Width, Weight, and Number of Axels have automatically been filled
in with the model’s dimensions.
Use the drop down list to select the Home Type.
Use the drop down list to select the Exempt Code for the home. Choices are Exempt, dealer
inventory and Exempt, Out of State. Please see below exemption codes and follow the steps
for each.
Exempt, dealer inventory: If this exemption code is selected, continue on to the next field to
add the Oregon dealer name.
Use the drop down list to select the Dealer this home will be transferred to. If the dealer is not in
the drop down list, please contact BCD with the dealer’s contact information and they will enter
them into the system.
The next step is to add the flooring lender if there is one associated to the home, by clicking the
down arrow on the drop down list and selecting the flooring lender. If the flooring lender is not
in the list, please contact BCD with the flooring lender’s contact information and they will enter
them into the system.
Note: These two fields (dealer and flooring lender) will not appear if the exemption code is set
to Exempt, out of state.
Exempt, out of state: If this exemption code is selected, you will see the following screen
requesting out of state dealer information.
Select OK when you see the pop up requesting out of state customer information.
Next select the down arrow on the Name drop down list. If the dealer has already been
entered into the system, their name will appear in the list. If it is, select the dealer name
and click on the Return button in the middle of the page.
If the dealer is not on the drop down list, you may add the dealer by selecting the Add
button to the right of the drop down list.
The next screen will ask you to enter in the dealer name, address, city and state.
Once this information is inputted, select the Return button which will take you back to
the Add Home screen.
Continue by typing in the Mfg Date.
After placing in the Mfg Date, the Mfg Year will automatically fill.
If you, as a manufacturer, has an invoice number, enter this information in on the Mfg
Invoice field.
Enter the manufacturer’s Serial Number for the first section of the home. At least one
section is required for each home.
Enter the HUD Number for the first section of the home. Manufactured homes built after
June of 1976, typically have HUD Numbers.
If there is more than one section of the home, repeat the above steps for adding the Serial
and HUD Numbers.
The Final Flag located near the top of your LOIS screen (opposite of the Home ID field)
should be checked ONLY when you are ready to release interest in this home and print
the Manufacturer’s Certificate of Origin (MCO).
If you are NOT ready to release interest and print an MCO, do NOT check the Final
Flag. By selecting Save at the bottom of the screen, you are able to save your what you
have just inputted into the system.
Once you have selected Save, the below message will pop up stating your transaction has
been processed. Select OK.
Make note of the Home ID number towards the top of the screen that has now populated
in the ID field. This is the number assigned to the home and will be the quickest way to
locate a home when searching for it later.
Finding the Home
Now that you have created the home in the Lois System and saved the information, you
are able to go back in and search for the home at any time.
If you are not already at the home page screen, select the Home Page button.
Once at the Home Page Screen, click the Search button under the menu options on the
left hand side.
The Lois System allows searches on any or all of the following criteria: Home ID, HUD
Number, Serial Number, X-Plate Number, Owner Name, Site Address, and Zip
Code. The Home ID, HUD Numbers, and X-Plate are all unique to each home,
therefore, entering either of these as a search criteria should result in a single home list.
Enter in one of the search options. Once you have entered the search criteria, the search
can be initiated by either selecting the Enter button on your keyboard, or by selecting
Search at the bottom of your Lois screen.
When you find the home you are looking for, highlight that home by either using the
arrow keys on your keyboard, or by using your mouse and clicking on the home.
Click on the Select button on near the bottom of the main screen to view further
information on this home.
Updating Home Information
Home information can be modified only if the Final Flag Box has not been checked and
saved.
The home must be identified before this transaction can be conducted. See Finding the
Home instructions on searching for a home within the Lois System.
Once you have identified the home, select the Update Home button. (This button
changes from New Home Entry to Update Home after a home is built into the system,
saved, and the information is being viewed.)
Update the information by typing over the existing information.
When you are sure the information is correct, select the Save button at the bottom of your
screen.
Setting Your Final Flag/Printing a
Manufactured Certificate of Origin (MCO)
Once all the information is correct in the Lois System and you are ready to release the
home to the dealer, you can do so by checking the Final Flag box at the upper portion of
the Update Home screen. You will not be able to access this portion of the system to
update any information once the Final Flag is checked and saved.
Notice that the Print MCO button at the lower right portion of the screen is now
available.
Some manufacturers choose to print an MCO from the system, while some choose to
print their own. It is up to the manufacturer to choose what they wish to do, however, this
option is only available at this time, when the Final Flag Box has been checked, and
before saving.
If you would like to print a MCO, click on the Print MCO button. You will then see the
following screen.
If you are ready to release your interest, select OK on the above pop up screen and then
OK when the next pop up screen appears stating that the transaction has been processed.
Your MCO will appear shortly and allow you to print it. You will want to wait for it to
come up before performing any other transaction, otherwise you will be unable print the
document and will need to contact BCD.
Once you have set your Final Flag and have printed the MCO, the dealer will then be
able to access this home to perform any ownership, site, exemption, or security interest
changes that may occur.