1
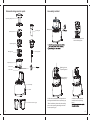
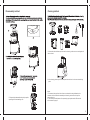
Safety notes
Please carefully read the instruction book before the product is used,
and please use the machine according to the instruction book. Be sure
not to use the product for other purposes.
1. Please do not make the machine share the same power supply with
other high-power electric appliances, and the product shall be used with
30A leakage circuit breaker installed.
2. To prevent electric leakage and other hazards, please use the machine
according to the instruction book.
3. It is forbidden to make the machine, power line and plug immersed into
water or other liquids.
4. Be careful to watch it during operation of the machine, so as to prevent
accident.
5. If the parts or product structure is found to be damaged (particularly,
the safety protection device and power line are damaged), please do not
use the machine. Do not attempt to repair it by yourself, and it shall be
repaired by professionals, so as to prevent accident.
6. Do not let children or the disabled operate the machine under the condition that they have not received any guidance or supervision.
7. Please do not make the product used on or beside high-temperature
1
2
Assembly method
Schematic diagrams for parts
1
Squeezing body cover
Pushing rod
Spiral propeller
Marking line
2. Put the squeezing barrel
into the washing rack.
Squeezing barrel
Cleaning brush
Washing rack
Squeezing cup
Marc outlet
Marking point on
squeezing barrel
Juice outlet
Marking point on
squeezing cup
Main body
Switch
3. Make the assembled squeezing barrel and
washing rack installed into the squeezing cup
Juice/marc receiving cup
3
4. Make the spiral propeller
installed into the squeezing
barrel.
*When installation, please make the marking
point on the squeezing barrel align with that
on the squeezing cup
4
使用方法
R
OPEN
CLOS
E
Corotation
Marking point on
squeezing body cover
Forward: Make fruits and vegetables pushed
downwards for squeezing.
Reverse: Fruits and vegetables return upwards
Press
Notes: Please don't use wet hand operate switch
2
Marking point on
squeezing cup
Reverse
Forward
OPEN
1
ON
Turn on the switch (forward)
Reverse
Stop
Make the clean fruits and vegetables (if the size of the
fruits and vegetables is larger than that of the feed inlet, please make them cut into the blocks with proper
size) put into the feed inlet, and make the pushed inwards by the pushing rod.
CLOS
E
3
Note: Please use fresh fruits and vegetables to make
the juice. The stale fruits and vegetables that have
been stored in refrigerator for a long time shall be used
after being immersed in cold water for over 10min.
Pushing rod
5. Install the squeezing body cover
① When it is installed downwards, the marking
point on squeezing body cover shall align
with that on the squeezing cup.
②③ Make “ ” at the back of the protruding part
of squeezing body cover rotate towards
“ ” on squeezing cup in clockwise direction
and lock.
Before put into fruits and vegetable, don't let
unit run free, Otherwise it may damage the unit.
Feed inlet
* The kernel of fruits must be removed.
R
Reverse
Stop
ON
Assembly of squeezing rubber pad
Corotation
Press
Reverse
Bottom of squeezing cup
5
Insertion direction of rubber pad
Forward
After the squeezing process is completed, please
press the stop switch, and pull out the power plug.
Warning: Please do not store the squeezed juice
for a long time.
The machine is inapplicable to crush grains
(motor clamp and mechanical failure are liable
to be caused).
Tight insertion
6
Cleaning method
Disassembly method
OPEN
CLOS
1
E
2
2: Do not make the mainframe put into water for cleaning; and be sure to use wringed soft
cloth to clean it.
3
3: After cleaning, please dry the cleaned parts and store them in a clean and ventilating
place.
4
5: Respectively disassemble the spiral propeller,
squeezing barrel and washing rack.
7
Notes:
1: Please wash the machine in time after use, otherwise the dreg will attach to the
container, which will affect the assembly and cleaning, and even result in performance reduction.
2: The rubber pad at the bottom of the squeezing cup may be washed. Please refer
to the contents in page 5.
8
Nominal voltage
Nominal frequency
220-240V
Troubleshooting
9
50-60Hz
Nominal power
200W
Nominal time
≤20min