1
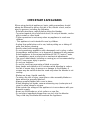
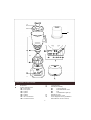
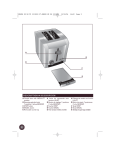
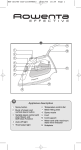
www.krupsusa.com
www.krups.com
IMPORTANT SAFEGUARDS
When using electrical appliances, basic safety precautions should
always be followed to reduce the risk of fire, electric shock, and/or
injury to persons, including the following:
- Read all instructions carefully before using the blender.
- To protect against risk of electrical shock, do not put blender, cord or
plug in water or other liquid.
- Close supervision is necessary when any appliance is used near
children.
- This appliance is not intended for use by children.
- Unplug from outlet when not in use, before putting on or taking off
parts, and before cleaning.
- Avoid contact with moving parts.
- Do not operate any appliance with a damaged cord or plug, or after
the appliance malfunctions, or is dropped or damaged in any manner.
Return appliance to the nearest authorized KRUPS Service Center
for examination, repair or electrical or mechanical adjustments.
- The use of attachments, including a canning jar, not recommended by
KRUPS may cause injury to person.
- Do not use outdoors.
- Do not let cord hang over edge of table or counter.
- Keep hands and utensils out of container while blending to reduce
the risk of severe injury to persons or damage to the blender. A
scraper may be used but must be used only when the blender is not
running.
- Blades are sharp. Handle carefully.
- To reduce the risk of injury, never place cutter assembly blades on
base without jar properly attached.
- Always operate blender with cover in place.
- When blending hot liquids, remove measuring cup (center piece of
cover) to allow steam to escape.
- Make certain the voltage of the appliance is in accordance with your
domestic supply.
- Never use the blender on a hot surface or near fire.
- Do not place ingredients bigger than one inch into the blender.
They could stop the blade and overheat the Appliance.
1
- Do not use the appliance for other than intended use.
- Do not place the blender jar in a microwave oven.
SAVE THESE INSTRUCTIONS
CAUTION
- This appliance is for household use only. Any servicing other than
cleaning and user maintenance should be performed by the nearest
authorized KRUPS Service Center.
- Do not immerse base in water.
- To reduce the risk of fire or electric shock, do not remove the base.
No user serviceable parts inside. Repair should be done by an
authorized KRUPS Service Center only.
SPECIAL CORD SET INSTRUCTIONS
Regarding your cord set:
A. A short power-supply cord is provided to reduce risks resulting from
becoming entangled in or tripping over a longer cord.
B. Longer extension cords are available and may be used if care is
exercised in their use.
C. If a long extension is used, (1) the marked electrical rating of extension cord should be at least as great as the electrical rating of the
appliance, (2) if the appliance is of the grounded type, the extension
cord should be of a grounded type, and (3) the longer cord should
be arranged so that it will not drop over the counter top or table top
where it can be pulled on by children or tripped over.
D. This appliance has a polarized plug (one blade is wider than the
other). As a safety feature, this plug will fit in a polarized outlet only
one way. If the plug does not fully fit in the outlet, reverse the plug. If
it still does not fit, contact a qualified electrician. Do not modify the
plug in any way.
2
G
Description of the blender
A
B
C
D
Metal base
Speed selection panel
b1 – Stop button
b2 – Slow speed
b3 – speed 1
b4 – speed 2
b5 – speed 3
b6 – speed 4
b7 – Ice crush function
b8 – Vari-Pulse function
E
F
G
3
Cord tidy cavity
Blender jar assembly
d1
Locking ring base
d2
Removable blade carrier
d3
Seal
d4
Graduated 60oz glass jar
Blender jar cover
Measuring stopper, 2.5oz
Food chopper accessory (available in
limited KRUPS Service Centers)
Important advice
The maximum power of your blender is reached with the food chopper
accessory (G).
1
2
Important: Ensure that the blender cover (E) with measuring stopper (F) are
correctly fitted on the blender jar (D).
When blending solid ingredients, first cut them into pieces 1/2” to 1” long.
Always pour liquid ingredients into the glass jar first before adding solid
ingredients.
To add ingredients once the blender has started, remove the measuring
stopper (F) from the cover (E) and put them through the hole in the lid.
If ingredients become stuck to the sides of the jar during blending, stop the
appliance and disconnect it. Then remove the glass jar from the metal base.
Use a spatula to scrape the sides.
NEVER put hand or fingers into the glass jar or close to the blade.
- Never start the appliance on its highest speed.
- Always increase speed progressively.
- Remove the blender jar from the metal base only when it has
come to a standstill.
- For greater convenience or storage, the length of the supply cord can be
reduced by pushing it into the metal base (A) through the opening at the rear
(C) (diagram 1).
Using your appliance
- Before use, clean blender jar, cover, measuring stopper, in warm soapy
water. Rinse and dry them carefully.
Never immerse the body of the appliance and never put it under running
water.
3
The capacity of the jar allows you a great deal of flexibility in your preparations.
Additionally, because the extra-thick glass is thermal-shock and scratch
resistant you can make a variety of ice-based preparations in complete safety.
1. Place the ring seal (d3) onto the base of the removable blade carrier (d2)
(diagram 2).
2. Press the assembly (d2 + d3) down into the locking ring base (d1). It will
click into place.
3. Place the glass jar (d4) onto the locking ring base (d1), taking care to
ensure that the glass knobs on the bottom of the jar (there are two of them)
fit into the grooves near the top of the locking ring base (diagram 3).
4. Hold the locking ring base (d1) firmly and give the glass jar a quarter turn to
lock it in place (diagram 3).
5. Place the assembled blender jar (D) onto the metal base (A). There are two
possible positions: the jar handle can be to the right or the left of the speed
selection panel (B). For your own safety, the blender will not start unless it is
correctly assembled and positioned on the metal base.
4
4
6. Put the ingredients to be mixed into the jar (D) without exceeding the
maximum level:
- 60oz for thick mixtures,
- 50oz for very liquid mixtures.
7. Fit the measuring stopper (F) in the cover (E). Put the cover assembly on
the jar (D) and twist counter clockwise to lock the lid in place (diagram 4).
8. Plug in the appliance and choose the function that you wish to use.
- Continuous operation: speeds Slow to 4 (b2, b3, b4, b5 and b6).
Start at Slow speed (b2) and then gradually increase to the most suitable
speed for your preparation. The button for the selected speed will light. Press
Off (b1) to stop the appliance. The indicator light for the speed in use will go
out.
NOTE: The Slow speed can be used to finish off recipes by adding solid
ingredients that you do not wish to blend, such as chocolate chips or nuts.
The cover must always be in place while the appliance is in operation. To
add ingredients while blending, remove the measuring stopper (F) from the
cover and pour the ingredients through the opening.
Speed
Recipe
Slow
1
2
3
4
Ice Crush
Incorporating chocolate chips
Hummus, mayonnaise
Brownies
Pancake batter
Soups
Crushed ice, onions
“Vari-Pulse” function:
This function gives finer control over the degree of blending for precise,
efficient preparations.
To use this short burst function, press the “Vari-Pulse” button (b8). The
indicator light will then blink. Press the button for the desired speed (from
Slow (b2) to speed 4 (b6)). The blender will run for as long as you keep the
button pressed. Release it and the appliance stops.
To turn off the “Vari-Pulse” function or switch to a different blending function,
press the “Off” button (b1). The indicator light will go out.
“Ice Crush” function:
This function operates the motor intermittently for the preparation of crushed
ice, smoothies or granitas.
To crush ice, put the ice cubes into the jar and replace the cover. There is no
need to add water. Press the "Ice Crush" button (b7).
For finely crushed ice, use a maximum of 6 to 8 large ice cubes (1/3 l level).
When the ice is ready, stop the blender by pressing the “Off” button (b1).
Unplug the appliance. Only remove the assembled jar when the appliance
has come to a complete stop.
5
Cleaning
CAUTION
- Unplug the blender and take off the jar or accessory assembly.
- Clean the metal base (A) with a damp cloth. Dry carefully.
- Never immerse the motor unit (A) in water.
- Rinse the blender jar (D), its cover (E) and the measuring stopper (F) under running water.
- For greater ease of cleaning, release the locking ring base (d1), blade unit (d2) and seal (d3) from the jar
(D) and clean them all separately.
HANDLE THE BLADES WITH CARE, THEY ARE VERY SHARP
- The blender jar (D), the cover (E), the measuring stopper (F) can be put in the dishwasher.
- Attention: avoid stress on the cover (E) when placing it in the dishwasher basket (risk of deformation).
Troubleshooting
PROBLEM
Appliance does not work
Excessive vibration
CAUSE
The plug is not connected
The jar is not fitted correctly on the
body of the appliance
Check for correct positioning of the jar
The product is not placed on a flat
surface
Place the product on a flat
surface
The jar is not correctly fitted to the
motor unit
Check for correct positioning of the jar
Too great a volume of ingredients
Do not go over the maximum level of the jar
(60oz for thick preparations and 50oz for
extremely liquid preparations)
The lid is not correctly positioned
Lock the lid onto the blender jar correctly
Silicone seal missing or incorrectly
assembled
Check for presence and correct operation of
seal.
Seal deformed or damaged
Replace seal. Available from K RUPS certified
service centre
Pieces of food too big or too hard
Reduce size of pieces of food or quantity.
Add liquid.
Leak from lid
Leak from bottom of jar
Blade does not turn
easily
SOLUTION
Connect the appliance to a socket with the
same voltage
6
LIMITED WARRANTY
This Krups product is warranted for 1 year from the date of purchase against defects in material and
workmanship. During this period, the Krups product that, upon inspection by Krups, is proved defective, will be repaired or replaced, at Krups’ option, without charge to the customer. If a replacement product is sent, it will carry the remaining warranty of the original product. This warranty does not apply
to any defect arising from a buyer’s or user’s misuse of the product, negligence, failure to follow Krups’
instructions, use on current or voltage other than that stamped on the product, wear and tear, alteration or repair not authorized by Krups, or use for commercial purposes.
THE WARRANTIES SET FORTH HEREIN ARE EXCLUSIVE AND NO OTHER WARRANTIES, EXPRESS OR
IMPLIED, INCLUDING BUT NOT LIMITED TO ANY WARRANTY OF MERCHANTABILITY OR FITNESS FOR A
PARTICULAR PURPOSE OR USE, ARE MADE BY KRUPS OR ARE AUTHORIZED TO BE MADE WTH RESPECT
TO THE PRODUCT.
Some states do not allow limitation on how long an implied warranty lasts or do not allow the exclusion
or incidental or consequential damages, so the above limitations may not apply to you. This warranty
gives you specific legal rights, and you may also have other rights, which vary from state to state. If you
believe you product is defective, bring the product (or send it, postage prepaid) along with proof of
purchase to the nearest authorized Krups Service Center.
Service center information is subject to change. Please confirm the location is current by visiting
our website at www.KrupsUSA.com or by calling our consumer service department. If you send the
product, please include a letter explaining the nature of the claimed defect.
USA Service Centers:
California
CES Concord
1170-G Burnett Ave.
Concord, CA 94520
925-827-1011
New York
Turnpike Appliance
3495A Lawson Blvd.
Oceanside, NY 11572
516-486-5700
CES Covina
612 S. Shoppers Lane
Covina, CA 91723
626-915-4935
Illinois
Authorized Appliance
1644 West Ogden Ave.
Downers Grove, IL 60515
630-852-1550
Maryland
Waters Appliance
216 E. Diamond Ave.
Gaithersburg, MD 20877
301-258-7500
Washington
Action Small Appliance
1500 145th Place SE
Bellevue, WA 98007
425-643-9806
Florida
Southern Electric
510 N. Paramore Ave.
Orlando, FL 32801
407-841-8824
7
If you have additional questions, please call our Consumer Service Department:
USA:
1-800-526-5377
Mon – Fri 8:30 a.m – 4:30 p.m. (EST)
www.KrupsUSA.com
196 Boston Avenue
Medford, MA 02155
Only letters can be accepted at this address. Shipments and packages that do not have a return
authorization number will be refused.
Canada:
1-800-418-3325
Mon – Fri 8:30 a.m. – 4:30 p.m. (EST)
www.Krups.ca
Groupe SEB Canada Inc.
455 Finchdene Square
Scarborough, Ontario M1X 1B7
Please note hours are subject to change.
Before calling the Consumer Service Department, please have the type number of your KRUPS appliance available. You must have this information before calling our Consumer Service Department so that
we may better answer your questions. The type number can be located by looking at the bottom of
your appliance
8
0 827 576