1
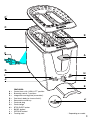
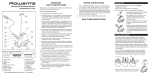
2-Slice Toaster
Instructions for use
Safety instructions
IMPORTANT SAFEGUARDS
When using electrical appliances, basic safety precautions should always be followed :
1• Read all instructions.
2• Never leave toaster unattended during use.
3• Keep out of reach of children.
4• Close supervision is necessary when the toaster is used by or near children.
5• Do not touch the metal parts or hot surfaces of the appliance when it is working. Use handles or knobs.
6• To protect against electrical shock do not immerse cord, plugs, or appliance in water or other liquids.
7• Unplug from outlet when not in use and before cleaning. Allow to cool down before cleaning and before putting on or taking off parts.
8• Do not operate any appliance with a damaged cord or plug or after the appliance malfunctions, or has been damaged in any manner.
Return appliance to an approved Service Center for examination, repair, or adjustment, in order to avoid any risk of danger.
See Warranty.
9• The use of accessory attachments are not recommended by the appliance manufacturer as it may cause injuries.
10• Do not let cord hang over edge of table counter or come in contact with hot surfaces.
11• Do not place on or near a gas or electric burner or near a heated oven.
12• Control lever must be in the “Up” position before attaching or disconnecting the plug from wall outlet.
13• Oversized foods, metal foil packages, or utensils must not be inserted in a toaster as they may cause an electric shock or fire.
14• Do not try to toast very thick slices of bread that could block the toasting mechanism.
15• If bread jams in the slots after toasting and the elements do not switch off, disconnect the plug immediately from the wall socket and
wait for the appliance to cool before attempting to remove the bread. Do not attempt to dislodge food when toaster is plugged in.
16• Do not cover this appliance while in use.
17• Do not put paper towels, cardboard or plastic in, on or under the toaster.
18• There is a fire risk if the toaster is “covered” by, in contact with, close to or beneath flammable materials like curtains, drapes or
wood.
19• Do not use outdoors. Avoid humid environments.
20• Do not use this appliance as source of heating or drying
21• Do not use the toaster for cooking, grilling or de-frosting frozen foods other than bread products.
22• Do not use the toaster for toasting bread and re-heating pastries/croissants at the same time.
23• The toaster must always be used in the upright position (not on its side or tilted forward or back).
24• Regularly remove crumbs from crumb tray.
25• This product has been designed for domestic use only. Any professional use, inappropriate use or failure to comply with the
instructions will void the warranty.
DEPENDING ON MODEL
With integrated warming plate (on selected models) :
• Do not use the toaster without its warming plate.
• Do not touch the warming plate as this will be hot. Use gloves or breadtongs if necessary.
• Never place items other than bakery products on the warming plate or in the toaster.
• Use caution when warming or toasting sugar coated or filled items as they can melt in the toaster.
• Do not block or obstruct the air vents of the warming plate.
SPECIAL CORD SET INSTRUCTIONS
(a) A short power cord is provided, to reduce risks resulting from becoming entangled in or tripping over a longer cord.
(b) Longer extension cords are available and may be used if care is exercised in their use.
(c) If a longer extension cord is absolutely necessary :
1) The marked electrical rating of the extension cord should be at least as great as the electrical rating of the appliance.
2) The cord should be arranged so that it will not drape the countertop or tabletop where it can be pulled on by children or tripped
over unintentionally.
(d) Do not unplug appliance by pulling on cord. Instead grasp plug and pull to disconect.
(e) Never wrap cord around toaster. Use cord storage on the underside of unit
PRODUCT IS FOR HOUSEHOLD USE ONLY.
SAVE THESE INSTRUCTIONS
2
C*
C
K
D
F
A
G
H
I*
B
J*
E
A
B
C
D
E
F
G
H
I
J
K
•
•
•
•
•
•
•
•
•
•
•
FEATURES :
Control lever with “HIGH-LIFT” position
Browning control, 7 positions
Integrated warming plate (removable*)
Cool touch body (or chrome finish*)
Removable crumb tray
Cord and plug
Cord storage
STOP/EJECT button
BAGEL button*
DEFROST button*
Toasting slots
J*
* Depending on model.
3
READ THE MANUAL AND CAREFULLY FOLLOW
THE INSTRUCTIONS BEFORE USE.
BEFORE USING FOR THE FIRST TIME :
• Unpack the toaster and remove any labels.
• Wipe the toaster and the warming plate with a damp cloth then
dry it.
• Unroll the electrical cord entirely and plug it in.
• Set the browning control (B) to minimum without inserting any
bread.
• Lower the control lever (A) until it is locked down.
• In order to remove any possible residues from manufacturing,
the toaster should be heated twice before inserting any bread.
A small amount of smoke may appear. This is normal and will
quickly disappear.
1
2
3
4
HELPFUL HINTS
Differences in moisture levels from one bread to another can
result in varying toasting times and browning levels. Below are
some general recommendations :
• Slightly dry bread should be toasted on a lower setting.
• Very fresh bread or whole wheat bread should be toasted on a
slightly darker setting.
• Breads with uneven surfaces, such as English muffins, may
require a darker setting.
• When toasting items with fruit, such as raisin bread, remove any
loose fruit before toasting.
• When toasting bagels, slice the bagel into two equal halves
before toasting.
• If you are toasting one slice of bread, set the browning control
at a lower setting.
• Use caution when warming or toasting sugar coated or filled
items (such as toaster pastries). Always set the browning control
to the lowest setting.
TOASTING AND “HIGH LIFT” FUNCTION
Never leave toaster unattended during use.
Use caution when toasting sugar coated or filled items (such
as toaster pastries). Always set control to lowest setting.
1 With the control lever in the high position, insert the slice(s) of
bread into the toasting slots.
2 Adjust the browning control to the desired setting depending on
the type, freshness and the thickness of the bread.
1 Very slightly browned
4-5
Well toasted
2-3 Lightly browned
6-7
Very well toasted
3 To begin toasting, press down the control lever (A) until it locks
into the low position. The bread slices are automatically centered
and the toasting begins.
At the end of the toasting cycle, the toaster automatically stops
and the control lever lifts up.
4
5
6
7
8
9
10
“HIGH-LIFT” FUNCTION
4 Use the “HIGH-LIFT” bread function by lifting the control lever
when toasting has finished. This will raise the bread and make it
easier to remove.
Do not use “HIGH-LIFT” during toasting.
STOP/EJECT FUNCTION
5 You can cancel the toasting or warming at any time by pressing
the STOP/EJECT button (H).
Do not use the control lever to stop the toasting cycle.
DEFROST FUNCTION*
6 If toasting frozen bread, place in the toasting slots and adjust the
browning control to the desired position.
Press the lever down and press the “DEFROST” button (J)*.
The bread will take longer to toast as the toaster will
automatically defrost the bread first.
BAGEL FUNCTION *
7 This function uses only the external heating elements. Place cut
side of bagel towards the outside of toaster.
• Select the browning level desired on the dial from 1 to 7.
• Press down the control lever then press the “BAGEL” button (I).
• Your bagel will be toasted on the cut side of the bagel
according to the browning selection.
• At the end of the cycle, the bagel will pop up automatically and
the toaster will switch off.
• If your bagel is too heavy, pull up the control lever to bring it out.
WARMING PLATE
Use the integrated warming plate feature (C) to reheat croissants,
rolls and other bakery products.
NEVER LEAVE TOASTER UNATTENDED DURING USE.
Use caution when warming sugar coated or filled items (such
as toaster pastries). Always set control to lowest setting.
8 Place the bakery product(s) directly on the integrated warming
plate ensuring that it does not hang over the edge of the plate.
9 Set the browning control dial to the #2 position.
Lower the control lever until it locks into position. The toaster is
now on and heat will rise to the warming plate.
The toaster stops automatically and the control lever springs up.
10 To heat the other side, turn the bakery product(s) over using oven
gloves or bread tongs.
CAUTION : THE WARMING PLATE WILL BE HOT.
5
Do not press the control lever. Simply leave to warm for 30-60
seconds.
Cancel the toasting or warming cycle at any time by pressing the
“STOP/EJECT” button.
11
MAINTENANCE, CLEANING AND STORAGE
Always unplug the toaster and let it cool before cleaning or
handling.
11 Wipe the outside of the toaster, the cord and the warming plate
with a damp sponge and a mild dish detergent.
Dry thoroughly.
For appliance with a metallic finish : Do not use any cleaning
products designed for metals. Use a soft cloth with a window or
glass cleaner.
12 13 For removal of the integrated warming plate : Grip the
metal warming plate by the middle and gently pull until it
becomes detached. Clean with a mild dish detergent, then
dry thoroughly.
14 Attaching the warming plate : Insert the 4 tabs on the warming
plate in the corresponding slots on the toaster and check that it is
correctly in place before each use.
NEVER USE TOASTER WITHOUT THE WARMING PLATE
IN PLACE.
15 To clean the crumb tray : Pull out the tray completely. Remove
the crumbs. Wipe it clean. Do this regularly, after each use. If
crumbs or crusts remain inside the heating elements, remove the
warming plate* and turn the toaster upside down so that these
remaining crumbs fall out. Replace the crumb tray and the metal
warming plate carefully.
16 Cord Storage : Wind the cord loosely in the storage area on the
underside of the toaster.
12
13
14
15
plus
* Depending on model.
16
6
7
ENVIRONMENT PROTECTION :
The packaging of your product is recyclable. Do not dispose of it with the rest
of your waste but rather recycle the packaging or bring it to your nearest recycling facility.
LIMITED WARRANTY
All Rowenta products are warranted for 1 year from date of purchase
against defects in material and workmanship. During this period, any
Rowenta product that, upon inspection by Rowenta, is proved defective,
will be repaired or replaced, at Rowenta´s option, without charge to the
customer. If a replacement product is sent, it will carry the remaining
warranty of the original product. This warranty does not apply to any defect
arising from a buyer’s or user’s misuse of the product, negligence, failure to
follow Rowenta’s instructions, use on current or voltage other than that
stamped on the product, or alteration or repair not authorized by Rowenta.
Repair or disassembly by anyone other than a Rowenta authorized service
center will void the warranty. THE WARRANTIES SET FORTH HEREIN ARE
EXCLUSIVE AND NO OTHER WARRANTIES, EXPRESS OR IMPLIED, INCLUDING
BUT NOT LIMITED TO ANY WARRANTY OF MERCHANTABILITY OR
FITNESS FOR A PARTICULAR PURPOSE OR USE, ARE MADE BY ROWENTA
OR ARE AUTHORIZED TO BE MADE WITH RESPECT TO THE PRODUCT.
If you believe your product is defective, bring the product (or send it, postage prepaid)
along with proof of purchase to the nearest authorized Rowenta Service Center (see below).
If you send the product, please include a letter explaining the nature of the claimed defect.
Rowenta Inc.
196 Boston Avenue
Medford, MA 02155
U.S.A.
Tel: (781) 396-0600
www.rowentausa.com
OFFICE LOCATION ONLY. FOR REPAIR INFORMATION SEE BELOW.
Our main service centers are listed below :
Turnpike Appliance
3495A Lawson Blvd.
Oceanside, NY 11572
516-483-5596
Authorized Appliance
1644 West Ogden Ave.
Downers Grove, IL 60515
630-852-1550
Service center information is subject to change.
Please visit our website at www.rowentausa.com
or call our service center information line at 781-306-4620
for current information and listings in California.
SUBJECT TO CHANGE
Ref. 3303051 - Janvier 2002
S.A. SEB - 21261 SELONGEY CEDEX - 302 412 226 R.C.S. DIJON
IKONA F - 03 84 93 65 65