1
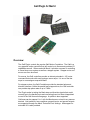
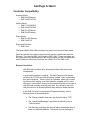
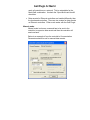
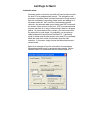
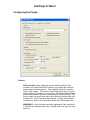
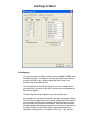
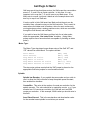
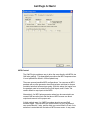
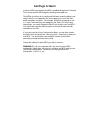
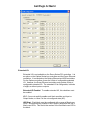
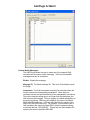
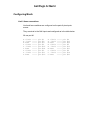
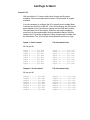
Galil PlugIn for Mach3
Table of Contents
1. Overview
2. Controller Compatibility
• Ethernet Controllers
3. Prerequisites
4. Installing the PlugIn
5. Configuring the PlugIn
• General
• Motor Options
• Diagnostics
• Move Settings
• Analog Inputs
• Axis Mapping
• Motor Type
• Spindle
• MPG Control
• Extended I/O
• Custom Notify Messages
6. Configuring Mach
• Limit/Home Switch Connections
• General I/O
• Probing
7. Credits
Galil PlugIn for Mach3
Overview:
The Galil PlugIn controls the popular Galil Motion Controllers. The Galil is a
very powerful motion controller that will control up to 8 axes and provides I/O
capabilities as well. When used with Mach, it provides a means of controlling
a closed loop servo system as well as a stepper system. Stepper motor and
servos can even be mixed.
For servos, the Galil controllers provide an industry standard +-10V motor
command that works with most analogue servo amps. It is one of the few
ways to run analogue amps with Mach.
For stepper motors, the Galil Controllers provide the standard pulse and
direction interface. Unlike the parallel port stepper driver, the Galil controller
can provide step pulse rates at up to 3 MHz.
The PlugIn works by taking the Mach step and direction signals that would
normally go to the parallel ports and converting them into linear interpolated
moves in the Galil command language. A spindle is also supported.
Galil axes can be mapped 1 to 1 with the Mach axes or mixed in any manner
desired. Limit switches, home switches, general inputs, and general outputs
are supported through the Mach “Ports and Pins” settings. And support for
extended I/O is also provided.
Galil PlugIn for Mach3
Controller Compatibility:
Accelera Series
• DMC-40x0 Ethernet
• DMC-18x6 PCI BUS
Optima Series
• DMC-17x0 ISA BUS
• DMC-18x0 PCI BUS
• DMC-21x0 Ethernet
• DMC-22x0 Ethernet
Econo Series
• DMC-21x2/3 Ethernet
• DMC-18x2 PCI
Single and Dual Axis
• DMC-14x5
The Optima DMC-20x0 USB controllers may work, but none have been tested.
Galil has versions of the above controllers that operate in distributed mode via
Ethernet. They are the DMC-31x2/3 and the DMC-34x5. These controllers are
not supported in their distributed form but can be loaded with the non-distributed
mode firmware to effectively turn them into a DMC-21x2/3 or DMC-14x5.
Ethernet Controllers:
Galil Ethernet controllers have a few special items that need some
consideration.
A good quality network is required. The Galil Controllers will answer
just about any TCP/IP port and will open a “handle” when contacted by
any remote machine. There is a limit of 8 handles, which can be used
up rather quickly making your Galil controller unusable until it is reset.
Obviously, a port sniffer running on the network will pretty much make a
Galil Ethernet controller hose up pretty fast. So it is best to have the
Galil controller on an isolated network along with your Mach machine.
In the Galil Controller Communication Parameters dialog, set the
following items as described below:
The “Primary Handle” drop down list should be set to “TCP”.
The “Unsolicited Messages” drop down list should be set to
“Take no action”.
The Ethernet controllers also have a feature that allows them to
listen to a Multicast address. This allows for one message to
Galil PlugIn for Mach3
reach all controllers on a network. This is undesirable for the
Mach/Galil combination. Uncheck the “Open Multi-cast Handle”
check box.
Data records for Ethernet controllers are handled differently than
the bus based controllers. There are two modes for data records
on Ethernet controllers. Either mode works with the Galil Plugin.
Manual mode:
Manual mode is where a command has to be sent to the
controller to request a data record and then the controller will
send one back.
Below is an example of how the controller’s Communication
Parameters should be set for manual data records.
Galil PlugIn for Mach3
Automatic mode:
Automatic mode is where the controller will send a data record to
the host PC at a predetermined interval. The automatic mode
produces a smoother Mach interface because the PlugIn doesn’t
have the overhead of requesting a data record and waiting for it.
Automatic mode will “feel” more like a bus based controller.
However, the automatic data record mode uses UDP to transmit
the stream of data records to the host. UDP is a connectionless
protocol and there is no way of determining if there is a dropped
packet. So if automatic mode is chosen, you must ensure that
the network is in good shape. Or preferably, use a crossover
cable between the controller and the Mach PC. If automatic
mode is chosen and the data stream to the host PC is unreliable,
Mach will crash from a lack of information from the Galil
controller. In this case, simply choose the Manual data record
refresh mode.
Below is an example of how the controller’s Communication
Parameters should be set for automatic data records. Set the
Refresh Rate to 25 milliseconds and the Cache Depth to 2.
Galil PlugIn for Mach3
Installing the PlugIn:
The PlugIn comes as an m3p file. Double clicking the m3p file should install
the plug-In in the correct Mach location. The file is installed in the
\Mach3\PlugIns directory. If the plug-in doesn’t appear in the controller
configuration menu at startup, check for the existence of Galil.dll in this
directory. If it is not found here, then do a search for this file and copy and
paste it manually into this directory.
Prerequisites:
While the setup and configuration of the Galil controller is beyond the scope of
this manual, a few things are worth mentioning.
The Galil controller needs to be registered in the Galil SmartTerm software.
Follow the instructions in Chapter 4 – Communications settings in the Galil
User’s Manual for your particular controller. Proper controller registration is
required for the Mach3 Galil Plugin to communicate with the controller.
If you are running servos, the PID filter values should be set in the controller
prior to running the Galil Plugin. This is known as tuning the servos. Also in
Chapter 4 of the Galil User’s Manual is a description of the Windows Servo
Design Kit (WSDK) which is Galil’s software that is capable of automatically
tuning the servos. The full version of GalilTools can also be used as well.
Manually tuning the servos is also possible via the KP, KI, and KD commands
through SmartTerm.
After tuning the servos with whatever method you choose, the KP, KI, and KD
values should be saved to the controller with the BN command.
All home and limit switches should be connected and verified. You can use
the “Display Data Record” menu option in the “Tools” menu of SmartTerm to
verify these switches.
Galil PlugIn for Mach3
Configuring the PlugIn:
General:
Galil Controller: When setting up communications with the Galil
controller in the Galil SmartTerm software, you register the controller
and provide information about it. This registration puts the controller
into the Galil registry. This version of the PlugIn allows you to choose
which registered controller to use for Mach. This allows different Mach
profiles on the same machine to control different Galil controllers. This
may be useful for people who wish to drive both a mill and a lathe from
the same PC. (Not at the same time though!). Simply choose which
controller you wish to use in this Mach profile from the dropdown list.
WARNING!!! You must have previously registered a Galil controller in
the SmartTerm software before any controllers will show up in the drop
down list.
Galil PlugIn for Mach3
Bus based controllers may require you to reboot the PC before a newly
registered bus based controller will be visible.
Disable Amplifiers When in E-Stop: Disables the amplifiers when
Mach is in an e-stop condition.
The Galil lets you control the active state of the limit switches. This
allows for both normally open and normally closed switches to be used.
It is popular to wire the limit switches with normally closed switches for
safety reasons. In the event of a cable cut, the machine will stop. A
normally closed switched system will be active low. A normally open
switched system will be active high.
Config Galil Limits Active Low: If you have normally closed switches
on your limits, then this checkbox should be enabled.
Config Galil Homes Active Low: Similarly, if your home switches are
active low, enable this checkbox.
Unfortunately, you cannot have a mixture of normally closed and
normally open limit switches. And you cannot have a mixture of switch
types for the homes switches either. You must choose one switch type
for the limits and one switch type for the home switches. However, you
could mix switch types if you wire them with relays that do the right
thing on the machine. The important thing is that the switch state that
the Galil sees must be consistent.
Use Limits for Homes: For machines where no separate home
switches are available, you will need to enable this checkbox. It is
preferable to install home switches since there is a dedicated home
switch input per axis on the Galil ICM.
Perform Axis Squaring for Slaves: Gantry style machines that have
a slaved axis require special homing routines. The default way the
plugin homes a gantry axis is that it first homes the master and slave
axes together. It will then disconnect the slave and home it to square
the gantry. If you do not wish to square the gantry, then uncheck this
checkbox.
Motor Options:
These check boxes determine how Mach gets the position feedback
and speed. Most of the time, these should remain unchecked. If
stepper motors are configured, using the “SM” jumpers, checking the
boxes may be necessary to display position in the DRO displays.
Galil PlugIn for Mach3
Diagnostics:
Enable Debug File Output: Enabling this checkbox creates a
GalilDebug.txt file in the PlugIn’s directory. This output may be useful
for the developers if you are running into problems. Leave it unchecked
for normal operation.
Move Settings:
Use Linear Interpolation: The Plugin is capable of using two modes
of motion; linear interpolation and contour mode. Linear Interpolation
works with all Galil controllers and thus, is the default. However, if have
an Accelera controller, you may wish to uncheck this checkbox to
enable Contour mode.
The Vector Time Constant and Vector Deceleration are effective in
the liner interpolation mode only.
For most situations, set the Vector Time Constant to 1. Setting this to a
lower value will have the effect of smoothing the moves. The Vector
Time Constant is a velocity filter. Setting the value progressively lower
increases the filtering to attempt to maintain a more constant velocity
over the move sequences.
The Galil is a very powerful motion controller in its own right and it is
capable or performing its own trajectory planning. But Mach is doing
the same thing! So the Vector Deceleration should be set to a range
that allows Mach to take the lead in this department. Start with
30,000,000. That’s thirty million!
Queue Buffer Level: The PlugIn uses an internal buffer to stream the
commands to the Galil controller. This is the Queue Buffer Level and it
can be tweaked to suit the speed of the Mach PC. If you are
experiencing motor stutters in mid moves, then start incrementing this
value by one until the stutter is gone. The default value is 10 and it will
go as high as 100. A side effect of increasing this number is that feed
rate overrides and feed holds will be slower, so start low and increase it
only to the point where your problem disappears.
Mach ExBuffer: For external motion PlugIns, Mach maintains a buffer
for the move sequences. This value impacts the response time of the
feed rate override and the feed hold. Lower the value yield the better
the responses. However, setting the value too low will cause the plugin
to cease producing moves. 15, the default value is “safe”. Faster Mach
machines may be able to use a value of 11 or 12.
Analog Inputs:
User DRO Start: This is the starting User DRO OEM code for the range
of 8 analog inputs that are available on some Galil controllers.
Galil PlugIn for Mach3
Axis Mapping:
You can map axes in a different order than the standard XYZABC order
that Mach provides. For instance, you may wish to drive your Mach X
axis with the Galil G axis. Simply choose the Galil G axis in the
dropdown list for the Mach X axis.
The limit switches travel with the Galil axis, so in the example above,
you would wire your limits to the Galil G axis but they would appear as
Mach X axis signals.
The Mach Spindle can be mapped to any unused Galil axis.
It is important not to map more axes than you have configured in Mach.
This is to allow unused Galil axes to remain independent and is handy if
you are using the Galil to drive brushless motors that require an extra
axis to perform the sinusoidal commutation. Since the Galil controller
will automatically map these sinusoidal axes to the last unused axes on
the Galil controller, we don’t want Mach trying to send movement
information to these axes. For example, if the X (A), Y (B), and Z(C)
Galil PlugIn for Mach3
Galil axes are driving brushless motors, the Galil maps the commutation
axes to F, G, and H on an 8-axis controller. In this case, it is very
important not to map the F, G, and H axes to any Mach axes. If any
Mach axis is unused, just leave it blank as in the example above and
don’t try to map it to a Galil axis.
It is also useful to hide Galil axes from Mach so that the axis can be
controlled from a thread running on the Galil controller. This is useful in
cases where the hidden axis is used as a drive for semi continuously
running devices such as a sewing machine motor, which are controlled
through the Galil thread, and not Mach.
If you wish to have the Galil home and then look for an index pulse,
check the appropriate “Use Index Pulse” checkbox. (Using index
pulses requires use of encoders that are capable of providing an index
pulse!).
Motor Type:
The Motor Type drop down boxes allows setup of the Galil “MT” and
“CE” values from within Mach. The options include:
Servo Motor
Servo Reverse
Step Motor Hi active
Step Motor Lo active
Step Motor Reverse Hi active
Step Motor Reverse Lo active
(MT1, CE0)
(MT-1, CE0)
(MT-2, CE4)
(MT2, CE4)
(MT-2.5, CE12)
(MT2.5, CE12)
The step motor options require that the “SM” jumper is placed on the
appropriate Galil axis jumpers for non Accelera models.
Spindle:
Spindle has Encoder: If your spindle has an encoder and you wish to
use it to allow the Galil controller to keep the spindle speed constant,
then enable this checkbox.
Counts/Rev: This value is the number of counts per revolution for the
spindle encoder. The value should be in quadrature counts. e.g. If your
encoder has 512 counts per revolution, the Galil will see it as 2048
counts per revolution. In this example, 2048 is what you should enter in
this field.
Accel Revs/Second: This is the acceleration and deceleration value
for the encoder based spindle in revolutions per second.
Galil PlugIn for Mach3
MPG Control:
The Galil PlugIn provides a way to drive the axes directly with MPGs via
Galil axis gearing. This dramatically smoothes the MPG response since
it is not pulsed from Mach’s 100ms update loop.
There are several possible MPG configurations. You can use an MPG
pendant with a pulse generator wheel and selector switches to choose
controlled axis and increment per pulse. With this setup, the inputs from
the pendant need to be wired into the Galil inputs, and a “brain” file
used in Mach to map inputs to the MPG.
Alternatively, An MPG pulse generator wheel can be connected to an
unused Galil encoder input and the tab-out MPG screen can direct
output and amount to the proper axis.
A third method uses 1 to 3 MPG encoders wired to unused Galil
encoder inputs. The first MPG can control Mach’s X axis, the second
can control Mach’s Y axis, and the third can control Mach’s Z axis. Axis
selection is controlled with the tab-out MPG screen menu. In any case,
Galil PlugIn for Mach3
to use an MPG requires that the MPG is enabled through the “Ports and
Pins” screen and the MPG page by checking the enable box.
The MPGs use either an un-configured Galil axis (meaning Mach is not
using it and it is not mapped in the axis mapping) or one of the Galil
axes’ secondary encoders. For example, if Mach is configured to use
X, Y, and Z axes and they are mapped to the Galil A, B, and C axes
respectively, you could choose the Galil D axis to drive your first MPG.
You would then hook the MPG encoder to the Galil D main encoder
terminals on the ICM.
If you have used all of your Galil axes for Mach, you can then choose
the Galil axis A and check the “Use Aux Encdr.” check box to drive your
first MPG. You would then hook the MPG encoder to the Galil A
secondary encoder terminals on the ICM.
Follow this method for each MPG you wish to connect.
WARNING!!!! It is very important that if you don’t have an MPG
configured in Mach then you must not configure the MPG setting in the
Galil PlugIn configuration. Otherwise, you may get weird axis
movements. X tied to Y, etc…
Galil PlugIn for Mach3
Extended I/O:
Extended I/O is not available on the Econo Series PCI controllers. It is
an option on the Optima Series bus controllers and the Econo Ethernet
controllers. It is standard on the Optima Ethernet and USB controllers.
For the Optima controllers, there are 64 bits of configurable extended
I/O. However, the Econo Ethernet controllers only provide 40 bits of
configurable extended I/O. The extended I/O is configurable, in blocks
of eight, as either inputs or outputs.
Extended I/O Enabled: To enable extended I/O, this checkbox must
be enabled.
I/O ?: You must explicitly enable each block as either and Input or
Output blocks, or leave it in the not configured state (NC).
LED Start: Each block must be configured with a range of Mach user
LEDs. Since each block consists of 8 I/O points, each block will use 8
Mach user LEDs. This filed is the number of the first Mach user LED in
the block.
Galil PlugIn for Mach3
Enabled: Each I/O bit can be enabled or disabled depending on the
state of its associated “Enabled” checkbox.
Inverted: The state of the I/O point (active high or active low) can be
configured with its associated “Inverted” checkbox.
Leave extended I/O disabled if you do not have extended I/O or do not
wish to use it.
Galil PlugIn for Mach3
Custom Notify Messages:
The Galil PlugIn allows the user to make use of the powerful Galil
command set via custom notify messages. There are 24 possible
messages that can be configured.
Enable: Enable this message.
Message ID: The Mach message ID. This is the ID that Mach sends
the PlugIn.
Commands: The Galil commands to send to the controller when the
PlugIn receives its corresponding message ID. More than one
command can be sent provided that they are separated by semicolons.
The entire command string can be no longer than 80 characters (the
Galil command line length). There is support for limited substitutions in
the command string. DROxxxx will substitute the value of the Mach
DRO with OEM code xxxx. LEDxxxx will substitute the values of the
Mach LED with OEM code xxxx. For instance, if you wanted to set a
Galil variable to the value of a Mach DRO, then the cammand string
would look like this: “SPI=DRO55”. This will set the Galil variable SPI
equal to the value in the Mach DRO #55.
Galil PlugIn for Mach3
Configuring Mach:
Limit \ Home connections:
Limit and home switches are configured on the ports & pins inputs
screen.
They are wired to the Galil inputs and configured as in the table below:
All use port #1
X
X
X
Y
Y
Y
Z
Z
Z
+limit
–limit
home
+limit
–limit
home
+limit
–limit
home
-------------------------------------
pin
pin
pin
pin
pin
pin
pin
pin
pin
#1
#9
#17
#2
#10
#18
#3
#11
#19
A
A
A
B
B
B
C
C
C
+limit
–limit
home
+limit
–limit
home
+limit
–limit
home
-------------------------------------
pin
pin
pin
pin
pin
pin
pin
pin
pin
#4
#12
#20
#5
#13
#21
#6
#14
#22
Galil PlugIn for Mach3
General I/O:
Galil controllers of 1-4 axes usually have 8 inputs and 8 outputs
available. 5-8 axis controllers have a total of 16 inputs and 16 outputs
available.
It is now necessary to configure the I/O in ports & pins to enable Mach
to access and control the Galil I/O. Prior to this release, the Galil inputs
were mapped to port1 and the pin number was the Galil input number.
The same was true of the outputs. While this was simple, problems
were found in the implementation that necessitated change. With this
release, the I/O must be configured in Mach using the pin numbers from
the table below. The I/O must also be identified as active low or high.
Inputs: 1-4 axis control
5-8 axis control only
All use port #1
Input
Input
Input
Input
Input
Input
Input
Input
1
2
3
4
5
6
7
8
---------------------------------
pin
pin
pin
pin
pin
pin
pin
pin
#25
#26
#27
#28
#29
#30
#31
#32
Outputs: 1-4 axis control
Input
Input
Input
Input
Input
Input
Input
Input
9
10
11
12
13
14
15
16
---------------------------------
pin
pin
pin
pin
pin
pin
pin
pin
#33
#34
#35
#36
#37
#38
#39
#40
5-8 axis control only
All use port #1
Output
Output
Output
Output
Output
Output
Output
Output
1
2
3
4
5
6
7
8
---------------------------------
pin
pin
pin
pin
pin
pin
pin
pin
#41
#42
#43
#44
#45
#46
#47
#48
Output
Output
Output
Output
Output
Output
Output
Output
9
10
11
12
13
14
15
16
---------------------------------
pin
pin
pin
pin
pin
pin
pin
pin
#49
#50
#51
#52
#53
#54
#55
#56
Galil PlugIn for Mach3
Probing:
The Galil PlugIn is capable of using a probe for various probing
functions. This is accomplished using the Galil high speed position
latch functions. Unfortunately, the latch inputs share general purpose
inputs on the Galil ICM. Galil axes A, B, C, and D use inputs 1, 2, 3,
and 4 and Galil axes E, F, G, and H use inputs 9, 10, 11, and 12 for the
latch inputs.
IMPORTANT!!!! A probe should be wired to ALL latch inputs for any
moving axis on your machine! For example, if you have a 3 axis mill
and you are using Galil axes A, B, and C to drive them, then the probe’s
output should be wired to inputs 1, 2, and 3. This is because the G31
probe command will move in all 3 dimensions. If you have 3 axis mill
with a 4th axis rotary driven from Galil axes A, B, C, and D, then the
probe’s output should be wired to inputs 1, 2, 3, and 4.
When setting up Mach for probing, it is imperative that the “Probe”
signal is enabled in “Ports and Pin” on the “Input Signals” tab and the
port and pin should be mapped to one of the Galil latch input pins. For
example, if your 3 axis mill uses Galil axes A, B, and C to drive Mach
axes X, Y, and Z, then the probe’s output signal should be wired to Galil
inputs 1, 2, and 3 and the Mach Probe signal should be enabled and
mapped to port 1, and one of pins 25, 26, or 27. Which pin is mapped
really does not matter since all of the inputs will be active upon a probe
hit.
Galil PlugIn for Mach3
Credits:
Brian Barker: [email protected]
Thanks go to Brian for feeling adventurous and writing the Galil PlugIn.
Without Brian, the Galil PlugIn would not have materialized at all.
Jeff Birt:
Jeff added the Extended I/O support.
Kenny Crouch: [email protected]
Kenny added the MPG support and improved the flow of the Galil
command to the controller. He also made it possible to run Galil
threads while under Mach control. He was able to smooth things out
tremendously.
Steve Murphree: [email protected]
Steve added the following:
The ability to control registered Galil controllers other than the
first registered controller.
Axis mapping.
Contour Mode movement control.
He originated this manual and continues to maintain version
control of the plug-in software.
Encoder controlled Spindle.
Analog Input support.
Custom Notify Messages
Use Limits for Homes.