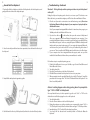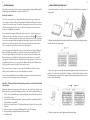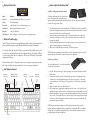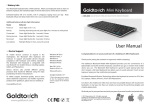
1
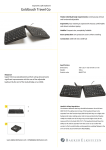
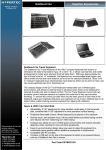
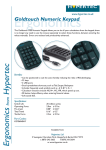
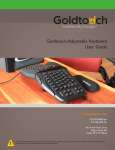
Device Support
As mobile devices continue to expand
in the marketplace, the Go!2 Travel
Keyboard will endeavor to support all
possible devices through compliance
with hardware and wireless standards.
Various devices also provide different
pairing processes that should be
followed using the steps provided by
the device manufacturer.
To obtain support, download guides,
and to learn about additional ergonomic
and mobile ergonomic products from
goldtouch, please visit our website at:
www.goldtouch.com.
Windows XP SP2+
Windows Vista, 7
Windows 8
Windows Mobile
Windows Phone
Go!2 Travel Keyboard
2
GTP-0044W GOLDTOUCH Go! MOBILE WIRELESS BLUETOOTH KEYBOARD
Mac OS X 10.4+
iPad w/ iOS 4.2.1+
iPhone iOS 4.2.1+
Google Android 2.3+
* Due to the open
source nature of this
OS, Goldtouch cannot
warrant support for all
Android devices.
User Manual
Congratulations on your purchase of a Goldtouch Go!2 Mobile Keyboard.
Also compatible with most
Bluetooth 3.0 enabled
devices, including laptops,
tablets, Playstations, iPads
and iPhones.
You’re about to join the tens of thousands of people who’ve traded in their OEM keyboards for
the most innovative, comfortable ergonomic keyboards ever designed.
The technology behind the Goldtouch ergonomic keyboard is one that recognizes the unique
needs of every individual, which vary according to body type, height, weight, shoulder width,
hand position, and other health and lifestyle factors. Goldtouch believes that ergonomic
keyboards should fit the individual, not force the individual to conform to the keyboard.
Utilizing our patented ball and lever locking mechanism, our new Goldtouch Go!2 Mobile
Keyboard offers you personalized adjustments for customized comfort that can significantly
improve personal productivity and mitigate the risks associated with computer-related
repetitive strain injuries.
From the quality of our components to driver-free setup; every Goldtouch keyboard is designed
for business. Our Go!2 Mobile Keyboard is light and compact for easy storage, and features
universal PC and MAC compatibility. Every Goldtouch keyboard is created to enhance your
personal productivity and deliver a speedy return on investment.
We thank you for your purchase and wish you years of personal comfort and productivity.
© 2013 Key Ovation, LLC. All rights reserved.
Goldtouch, the Goldtouch logo and Productivity
through Prevention® are registered trademarks of
Key Ovation, LLC. All other trademarks are copyright their respective owners. All rights reserved.
2
Getting Started - Bluetooth Validation
Operating Distance
The Goldtouch Go!2 Travel Keyboard is equipped with Bluetooth technology. Bluetooth
is a short-range wireless technology that lets you connect multiple computers, input
devices, mobile phones, and handheld devices to each other without cables. To use the
Goldtouch Bluetooth Keyboard, please check to make sure that your device is Bluetooth
capable, and that Bluetooth is turned on. You may check your manufacturer part number
or invoice to see if your device is equipped with a Bluetooth Receiver.
If you aren’t sure your device is equipped with Bluetooth technology, please refer to the
Bluetooth Validation guide in the Troubleshooting section on page 8.
11
Under normal operating conditions, your Bluetooth Go!2 will maintain connectivity to
your mobile device or PC up to a distance of ten meters, or 33 feet.
Note: The operating distance may be affected by the type of Bluetooth adapter in use.
Maintaining Your Keyboard
Like all electronic equipment you need to avoid getting it wet, dropping it, or using undue force to depress the keys or operate the latch handle.
Do not subject the keyboard to extremes in temperature. Your keyboard will operate best
in temperatures of - 5° C to 50° C (23°F to 122°F).
How to pair your Bluetooth Go! with your device
Begin by selecting your operating system, by adjusting
the switch located on the back of the keyboard to PC or
Mac mode. (Please note, keyboards are in PC mode by
default).
Keep the surface of your keyboard clean by wiping with a soft cloth that is dampened
with a mild cleaning solutions; preferably water and mild soap.
Important: Do not attempt to adjust the keyboard without releasing the latch handle
and DO NOT PLACE ANY LUBRICATION or CLEANING FLUID IN THE BALL JOINT. THIS WILL
VOID YOUR WARRANTY.
Next follow the directions for your specific device:
Bluetooth Pairing with PC
1.
2.
3.
4.
5.
Turn on the power using the power switch on the back
of the keyboard.
Press the Connect button on the back of the keyboard, the
blue pairing light on the keyboard status bar will blink when
the keyboard is in pairing mode.
Scan for Bluetooth devices on your PC or tablet.
Once your PC has recognized the device, you will be presented
with a pairing code. Enter the pairing code on the Bluetooth
keyboard and press Enter.
Please allow time for your system to automatically install the
proper drivers for your new keyboard.
Microsoft
2.
3.
4.
5.
Turn on the power using the power switch on the back
of the keyboard.
Press the Connect button on the back of the keyboard,
the blue pairing light on the keyboard status bar will
blink when the keyboard is in pairing mode..
Scan for Bluetooth devices on your Mac, iPad or iPhone.
Once your Mac has recognized the device, you will be
presented with a Passkey. Enter the Passkey on the
Bluetooth keyboard and press Enter.
Please allow time for your system to automatically install
the proper drivers for your new keyboard.
You may need only simple instructions to correct a problem with your purchase from
Goldtouch, Key Ovation. You can email our Support team at [email protected].
Hours of operation are from 9am-5pm CST, Monday through Friday (times subject to
change). 24 hour service is available through our website at www.goldtouch.com.
Warning
Please be aware that there are two magnetized rubber bumpers located on the right and
left sides of your keyboard. These magnetic bumpers help ensure that the two segments
of the keyboard stay folded during transport.
Bluetooth Pairing with MAC
1.
Help and Service Information
Apple
We recommend that you avoid directly exposing your credit or debit cards to these magnetic strips. Credit cards may become unreadable when exposed to magnets for long periods of time. Close proximity will not have an effect on the credit card. The card would
need to be placed directly on the strip for some period to cause an issue.
Connectivity
Please note, the Goldtouch GTP-0044W is wireless only. The USB port on the keyboard is
only for charging the battery and will not provide connectivity to your computer or other
device.
10
3
USB Bluetooth Adapter - Optional
If your computer of laptop is not equipped with a Bluetooth
receiver, you may need an optional USB Bluetooth adapter to
use your Go!2 Mobile Keyboard. The Bluetooth adapter can be
purchased at www.goldtouch.com or in most major electronic
stores.
If your computer has a built-in Bluetooth receiver, then this
adapter is not necessary. You may skip the adapter installation
steps in this guide and begin by pairing your device.
2
How to pair your Bluetooth Go! with your device - Continued
Bluetooth Pairing with Android 3 or Older
1.
Turn on the power using the power switch on the back of the
keyboard.
Press the Connect button on the back of the keyboard.
Scan for Bluetooth devices on your Android device.
Once your Android device has recognized the keyboard, you
will first be asked to enter in a Pin Code for your keyboard on
your Android Device. Please note, you may enter any 4 digit
Pin number that you like.
Next, enter the same 4 digit Pin Code (from step 4) on your
Goldtouch Keyboard and press Enter. (We recommend that
you write down your Pairing code, or you will need to re-pair if
your device disconnects.)
(Note - Android 4 or higher pairs like a PC)
2.
3.
4.
5.
WARNING!!!
It is strongly recommended that you DO NOT use a Bluetooth adapter on a computer
with a built-in Bluetooth receiver.
The Goldtouch Go!2 Mobile Bluetooth Keyboard is designed to utilize Microsoft and
Apple’s built-in support for Bluetooth devices.
Bluetooth Pairing with Samsung Galaxy
If your computer or laptop does not have native Bluetooth support and you have purchased
the Goldtouch Bluetooth Dongle Adapter, please use the following instructions to walk
you through the basic Bluetooth Adapter installation process:
2.
3.
4.
Please follow the instructions for your operating system to install the optional USB
Bluetooth adapter. USB ports are only available on PC or Mac based computers, there
are no USB ports on most portable devices. Make sure that your device has a USB port
before installing the dongle:
Windows XP SP3
Installing the USB Bluetooth Adapter:
1. Ensure that you have an active internet connection.
2. Insert the USB Bluetooth Adapter into an available USB Port.
3. The Add New Hardware wizard will automatically detect the device and install the
appropriate “Bluetooth Radio” drivers.
Windows Vista/ Windows 7/ Windows 8
Installing the USB Bluetooth Adapter:
1. Ensure that you have an active internet connection.
2. Insert the USB Bluetooth Adapter into an available USB Port.
3. The Add New Hardware wizard will automatically detect the device and install the
appropriate “Bluetooth Radio” drivers.
1.
Turn on the power using the power switch on the back of the
keyboard.
Press the Connect button on the back of the keyboard.
Scan for Bluetooth devices on your Samsung Galaxy.
Once your Samsung Galaxy has recognized the device, you
will be presented with a Passkey. Enter the Passkey on the
Bluetooth keyboard and press Enter.
Please allow time for your system to automatically install the
proper drivers for your new keyboard.
5.
Android
Galaxy
FN - Function Features
To activate the FN (Function) features on your Goldtouch Go!2 keyboard, press and hold
the FN key, and select the following Function Features, outlined in blue (for PC) and yellow
(for Mac):
Windows & Mac
FN Features
Windows Only
FN Features
Play/Pause
Email
Rewind
Calculator
Home Screen
Mute
Favorites Folder
Volume Down
My Computer
Volume Up
Fast Forward
4
How to Fold Your Keyboard
1. Push and hold the Lock button on the back of the Keyboard to the Unlock position, and
gently pull the two halves of the keyboard apart.
Troubleshooting - Continued
9
Windows 7 - Putting the keyboard into pairing mode does not pair the keyboard
with my PC.
Putting the keyboard in pairing mode alone does not cause your PC to detect a new
Bluetooth device, you must first configure your PC to detect the new Bluetooth Device.
1. Check to see if your radio receiver status is on and functioning correctly. Do not use
the Optional Bluetooth Dongle adaptor if your computer or laptop already has
a Bluetooth Receiver.
Note: If your computer has integrated Bluetooth and it is turned on, when you go to your
Task Bar you should see the Bluetooth Devices icon.
2. Once the two keyboard halves have been separated, release the handle on the top of
the keyboard.
2. If you don’t see this icon
on the task bar, then your radio receiver is likely turned
off or your computer does not have Bluetooth integrated in your computer. If you
previously had Bluetooth devices connected to you device then you probably DO have
native Bluetooth Support. In this case, using the Optional USB Bluetooth adapter will
interfere with your system’s native support. If your system has integrated Bluetooth,
and it is turned on, you should see the BT icon on your Taskbar along the bottom of
your screen. There is usually an On/Off slider switch on the front or side of the laptop.
3. If your computer does have integrated Bluetooth support, make sure you have
installed the latest Bluetooth drivers from your manufacturer’s website.
Follow these steps to complete the pairing process:
3. Next, fold the two keyboard segments together.
1. Double-click the Bluetooth icon on your Task Bar, or go to Control Panel\Devices and
Printer\Bluetooth Devices.
2. Turn the keyboard On.
3. Press the Connect button on the back of the keyboard.
4. Click Add Device and wait for the keyboard to connect to your system.
5. When prompted, enter the provided Pairing Code on the Go!2 Keyboard. You will be
presented with a message that “The Device “Goldtouch Bluetooth Keyboard” Has
Been Successfully Installed”.
Android - nothing happens when during pairing when I’m prompted to
type “1234” or “0000” on the keyboard.
On many Android devices, it is first required to type the code “0000” or “1234” on the
Android device itself before typing the code on the keyboard.
4. Push the handle on the top of the keyboard, back into the closed and locked position.
1. Turn the Keyboard On.
2. Press the Connect button on the back of the keyboard.
3. During the pairing process, at the point where you are prompted to type in “0000” or
“1234,” first tap the entry field on the Android device and type “1234” and press Enter.
4. Immediately type “1234” on the Go! Keyboard and press Enter.
5. Your device will be detected and successfully added as “Goldtouch Bluetooth
Keyboard”.
8
Troubleshooting
This section covers several common issues encountered when pairing the Bluetooth Go!
Mobile Keyboard with Windows®, Android® and Mac® OS X:
How to Unfold your Keyboard
5
1. Undo the handle lever on the top of your keyboard, and unfold the two segments of
the keyboard.
Bluetooth Validation:
If you aren’t sure your device is equipped with Bluetooth technology, you may check
your computer or device for Bluetooth capability in the Wireless and Network or Devices
sections of your specific system. This will vary depending on the type of device you have,
and the operating system. Please see your system documentation for specific instructions for checking Bluetooth capability.
If your computer has integrated Bluetooth and it is turned on -----when you go to your
Task Bar you should see the Bluetooth Devices icon, which looks like this: . If you don’t
see this icon on the task bar, then your radio receiver is likely turned off or your computer
does not have integrated Bluetooth capability. Many laptop computers have an On/Off
switch to turn your wireless support on, please ensure the switch is in the On position.
There is usually a slider switch on the front or side of the laptop.
2. When the keyboard is unfolded, push the handle lever on the top of your keyboard back
into the closed and locked position.
If you do not have native Bluetooth support, you may purchase our Optional Goldtouch
Bluetooth USB Dongle available on our website or through our Reseller Channel. DO
not use this Optional Bluetooth Dongle if your computer or device already has native
Bluetooth support as it will interfere with your system’s native receiver. A system will
only support one Bluetooth Receiver. Bluetooth technology supports the connection of
many Bluetooth devices, one-to-many, which is different than the older 2.5Ghz wireless
technology which required a dongle for each wireless device.
Please ensure that your computer or device has the latest Bluetooth Receiver drivers
which should be available from your device Manufacturer’s website.
Once you have validated the existence of Bluetooth support and have the latest drivers,
you may proceed to the pairing steps located on page 2.
3. Next, you’re going to push the two keyboard segments into the closed and locked
position. To do this, push and hold the Lock button on the back of the keyboard to the
Unlocked position, now push the two segments of the keyboard together until you can no
longer see the folding hinge.
Mac OS X - Putting the keyboard into pairing mode does not pair the keyboard
with my Mac.
Putting the keyboard in pairing mode alone does not cause your Mac to detect a new
Bluetooth device, you must first configure your Mac to detect the new Bluetooth Device.
1. To Pair - Go to System Preferences > Internet & Wireless, then click the Bluetooth Icon.
2. Turn the keyboard on.
3. Press the Connect button on the back of your keyboard, then immediately Click “Setup New Device” on your Mac.
4. When the keyboard, device ID “Goldtouch Bluetooth Keyboard” is detected, click
Continue.
5. When prompted, enter the provided Pairing Code on the Go!2 Keyboard.
6. Message will pop up that the keyboard has been added.
7. Click Quit to exit.
4. Make your keyboard comfort adjustment and begin working.
6
2
How to adjust the Goldtouch Go!
Keyboard Status Bar
7
Step One, dialing in personalized comfort.
States:
Behavior:
Power On Intermittent blinking, blue LED for 2 sec., then off.
Pairing Blue LED light blinks.
Connected Solid Blue light for 2 Seconds, then light goes out.
Low Battery Blinking green LED light on status bar.
A leading contributing factor to the development of computer-related repetitive strain
injuries is the flat standard keyboard, which places the forearm and wrist in awkward
positions for long periods of time.
Charging Solid green LED light.
Fully Charged Green LED light goes out when keyboard is completely charged.
Battery Life & Charging
Your Go!2 Travel Keyboard has an internal lithium-ion battery. When your keyboard needs
to have it’s battery charged, a green LED light will blink in your keyboard status bar.
To charge the keyboard, plug the USB power cord into the keyboard (the power port is
located on the top of the keyboard, next to the adjustment lever). Next, plug the USB port
on your charging cable into your computer or AC Powered USB charger. Approximate
charging time is 5 hours.
Estimated battery life is 32 days with normal use (4 contiguous typing hours per day).
Note: keyboard will go into sleep mode when not in use, to preserve battery life.
Go!2 Keyboard Layout
Keyboard
Power Bar
FN Key
Windows & Mac
Multi Media Keys
Windows
Hot Keys
Scroll Lock
Keyboard
Status Bar
1. Your first adjustment of your new Goldtouch Go!2 Mobile Keyboard is to adjust the
keyboard to straighten your wrists and forearm along the horizontal plane. Start by
releasing the latch on the top of the keyboard.
2. Now, move the segments until the angle of each panel matches the natural line
created by your fingers across the center row of keys when both your wrists and
forearms are straight.
3. This first individual adjustment will correct for undue pressure caused in the wrist
and forearm when typing on a normal keyboard.
4. When you’ve established the correct angle, lock the lever down.
NOTE: Goldtouch recommends you work in this position for a few days until you’re comfortable with the split of the panels, compared to your previous keyboard.
Step Two, go Vertical!
Your next adjustment is to correct the inward turn
of your wrists or pronation.
1. First, let’s find your tent angle. Start by grasping a pen in your hand with your palm
facing down.
2. Now, relax and rotate your arm (clockwise if the pen is in your right hand, counterclockwise if you are left handed) until you feel a release in pressure — this angle
is usually between 7 and 15 degrees. Congratulations. You’ve found your tenting
angle.
3. Release the latch on the top of the keyboard.
4. Lift the segments by grasping the segments near the center – close to the ball and
replicate the angle you found earlier. Don’t forget to keep your split angle as part of
this final adjustment. Once you’ve made this final adjustment, lock to the lever back
into position. You may find that over a period of time, these two angles may change.
Feel free to continue adjusting the keyboard to dial-in your own personal split and
tent angle for greatest comfort.
NOTE: Always ensure that your fingers or other foreign objects are not in between the
keyboard and the locking handle when closing the lever. It’s important NOT to over-adjust
the keyboard. See our website www.goldtouch.com for a video demonstration on how to
properly adjust your Goldtouch keyboard.