1
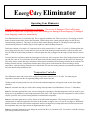
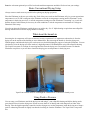
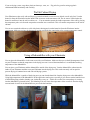
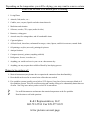
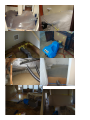
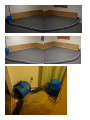
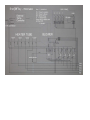
Energedry Eliminator Electric Heat Drying System Operations Manual K & J Representatives, LLC 602-723-2534 Fax 928-277-8123 Energedry Eliminator Safety Page Read this owner’s manual carefully before using your Eliminator Caution: Eliminator Safety Information Never use the Eliminator in conditions exceeding 130F degrees. Never set the Thermostat control to higher than 130F degrees. Never use an extension cord smaller than 12 gauge. Never use an extension cord longer than 100’. Never drop or bounce the Eliminator. Internal damage may occur. Never clean or service the Eliminator while plugged into a live electrical power source. Never operate the Eliminator in standing water. Always wear rubber gloves and boots when operating the Eliminator in damp conditions. Never operate the Eliminator unless all panels and guards are in place and properly secured. Always keep the air inlet & outlet clear of any obstructions and loose material. Never operate the Eliminator without the fan on. Never operate the Eliminator with a damaged cord(s). Never operate the Eliminator with loose cord connections. Warning: Ignoring these safety precautions may result in personal injury. K & J Representatives, LLC 602-723-2534 K & J Representatives, LLC 2 Year Limited Warranty Eliminator Heat Drying System Warrantor: K & J Representatives, LLC, 6550 E. 6th St., Ste C, Prescott Valley, AZ 86314. Telephone: 602723-2534, Fax: 928-277-8123 Who is Covered: This warranty extends to the original end-user and may not be assigned or transferred. Warranty Period: The term of the warranty coverage from the date of purchase is: 2 years on the housing 1 year on parts and labor Warranty Coverage: K & J Representatives, LLC warrants that, for one (1) year, the Eliminator Heat Drying System manufactured by K & J Representatives, LLC will operate free from defects in material or workmanship, or K & J Representatives, LLC, at its option, will repair or replace the defective part(s), free of charge. K & J Representatives, LLC further warrants that for a period of five (5) years, the housing of the Eliminator manufactured by K & J Representatives, LLC will be free from defects in material or workmanship, K & J Representatives, LLC will repair of replace the defective part(s), providing that all labor and shipping costs for the defective part(s) shall be borne by the end-user. This warranty does not cover any defect, malfunction, etc… resulting from improper operation, lack of maintenance, freezing, corrosion from chemicals, condensation, tampering, modification, unauthorized or improper repair, accident, acts of nature, or normal wear to items such as power cords, plug adaptors or other items which require replacement resulting from normal usage. End-User Responsibilities: Warranty service must be performed by a firm or Individual authorized by K & J Representatives, LLC. The end-user must contact K & J Representatives, LLC at the above location. K & J Representatives, LLC will arrange for covered warranty service. All covered warranty service will be arranged during normal business hours. Limitations and Exclusions: If any part of the Eliminator manufactured by K & J Representatives, LLC is repaired or replaced as covered warranty, the new part shall be warranted only for the remainder of the original warranty period of the Eliminator. Upon expiration of the written warranty applicable to the K & J Representatives, LLC Eliminator or any part thereof, all other warranties implied by law, including merchantability and fitness for a particular purpose, shall also expire. All warranties made by K & J Representatives, LLC are set forth herein, and no claim may be made against K & J Representatives, LLC on any oral warranty. In no event shall K & J Representatives, LLC, in connection with the sale, operation, repair or replacement of any K & J Representatives, LLC device or part thereof be liable under any legal theory for any special, indirect or consequential damages including without limitation water damage, lost profits, delay, or loss of use or damage to any real or personal property. Legal Rights: This warranty gives you specific legal rights, and you may also have other rights which vary from State to State. Energedry Eliminator Operating Your Eliminator Unpack & inspect your Eliminator for damage – Do not use if damaged. Check all heating elements to make sure everything works and nothing was damaged from shipping. If damaged from shipping, contact us immediately. Your Eliminator has one (1) cord for the fan. This is wrapped around the unit. There are four (4) 115volt plug-ins for the heater elements located at the front of the Eliminator. When looking at the control panel the plug-in on the left rear controls heating element #1. The plug-in on the left front controls heating element #2. The plug-in on the right front controls heating element #3 and the plug-in on the right rear controls heating element #4. Each heater element is less than 11.67 amps and can be safely connected to a 15 amp 115v circuit. A 240volt splitter box that is plugged into the dryer 30 amp 240volt circuit can run all the heating elements and still be within electrical code. You can connect all the heating elements to a 240volt splitter box that is plugged into the range 50 amp 240volt circuit as well. You must have the cord that controls the fan plugged in or the unit will not operate. None of the heating elements will turn on if the fan is not on. If you block the inlet or the outlet of the unit the heating elements will shut-off or will not turn on. This safety feature insures that proper minimum airflow must be maintained so the heating elements do not overheat. The heating elements also have a temperature breaker that will keep the air in the heater tube from exceeding a certain temperature. Lastly the heating elements have a failsafe that will cause the heating elements to permanently shutdown in the event that all safety mechanisms fail. Temperature Controller Your Eliminator comes with a state of the art digital temperature controller on 12’ of cable. You must plug the temperature controller into the corresponding fitting on the front of the unit. Within seconds of turning on the fan you will notice the ambient temperature will appear on the screen of the digital controller. Press the set button once and you will be able to change the temperature from Fahrenheit to Celsius. F = Fahrenheit Press the set button again and this is the screen to change the temperature to the high temperature limit you want for your drying area. You should never set the high temperature limit above 130F degrees. Once this temperature is achieved in the airspace your ELE will cycle the heating elements to maintain this temperature. Press the set button again and you will be able to set the differential temperature. This setting will turn the heating elements back on when the temperature has fallen by the number of degrees you set. If you set one degree as differential, then the elements will shut off when the temperature achieves the high limit set temperature and will turn back on when the temperature drops one degree below the high temperature set point. Press the set button again and you can change the screen from H1 to C1 and back to H1. You must be on the H1 setting or your heating elements will not work. Press the set button again and you will be back at the ambient temperature and this will also activate your settings. Basic Conventional Drying Setup Always extract as much water as possible before placing any drying equipment. Place the Eliminator in the area you wish to dry. Each of the power cords on the Eliminator will give you an approximate temperature rise of 22-24F coming out of the Eliminator versus the air temperature coming into the Eliminator. As the temperature in the drying area rises, so will the temperature coming out of the Eliminator. Connecting 3 or 4 cords will heat the airspace faster and may be necessary in colder conditions. Limit the temperature to maximum of 130 degrees Fahrenheit in this setup. You also can place the Eliminator outside the area you wish to dry. Use 6” Mylar ducting or equivalent non-collapsible ducting. Duct the hot air into the drying chamber or tenting. What about the humid air Increasing the air temperature will cause an increase in water evaporation. It is important to exhaust the air from the drying area to the outside of the building or into a dehumidifier, thus removing the humid air from the drying area. Without proper ventilation the drying area can become very humid defeating the purpose of using the Eliminator. You can also duct the air in the drying area to the intake of a high temperature LGR dehumidifier using non-collapsible ducting. The VapairVent system is excellent for removing humid air from the drying area. Do not duct out more air than the Eliminator can process or you will have a hard time keeping your set temperature in the drying area. VapairVent exhausts moist air out through the exhaust fan in a bathroom or laundry room. Using Positive Pressure You can setup your Eliminator outside the drying area and using 6”, non-collapsible ducting and Mylar ducting works great, duct the hot air into the drying area. Do not use more than 10’ of ducting and avoid sharp turns or kinks in the ducting. Take the digital temperature controller into the drying area to set the temperature inside the drying area. Setup a positive exhausting of humid air slightly less than the incoming air from the Eliminator. The VapairVent is setup to do this. If you are drying a room, setup sheet plastic at doorways, vents, etc… Zip poles for great for setting up plastic containments both horizontally and vertically. Wall & Cabinet Drying Your Eliminator works easily with wall drying systems that attach to an air-mover (whistle or snail style fan). Vent the heated air from the Eliminator into the intake of the air-mover on the non-motor side. The air-mover will then take the heated air and blow it into the wall or cabinet, etc… You can monitor/control the inside temperature of the wall by placing the temperature probe wire from the temperature controller into a small hole. This will monitor temperatures in the wall or cabinets. You can use contain the cabinets or walls with plastic sheeting and vent the heated air from the Eliminator into the containment. Make sure to place the thermostat sensing cord inside the contained area for accurate temperature control. Leaning cardboard against the wall allows you to pump hot air in and “Focus” heats the wall. Using a Dehumidifier with your Eliminator You can place the dehumidifier in the same room with your Eliminator. Make sure that you set the high temperature limit on your Eliminator so that the temperature in the drying area won’t exceed the manufacturer’s recommended working temperature of the dehumidifier. You can place your Eliminator and the dehumidifier outside of the drying area. Vent the dehumidifier exhaust into the intake of your Eliminator and then vent your Eliminator into the drying area. This works extremely well on positive pressure drying of contained areas and with wall drying systems. While the dehumidifier is outside of the drying area you can duct the humid air from the drying area to the dehumidifier. Using high temperature LGR dehumidifiers in this application works great, especially if you cannot vent the humid air out of the building using a bath or laundry vent, clothes dryer vent, etc… Make sure to allow for some makeup air coming into the dehumidifier (pictured below). This blending of air will lower the temperature of the overall air from the drying area and make it easier for the dehumidifier to process the hot humid air. Depending on the temperature you will be drying, you may want to remove certain items from the area to be heated prior to heating: Living Plants Animals, fish, turtles, etc… Candles, wax, crayons, lipstick and other items that melt Medicines and vitamins Software, records, CD’s, tapes (audio & video) Batteries, writing pens Aerosol cans, fire extinguishers, and all combustible items Cigarette lighters All fresh foods, chocolates, carbonated beverages, wines, liquors, artificial sweeteners, canned foods Oil paintings, acrylics (art work), paintings & pictures Antique furniture Computer (towers), printers (anything with ink) Refrigerator, freezer, ice maker, etc… Anything you would not leave in your car on a hot summer day Anything you may suspect that could be affected by heat drying process Things to be cautious of: Musical instruments (may detune due to expansion & contraction from heat/humidity) Heat should not be used in or around wine cellars that are stocked Fire sprinkler systems (usually not set below 155F degrees), keep lots of air movement to blend air if fire sprinklers present. This will avoid heat rising and causing ceiling to be substantially hotter than rest of room. Not a big issue unless you have a lack of air movement. Use an IR thermometer and measure the material temperature at the fire sprinkler Don’t hesitate to call with questions. K & J Representatives, LLC 602-723-2534 Fax 928-277-8123 A few pictures on next page