1
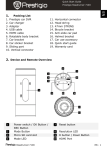
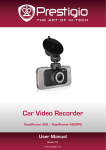
Quick Start Guide Prestigio Roadrunner 500 1. Packing List 1. Prestigio car DVR 2. Suction mount 3. Car charger 4. USB cable 5. HDMI cable 6. AV cable 7. Rechargeable battery 8. Quick start guide 9. Pouch N 2. Device Overview 1 O 6 1 AD R 2 7 4 8 3 10 12 H 5 6 LED light Lens Battery door AV, USB, HDMI ports Reset button Mount hole 7 Menu button 1 2 3 4 5 11 9 Roadrunner 500 8 9 10 11 12 13 14 13 14 Mode Button Play button Power button LCD display Record button Navigation button (5 directions – up, down, left, right, center) Speaker EN - 1 Quick Start Guide Prestigio Roadrunner 500 Getting started 3. Power on/Power off 4. Charging O N Position the device in the vehicle using the suction mount and press the Power button to turn it on. To power off the device press the button again. You can also connect the device to the car charger. It will automatically turn on and start recording when the car engine starts. When the engine stops, the device will automatically save the last file and turn off. Note: USB IN must be activated (for more details see section 9 - USB IN). H AD R Using the USB cable: connect the device to the USB port of a computer. The USB menu will be displayed, containing MSC, Charge and Power On. Select Charge and the device will immediately start charging. Using the car changer: Connect the device to the car charger. The device will start charging after the car engine is turned on. The device will automatically turn on and start recording (if USB IN is activated). When the engine stops, the device will automatically save the last file and turn off. Note: You can manually set the automatic shut down time after stopping the car engine. Go to Video MenuVideo SettingsShutdown and choose the desired option. Normally it takes approximately 2-3 hours to fully charge the device. Operating the device while charging with the AC adapter may extend the time of full charge. Note: Before using the device for the first time, please, connect it to the PC or notebook using the USB cable provided to fully charge the Li-ion battery. The battery is completely charged in 2-3 hours. 5. Inserting the SD-card Before starting video recording, please, insert an SD card (not EN – 2 Roadrunner 500 Quick Start Guide Prestigio Roadrunner 500 included) into the SD card slot in the device. To extract the SD card slightly push it inside the device, and remove. Note: After inserting the SD card the device will automatically recognize it as default storage and all the data will be saved on this card. 6. Recording O N To start recording make sure the Video Mode is selected. Press the Record button to start recording. The recorded files are saved on SD Card. To stop recording, press any button or stop the car engine if the device is connected to the car charger. The light will turn off. With car charger connected the device will automatically turn on and start recording if USB IN is activated. H AD R 7. Taking pictures To take a picture make sure the Picture Mode is selected. Press the Record button to take a photo. Taken photos are saved on SD Card. To take photos with a flash press the navigation button left/right, until the necessary flash symbol appears on the screen. To zoom the lens in/out press the navigation button up/down. Roadrunner 500 EN - 3 Quick Start Guide Prestigio Roadrunner 500 Home screen 8. Main menu The following symbols may be displayed on the screen: Play AD R System settings Picture size is 8m Storage card Battery level Sunny Cloudy Tungsten Auto flash Fluorescent Fill flash High definition Flash is off WVGA H EN – 4 Picture size is 12m O Picture mode Picture size is 5m N Video recording mode Roadrunner 500 Quick Start Guide Prestigio Roadrunner 500 Settings 9. Video Menu settings N Turn on the device and make sure the Video mode is selected. Note: To select Video or Picture Mode press the Mode button. The appropriate symbol will be displayed in the top left corner of the screen. Press Menu button to enter Settings. Press the navigational button up/down to select the option and press it left/right to set the value. H AD R O The following options list is available in the Video menu: Size: Select the video image size from 1920x1080 (30 fps), 1920x1080 (15 fps), 1440x1080, 1280x720, 848x480. EV: Select the exposure compensation (when the device fails to identify the correct exposure automatically). White Balance: Select the correct white balance according to the lighting conditions. Contrast: Select your preferred contrast. Sharpness: Select the needed sharpness of the image. Effect: Select the special colour effect to apply to the image. Scene: Select the video mode (such as night recording, landscape or portrait orientation etc). ISO: Set the ISO. Recycle: Once there is no more free space left on the SD card the device will automatically erase the oldest files on the card and continue recording new ones. Select one of the values to set the video duration. USB IN: Set to ON to start video recording automatically after turning on the car engine. This option is effective when the device is connected to the car charger. If USB IN is not activated, the device will launch the start-up screen after you turn on the car engine. Shutdown: Select the time of automatic shutdown, when the device is connected to the car charger. You can choose values between Power Off (immediate shutdown after the car engine stops), No (the device will continue working even after the engine stops), 10 min, 5 min, 10 second (the device will turn off in 10 minutes, 5 minutes or 10 seconds accordingly after the car engine stops). Roadrunner 500 EN - 5 Quick Start Guide Prestigio Roadrunner 500 10. Picture Menu settings N Video Flip: The device can record video in 2 different positions – when the camera is on the top (like on the scheme in section 2) and when it is in upside down position. To make sure the video file is not played upside down, select Video flip – Yes. Motion Detect: After enabling this function the device will start recording automatically if it detects a moving object and stop recording when there is no movement detected. Mic: Select to turn the microphone on or off. H AD R O Turn on the device and make sure the Picture mode is selected. Note: To select Video or Picture Mode press the Mode button. The appropriate symbol will be displayed in the top left corner of the screen. Press Menu button to enter Settings. Press the navigational button up/down to select the option and press it left/right to set the value. The following options list is available in the Picture menu: Size: Select the image size from 5m, 8m and 12m. EV: Select the exposure compensation (when the device fails to identify the correct exposure automatically). Quality: Select the image quality. White Balance: Select the correct white balance according to the lighting conditions. Contrast: Select your preferred contrast. Sharpness: Select the needed sharpness of the image. Effect: Select the special colour effect to apply to the image. Scene: Select the video mode (such as night recording, landscape or portrait orientation etc). ISO: Set the ISO. Selftimer: Select On to use the timer when taking pictures. Burst: Select this option to make a set of pictures with one click. 11. General settings Press Menu button to enter Settings. Press the navigational button right to select Settings. The following settings are available: Volume: Select the playback volume and tone volume on key press. Language: Select the desired language from the list. Date: Install the current date. EN – 6 Roadrunner 500 Quick Start Guide Prestigio Roadrunner 500 O N Clock: Install the current time. Format: Select to format the SD card. Important note: Once you select YES and press the navigation button the card will be formatted without warning. All data on it will be erased. System reset: Select to restore default system settings. Auto Off: Select the time of automatic power off when the device is not in use. Light frequency: Change frequency to remove the blinking effect when recording under artificial lighting. Stamp: Select ON to add time and date indications to the images and video. Version: Displays the current system version. AD R 12. Playback mode To enter playback mode press Play button. The last recorded file will be displayed. Press the navigation button to view the file, press it right or left to view other recorded files, or press it down to display thumbnails of all recorder files. To enter menu options press Menu button. The following settings are available: Delete: Select Yes to delete the current file. Slide show: Select to display the files in slide show. 13. USB connection H To download registered files on your PC/notebook, please, connect the device to the PC or notebook via USB-cable provided. After connecting the device to the PC the USB menu will be displayed, containing MSC, Charge and Power On. Select MSC, and the device will appear in “My computer” as the removable disk. All registered files are stored in DCIM folder, videos are stored in MOV format, and the pictures are stored in JPG format. You can now download the files from the device. 14. Playback on TV To playback the recorded files on TV connect the device to your TV with the AV or HDMI cable provided and follow the TV instructions or refer to Roadrunner 500 EN - 7 Quick Start Guide Prestigio Roadrunner 500 Safety precautions O N your TV user manual. Notes: Please insert the SD card before recording. SD card is not included in the package. When the SD card is out of memory, it will automatically erase the oldest files and start recording from the beginning (only if the Recycle option is activated). H AD R Please observe all safety precautions before using Prestigio Roadrunner 500. Please follow all procedures outlined in this manual to correctly operate the device. Do not attempt to disassemble or alter any part of the device that is not described in this guide. Do not place the device in contact with water or any other liquids. The device is NOT designed to be liquid proof of any sort. In the event of liquid entry into interior of device, immediately disconnect the device from the computer. Continuing use of the device may result in fire or electrical shock. Please consult your product distributor or the closest support center. To avoid risk of electrical shock, do not connect or disconnect the device with wet hands. Do not place the device near a heat source or directly expose it to flame or heat. Never place the device in vicinity of equipments generating strong electromagnetic fields. Exposure to strong magnetic fields may cause malfunctions or data corruption and loss. EN – 8 Roadrunner 500 Quick Start Guide Prestigio Roadrunner 500 Technical Specifications 1920x1080 (30 fps), 1920x1080 (15 fps), 1440x1080, 1280x720, 848x480 pixels MOV JPG Replaceable rechargeable battery HDMI, USB, AV out, SD card (Supports max 32GB, high-speed SD card recommended) Built-in Microphone Operating temperature AD R Video Storage Capacity O - 5°~ 40°C N Recording resolution Video format Picture format Power source Interfaces Storage H.264 H.264 848 X 2592 X 3264 X 3264 X card(G) 720P 1080P 480P 1944 2448 2448 (WVGA) (5M) (8M) (12M) 200min 4720 3193 2400 photos photos photos 2360 1565 1200 photos photos photos 1180 753 600 photos photos photos 590 386 300 photos photos photos 8G 4G 2G 80min 40min 20min 80min 40min 20min 10min 100min 50min 25min H 1G 160min Disclaimer As the Prestigio products are constantly updated and improved, your device may have a slightly different appearance or modified functionality than presented in this Quick Start Guide. Roadrunner 500 EN - 9