1
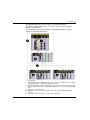
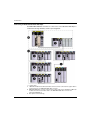
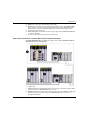
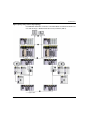
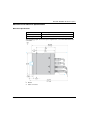
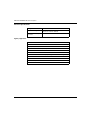
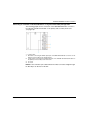
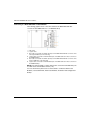
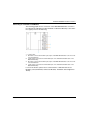
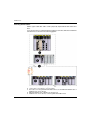
BMX NRP 0200/0201
EIO0000001108 07/2012
BMX NRP 0200/0201
M340 Fiber Converter Module
User Guide
EIO0000001108.00
07/2012
www.schneider-electric.com
The information provided in this documentation contains general descriptions and/or
technical characteristics of the performance of the products contained herein. This
documentation is not intended as a substitute for and is not to be used for
determining suitability or reliability of these products for specific user applications. It
is the duty of any such user or integrator to perform the appropriate and complete
risk analysis, evaluation and testing of the products with respect to the relevant
specific application or use thereof. Neither Schneider Electric nor any of its affiliates
or subsidiaries shall be responsible or liable for misuse of the information that is
contained herein. If you have any suggestions for improvements or amendments or
have found errors in this publication, please notify us.
No part of this document may be reproduced in any form or by any means, electronic
or mechanical, including photocopying, without express written permission of
Schneider Electric.
All pertinent state, regional, and local safety regulations must be observed when
installing and using this product. For reasons of safety and to help ensure
compliance with documented system data, only the manufacturer should perform
repairs to components.
When devices are used for applications with technical safety requirements, the
relevant instructions must be followed.
Failure to use Schneider Electric software or approved software with our hardware
products may result in injury, harm, or improper operating results.
Failure to observe this information can result in injury or equipment damage.
© 2012 Schneider Electric. All rights reserved.
2
EIO0000001108 07/2012
Table of Contents
Safety Information . . . . . . . . . . . . . . . . . . . . . . . . . . . . . .
About the Book . . . . . . . . . . . . . . . . . . . . . . . . . . . . . . . . .
Chapter 1 Architectures. . . . . . . . . . . . . . . . . . . . . . . . . . . . . . . . . . .
Introduction . . . . . . . . . . . . . . . . . . . . . . . . . . . . . . . . . . . . . . . . . . . . . . . .
Quantum Ethernet I/O Network Topologies . . . . . . . . . . . . . . . . . . . . . . .
Chapter 2 BMX NRP 0200/0201 Module Description. . . . . . . . . . . .
Presentation . . . . . . . . . . . . . . . . . . . . . . . . . . . . . . . . . . . . . . . . . . . . . . .
LED Indicators. . . . . . . . . . . . . . . . . . . . . . . . . . . . . . . . . . . . . . . . . . . . . .
General Specifications . . . . . . . . . . . . . . . . . . . . . . . . . . . . . . . . . . . . . . .
Mechanical and Electrical Specifications . . . . . . . . . . . . . . . . . . . . . . . . .
Operating and Storage Conditions . . . . . . . . . . . . . . . . . . . . . . . . . . . . . .
Chapter 3 BMX NRP 0200/0201 Module Installation . . . . . . . . . . . .
Selecting Fiber Optic Cable. . . . . . . . . . . . . . . . . . . . . . . . . . . . . . . . . . . .
Grounding Considerations. . . . . . . . . . . . . . . . . . . . . . . . . . . . . . . . . . . . .
Fitting of the Fiber Converter. . . . . . . . . . . . . . . . . . . . . . . . . . . . . . . . . . .
Installing Fiber Optic Cables . . . . . . . . . . . . . . . . . . . . . . . . . . . . . . . . . . .
Connecting the Fiber Converter to I/O Network Devices . . . . . . . . . . . . .
Configuration with Unity Pro . . . . . . . . . . . . . . . . . . . . . . . . . . . . . . . . . . .
Chapter 4 Maintenance . . . . . . . . . . . . . . . . . . . . . . . . . . . . . . . . . . .
5
7
9
10
13
19
20
23
25
27
29
31
32
33
34
37
40
46
47
Hot Swapping . . . . . . . . . . . . . . . . . . . . . . . . . . . . . . . . . . . . . . . . . . . . . .
Troubleshooting. . . . . . . . . . . . . . . . . . . . . . . . . . . . . . . . . . . . . . . . . . . . .
48
49
Glossary . . . . . . . . . . . . . . . . . . . . . . . . . . . . . . . . . . . . . . . . . . .
Index . . . . . . . . . . . . . . . . . . . . . . . . . . . . . . . . . . . . . . . . . . .
53
59
EIO0000001108 07/2012
3
4
EIO0000001108 07/2012
Safety Information
§
Important Information
NOTICE
Read these instructions carefully, and look at the equipment to become familiar with
the device before trying to install, operate, or maintain it. The following special
messages may appear throughout this documentation or on the equipment to warn
of potential hazards or to call attention to information that clarifies or simplifies a
procedure.
EIO0000001108 07/2012
5
PLEASE NOTE
Electrical equipment should be installed, operated, serviced, and maintained only by
qualified personnel. No responsibility is assumed by Schneider Electric for any
consequences arising out of the use of this material.
A qualified person is one who has skills and knowledge related to the construction
and operation of electrical equipment and its installation, and has received safety
training to recognize and avoid the hazards involved.
6
EIO0000001108 07/2012
About the Book
At a Glance
Document Scope
This document is the reference guide for the Modicon M340 fiber converter modules
BMX NRP 0200 and BMX NRP 0201.
Validity Note
This document is valid from Unity Pro 7.0 or later.
Related Documents
Title of Documentation
Reference Number
Quantum Ethernet I/O System Planning Guide
S1A48959 (Eng),
S1A48961 (Fre),
S1A48962 (Ger),
S1A48964 (Ita),
S1A48965 (Spa),
S1A48966 (Chs)
Quantum Ethernet I/O Ethernet Remote I/O Modules Installation and S1A48978 (Eng),
Configuration Guide
S1A48981 (Fre),
S1A48982 (Ger),
S1A48983 (Ita),
S1A48984 (Spa),
S1A48985 (Chs)
EIO0000001108 07/2012
7
Modicon M340 Using Unity Pro
35012676 (Eng),
35012677 (Fre),
35013351 (Ger),
35013352 (Ita),
35013353 (Spa),
35013354 (Chs)
You can download these technical publications and other technical information from
our website at www.schneider-electric.com.
Product Related Information
DANGER
UNINTENDED EQUIPMENT OPERATION
The application of this product requires expertise in the design and programming
of control systems. Only persons with such expertise should be allowed to
program, install, alter, and apply this product.
Follow all local and national safety codes and standards.
Failure to follow these instructions will result in death or serious injury.
User Comments
We welcome your comments about this document. You can reach us by e-mail at
[email protected].
8
EIO0000001108 07/2012
BMX NRP 0200/0201
Architectures
EIO0000001108 07/2012
Architectures
1
Overview
This chapter provides general information on Quantum Ethernet I/O (EIO)
architectures, where M340 BMX NRP 020• fiber converters can be used to support
fiber optic cables on the daisy chain loop.
What Is in This Chapter?
This chapter contains the following topics:
Topic
EIO0000001108 07/2012
Page
Introduction
10
Quantum Ethernet I/O Network Topologies
13
9
Architectures
Introduction
Overview
The M340 BMX NRP 020• are fiber optic converters that work in a Quantum
Ethernet I/O (EIO) architecture. These modules enable to connect M340 remote I/O
drops and Quantum EIO drops to the main ring of the Quantum EIO network on fiber
optic cable without the need to use dual-ring switches (DRSs) for the copper-fiber
conversion.
There are 2 models of fiber converters each supporting one type of fiber optic cable:
BMX NRP 0200 supports multimode fiber cable for distances up to 1.24 mi (2
km).
z BMX NRP 0201 supports single-mode fiber cable for distances up to 9.32 mi (15
km).
z
Quantum Ethernet I/O Networks
Using Ethernet as a backbone, the PLC communicates with remote I/O drops and/or
distributed I/O devices dispersed through the network via a Quantum CRP head
module installed in the local rack and adapter modules (Quantum 140 CRA or
Modicon BMX CRA) installed in I/O drops using copper cable. While DRSs enable
the use of fiber cable, they also allow you to connect sub-rings to the main ring and
to connect distributed I/O devices to the remote I/O network. DRSs need to be
configured.
You can use BMX NRP 020• fiber converters for the copper to fiber conversion and
vice versa.
The BMX NRP 020• fiber converters install on a local extended rack between the
local rack Quantum CRP head module and next to each remote M340 CRA adapter
module on the main ring.
On the local extended rack, the fiber converter works with the Quantum CRP head
module. It allows:
z a copper-to-fiber connection.
z a fiber-to-fiber connection, where the optical link connects the fiber converter on
the local extended rack to the fiber converters on the daisy chain.
On the remote I/O drop, the fiber converter works with the Quantum 140 CRA and
M340 CRA adapter modules. It allows:
z a fiber-to-fiber connection with daisy chain loop management.
z a fiber-to-copper connection with daisy chain loop management, where the
optical link connects to the fiber converter and the copper link connects to the
CRA module.
The BMX NRP 020• fiber converters allow an indication of communication disruption
to be sent back through the network so that the system can recover within 50 ms.
10
EIO0000001108 07/2012
Architectures
The BMX NRP 020• fiber converters mount on the M340 backplane
(see Modicon M340 Using Unity Pro, Processors, Racks, and Power Supply
Modules, Setup Manual).
The following figure shows the installation of BMX NRP 020• fiber converters
throughout a Quantum EIO network:
- - - fiber cable
––– copper cable
1 140 CRP 312 00 remote I/O head module on the local rack connected via copper cable to
a RJ45 Ethernet port of a BMX NRP 020• fiber converter
2 BMX NRP 020• fiber converter connected via copper cable to the 140 CRP 312 00 module
and connected via fiber cable to the BMX NRP 020• fiber converter on a subsequent M340
drop
3 fiber portion of the main ring
4 M340 drops connected to the main ring via fiber cable using a BMX NRP 020• fiber
converter
5 local rack area with local main rack and local extended rack
EIO0000001108 07/2012
11
Architectures
In the example above, a fiber converter is installed in a local extended rack, allowing
you to run copper cables from the Quantum 140 CRP head module to the fiber
converter. From there, a fiber converter is installed in each M340 remote I/O drop so
that all the M340 remote I/O drops are connected by fiber optic cable.
Fiber optic cable enables you to:
z separate the remote I/O drops from one another by distances greater than 328 ft
(100 m). The maximum distances are:
z 1.24 mi (2 km) for multimode fiber
z 9.32 mi (15 km) for single-mode fiber
z
carry control signals more effectively through noisy environments
For more details about daisy chain loops, refer to Planning a Simple Daisy Chain
Loop (see Quantum EIO, System Planning Guide).
12
EIO0000001108 07/2012
Architectures
Quantum Ethernet I/O Network Topologies
Overview
The insertion of BMX NRP 020• fiber converters in a Quantum EIO network enables
conversion from copper cable to fiber optic cable and the other way around in
different network topologies.
NOTE: A fiber converter does not need to be counted as 1 device in your main ring
capacity calculations.
EIO0000001108 07/2012
13
Architectures
Connecting to M340 and Quantum EIO Drops
Use BMX NRP 020• fiber converters to connect one or more Quantum EIO drops to
a fiber main I/O ring with daisy chain loop management:
- - - fiber cable
––– copper cable
1 140 CRP 312 00 remote I/O head module on the local rack connected via copper cable to
a transceiver port of a BMX NRP 020• fiber converter
2 BMX NRP 020• fiber converter connected via copper cable to the 140 CRP 312 00 head
module and connected via fiber cable to the BMX NRP 020• fiber converter on a
subsequent M340 drop
3 fiber portion of the main ring
14
EIO0000001108 07/2012
Architectures
4
5
6
7
8
M340 drops connected to the main ring via fiber cable
M340 drop connected to the main ring via fiber and copper cable — the BMX NRP 020•
fiber converter connects the drop to the main ring via fiber, and the BMX CRA 312 00
adapter module connects the Quantum EIO drop to the main ring via copper cable
copper portion of the main ring
Quantum EIO drop connected to the main ring via copper cable (No BMX NRP 020• fiber
converter is required.)
Local area with local main rack and local extended rack
Fiber Connection Between a Quantum Main Rack and Quantum EIO Drops
Use BMX NRP 020• fiber converters to connect one or more Quantum EIO drops
with daisy chain loop management:
- - - fiber cable
––– copper cable
1 140 CRP 312 00 remote I/O head module on the local rack connected via copper cable to
a transceiver port of a BMX NRP 020• fiber converter
2 BMX NRP 020• fiber converter connected via copper cable to the 140 CRP 312 00 head
module and connected via fiber cable to the BMX NRP 020• fiber converter on a
subsequent M340 drop
EIO0000001108 07/2012
15
Architectures
3
4
5
BMX NRP 020• fiber converter connected via copper cable to the 140 CRA 312 00 drop
module(s) and connected via fiber cable to the BMX NRP 020• fiber converter
Quantum EIO drop connected to the main ring via copper cable
Local area with local main rack and local extended rack
Creating a Long-Haul Hot Standy Link
The following graphic shows the installation of BMX NRP 020• fiber converters to
extend the distance between the 2 PLCs beyond 328 ft (100 m):
1
2
3
4
5
140 CRP 312 00 remote I/O head module on the primary Hot Standby PLC connected to
a copper port of a BMX NRP 020• fiber converter
140 CRP 312 00 remote I/O head module on the secondary Hot Standby PLC connected
to a copper port of a BMX NRP 020• fiber converter
BMX NRP 020• fiber converters on local extended racks connected via copper cable to
140 CRP 312 00 head modules on the local racks
fiber cable connected to the fiber ports of the BMX NRP 020• fiber converters to extend the
distance between the Hot Standby PLCs beyond 328 ft (100 m)
fiber cable used for the CPU-sync link
NOTE: Connect the fiber optic cable between the 2 fiber converters (3) straight
through. No EIO drops are allowed on this link.
16
EIO0000001108 07/2012
Architectures
High-Capacity Daisy Chain Loop Topology
Use BMX NRP 020• fiber converters to extend the distance between the main local
rack and sub-rings or distributed I/O devices beyond 328 ft (100 m).
- - - fiber cable
––– copper cable
EIO0000001108 07/2012
17
Architectures
1
140 CRP 312 00 remote I/O head module on the primary Hot Standby PLC connected to
a copper port of a BMX NRP 020• fiber converter
2 140 CRP 312 00 remote I/O head module on the secondary Hot Standby PLC connected
to a copper port of a BMX NRP 020• fiber converter
3 BMX NRP 020• fiber converters on extended local racks connected via copper cable to
140 CRP 312 00 head modules on the local racks
4 fiber cable connected to the fiber ports of the BMX NRP 020• fiber converters to extend the
distance between the Hot Standby PLCs beyond 328 ft (100 m)
5 fiber cable used for the CPU-sync link
6 BMX NRP 020• fiber converters on M340 Ethernet remote I/O drops connected to DRSs
via fiber cable
7 DRSs (with a C3 predefined configuration file) connecting Quantum Ethernet remote I/O
sub-rings and distributed I/O clouds to the main ring via copper cable
8 Quantum Ethernet remote I/O sub-rings
9 distributed I/O clouds
10 BMX NRP 020• fiber converters on M340 Ethernet remote I/O drops connected to DRSs
via fiber cable and connected to each other
11 fiber cable connecting two M340 Ethernet remote I/O drops to extend the distance beyond
100 m
12 control network
For more details on high-capacity chains, refer to Planning a High-Capacity Daisy
Chain Loop (see Quantum EIO, System Planning Guide).
NOTE: You can install BMX NRP 020• fiber converters on the main ring and subrings for copper-to-fiber conversion and vice-versa. However, you cannot use these
modules to connect sub-rings to the main.
18
EIO0000001108 07/2012
BMX NRP 0200/0201
BMX NRP 0200/0201 Module Description
EIO0000001108 07/2012
BMX NRP 0200/0201 Module
Description
2
Overview
This chapter provides a general description of the BMX NRP 020• fiber converters.
What Is in This Chapter?
This chapter contains the following topics:
Topic
EIO0000001108 07/2012
Page
Presentation
20
LED Indicators
23
General Specifications
25
Mechanical and Electrical Specifications
27
Operating and Storage Conditions
29
19
BMX NRP 0200/0201 Module Description
Presentation
Overview
The BMX NRP 020• fiber converters provide communication between 2 or more
Quantum EIO nodes or segments of networks over fiber optic cables. Each fiber
converter has 2 Ethernet network interfaces and 2 fiber optic interfaces for media
conversion from copper to fiber and fiber to copper. The maximum forward delay of
one media converter is 5 µs.
Based on the fiber optic interface there are 2 models of M340 fiber converters:
Use a BMX NRP 0200 with multimode fiber for distances up to 1.24 mi (2 km).
z Use a BMX NRP 0201 for single-mode fiber link for distances up to 9.32 mi
(15 km).
z
The BMX NRP 020• fiber converters are simple networking devices without network
management functions. Therefore, the modules do not support communication
through the backplane connector.
Power is supplied from the rack.
The following graphic shows the BMX NRP 020• fiber converter front panel:
1
2
3
4
5
20
Model number
LED display panel
Optical port with SFP transceiver for LC-type connector
RJ45 Ethernet port
LNK and ACT LED indicators on the RJ45 Ethernet port
EIO0000001108 07/2012
BMX NRP 0200/0201 Module Description
NOTICE
INOPERABLE EQUIPMENT
Do not remove the protective covers from unused optical ports on this fiber
converter.
Failure to follow these instructions can result in equipment damage.
Ethernet Ports
The BMX NRP 020• fiber converters are equipped with two 100BaseT(X), full
duplex, and auto MDI/MDX Ethernet ports without MAC address. The connectors
are mechanically tied to the module ground.
The M340 fiber converter uses copper cable for Ethernet connection with the
maximum distance limitation of 328 ft (100 m).
The 2 LEDs, LNK and ACT embedded on each Ethernet port indicate the
connection status and link speed of the communication.
z LNK LED lighting green: link established at 100 Mbps
z ACT LED lighting green: connection is active
The following table describes the pinout details of the RJ45 Ethernet 100BaseT
connector:
Pin Connection
EIO0000001108 07/2012
Pin
Signal
1
TD+
2
TD-
3
RD+
4
N.C
5
N.C
6
RD-
7
N.C
8
N.C
Shell
Chassis ground
21
BMX NRP 0200/0201 Module Description
Optical Ports
The BMX NRP 020• fiber converters are equipped with 2 optical ports. Each port
has a SFP transceiver module. One pair of fiber optic cables is connected to one
optical port using an LC-type duplex connector (one connector for the transmitter
signal (Tx) and one connector for the receiver signal (Rx)).
The optical ports of the BMX NRP 0200 fiber converter receive SFP multimode
transceivers that support 100BaseFX, an LC-type connector, and multimode fiber of
62.5/125 µm and 50/125 µm.
The optical ports of the BMX NRP 0201 fiber converter receive SFP single-mode
transceivers that support 100BaseFX, an LC-type connector, and single-mode fiber
of 9/125 µm.
NOTICE
INOPERABLE EQUIPMENT
Do not unplug a SFP transceiver or insert third party SFP transceivers in the optical
port of BMX NRP 020• fiber converters.
Failure to follow these instructions can result in equipment damage.
22
EIO0000001108 07/2012
BMX NRP 0200/0201 Module Description
LED Indicators
LED Display Panel
The following figure shows the LED indicators of the BMX NRP 020• fiber
converters:
The following table describes the LED indicators on the LED display panel:
LED Label
Color
Description
OK
Green Status of the power supply
ERR
Red
STS1/STS2
Green The link status of the respective fiber connection
A detected error on a module or channel
FX1 ACT/FX2 ACT Green The communication status of the respective fiber connection
LED Display Panel and RJ45 LED Indicators
The following table describes the behavior of LED indicators:
OK
ERR
STS1/STS2
FX1
ACT/FX2
ACT
ETH1/ETH2 ETH1/ETH2
LNK
ACT
Description
OFF
OFF
OFF
OFF
OFF
OFF
Power off
ON
ON
ON
ON
ON
ON
Self testing
ON
OFF
OFF
OFF
OFF
OFF
Initial power on
without link
ON
OFF
FLK
OFF
OFF
OFF
Fiber cable break1
ON
OFF
ON
OFF
OFF
OFF
Copper cable
break2
ON
OFF
ON
ON
ON
ON
Copper and fiber
cables connected
without data
1
when the fiber optic cable breaks, LED of STS is flickering. If the copper cable is plugged
off, LED display keeps the same and does not indicate the copper cable is unplugged.
2
when the copper cable breaks, LED of STS is on. If the fiber optic cable is plugged off, LED
display keeps the same and fiber converter cannot sense the fiber optic cable plug off.
EIO0000001108 07/2012
23
BMX NRP 0200/0201 Module Description
OK
ERR
STS1/STS2
FX1
ACT/FX2
ACT
ETH1/ETH2 ETH1/ETH2
LNK
ACT
Description
ON
OFF
ON
FLK
ON
FLK
Copper and fiber
cables connected
with data
ON
ON
FLK
OFF
OFF
OFF
SFP/Fiber PHY
breakdown
ON
ON
ON
OFF
OFF
OFF
Copper PHY
breakdown
1
when the fiber optic cable breaks, LED of STS is flickering. If the copper cable is plugged
off, LED display keeps the same and does not indicate the copper cable is unplugged.
2
when the copper cable breaks, LED of STS is on. If the fiber optic cable is plugged off, LED
display keeps the same and fiber converter cannot sense the fiber optic cable plug off.
24
EIO0000001108 07/2012
BMX NRP 0200/0201 Module Description
General Specifications
Introduction
This section gives the BMX NRP 020• fiber converter specifications.
WARNING
UNINTENDED EQUIPMENT OPERATION
Do not exceed any of the rated values specified in the following tables.
Failure to follow these instructions can result in death, serious injury, or
equipment damage.
General Specifications
Characteristics
BMX NRP 0200
Power Consumption in
BKP 24 Vdc
140 mA (200 mA maximum)
BMX NRP 0201
Hot Swapping
Supported
RJ45 Ethernet Ports
2 ports compliant with IEEE802.3u 100BaseT(X)
Optical Ports
2 ports compliant with IEEE802.3u 100Base-FX
Wavelength
1310 nm
Fiber Size
50/125 μm
62.5/125 μm
9/125 μm
Maximum Distance
0...6,562 ft (0...2 km)
up to 49,213 ft (15 km)
Characteristics
BMX NRP 0200
BMX NRP 0201
Optical Power
–23.5...–14 dBm with
50/125 μm fiber cable
–20...–14 dBm with
62.5/125 μm fiber cable
–15...–8 dBm with 9/125 μm
fiber cable
Rise/Fall Time
3 ns or better
2.5 ns or better
Transmitter Disable Off
Power
–45 dBm maximum
Optical Transmitter Specifications
EIO0000001108 07/2012
25
BMX NRP 0200/0201 Module Description
Optical Receiver Specifications
Characteristics
26
BMX NRP 0200
BMX NRP 0201
Receiver Sensitivity
–31...–14 dBm
–31...–8 dBm
Loss of Signal Deassert
–32 dBm maximum
–31.5 dBm maximum
EIO0000001108 07/2012
BMX NRP 0200/0201 Module Description
Mechanical and Electrical Specifications
Mechanical Specifications
Weight
7.16 oz (203 g)
Dimensions (H x D x W)
3.94 x 3.39 x 1.26 in. (100 x 86 x 32 mm)
Space Requirements
1 backplane slot
The following graphic shows the space requirements of the BMX NRP 020• fiber
converters:
1
2
3
EIO0000001108 07/2012
Backplane
Module
Cable connections
27
BMX NRP 0200/0201 Module Description
Electrical Specifications
Voltage
24 Vdc
Dielectric Strength
Field to bus: 1400 Vdc
Channel to channel: 500 Vdc
Protection Offered by
Enclosure
IP20
Agency Approvals
UL 508
CSA C22.2 No142-M2000
Factory Mutual Class 1, Div 2
CSA C22.2 No. 213-M1987 (R2004)
UL 1604
ATEX Zone 2
EN61131-2 Zone B and Zone C (except surges on AC: Zone B only) CE
C-Tick
Gost
Merchant Navy
GL
28
EIO0000001108 07/2012
BMX NRP 0200/0201 Module Description
Operating and Storage Conditions
Operating and Storage Conditions
EIO0000001108 07/2012
Operating Temperature
32...140 ° F (0...60 ° C)
Humidity
95% maximum
Altitude
0...13,124 ft (0...4000 m)
Storage Temperature
–40...158 ° F (–40...70 ° C)
29
BMX NRP 0200/0201 Module Description
30
EIO0000001108 07/2012
BMX NRP 0200/0201
BMX NRP 0200/0201 Module Installation
EIO0000001108 07/2012
BMX NRP 0200/0201 Module
Installation
3
Overview
This chapter provides information on installing BMX NRP 020• fiber converters in an
EIO Network.
What Is in This Chapter?
This chapter contains the following topics:
Topic
Selecting Fiber Optic Cable
EIO0000001108 07/2012
Page
32
Grounding Considerations
33
Fitting of the Fiber Converter
34
Installing Fiber Optic Cables
37
Connecting the Fiber Converter to I/O Network Devices
40
Configuration with Unity Pro
46
31
BMX NRP 0200/0201 Module Installation
Selecting Fiber Optic Cable
Overview
If you are using BMX NRP 020• fiber converters in your Quantum EIO network,
there are several parameters that you have to consider. Some of those parameters
are cable attenuation and cable bandwidth.
Parameters are specified by the cable manufacturer and are based on:
the wavelength of the optical signal: 1310 nm in the Quantum EIO optical link
z the cable index: use graded-index cable only
z the fiber size:
z 50/125 μm or 62.5/125 μm
z 9/125 μm
z
For most multimode optical cable links, the use of 62.5/125 μm cable is
recommended because of its relatively low loss and signal distortion.
z
z
32
Select the fiber optic cable that meets the demands of your application. Multiconductor cables are recommended.
Most 62.5/125 μm cables are rated at 1.5 dB loss per km. With a multiconductor
cable, pairs come with an attenuation specification as measured, which is less
than 3.5 dB/km.
EIO0000001108 07/2012
BMX NRP 0200/0201 Module Installation
Grounding Considerations
General
Proper grounding of Modicon M340 modules is crucial to avoid electric shocks.
Grounding BMX NRP 0200/0201 Fiber Converters
WARNING
UNINTENDED EQUIPMENT OPERATION
Tighten the clamping screws of the modules to guarantee the system characteristics. A break in the circuit could lead to an unexpected behavior of the system.
Failure to follow these instructions can result in death, serious injury, or
equipment damage.
The BMX NRP 020• fiber converters are equipped with ground connection contacts
at the rear for grounding purposes:
These contacts connect the grounding bus of the fiber converter to the grounding
bus of the rack.
EIO0000001108 07/2012
33
BMX NRP 0200/0201 Module Installation
Fitting of the Fiber Converter
At a Glance
The BMX NRP 020• fiber converters are powered by the bus of the rack.
Fitting operations (installation, assembly, and disassembly) are described below.
Installation Precautions
The BMX NRP 020• fiber converters may be installed in any slot in the rack except:
on EIO drop, BMX NRP module can be mounted starting from the fourth slot. The
first 3 slots in the M340 drop are reserved for the rack’s power supply module
(BMX CPS ••••) and the M340 CRA adapter module (BMX CRA 312 0•).
z on local extended rack, BMX NRP module can be mounted starting from third
slot. The first 2 slots in the subsequent M340 drop are reserved for the rack’s
power supply module (BMX CPS ••••).
z
Power is supplied by the rack. No additional power is needed.
Before installing a fiber converter, you must take off the protective cap from the
module connector located on the rack.
DANGER
SEVERE EYE DAMAGE
Do not view the ends of fiber optic cable under magnification while a transmit signal
is present on the cable.
Failure to follow these instructions will result in death or serious injury.
NOTICE
INOPERABLE EQUIPMENT
Do not remove the protective coverings from the optical cable port and optical
cable tips until immediately fiber cable connection to the cable port.
After removing the protective coverings, never touch exposed parts such as the
ferrule.
After connecting the fiber cable, retain the protective coverings for future use.
Do not remove the protective covering from the unused connector.
Failure to follow these instructions can result in equipment damage.
34
EIO0000001108 07/2012
BMX NRP 0200/0201 Module Installation
Fiber Cable Preparation
Before installing BMX NRP 020• fiber converters, optical network cables must be
prepared.
To prepare fiber optic cables:
z Follow the cable manufacturer’s recommendations for routing, installing, and
testing the cable. Take care when terminating the ends of each fiber optic cable
in order to minimize loss of optical signal. Follow the manufacturers guidelines for
installing optical connectors.
z Test the cable for proper attenuation before the connection of the fiber
converters. The cable ends has to be accessible at each fiber optic installation
site. Allow sufficient cable length for a service loop and strain reliefs.
z Label each cable end to facilitate future maintenance.
NOTICE
INOPERABLE EQUIPMENT
Do not unplug a SFP transceiver or insert third party SFP transceivers in the
BMX NRP 020• fiber converters.
Failure to follow these instructions can result in equipment damage.
EIO0000001108 07/2012
35
BMX NRP 0200/0201 Module Installation
Installing the Fiber Converter on the Rack
The following table shows the procedure for mounting the fiber converter module in
the rack.
Step
36
Action
Illustration
1
Steps 1 and 2
Position the locating pins situated at
the rear of the module (on the bottom
part) in the corresponding slots in the
rack.
Before positioning the pins, make sure
you have removed the protective cover
(see Modicon M340 Using Unity Pro,
Processors, Racks, and Power Supply
Modules, Setup Manual).
2
Swivel the module towards the top of
the rack so that the module sits flush
with the back of the rack. It is now set
in position.
3
Tighten the retaining screw to ensure
that the module is held in place on the
rack.
Tightening torque: Max. 1.5 N•m
(1.11 lb-ft).
Step 3
EIO0000001108 07/2012
BMX NRP 0200/0201 Module Installation
Installing Fiber Optic Cables
Observing Safety Precautions
Before connecting the fiber optic cables to the BMX NRP 020• fiber converter, read
the following messages. Follow them at all times during the installation of the fiber
optic cables.
DANGER
SEVERE EYE DAMAGE
Do not view the ends of fiber optic cable under magnification while a transmit signal
is present on the cable.
Failure to follow these instructions will result in death or serious injury.
NOTICE
INOPERABLE EQUIPMENT
Do not remove the protective coverings from the optical cable port and optical
cable tips until immediately fiber cable connection to the cable port.
After removing the protective coverings, never touch exposed parts such as the
ferrule.
After connecting the fiber cable, retain the protective coverings for future use.
Do not remove the protective covering from the unused connector.
Failure to follow these instructions can result in equipment damage.
EIO0000001108 07/2012
37
BMX NRP 0200/0201 Module Installation
Installing Fiber Optic Cables
Connect the fiber optic cable to the SFP transceiver module as described in the
following table:
Step
38
Action
1
Remove the dust plugs from the LC connectors of the fiber optic cable as shown in
the following figure. Save the dust plugs for future use.
2
Inspect and clean the fiber optic end faces of the LC connectors.
3
Remove the dust plug from the SFP transceiver module as shown in the following
figure.
EIO0000001108 07/2012
BMX NRP 0200/0201 Module Installation
Step
4
Action
Immediately attach the LC connector of the fiber optic cable to the SFP transceiver
module as shown in following figure.
NOTE: Do not remove the SFP transceiver modules from the BMX NRP 020• fiber
converters as shown in the following figure.
EIO0000001108 07/2012
39
BMX NRP 0200/0201 Module Installation
Connecting the Fiber Converter to I/O Network Devices
Overview
Connections on the BMX NRP 020• fiber converters vary depending on the network
topology and the position of the fiber converters on the network.
The fiber converters can be connected to:
a Quantum CRP head module when installed on the local extended rack
z a Quantum CRP head module in a long-haul Hot Standby configuration
z a Quantum or an M340 CRA adapter module
z a DRS in a high-capacity daisy chain loop topology
z
Connecting to a 140 CRP 312 00 Head Module
The following graphic shows connections of the BMX NRP 020• fiber converter on
the local extended rack to the 140 CRP 312 00 head module on the local main rack
in a simple daisy chain loop topology (see page 14):
- - - fiber cable
––– copper cable
1 fiber cable connected to the ETH2 optical port of the BMX NRP 020• fiber converter on the
subsequent EIO drop on the main ring
2 copper cable connected to the ETH4 RJ45 port of the 140 CRP 312 00 head module on
the local main rack
3 fiber cable connected to the ETH1 optical port of the BMX NRP 020• fiber converter on the
last EIO drop on the main ring
4 copper cable connected to the ETH3 RJ45 port of the 140 CRP 312 00 head module on
the local main rack
For more information, please refer to Characteristics of Ethernet Remote I/O
Modules (see Quantum EIO, Remote I/O Modules, Installation and Configuration
Guide).
40
EIO0000001108 07/2012
BMX NRP 0200/0201 Module Installation
Connecting to a 140 CRP 312 00 Head Module in a Long-Haul Hot Standby Configuration
The following graphic shows connections of the BMX NRP 020• fiber converter to
the 140 CRP 312 00 head module on the primary and secondary main racks
(see page 16):
- - - fiber cable
––– copper cable
1 fiber cable connecting the ETH2 optical port of the BMX NRP 020• fiber converters on the
primary and secondary local extended racks
2 copper cable connected to the ETH3 RJ45 port of the 140 CRP 312 00 head modules on
the primary and secondary local main racks
3 not used
4 not used
NOTE: Connect the fiber optic cable between the 2 fiber converters straight through.
No EIO drops are allowed on this link.
EIO0000001108 07/2012
41
BMX NRP 0200/0201 Module Installation
Connecting to a M340 BMX CRA 312 00/10 Module
The following graphic shows connections between the BMX NRP 020• fiber
converter and the BMX CRA 312 •• on M340 EIO drop:
- - - fiber cable
––– copper cable
1 fiber cable connected to the ETH2 optical port of the BMX NRP 020• fiber converter on the
subsequent EIO drop on the main ring
2 copper cable connected to the ETH2 RJ45 port of the BMX CRA 312 •• fiber converter on
the M340 EIO drop
3 fiber cable connected to the ETH1 optical port of the BMX NRP 020• fiber converter on the
previous EIO drop on the main ring
4 copper cable connected to the ETH3 RJ45 port of the BMX CRA 312 •• fiber converter on
the M340 EIO drop
NOTE: The shortest length of copper cable used to connect the RJ45 Ethernet ports
of a NRP and a CRA module is 3.28 ft (1 m).
For more information, please refer to Characteristics of Ethernet Remote I/O
Modules (see Quantum EIO, Remote I/O Modules, Installation and Configuration
Guide).
42
EIO0000001108 07/2012
BMX NRP 0200/0201 Module Installation
Connecting to a 140 CRA 312 00 Module
The following graphic shows connections of the BMX NRP 020• fiber converter to
the 140 CRA 312 00 adapter module installed on a Quantum EIO drop connected to
the copper portion of the main ring:
- - - fiber cable
––– copper cable
1 fiber cable connected to the ETH1 optical port of the BMX NRP 020• fiber converter on the
local extended rack
2 copper cable connected to the ETH2 RJ45 port of the 140 CRA 312 00 module on the
Quantum EIO drop
3 fiber cable connected to the ETH2 optical port of the BMX NRP 020• fiber converter on the
local extended rack
4 copper cable connected to the ETH3 RJ45 port of the 140 CRA 312 00 module on the
Quantum EIO drop
For more information, please refer to Characteristics of Ethernet Remote I/O
Modules (see Quantum EIO, Remote I/O Modules, Installation and Configuration
Guide).
EIO0000001108 07/2012
43
BMX NRP 0200/0201 Module Installation
Connecting to a DRS in a High-Capacity Daisy Chain Loop Topology
The following graphic shows connections of the BMX NRP 020• fiber converter to a
DRS to extend the distance between the DRS and the local main rack (see page 17)
beyong 328 ft (100 m):
- - - fiber cable
––– copper cable
1 fiber cable connected to the optical port (1) of the DRS
2 copper cable connected to the ETH4 RJ45 port of the 140 CRP 312 00 head module on
the local main rack
3 fiber cable connected to the ETH2 optical port of the BMX NRP 020• fiber converter on the
local extended rack
4 copper cable connected to the ETH3 RJ45 port of the BMX CRA 312 •• adapter module on
the M340 EIO drop
NOTE: The optical port (2) (see Quantum EIO, System Planning Guide) of the DRS
is connected via fiber cable to the ETH1 optical port of the BMX NRP 020• fiber
converter installed on the subesequent drop on the main ring.
NOTE: Apply predefined configuration settings C3 or C4 to the DRS in this topology.
For more details, refer to chapter Predefined Configuration Files (see Quantum EIO,
System Planning Guide).
Applying Power
Before applying power to the backplane, verify that all power connections, electrical
cable connections, and fiber optic connections are correctly installed for your
application.
When the backplane power is applied to the BMX NRP 020• fiber converters, the
LED OK illuminates LED indicators (see page 23).
44
EIO0000001108 07/2012
BMX NRP 0200/0201 Module Installation
Reading the Network Indicators
After applying power to the module, the LED indicators (see page 23) on the module
illuminate as follows:
z The LED LNK of the RJ45 Ethernet port lights green when the physical link is
established at the speed of 100 Mbps.
z The LED ACT of the RJ45 Ethernet port lights green when the signal is received
at the module’s port.
z Each optical port LED indicator (FX1ACT and FX2ACT) lights when a signal is
received at the optical Rx port.
If a port indicator is off, it can indicate a lack of transmitted signal from another
network node. Before replacing the BMX NRP 020• fiber converters, check the
cable connections for a possible incorrect or loose connection. Also check the
indicators on other devices on the signal path to see if the signal loss is external to
the module. For details, refer to the chapter Troubleshooting (see page 49).
EIO0000001108 07/2012
45
BMX NRP 0200/0201 Module Installation
Configuration with Unity Pro
Validity
The following information is valid for Unity Pro 7.0 or later.
Module Configuration
When the BMX NRP 020• fiber converters are integrated in an I/O station (local or
remote), you can match the physical layout of the backplane with Unity Pro
configuration. Refer to chapter Module Configuration (see Modicon M340 Using
Unity Pro, Processors, Racks, and Power Supply Modules, Setup Manual) for
details on procedure to follow.
If one or more power supply modules is configured, the Unity Pro software displays
the power budget (see Modicon M340 Using Unity Pro, Processors, Racks, and
Power Supply Modules, Setup Manual) of all configured modules.
NOTE: The BMX NRP 020• fiber converters do not require parameter configuration.
46
EIO0000001108 07/2012
BMX NRP 0200/0201
Maintenance
EIO0000001108 07/2012
Maintenance
4
Overview
This chapter provides troubleshooting and hot swapping information to maintain the
BMX NRP 020• fiber converters.
What Is in This Chapter?
This chapter contains the following topics:
Topic
EIO0000001108 07/2012
Page
Hot Swapping
48
Troubleshooting
49
47
Maintenance
Hot Swapping
Overview
The BMX NRP 020• fiber converters can be removed under power (hot swapped)
without damaging modules or the backplane.
NOTE: You have to understand and plan for the consequences of hot-swapping a
module. Disconnecting a module will interrupt communication to the connected
remote I/Os.
Be sure that you know which Ethernet remote I/Os are connected to the fiber
converter, and the impact that this disconnection would have on your machine or
process before attempting a hot-swap operation.
WARNING
HOT SWAPPING RESTRICTION
Do not hot swap modules in a Class 1, Division 2 environment.
Failure to follow these instructions can result in death, serious injury, or
equipment damage.
Hot Swapping Procedure
The following table describes how to hot-swap a BMX NRP 020• fiber converter:
Step
48
Action
1
Disconnect the copper cable(s).
2
Disconnect the fiber optic cable(s).
NOTE: Install the protective covers on the connectors of the fiber optic cable(s)
and on the port(s) of the BMX NRP 020• fiber converter.
3
Remove the BMX NRP 020• fiber converter from the M340 backplane.
4
Install the new BMX NRP 020• fiber converter to the free slot of the backplane.
5
Connect all the network cables to the new module.
EIO0000001108 07/2012
Maintenance
Troubleshooting
Overview
As a general method, start investigations by checking the EIO head module
transmission propagation through the whole path until reception at each drop. In a
second step, connect and check each drop module transmission back to the EIO
head. Refer to the chapter System Diagnostics (see Quantum EIO, System
Planning Guide), for more details.
There are documented procedures for analyzing the wire side characteristics of EIO
network applications, and it is recommended that they be used as a first line of
attack and afterward whenever trouble is suspected.
The troubleshooting tables in this section cover the most likely encountered events
with the BMX NRP 020• fiber converters.
EIO0000001108 07/2012
49
Maintenance
Detecting Broken Cables
Unlike copper cable, fiber cable contains physically separated transmit and receive
lines.
Your system can lose communication through the receive line, while the transmit line
remains intact, as shown in the following graphic:
1
2
3
4
5
50
Quantum EIO local rack, containing a 140 CRP 312 00 remote I/O head module
copper cables connecting the converter module
fiber cables connecting the BMX NRP 0200 module to another BMX NRP 0200 module on
M340 Ethernet remote I/O drop
BMX NRP 0200 module on M340 local extended rack
M340 Ethernet remote I/O drops containing BMX NRP 0200 modules
EIO0000001108 07/2012
Maintenance
In this scenario, the PLC does not receive input data because of the break in the
receive line. In typical circumstances, the PLC continues to drive outputs through the
intact transmit line — which could lead to outputs turning on or off due to invalid
input data.
Diagnosing Broken Cables
The BMX NRP 020• modules do not support RSTP. You cannot program a bit in the
PLC to diagnose detected errors.
In the event of a BMX NRP 020• module communication loss, the BMX CRA,
140 CRA, or 140 CRP module connected to the BMX NRP 020• module reports the
detected error. The BMX NRP 020• modules allow a link-down indication that is sent
through the Quantum EIO network in order for the 140 CRP 312 00 remote I/O head
module to re-establish a network communication path within 50 ms.
For detailed troubleshooting on the BMX NRP 020• module, refer to the
Troubleshooting (see page 49).
Troubleshooting Table
Identify the status of the LED indicators on the BMX NRP 020• fiber converter as
described in the left column and then take the corresponding corrective action(s)
described in the right column:
LED Status
Diagnostic
Action
All LEDs are OFF
The fiber converter is not
powered
Check the power supply module.
All LEDs are OFF while other
modules installed on the backplane
show normal behavior
An internal loss of power
occured in the fiber converter
Change BMXNRP0200/0201 module.
ETH1 LEDs OFF, STS1 LED flickers Fiber link of channel 1 is down z Check whether the fiber cable of channel
(while ERR LED is OFF)
1 is connected to the partner 1 correctly,
and that the partner 1 works well.
z Check the fiber cable.
ETH2 LED OFF, STS2 LED flicker
(while ERR LED is OFF)
Fiber of channel 2 link down
Check whether the fiber cable of channel 2 is
connected to the partner 1 correctly, and the
partner 1 works well.
ETH1 LED OFF, STS1 LED ON
(while ERR LED is OFF)
Copper of channel 1 link down Check whether the copper cable of channel 1
is connected to the partner 1 correctly, and
the partner 1 works well.
ETH2 LED OFF, STS2 LED ON
(while ERR LED is OFF)
Copper of channel 2 link down Check whether the copper cable of channel 2
is connected to the partner 1 correctly, and
the partner 1 works well.
1
NRP module connects to other Ethernet modules which has a fiber optic interface. For example., the DRS.
EIO0000001108 07/2012
51
Maintenance
LED Status
Diagnostic
Action
ERR LED is ON (STS1 or STS2 LED SFP alarm or fiber PHY broken Plug out the transceiver first.
flickers)
If ERR LED turned OFF (that is, there is an
alarm reported by the SFP), the possible
errors are as follows:
z If it is temperature alarm, try again by
plugging in SFP after it cools down)
z Check if a third party SFP is used
z Check for transceiver mismatch with
NRP, use multimode SFP with
BMXNRP0201 or use single-mode SFP
with BMXNRP0200
z If transceiver is broken, correct
information cannot be read from its
memory
If ERR LED turned ON, the possible errors
are as follows:
z The internal communication (MII) of NRP
is wrong
z The PHY connected to fiber is destroyed.
Power down and power up the NRP to
have a try
ERR LED is ON (STS1 or STS2 ON) Copper PHY broken
ERR LED is ON, after powered up
every time (without transceiver
plugged in)
1
52
Fiber converter is broken
The possible errors are as follows:
z The internal communication (MII) of NRP
is wrong
z The PHY connected to fiber is destroyed.
Power down and power up the NRP to
have a try
Change BMXNRP0200/0201 module.
NRP module connects to other Ethernet modules which has a fiber optic interface. For example., the DRS.
EIO0000001108 07/2012
BMX NRP 0200/0201
Glossary
EIO0000001108 07/2012
Glossary
A
adapter
The target of real-time I/O data connection requests from scanners. It cannot send
or receive real-time I/O data unless it is configured to do so by a scanner, and it does
not store or originate the data communications parameters necessary to establish
the connection. An adapter accepts explicit message requests (connected and
unconnected) from other devices.
architecture
A framework for the specification of a network, constructed on the following:
z physical components and their functional organization and configuration
z operational principles and procedures
z data formats used in its operation
attenuation
Signal loss through an electrical circuit or conductor (see also signal loss).
B
bandwidth
A range of frequencies.
bend radius
The radius of the arc along which a cable can be bent.
EIO0000001108 07/2012
53
Glossary
bus
A single cable connecting multiple ports.
C
connection
A virtual circuit between 2 or more network devices, created prior to the transmission
of data. After a connection is established, a series of data is transmitted over the
same communication path, without the need to include routing information —
including source and destination address — with each piece of data.
D
drop
An address on the RIO network. See also node.
F
fiber
A thin filament of glass. An optical waveguide consisting of a core and a cladding is
capable of carrying information in the form of light.
full duplex
The ability of 2 networked devices to independently and simultaneously
communicate with each other in both directions.
G
graded-index
Fiber design in which the refractive index of the core is lower towards the outside of
the fiber core and increases towards the center of the core. It bends the rays inward
and allows them to travel faster in the lower index-of-refraction region. This type of
fiber provides high bandwidth capabilities.
54
EIO0000001108 07/2012
Glossary
H
high capacity daisy chain loop
Often referred to as HCDCL, a high-capacity daisy chain loop uses DRSs to extend
the distance between remote I/O drops or connect sub-rings (containing remote I/O
drops or distributed I/O devices) and/or distributed I/O clouds to the Ethernet remote
I/O network.
hot standby
A high availability Quantum control system with a second (standby) PLC that
maintains up to date system status. If the primary PLC becomes inoperable, the
standby PLC takes control of the system.
I
impedance
See characteristic impedance.
L
local rack
A Quantum rack containing the controller, a power supply, and an Ethernet remote
I/O head module. A local rack consists of 1 or 2 racks — the main rack (containing
the remote I/O head module) and an optional extended rack. A Quantum Ethernet
remote I/O network requires 1 local rack on the main ring.
M
MII
Media Independent Interface. The MII is used to connect Ethernet to PHY.
N
network
A system consisting of the cable media components and the communication nodes.
EIO0000001108 07/2012
55
Glossary
node
An intelligent unit or option on the RIO network, either a RIO processor or a drop
adapter.
P
PHY
Physical layer transceiver for Ethernet.
PLC
programmable logic controller. The PLC is the brain of an industrial manufacturing
process. It automates a process as opposed to relay control systems. PLCs are
computers suited to survive the harsh conditions of the industrial environment.
R
remote I/O drop
One of the 3 types of remote I/O devices in an Ethernet remote I/O network. A
remote I/O drop is a Quantum rack of I/O modules that are connected to an Ethernet
remote I/O network and managed by an Ethernet remote adapter module. A drop
can be a single rack or a rack with an extension rack.
remote I/O network
An Ethernet-based network that contains 1 standalone PLC or one Hot Standby
system and remote I/O devices. There are 3 types of remote I/O devices: a local
rack, a remote I/O drop, and a ConneXium extended dual-ring switch (DRS).
Distributed I/O devices may also participate in a remote I/O network via connection
to DRSs.
RSTP
(rapid spanning tree protocol) A protocol that allows a network design to include
spare (redundant) links to provide automatic backup paths if an active link stops
working, without the need for loops or manual enabling/disabling of backup links.
56
EIO0000001108 07/2012
Glossary
S
SFP
small form-factor pluggable. The SFP is a transceiver that acts as an interface
between module and fiber optic cables.
signal loss
The amount of signal lost through media devices. See also attenuation.
simple daisy chain loop
A simple daisy chain loop contains remote I/O devices only (no switches or
distributed I/O devices). This topology consists of a local rack (containing a remote
I/O head module) and 1 or more remote I/O drops (each drop containing a remote
I/O adapter module).
T
topology
The complete media specification. The topology should be mapped into a log with
all installation details for future reference.
twisted pair cable
A type of transmission line having a cable consists of a pair of insulated wires twisted
together for the purpose of cancelling out electromagnetic interference (EMI) from
external sources.
W
wavelength
The distance between the same point on adjacent waves.
EIO0000001108 07/2012
57
Glossary
58
EIO0000001108 07/2012
BMX NRP 0200/0201
Index
EIO0000001108 07/2012
B
AC
Index
A
H
Architectures
introduction, 10
Quantum Ethernet I/O network topologies, 13
attenuation
bandwidth, 32
parameters, 32
hot swapping, 48
B
terminal blocks
installing, 34
troubleshooting, 49
BMX NRP 0200/0201
general specifications, 25
mechanical and electrical specifications,
27
BMXNRP0200/0201
configuration, 46
installation, 37
LED indicators, 23
operating and storage conditions, 29
Presentation, 20
I
installation, 37
T
C
configuration, 46
G
grounding, 33
EIO0000001108 07/2012
59
Index
60
EIO0000001108 07/2012