1
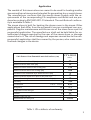
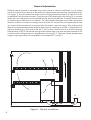
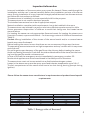
CTY-WS12
INSTALLATION AND OPERATION
MANUAL FOR
WOOD-BURNING SAUNA STOVES
EN 15821:2011
Please carefully consider the capacity of the sauna stove. Low heating efficiency results in having to heat the sauna stove longer and more
intensely, which, in turn, reduces its service life. Resellers as well as
the representative of our factory will be happy to assist you in choosing
the appropriate sauna stove. For more information, visit our website at
Dear Client
You have purchased a high quality sauna stove, which will guarantee you
sauna pleasures for many years. The purpose of this installation and user’s manual is to provide you with detailed information. Please pay attention to important information and data related to fire safety. First of
all check whether the delivered sauna stove is intact. In case any damage
is caused during transportation, please inform the transport company or
consult the supplier, who sold you the device.
2
Application
The models of this sauna stove are meant to be used for heating smaller
saunas and barrel saunas and intended for generating dry or moist steam.
The manufacturer confirms that the sauna stoves comply with the requirements of the corresponding CE compliance certificate and are produced according to EN 15821:2011-01 standard. The certificate of conformity is available in Table 1.
The sauna stove is built for heating the steam room in the sauna. Other
applications that differ from the purposeful use are considered non-purposeful. Regular maintenance and the service of the stove form a part of
purposeful application. The manufacturer shall not be held liable for unauthorised changes executed by the user of the sauna stove, or damage
caused due to it. The risk of damage and expenses caused due to the nonpurposeful application shall be covered by the person, who made unauthorised changes in the device.
C TY -WS12
Safe distance from flammable materials/surfaces (cm)
series
Distance from the side wall (cm)
Distance from the back wall (cm)
Distance from the stones to the ceiling (cm)
Distance from the flue to the ceiling (cm)
Thickness of the insulation layer under the stove (cm)
Distance from the metal stove door to the front wall (cm)
Distance from the glass stove door to the front wall (cm)
Efficiency
%
CO emission
Vol.% - 13% O²
Heat power
kW
Temperature of the flue gas
Pressure
Amount of the flue gas
°C
Pa
kg/h
Duration and fire safety test
25
15
124
108
4
50
65
70,5
0,23
9,1
314
12
3,0
Passed
Table 1. CE certificate of conformity
3
General information
Optimal sauna climate is achieved only when there is natural ventilation in the steam
room: the inlet of fresh air has to be under the sauna stove near the floor (marked by letter
A in Figure 1), and the outlet has to be by the ceiling (marked by letter B in Figure 1) as far
as possible from the stone hearth. The purpose of the opening by the ceiling is to remove
moisture from the steam room emitted during sauna procedures. A heated sauna stove
by itself ensures efficient air circulation. The stove heats the steam room with convection
streams: cold air is blown in through vents and the air warmed by the heated stove rises
up. A part of the warmed air is pressed into the steam room via vents. This is the typical
way to increase the temperature of the steam room, reaching up to 100 ºC below the ceiling and remaining on the level of 30-40 °C on the floor. Due to that it is usual that when
temperature is 100 °C below the ceiling of the steam room, the thermometer placed 20-25
cm below the ceiling shows the temperature of only 80 °C. The best steam temperature
range on the upper bath-house platform is between 80 °C to 90 °C.
B
A
cm
Figure 1. Natural ventilation
4
Important information
Incorrect installation of the sauna stove may cause fire hazard. Please read through the
installation and the user’s manual carefully before the installation and use of the sauna
stove. During installation it is very important to apply safe distances from the sauna stove
and follow the instructions as follows:
The sauna stove is installed in a room especially built for the purpose.
The sauna stove is not used for business purpose.
The installed sauna stove has to be of appropriate output.
Natural ventilation, compliant with requirements, has to be installed in the room.
The sauna stove may be used by a person who has sufficient experience and/or skills.
Ensure permanent supervision of children to avoid their being near the heated sauna
stove all alone.
For heating the sauna use only appropriate firewood meant for heating the steam room
(low pitch content, unprocessed timber – for the energy content of different firewood see
Table 2).
Caution: Wrong installation of the stones of the sauna hearth and/or a covered sauna
hearth may cause fire hazard.
Before heating the sauna, be sure that there are no unnecessary things near the stove.
The operating sauna stove works on high temperature and any contact with it may cause
serious burns.
Do not forget to open dampers of the gas flue or the chimney before heating the sauna.
Avoid overheating the stove. Check that the side and back walls of the stove (not the housing) and the gas flue would not become red.
In case of fire call the emergency service immediately by emergency number 911.
No electrical appliances or wires are allowed in the safety zone of the stove.
The sauna stove must not be connected into a distributed smoke gas system.
Lamps in the steam room must be spray-proof and tolerate temperature up to 140 ºC.
The ash compartment of the sauna stove has to be shut during burning (except during
ignition).
Please follow the sauna stove manufacturer’s requirements and product-based special
requirements.
Wood / type of fuel
Ash logs
Birth logs
Conifer logs
Alder logs
Aspen logs
Gray alder logs
Moisture content %
20
20
20
20
20
20
Energy value kWh/rm
1650
1500
1300
1200
850
700
Table 2. Energy value of firewood
5
1. Ash compartment
2. Ash grate
3. Furnace
4. Vent
5. Beginning of the gas flue
6. Smoke channel
7. Maintenance port
8. End of the smoke channel
9. Opening of the smoke flue
Modelis
Model
MinimĈlais Cubage
maksimĈlais
min-max(m³)
apjoms
(m³)/
HeaƟng
Siltumjauda
power
Weight of the stove
KrĈsns masa (kg)
(kg)
Amount
AkmeźƵofapjoms
stones(kg)
(kg)
Length
Kurtuves
of the
garums
hearth
Figure 2. Cross section of the stove
CTY-WS12
5-12
70,5
40
20
35
A
B
C
60
39
45
C
D
E
F
B
A
6
Description of the sauna stove
The sauna stove is covered by a metal housing. The sauna stove has three (on sides and
at the back) double walls, which enable to decrease the safe distances. The stove consists of a furnace with an ash compartment under it and a compartment for stoves for
the sauna hearth on top of it with a trapeze-shaped outlet flue in the middle. An afterburning chamber is located at the end of the outlet flue. A narrow cast iron furnace grate
is installed between the furnace and the ash compartment. The door of the furnace and
the grate are placed so that they form a threshold that prevents firewood from falling
out. The air needed for burning comes in through the ash compartment and the grate. The
after-burning chamber is equipped with a flue ( Ø 11.5 cm), which opens into the chimney
on top of the stove. The trapeze-shaped outlet flue is equipped with two cleaning-out
openings. There is a 5cm gap between the sauna stove and the housing via which the air
moves upwards when the stove is heated. The gap is covered with perforated sheet iron
on the top. The openings in the iron sheet create air whirls which prevent air outflow. Due
to that some of the air is directed through the vents located in the sides and the back of the
stove walls so that the air is directing through the stones of the hearth between the stove
ceiling and the flues. Via the vents the air moves the through the stones of the hearth and
between the flues warming the stone additionally. Thanks to this kind of ventilation the air
in the room is heated intensively and rises to the intended temperature level in the steam
room within a short time. In all models it is possible to change the metal plate for a glass
plate or vice versa.
CTY-WS12 model has an extra-accessory, which is a decorative bar for covering the wall
around the stove door, which is placed around the opening up to 3.5 cm on top and on both
sides. Decorative bars are made of black metal painted black and of stainless steel.
Putting into operation for the first time
The housing of the sauna stove is covered by heat resistant paint, which reaches its final
hardness during the first heating procedure. Up to that time avoid scratching the painted
surfaces of the sauna stove. During the first heating the paint softens at first due to which
contact with the painted surfaces has to be avoided. Substances evaporating from the
painted surfaces may give off unpleasant smell and due to that the first heating may be
done outside or in a well-ventilated room on the installation site of the sauna hearth. After
heating the hearth in the steam room for the first time, you definitely have to ventilate the
room. The sauna stove is heated for the first time without hearth stones being installed.
Also water must not be thrown on the housing of the sauna stove during the first heating.
When heating the sauna stove outside, it is recommendable to install the sleeves to eliminate the smell of the emitted substances.
Place of installation
When choosing a place for the sauna stove also the safe distances and distances required
for maintenance have to be considered besides the measurements of the stove. In front
and towards the depth of the furnace at least one metre radius of space is required for
maintenance. The sauna stove has to be installed far enough from inflammable materials
(see Table 1). Discharge fans installed in the steam room may affect the operation of the
sauna stove.
7
Protection of walls
When wooden walls (wooden boards, planks, logs, etc.) are closer to the stove than allowed according to safe distances, the walls have to be protected by installing required
materials (heat barrier). Single-layer heat barrier is made of at least 7-mm thick fibrereinforced non-flammable concrete plate or at least 1-mm thick metal plate.
There has to be an adequate number of fixing points to ensure the strength of the construction. A single-layer heat barrier equals to at least 5.5-cm thick brick wall. The wall
has to be with open edges and at least 3 cm away from the protected surface reaching 60
cm beyond the total area of the sauna stove and be at safe distance from the side walls
(at least 50 cm).
Protection of floors
If a sauna stove is installed on a floor made of flammable material (wood, plastic or other),
at least a 4-cm thick concrete base has to be made on the floor to protect it from heat. For
example, the used material may be Slica 250 KM. The base has to reach beyond the stove
on sides at least 20 cm and at least 30 cm in front. The base plate should be installed a
little bit higher of the floor to keep the wooden floor dry. Detailed fire precautions are delivered by the local fire service official, who also coordinates the installation of the sauna
stove.
Connecting the sauna stove in the laid flue
The area of the cross-section of the chimney flue must not be smaller than area of the
cross-section of the stove flue.
There is a smoke vent on the stove. The opening required for connecting the flue is measured on the base of the chimney and is made a litter bigger than the flue pipe. Finally the
flue pipe connected to the base of the chimney is sealed with fire-proof with rock wool.
Appropriate sealing gap around the pipe is about 1 cm.
The inner corners of the flue opening have to be rounded to ensure free entrance of smoke.
The flue connection pipe must not be pushed too deep into the flue. If necessary, the smoke
pipe has to be made shorter.
First fix the flue connecting pipe in the smoke vent of the sauna stove. After that the tightness and strength of the connection has to be checked. The stove is placed in the flue
opening and is pushed in the direction of the flue. The connecting pipe has to be wrapped
in fire-proof rock wool and be pushed into place in the stove. It may be necessary to add
fire-proof rock wool when checking the tightness of the sealing of the flue connection. If
the sealing wool is deep in the base of the chimney (deeper than 1 cm), the wool may be
covered with a layer of plaster or a decorative bar of the smoke pipe. Using a damper in the
connection of the sauna stove with the chimney is not compulsory.
Maintenance of the sauna stove
The manufacturer expects that the sauna stove is maintained by a competent specialist. The soot deposited on the smoke channels of the sauna stove are removed via round
maintenance trap doors located on the sides of the stone sockets. The smoke outlet and
the flue have to be cleaned regularly. The device has to be checked also when it has not
been used for a longer period.
Stones may crumble when used and that is why they have to be piled again at least once
a year (more often if used intensively). Stone rubble that has gathered in the lower part of
the stove has to be removed and broken bricks replaced. The flue has to be cleaned regularly to ensure proper ventilation.
The ash compartment has to be cleaned before every use to ensure air access from the
ash compartment through the grate. A metal container should be used for removing the
ash. The user of the sauna stove needs at least 1 m2 of space in front of the stove.
Do not keep the ash container near flammable materials as the removed ash may contain smouldering firebrands.
8
Hearth stones
Stones of the hearth must not block the air circulation between the centre of the hearth and the
housing.
Some natural stones may contain improper substances such as sulphur compounds, which make
them unsuitable for the use as hearth stones.
Clean the stones from dust before you pile them
on the hearth. Bigger stones are laid at the bottom of the stone base; smoother stones are piled
along the walls of the stone base. Smaller stones
are laid out on top because they are heated up
quickly. The humidity of the steam depends on
the amount of stones and the temperature of the
sauna. The more stone and the lower temperature, the more humid the steam is.
Heating the sauna stove
Dry firewood is the best for heating the sauna stove. Fuels of high heating value should
not be used for heating the sauna, e.g. fibreboard, plastic, plywood, charcoal, etc. Liquid
fuels must not be used in any case. It is recommended by the manufacturer to fill only half
of the stove with firewood. Filling the furnace at full extent may cause overheating. This
shortens the service life of the sauna stove significantly.
The ash compartment may be open only during starting the fire to enable the access of
additional air needed for burning. During heating the ash compartment has to be closed,
except when adding firewood or removing the ashes, to avoid smoke spreading into the
steam room.
Heating the steam room depends on the size of the room, the placement of windows in
the steam room, power of the stove and the material of walls. In case of non-insulated
wall surfaces (brick, ceramic plate, concrete, etc.) a powerful stove is required: per every
m² of the wall 1.2 m³ of additional capacity is needed. In case of log walls the capacity is
multiplied by 1.5. A properly chosen sauna stove heats the steam room up to the required
temperature within 1 (one) hour.
Water for steam
Clean water is used for making steam. Salty, hard or water rich in iron causes corrosion
and shortens the service life significantly.
Warranty conditions
The manufacture undertakes to exchange or repair a defective stove within 12 months
from the date of sale in factory or shop on condition the consumer has not failed to follow the requirements of the installation and the user manual. The warranty is effective on
condition the stove is used for its intended purpose and the manufactured construction is
not changed. If the door glass of the sauna stove is broken, the manufacture is not obliged
to change it.
9
SAUNACORE
WWW.SAUNACORE.COM
[email protected]