1
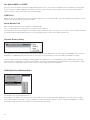
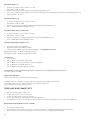
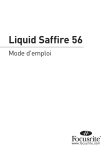
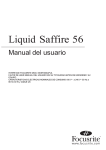
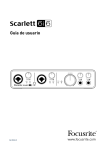
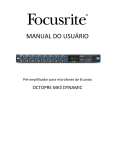
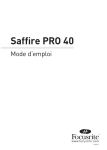
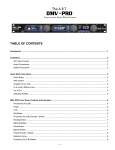
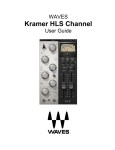
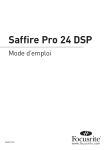
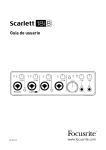
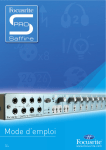
Liquid Saffire 56
User Guide
FA0385-01
1
Important Safety Instructions
1. Read these instructions.
2. Keep these instructions.
3. Heed all warnings.
4. Follow all instructions.
5. Do not use this apparatus near water.
6. Clean only with dry cloth.
7. Do not block any ventilation openings. Install in accordance with the manufacturer’s instructions.
8. Do not install near any heat sources such as radiators, heat registers, stoves, or other apparatus (including amplifiers) that produce heat.
9. Do not defeat the safety purpose of the polarized or grounding-type plug. A polarized plug has two blades with one wider than the other. A grounding type
plug has two blades and a third grounding prong. The wide blade or the third prong are provided for your safety. If the provided plug does not fit into your
outlet, consult an electrician for replacement of the obsolete outlet.
10. Protect the power cord from being walked on or pinched particularly at plugs, convenience receptacles, and the point where they exit from the apparatus.
11. Only use attachments/accessories specified by the manufacturer.
12. Unplug this apparatus during lightning storms or when unused for long periods of time.
13. Refer all servicing to qualified service personnel. Servicing is required when the apparatus has been damaged in any way, such as power-supply cord or
plug is damaged, liquid has been spilled or objects have fallen into the apparatus, the apparatus has been exposed to rain or moisture, does not operate
normally, or has been dropped.
14. GB
The apparatus shall be connected to a Mains socket outlet with a protective earthing connection.
FIN
Laite on liitettävä suojamaadoituskoskettimilla va rustettuumpistorasiaan
NOR
Apparatet mǻ tikoples jordet stikkontakt
SWE
Apparaten skall anslutas till jordat uttag
15. The apparatus shall not be exposed to dripping or splashing and that no objects filled with liquids, such as vases, shall be placed on the apparatus.
16.
WARNING - To reduce the risk of fire or electric shock do not expose this apparatus to rain or moisture.
17. The appliance coupler is used as the disconnect device, the disconnect device shall remain readily operable.
18. No naked flame sources, such as lighted candles, should be placed on the apparatus.
19. Do not use a damaged or frayed power cord.
20. If the mains plug supplying this apparatus incorporates a fuse then it should only be replaced with a fuse of identical or lower rupture value.
21. Use only with the cart, stand, tripod, bracket, or table specified by the manufacturer, or sold with the apparatus. When a cart is used, use caution when
moving the cart/apparatus combination to avoid injury from tip-over.
2
Contents
Introduction................................................................................................................... 4
Basics............................................................................................................................ 4
Box Contents................................................................................................................. 4
Getting Started.............................................................................................................. 5
Hardware....................................................................................................................... 6
Back Panel............................................................................................................ 6
Front Panel............................................................................................................ 7
Installation.................................................................................................................... 8
Audio Set-up in your DAW.............................................................................................. 8
Liquid Saffire 56 Architecture....................................................................................... 9
Saffire MixControl .......................................................................................................12
Pre-amp Section..................................................................................................13
Mixer Section.......................................................................................................15
Routing Section....................................................................................................19
Monitor Section....................................................................................................21
Device Status Section.......................................................................................... 24
Settings Menu..................................................................................................... 25
File Menu............................................................................................................. 27
Liquid Saffire 56 Specifications................................................................................... 27
Troubleshooting.......................................................................................................... 29
Pre-amp Emulation Guide........................................................................................... 30
3
Introduction
Thank you for purchasing Liquid Saffire 56, the latest Focusrite professional multi-channel Firewire interface. You now have a
complete solution for routing high quality audio in and out of your computer.
This Guide provides a detailed explanation of both the hardware and accompanying control software “Saffire MixControl” to help you
achieve a thorough understanding of the product’s operational features. We recommend that both users who are new to computer
recording, as well as more experienced users, take the time to read through the user guide so that you are fully aware of all the
possibilities that the Liquid Saffire 56 and accompanying software has to offer.
If the main User Guide sections do not provide the information you need, be sure to consult http://www.focusrite.com/answerbase,
which contains a comprehensive list of common technical support queries regarding the product to date.
Basics
The Liquid Saffire 56 hardware interface provides the means for connecting microphones, line-level signals, instrument-level
signals, and digital signals to your computer, which are then routed to your audio recording software / digital audio workstation
(referred to throughout this user guide as “DAW”).
The Liquid Saffire 56 features two Liquid Pre-amps. ‘Liquid’ refers to our hybrid microphone pre-amplifier technology, matching
high quality Focusrite Mic pre design with meticulously sampled pre-amp emulations transporting classic front-end processing into
the digital age.
All audio signals connected to the inputs, plus audio output from your computer programs are routed to the physical outputs for you
to connect to an amp and speakers, powered monitors, headphones, analogue/digital mixer, and any other studio equipment that you
wish to use. There are also connectors for sending and receiving MIDI.
The accompanying software application, Saffire MixControl provides further recording, routing and monitoring options, as well as
the ability to control global hardware settings such as sample rate and synchronisation.
Saffire MixControl software provides mixing and routing to and from the DAW, allowing control over which signals are sent from
the sequencer to each output. All inputs on the Liquid Saffire 56 are routed directly to your DAW software for recording, but Saffire
MixControl also allows you to route these signals to your monitors so that you can listen to the audio signals with zero latency before they arrive at your DAW.
Box Contents
Along with your Liquid Saffire 56 you should have:
1 - 6 pin Firewire cable (also known as a IEEE1394 cable)
1 - IEC Power Cable
1 - CD containing software installer software for Mac and Windows
4
Getting Started
The Liquid Saffire 56 has 2 x 6 pin Firewire ports on the back. You can connect your computer to either Firewire port, and this
will work with any of the current Firewire standards and connections; Firewire 400 (6 pin or 4 pin connection); and Firewire 800.
BEFORE YOU CONNNECT THE LIQUID SAFFIRE 56 TO YOUR COMPUTER, PLEASE RUN THE INSTALLER. This will ensure that the
correct drivers are used, thus preventing any unexpected behaviour
The Liquid Saffire 56 requires power, supplied via the included power cable.
The Liquid Saffire 56 ships with a 6 pin Firewire cable. However on Windows laptops, the Firewire connection may be 4 pin Firewire.
If this is the case with your computer, you will need to purchase a 6 pin to 4 pin cable.
You may have a Firewire 800 connector on your computer. In this case you will need to purchase a 6 pin Firewire 400 to 800 cable.
Note:
Firewire considerations - Most computers will generally be equipped with 1 Firewire bus. You may have multiple Firewire ports
(connectors) on your computer, but these are all connected to 1 physical chip which controls the bus.
The Firewire bus is limited in the amount of data bandwidth it can handle. Each additional Firewire device connected to the Firewire
bus demands additional bandwidth resources, thus increasing the chances of exceeded the total available bandwidth. Consequently,
it is recommended that Liquid Saffire 56 run on its own Firewire bus for best performance.
The Liquid Saffire 56 should be able to work along side other devices connected to the same Firewire bus. However, problems may
arise depending on which Firewire devices are connected. For example, a Firewire disk used for back-up or a digital camera should
not cause any problems, but when streaming audio from a Firewire hard disk or a Firewire DSP box such as Focusrite Liquid Mix,
the totoal Firewire bandwidth may be reached. This will result in audio drop outs, or reduced performance on either the Liquid
Saffire 56 or the other connected Firewire device.
For this reason, we would recommend that you use a separate Firewire bus for each Firewire device. This may be a PCI / PCIe card
in your desktop, or a PCMCIA or Express card in your Laptop.
5
Hardware
Back Panel
The Back Panel provides the majority of input and output connections on the Liquid Saffire 56.
1. 2 x XLR input sockets for the Liquid Mic Pre-amps (Analogue Mic Inputs 1 & 2).
1, 2
3, 4
12
2.
3.
4.
5.
6.
7.
8.
9.
10.
11.
12.
11
10
9
8
2 x Jack input sockets for Line level signals (Analogue Line Inputs 1 & 2). *
6 x XLR input sockets for Mic level signals (Analogue Mic Inputs 3 - 8).
6 x Jack input sockets for Line level signals (Analogue Line Inputs 3 - 8). *
2 x TRS jack sockets for balanced outputs for the main monitor mix. *
8 x TRS jack sockets for balanced outputs 3-10. *
Word Clock input and output BNC connectors.
2 x Pairs of Optical ADAT input and output sockets. **
2 x IEEE 1394 6 pin Firewire sockets.
2 x Din5 MIDI input and output sockets.
2 x RCA S/PDIF input and output sockets.
1 x IEC Power inlet socket.
* Either 1/4 inch TRS (balanced) or TS (unbalanced) Jack connectors can be used.
** ADAT 2 can also be used as an additional S/PDIF optical i/o.
6
7
6
5
Front Panel
The Front Panel includes the input connectors for instrument jacks, as well as all the input gain controls and monitoring controls.
8
11
12
1
7
2
5
3, 4
14
13
18
10
9
15
16
20
17
21
19
6
22
1.
2.
3.
4.
5.
6.
7.
8.
9.
10.
11.
12.
13.
14.
15.
16.
17.
18.
19.
20.
21.
22.
Liquid Pre-amps Mic / Line input indication LEDS.
Liquid Pre-amps Gain control knobs – use these to set the level of your input signal
Liquid Pre-amps +48V phantom power buttons with LEDs.
Liquid Pre-amps HPF (High Pass Filter) buttons with LEDs.
Instrument Input TS Jacks for channels 3 and 4.
Channels 3 and 4 Mic / Line / Instrument input indicator LEDs.
Channels 5 to 8 Mic / Line input indicator LEDs.
Channels 3 to 8 Pre-amp Gain control knobs - Use these to set the level of your input signal.
Channels 3 and 4 Pad buttons with LEDs. Maximum input level without pads is +7dBu, with pads is +16dBu
Channels 3 to 8 +48V phantom power buttons with LEDs
Channels 3 to 8 HPF (High Pass Filter) buttons with LEDs.
Channels 3, 5 and 7 Phase reverse buttons with LEDs.
Input signal level meters: 5 LEDs indicate -42, -18, -6, -3, 0dBFS
Indicator LEDs for Signal level meters – LED for ADAT 1, ADAT 2, SPDIF. When no LEDs are lit, the meters indicate analogue
input levels.
Firewire active LED - Lit when the Liquid Saffire 56 is successfully connected to the computer.
Synchronisation Lock LED – Lit when Liquid Saffire 56 is either syncronised to its internal clock, or to an external digital input.
MIDI In indicator – Lights and flashes when the Saffire recives MIDI data at the MIDI In port.
Monitor Level control pot – Can be configured to control any number of the analogue outputs.
Monitor Dim and Mute switches with associated LEDs.
Headphones 1 & 2 level control and output 1/4 inch jacks.
Power switch and LED indicator - Lit when the unit is receiving power and is turned on
Removable rack ear covers – remove when fitting to a 19 inch rack.
7
Installation (Windows and Mac)
We aim to ensure that the latest installation software will be on the disk included with your Liquid Saffire 56. However we strongly
recommend that you check for the latest version of software on our website; www.focusrite.com before starting to work with your
Liquid Saffire 56 unit.
1. Insert your installer disk into your computer’s CD-ROM drive.
2. You should see a window pop up showing the Liquid Saffire 56 installer icon.
3. Double click on the installer icon to begin the installation process.
4. Follow onscreen instructions to complete the installation process.
Once the installation has been completed, your Computer OS should automatically switch its default audio outputs to be the
Liquid Saffire 56.
To make sure this is the case:
On Windows, go to Start > Control Panel > Sounds and Audio Devices > Set the input and output to ‘Saffire’.
On Mac, go to System Preferences > Sound > Set the input and output to ‘Saffire’.
For more detailed setup options on a Mac, go to Applications > Utilities > Audio Midi Set-up.
Audio Set-up in your DAW
The Liquid Saffire 56 is compatible with any DAW that uses ASIO drivers on Windows, and any DAW that uses Core Audio on Mac.
Your DAW software will not automatically switch the device it used to input and output audio.
You must ensure that you select ‘Saffire’ as the ASIO driver (Windows) or Core Audio driver (Mac) in your DAW’s audio set-up page.
Please refer to your DAW’s documentation if you are unsure where to select the ASIO / Core Audio driver.
8
Liquid Saffire 56 Architecture
Liquid Saffire 56 offers more than just simple input and output routing to and from your computer. Saffire MixControl software
also allows you to re-route audio signals to any output, and to create custom mixes to be sent to your recording artists, outboard
processing equipment, or mixing console.
The following diagrams give an overview of the Liquid Saffire 56 audio paths when set at different sample rates and
S/PDIF configurations.
The Hardware Inputs are routed directly to the DAW Inputs. The table below each diagram shows the routing configuration.
44.1kHz / 48kHz Optical as ADAT
Liquid Saffire 56
Saffire Mix Control
HARDWARE IN
MIXER
S/PDIF
ADAT 1
ADAT 2
Analog
12345678 12345678
12345678 1 2
DAW IN
28 IN
1 2 3 4 5 6 7 8 9 10 11 12 13 14 15 16 17 18 19 20 21 22 23 24 25 26 27 28
HARDWARE OUT
Analog
1 2 3 4 5 6 7 8 9 10
Music Software
ROUTER
S/PDIF
ADAT 1
ADAT 2
1 2
12345678 12345678
DAW OUT
28 OUT
1 2 3 4 5 6 7 8 9 10 11 12 13 14 15 16 17 18 19 20 21 22 23 24 25 26 27 28
Loop back
HARDWARE IN
DAW IN
Analogue 1-8 1-8
S/PDIF 1-2 9-10
ADAT 1 1-8
ADAT 2 1-8
11-18
19-26
Loop back 1-2
27-28
44.1kHz / 48kHz Optical as S/PDIF
Liquid Saffire 56
HARDWARE IN
Analog
S/PDIF
ADAT 1
S/PDIF 2
1234567 8 1 2
1 2 3 4 5 6 78
3 4
HARDWARE OUT
Analog
1 2 3 4 5 6 7 8 9 10
S/PDIF
ADAT 1
S/PDIF 2
1 2
1 2 3 4 5 6 78
1 2
Saffire Mix Control
MIXER
Music Software
DAW IN
1 2 3 4 5 6 7 8 9 10 11 12 13 14 15 16 17 18 19 20
ROUTER
DAW OUT
22 IN
27 28
22 OUT
1 2 3 4 5 6 7 8 9 10 11 12 13 14 15 16 17 18 19 20 21 22
Loop back
HARDWARE IN
DAW IN
Analogue 1-8 1-8
S/PDIF 1-2 9-10
ADAT 1 11-18
S/PDIF 1-2
19-20
Loop back 1-2
27-28
*DAW IN 21-26 are redundant
9
88.2kHz / 96kHz Optical as ADAT
Liquid Saffire 56
Saffire Mix Control
HARDWARE IN
Analog
S/PDIF
ADAT 1
1 2 3 4 5 678 1 2
1234
MIXER
ADAT 2
1234
S/PDIF
ADAT 1
1 2
1234
ROUTER
ADAT 2
1234
HARDWARE IN
DAW IN
Analogue 1-8 1-8
S/PDIF 1-2 9-10
ADAT 1 1-4
11-14
ADAT 2 1-4
15-18
Loop back 1-2
19-20
DAW IN
20 IN
1 2 3 4 5 6 7 8 9 10 11 12 13 14 15 16 17 18 19 20
HARDWARE OUT
Analog
1 2 3 4 5 6 7 8 9 10
Music Software
DAW OUT
20 OUT
1 2 3 4 5 6 7 8 9 10 11 12 13 14 15 16 17 18 19 20
Loop back
88.2kHz / 96kHz Optical as S/PDIF
Liquid Saffire 56
HARDWARE IN
Analog
S/PDIF
ADAT 1
12345678 1 2
1234
S/PDIF 2
3 4
HARDWARE OUT
Analog
1 2 3 4 5 6 7 8 9 10
S/PDIF
ADAT 1
1 2
1234
S/PDIF 2
1 2
HARDWARE IN
DAW IN
Analogue 1-8 1-8
S/PDIF 1-2 9-10
ADAT 1 1-4 11-14
S/PDIF 3-4 15-16
Loop back 1-2
19-20
10
Saffire Mix Control
MIXER
Music Software
DAW IN
1 2 3 4 5 6 7 8 9 10 11 12 13 14 15 16
ROUTER
18 IN
19 20
DAW OUT
1 2 3 4 5 6 7 8 9 10 11 12 13 14 15 16 17 18
Loop back
*DAW IN 16-18 are redundant
18 OUT
176.4kHz / 192kHz Optical as ADAT
Liquid Saffire 56
HARDWARE IN
Analog
1 23 45 6 7 8
S/PDIF
1
2
ADAT 1
1 2
ADAT 2
1 2 3 4 5 6 7 8 9 10
S/PDIF
1
2
MIXER
1 2
ADAT 1
1 2
ADAT 2
ROUTER
1 2
HARDWARE IN
DAW IN
Analogue 1-8 1-8
S/PDIF 1-2 9-10
ADAT 1 1-4
11-12
ADAT 2 1-4
13-14
Loop back 1-2
15-16
Music Software
DAW IN
16 IN
1 2 3 4 5 6 7 8 9 10 11 12 13 14 15 16
HARDWARE OUT
Analog
Saffire Mix Control
DAW OUT
16 OUT
1 2 3 4 5 6 7 8 9 10 11 12 13 14 15 16
Loop back
176.4kHz / 192kHzOptical as S/PDIF
Liquid Saffire 56
HARDWARE IN
S/PDIF
ADAT 1
Analog
1 2
1 23 45 6 7 8 1 2
S/PDIF 2
3 4
HARDWARE OUT
Analog
1 2 3 4 5 6 7 8 9 10
S/PDIF
ADAT 1
1 2
1 2
HARDWARE IN
DAW IN
Analogue 1-8 1-8
S/PDIF 1-2 9-10
ADAT 1 1-4
11-12
ADAT 2 1-4
13-14
Loop back 1-2
15-16
S/PDIF 2
1 2
Saffire Mix Control
MIXER
Music Software
DAW IN
16 IN
1 2 3 4 5 6 7 8 9 10 11 12 13 14 15 16
ROUTER
DAW OUT
16 OUT
1 2 3 4 5 6 7 8 9 10 11 12 13 14 15 16
Loop back
11
Saffire MixControl
The Saffire MixControl software allows flexible mixing and routing of all audio signals to the physical audio outputs, as well as
control of output monitor levels. All sample rate selection, digital syncing and buffer size settings (Windows only) are available from
Saffire MixControl.
To open Saffire MixControl.
Windows
Start > Programs > Focusrite > Saffire MixControl.
Mac
Open Finder > Applications > Saffire MixControl.
This is how the Saffire MixControl Graphical Interface will appear on your computer.
1
2
3
4
6
5
1.
2.
3.
4.
5.
6.
7.
12
Mixer
Selected Mix Tab
Mixer Input Channel
Selected Mix Output Channel
Routing Section / Pre-amp Section (switchable)
Monitor Section
Device Status Section
7
Switching between Pre-amp and Routing Sections
The Routing and Pre-amp sections occupy the same space within the Saffire MixControl software interface. Click on this box to
switch between each view to access the respective controls
Pre-amp Section
This section is divided into two parts, the left hand side for the 2 Liquid Pre-amps and the right hand side for Pre-amps 3-8.
The Liquid Pre-amps feature high quality Focusrite Analogue microphone pre-amps. After analogue to digital conversion, the audio
signal is routed through the Liquid Pre-amps DSP. The analogue circuit in the pre-amp will switch to match the impedance settings
of the original pre-amp emulation.
Gain, phantom power and high pass filter controls are available from the front panel of the Liquid Saffire 56 and all additional
controls are available in the Saffire MixControl software.
The Liquid Pre-amp section provides control over the following parameters:
•
•
•
Pre-amp Emulation Select
Phase Select
Harmonics Knob
•
Pre-amps 3 to 8 Input Signal Source Select
These are described on the next page.
13
Pre-amp Emulation Select
To select the pre-amp emulation, click on the field to open a drop down list. The following table shows the original units that were
used for each pre-amp emulation. The available pre-amp cover a range or vintage and modern, desk and channel strip pre-amps.
Emulation Title
Emulated Hardware
Flat (Default)
N/A
TRANY 1 H
API 3124+ (high gain setting)
SILVER 2
Avalon VT-737SP
FF RED1 H
Focusrite Red 1 (high gain setting)
SAVILLEROW
Helios Console
DUNK
Manley Slam
CLASS A 2A
Neve 1073 (high impedance setting)
OLD TUBE
Pultec MB1
DEUTSCH 72
Telefunken V72
STELLAR 1B
Universal Audio 610 (low impedance setting)
NEW AGE 1
Millennia HV-3D
* IMPORTANT INFORMATION: FOCUSRITE, the FF logo, LIQUID TECHNOLOGY, SAFFIRE MIX CONTROL and the LIQUID SAFFIRE 56 logo are trademarks of Focusrite Audio Engineering Ltd.
DYNAMIC CONVOLUTION is a trademark of Sintefex Ltd. All other product names, trademarks, or trade names are the names of their respective owners, which are in no way associated,
connected nor affiliated with Focusrite or its LIQUID SAFFIRE products and which have not endorsed Focusrite’s LIQUID SAFFIRE products. These other product names, trademarks, and trade
names are used solely to identify and describe the third party products the sonic behaviour of which was studied for the LIQUID SAFFIRE products, and to accurately describe the functionality of
the Liquid Mix products. The Liquid Mix products are an independently engineered technology which utilises the patented process of Dynamic Convolution to actually measure examples of the
sonic impact of original analogue products upon an audio stream, so as to electronically emulate the performance of the original product studied. The result of this process is subjective and may
not be perceived by a user as producing the same effects as the original products studied.
Input / Phase Select
Click the button to switch the Input signal source to Mic (rear panel XLR) or Line (rear panel jack) input.
Note that Line level signals are NOT routed through the Liquid Pre-amp DSP circuit.
Click on the ø button to reverse the phase of the input signal.
Harmonics
Rotate this knob clockwise to add desirable harmonic distortion to the signal - often perceived as adding
‘warmth’. The Harmonics control allows you to add this type of distortion and emulate the subtle variations
between analogue devices - sometimes two units of the same type can have different amounts of harmonic
distortion. This allows you to create an ‘overdriven’ sound without having to overdrive the pre-amp.
The exact amount of second, third and fifth order harmonics depends both on the type of pre-amp chosen
and the amount of mic pre gain. This is because the amount of each harmonic, with respect to each other,
is different for pre-amps with valves compared to those with transistors; and also because the balance of
harmonics changes with level.
The result is that a higher gain at the mic pre stage will produce a greater, and hence more noticeable,
effect as the harmonics setting is increased.
Pre-amps 3 to 8 Input Signal Source Select
Select the input source for inputs 3-8 by clicking on the corresponding buttons. Inputs 3 & 4 can be set
to Mic, Line or Instrument level. Inputs 5 - 8 can be set to Mic or Line level.
14
Mixer Section
The Mixer Section is used to create mixes for monitoring purposes. The mixes you create do not affect how the audio inputs are
routed to the DAW, nor does it affect the audio level of the signal to be recorded. What you set up in the mixer section of Liquid
Saffire 56 Control only affects what is heard in the outputs of the mix.
The Mixer includes a total of 16 mixes, each with a maximum of 18 channels in the mix. Up to 16 mono mixes or 8 stereo mixes, (or
any combination of mono and stereo mixes,) are available, making up a total of 16 mix channels.
Note that at sample rates of 176.4kHz and 192kHz the number of mixes is reduced to 4 Mono (or 2 Stereo).
Each Mix can contain up to 18 of the possible 40 inputs signals, and each mix can be sent to any number of outputs.
Each mix shares the same source inputs, but all other mixer controls are independent in each mix.
The Input recording levels that are sent to the DAW are therefore those set on the hardware using the Gain knobs.
An example of one use for the mixer is to record multiple artists simultaneously. (e.g. a guitarist and a vocalist are recording at
the same time, and you wish to provide them with a backing track and a feed of each other’s input signal.)
The guitarist needs to hear mainly the backing track, her guitar, and some vocals. The vocalist needs to hear the backing track,
a little of the guitar and lots of his vocals .
A separate mix can be created for each artist with the exact levels that he or she needs. Each artist has his or her own mix on
a different mix tab.
Mixer Tab
Each mix can be selected on the corresponding mixer tab.
Input Channel
Here is a picture of 2 mixer input channels. Below is a description of every component of a mixer channel.
15
Audio source select
When there is no input to a mixer channel, it will display “off”.
Clicking on the “off” region brings up a list of all available inputs that can be fed to the channel. All analogue (labelled ‘Line’) and
digital inputs, and DAW outputs are available.
When selecting a source on a stereo channel, if an odd numbered input is chosen for the left channel, the next even number input is
auto selected for right, and Vice Versa
Note that if an input has already been taken, it will be greyed out and you cannot select it again. The input needs to be deselected
from the track where it is already taken, and then re-selected on the desired track.
To get your sounds from your DAW or other computer applications into the mixer, you should select ‘DAW 1’ and ‘DAW 2’ on a stereo
input track.
Pan Slider
A Pan Slider is used to position the audio signal anywhere between the left and right speakers.
Moving the horizontal slider from left to right will move the audio signal from left to right within the stereo field, i.e., the signal is
faded between two audio outputs such as monitor L and R.
When used with a stereo track, the slider affects the audio signal such that when fully left, only the left channel is heard, and when
fully right, only the right channel is heard
16
Fader
Use the fader to set the level of your audio signal for monitoring within the current mixer.
Click the fader with your mouse and drag to any position. Double click on the fader to set it to 0.
Fader range is from -∞ to +6 dB with the current fader level displayed in the box below.
Meter
The meter shows the signal level of the source input to the channel. The maximum reached signal level is displayed in
the box below.
The metering is always pre-fade - showing the level of the signal at the input, therefore the fader level has no effect on
the metering.
Clip light
If the red portion at the top of the fader lights up, then the signal level is too high.
You will need to turn down the signal level by either using the gain knobs on the front panel for the analogue inputs,
using the gain on the external devices connected to the digital inputs, or using the gain within the DAW.
Once the gains are lowered, click on the red portion to reset the clip light.
Mute
Pressing this button mutes the signal. Red indicates that Mute is active.
Solo
Pressing this button solos the signal. The level of the fader will affect the level of the soloed signal.
Yellow Indicates that Solo is active.
PFL (Pre-fade listen)
Pressing this button solos the signal and automatically routes it to Monitor 1 and 2. The level of the soloed signal is pre-fade (i.e. it
will not be affected by the level of the fader). Green Indicates that PFL is active.
17
Stereo
Pressing this button combines 2 mono channels into 1 stereo channel.
Track Name
As a default, each track is given a number as a name. Double click to rename the track to something more useful such as ‘Vocal Mic’.
Mix Output Channel
The output channel of the mix is where all the input channels are routed to and mixed together. The output
channel gives you control of the overall level of the entire mix. You can send a mix to any or all hardware outputs;
if a single output is selected this is displayed at the top of the output channel. “Many…” will be displayed if multiple
outputs are selected.
The output channel can be either mono or stereo depending on the status of the stereo button. When the channel
is set to stereo, you will see that the tab for that mix doubles in size. This is due to the fact that the stereo version
takes up 2 channels of the available total output channel count.
Note that when pressing on the solo button on an output channel, that channel (i.e. the whole mix) is soloed and
routed to Monitor outputs 1 and 2. This is a non-latching button.
You can name the current mix by typing the desired name in the text field below the output channel. You will see
the name appear in the mix tab. For example, Mix 1 can be renamed “Monitor Mix”, and Mix 5 named “Headphone
1 Mix”.
To copy an existing mix to another mix, simply click on “Copy Mix To...” and select the mix to which you would like
to copy. Note that you can only copy a stereo mix to another stereo mix, and a mono mix to another mono mix.
Therefore you must make sure that you have correctly set up the output channels to either stereo or mono before
copying the mix.
Click on “Sel…” to view a drop down menu of the available output destinations for the selected mix (see the drop
down menu in the screenshot on the left side of this page). Select an output in this menu in order to chose the
output destination for the selected mix.
18
Routing Section
The routing section allows you to set up which audio sources are to be routed directly to which physical outputs.
The routing section displays every physical output on the Liquid Saffire 56 and the audio stream to be sent to that output is available
for selection in a drop down menu to the left of that output.
Clicking on the box to the left of the output label will bring up a list of all available audio output sources.
The available sources include:
• All input streams (Analogue 1-8, S/PDIF, ADAT 1 & ADAT 2)
• All DAW playback stream (DAW 1 - 28)
• All mixes from the mixer (Mix 1 - 16)
If you have named the mix (by clicking in the track name section – see previous chapter) then this name is displayed as the mix
source name.
Note that the routing section is linked to the selection made for the output channel destination set-up in the mixer. If you have
outputs pre-assigned from when you created your Mix, you will see the routing selections have been set up. Similarly, if you change
the audio source from the routing section, the output of the mix will change automatically.
‘Headphones 1’ is a copy of line outputs 7 and 8
‘Headphones 2’ is a copy of line outputs 9 and 10.
When working at sample rates of 88.2kHz or 96kHz, the total number of ADAT channels available drops to 8 channels – 4 per ADAT
connection (“ADAT SMUX “) At these sample rates, ADAT channels 5-8 for each ADAT connection are greyed out.
When working at sample rates of 176.4kHz or 192kHz , the total number of ADAT channels available drops to 4 channels – 2 per
ADAT connection (“ADAT SMUX II “) At these sample rates, ADAT channels 5-8 for each ADAT connection are greyed out.
19
Routing Presets
Routing Presets are provided as a starting point for you to create your own routing and mixer set-ups.
These will enable you to quickly set up your routing for recording (monitoring your inputs); mixing (sending signals out to outboard
processors or external mixer); or internal looping (routing audio between software applications without leaving the computer).
Clear
This turns off all output routing. This can be used to re-set the routing for when you need to completely restart a configuration,
meaning you do not have to manually turn everything off first.
DAW Tracking
‘DAW Tracking’ is used for the initial recording process. It will automatically output DAW 1 and 2 to be sent to all Line outputs
and hence your main monitors (1+2) and to Headphone outputs 1 and 2. All input channels must be monitored from within the
DAW application.
Zero Latency Tracking
Zero Latency Tracking is used for the recording process. It will automatically output Mix 1 and 2 to all your Line outputs
simultaneously, and hence will route to the main monitors (1+2), and to the Headphone outputs 1 and 2. Line inputs and DAW outputs
must be set up in Mix 1 so that you are able to monitor these sources with zero latency. You must also ensure that you are not
monitoring the same signals from within your DAW at the same time, otherwise you will be monitoring the same signal twice (once
direct from Saffire MixControl AND a second time (with latency) from your DAW.)
Mixing
‘Mixing’ is used for the mixing process. When sending signals out to a mixer or to external processing hardware, hardware outputs
are typically set exactly as they are set in the DAW software. DAW outputs route directly to the line output of the same number. (DAW
outputs 1-10 to Monitor Outputs 1-2, Line outputs 3-10.)
Loopback
Use when recording from one software program to another. You can use loopback routing to record audio from your internet
browser into your DAW, or to record from one DAW to another. Please refer to the ‘Architecture’ diagrams on pages 9 to 11 for
information on which DAW input channels are used for Loopback.
To prevent any audio feedback, make sure that the DAW you are recording into is not set to monitor its inputs. Alternatively, set the
outputs of the DAW into which you are recording to 3 and 4; this allows you to monitor the inputs without feeding the signal back into
the record stream.
20
Monitor Section
The output levels of the monitor outputs and line outputs are configured in the Monitor Section. You can set up your Liquid Saffire
56 so that the hardware ‘Monitor’ knob on front panel of the Liquid Saffire 56 will control the desired outputs, such as your stereo
monitors, your surround sound system. Alternatively the hardware ‘Monitor’ knob be deactivated for specific outputs e.g. when
hardware volume control is required for a pair of monitor speakers, but not for additional outputs being sent to e.g. an external
compressor. Additional controls such as mute, dim and mono are available.
Monitor control enable buttons (1 to 10)
The monitor control enable buttons indicate which outputs are controlled by the monitor section on the GUI directly below the ten
buttons. The Liquid Saffire 56 can be set up so that you have hands-on control of volume levels, and depending on your monitoring
set-up, you may control no speakers, just a single pair of speakers, or up to 10 speakers simultaneously.
(All digital output levels are unaffected by Liquid Saffire 56 control. Use the output levels of the DAW to control digital output levels.)
Each button can be set to 1 of 3 possible states:
Blue - this output is controlled by the below monitor section.
Red - this output is not controlled by the below monitor section and it is muted.
Grey - this output is not controlled by the below monitor section and it is at full level.
To set a button to its Grey state, SHIFT + Click the button.
WARNING: When a Monitor control button is set to ‘Grey’, the signal routed to that output will be played back at full level.
This may potentially result in a very loud signal being sent to your monitor speakers, headphones or other equipment.
Be cautious when setting your levels (in your DAW or the Saffire MixControl Mixer) before setting the monitor button to Grey.
21
Monitor Presets dropdown menu
These presets allow quick changing of typical monitoring set-ups.
For the monitor presets to work, you must have your speakers connected to the line outputs as shown in either picture below.
Surround Sound Monitoring: (Quad), (2.1), (5.1), (7.1)
1 Left
2 Right
3 Centre
4 Sub Woofer
5 Left Side
6 Right Side
7 Left Rear
8 Right Rear
Loudspeaker Set-up: Main Monitors (Stereo), Medium Monitors (Mid + Phones 1), Small Monitors (Mini + Phones 2)
1 Left Main
2 Right Main
7 Left Medium
8 Right Medium
9 Left Small
10 Right Small
22
Monitor Presets
Preset Name
Output
Off - no Monitor control buttons enabled, therefore no sound will come out of any analogue output.
Mono - outputs only to the Centre / mono speaker (Line output 3.) All other channels are muted.
Output - 3
Stereo - outputs to Stereo speakers (Monitor 1 and 2 output.) All other channels are muted.
Outputs - 1,2
Quad - outputs to Monitor 1 and 2 outputs and Line 5 and 6 outputs. All other channels are muted.
Outputs - 1,2,7,8
2.1 Surround - outputs to Stereo speakers (Monitor 1 and 2 output) and Sub (Line output 4).
Outputs - 1,2,4
5.1 Surround - outputs to all 5.1 speakers. All other channels are muted.
Outputs - 1,2,3,4,7,8
7.1 Surround - outputs to all 7.1 speakers. All other channels are muted.
Outputs - 1,2,3,4,5,6,7,8
Mid + Phones 1 - outputs to Mid Speakers and Headphones 1.
Outputs - 7,8
Mini + Phones 2 - outputs to Mini Speakers and Headphones 2.
Outputs - 9,10
Monitor Section Controls
The Monitor section will affect those channels that have been selected for monitor control (indicated with a blue button, see above.)
Monitor level control knob
Set the output level of all assigned outputs using this knob. The output level can be adjusted using the mouse, or from the front
panel control, depending on the status of the H/W Control button. The dB display below shows the current level to which the monitor
knob is set.
Hardware control button
When lit, the monitor knob on the front panel takes control of the monitor level control knob. Mouse control of the monitor knob is
disabled when active.
Note that if the hardware control is switched in and out, and the hardware control position does not match the software position,
then the volume knob works in pick-up mode. A volume change will only occur when the position of the hardware knob matches or
passes through the position of the software level. This will ensure that there are no sudden unwanted volume increases when the
knob is moved.
23
Dim switch
Attenuates the output level by 18dB.
Mute switch
Mutes the output.
Left Mute switch
Mutes the left output.
Right Mute switch
Mutes the right output.
Mono switch
Sums (combines) the left and right signals. The combined signal is then sent out of both Left and Right outputs.
Remember that these dim, mute and mono buttons only affect the outputs selected for control (i.e. Blue) in the monitor
control section.
Device Status section
The Device Status section shows information about the sample rate, synchronisation and driver status of the
Liquid Saffire 56. The desired sample rate can be set as well as external synchronisation options for using
the Liquid Saffire 56 with external digital devices.
24
Sample rate display
This displays the current Sample rate at which the Liquid Saffire 56 is running. To change the Sample rate, click on the red sample
rate value and select 44.1kHz, 48kHz, 88.2kHz, 96kHz, 176.4kHz, or 192kHz.
Note: it is advisable to quit your DAW application BEFORE you make sample rate changes to prevent any undesirable side-effects
in your DAW!
Sync Source display
Displays the currently selected sync source (red display) – To change the sync source, click on the red sync source value and select
SPDIF, SPDF -OPT, ADAT1, ADAT 2, Word Clock, or Internal.
Sync source locked display
Displays “Locked” when the Liquid Saffire 56 has successfully locked to the specified Sync Source.
If “No Lock” is seen, then the unit has been unable to lock to either an external ADAT or S/PDIF signal. If this is the case, then
please check that digital cables are secure in their input sockets, and that the external digital devices have been set up as
master devices.
Firewire Driver
This should display “Connected” at all times when the Liquid Saffire 56 is connected to the computer via Firewire. If this shows
“Disconnected” please check Firewire connections, check that the unit is switched on etc. If it still shows “Disconnected” then
restart the computer and then re-start the Liquid Saffire 56.
Unit Name Text Field
Allows naming of the Liquid Saffire 56 unit. Double click in the field and enter your text. Press enter (return) on your computer
keyboard to complete.
Settings Menu
This is a dropdown menu containing all of the following items which allow you to set up different global/system configurations.
This is the only part of Saffire MixControl software where there are differences between the Windows and Mac versions.
Mac
Windows
25
Use Optical ADATs as S/PDIF
Here you can set the format of the optical digital input/output socket. It can either be an ADAT stream or an S/PDIF stream. (Useful
for those who have S/PDIF equipment that only has an optical connector.) Note that the audio sent to the optical S/PDIF output is
always exactly the same as the audio sent to the RCA output.
S/PDIF AC3
Allows the user to stream AC3 directly via the S/PDIF outputs. (AC3 is encoded 5.1 audio, e.g. from a DVD player, that will be sent via
S/PDIF cable (RCA or Optical) to your 5.1 decoder.)
Active Monitor Pad
When ticked, this drops the level of monitors 1 and 2 by 20dB.
This is recommended for set-ups using a stereo pair of Active Monitors.
If you find that for normal listening levels, the Volume monitor knob has to be set at only e.g. 3 or 4, then tick ‘Active Monitor Pad’ and
the volume monitor knob should now be at 6 or 7, thus giving you better control of the output volume level.
Firewire Driver Latency
The Liquid Saffire 56 latency performance will be dictated by the Core Audio buffer size specified in your DAW (Mac,) or as set in the
ASIO buffer size (Windows.) The Firewire Driver Latency affects the performance of the Core Audio or ASIO buffer settings.
If you are experiencing clicks and pops or audio dropouts, this may be due to certain hardware in your computer that is affecting
the performance of audio devices connected via FireWire. Rather than removing and replacing hardware (e.g. your graphics card or
wireless internet card) trying a longer Firewire Driver Latency setting may solve the problem.
ASIO Buffer Size (Windows Only)
Set the buffer size of your ASIO driver here.
A small buffer size will in result in lower latency at the expense of increased CPU usage. A high buffer size will result in a higher
latency but with lower CPU usage. If you are using lots of virtual instruments and effects processing in your DAW project, and the
CPU usage is high, then increase the buffer size to permit lower CPU usage.
26
Hardware Meter Source
Set the LEDs on the Liquid Saffire 56 Front Panel to monitor either the Analouge, ADAT 1, ADAT 2, or S/PDIF inputs.
File Menu
Mac
Windows
Open - opens a File open dialog allowing selection of any pre-saved Saffire MixControl set-ups.
Save - opens a File save dialog allowing selection of a location into which your Saffire MixControl set-up can be saved.
Subsequent saves overwrite the original file.
Save As - opens a File save dialog allowing selection of a location into which your Saffire MixControl set-up can be saved. Use this
option if you want to keep your original saved set-up and create a new one with a different name.
Restore Factory Default - Causes the Liquid Saffire 56 to revert to the original default state in which it left the factory. This can be
used to globally reset all mixer, routing, and monitor settings, allowing creation of a new set-up from scratch.
Save to Hardware - This saves the current Saffire MixControl set-up to the Liquid Saffire 56 hardware. If you are moving the Liquid
Saffire 56 from one computer to another and want to retain the set-up, then choose this option. Note that Saffire MixControl does
not automatically load from hardware (as this would overwrite a current set-up); it must be loaded manually.
Load from Hardware - This loads the saved set-up from the Liquid Saffire 56 hardware into the Saffire MixControl software.
As you can see from the above screen shots, ‘Open’, ‘Save’ and ‘Save as’ all have keyboard shortcuts. These are standard shortcuts
for their respective functions, so if you are regularly changing settings for your various sessions, then the shortcuts will reduce
your set-up time.
Performance Specifications
Microphone Inputs 1-2
•
•
•
•
•
•
•
Frequency Response: 20Hz - 20kHz +/- 0.1 dB
Gain Range: +13dB to +60dB
THD+N: 0.001% (measured at 1kHz with a 20Hz/22kHz bandpass filter)
Noise EIN: 128dB analogue to digital (measured at 60dB of gain with 150 Ohm termination (20Hz/22kHz bandpass filter)
LIQUID TECHNOLOGYTM Mic-amp emulation*
Input Impedance: variable, set in software by pre-amp emulation chosen
Harmonics Distortion Range: 0 to 15 where maximum (15) = 10% of 2nd-, 20% of 3rd- and 10% of 5th-order at 0dBFS (leveldependant distortion)
27
Microphone Inputs 3-8
•
•
•
•
•
Frequency Response: 20Hz - 20kHz +/- 0.1 dB
Gain Range: +13dB to +60dB
THD+N: 0.001% (measured at 1kHz with a 20Hz/22kHz bandpass filter)
Noise: EIN: 128dB analogue to digital (measured at 60dB of gain with 150 Ohm termination (20Hz/22kHz bandpass filter)
Input Impedance: 2k ohm
Line Inputs (Inputs 1-8)
•
•
•
•
Frequency Response: 20Hz - 20kHz +/- 0.1dB
Gain Range: -10dB to +36dB
THD+N: < 0.001% (measured with 0dBFS input and 22Hz/22kHz bandpass filter)
Noise: -90dBu (22Hz/22kHz bandpass filter)
Instrument Inputs (Inputs 3 and 4 only)
•
•
•
•
Frequency Response: 20Hz - 20kHz +/- 0.1dB
Gain Range: +13dB to +60dB
THD+N: 0.004% (measured with 0dBu input and 20Hz/22kHz bandpass filter)
Noise: -87dBu (20Hz/22kHz bandpass filter)
Analogue Audio Outputs (Outputs 1-10)
• 10 Electronically Balanced Outputs
• Maximum Output Level (0dBFS): +16dBu
• THD+N: 0.001% (0dBFS input, 20Hz/22kHz bandpass filter)Digital Performance
A/D Dynamic Range = 110dB (A-weighted), all inputs
D/A Dynamic Range = 110dB (A-weighted), all outputs
Clock Sources:
• Internal Clock
• Sync to Word Clock on SPDIF Input (RCA)
• Sync to Word Clock on optical SPDIF Input (when enabled)
• Sync to Word Clock on ADAT input 1 or 2
• Sync to Word Clock on BNC Word Clock Input
JetPLLTM PLL technology providing superb jitter reduction for class leading converter performance.
Clock jitter:250 picoseconds
Supported Sample Rates
44.1kHz, 48kHz, 88.2kHz, 96kHz, 176.4kHz and 192kHz
28 x input channels to computer: Analogue (8), SPDIF (2), ADAT (16) and Mix Loop-back (2).
28 x output channels from computer: Analogue (10), SPDIF (2), ADAT (16).
Fully assignable 18 input by 16 output mixer.
FRONT AND REAR CONNECTIVITY
•
•
•
•
•
Analogue Channel Inputs (Inputs 1-8)
8 x Mic XLR (channels 1-8) on rear panel
8 x Line ¼” TRS (channels 1-8) on rear panel
2 x Instrument (Hi-Z) ¼” TRS (channels 3 and 4) on front panel
Switching between Mic / Line (channels 1-8) / Instrument (channels 3 and 4 only) via Saffire MixControl Application
Digital Channel Inputs (Inputs 9-26) 44.1-192kHz
•
•
•
28
Stereo S/PDIF input on RCA
16 x ADAT inputs on two Optical Connectors, reduces to 8 inputs at 88.2/96kHz and 4 inputs at 176.4/192kHz
Optical Input 2 can be switched to S/PDIF 3/4 in software preferences (ADAT Input 2 disabled)
Analogue Audio Outputs (Outputs 1-10)
•
•
•
•
10 x ¼” TRS Jacks
2 x monitor mix outputs (anti-thump circuitry) on ¼” TRS Jack (Outputs 1 and 2 only)
Stereo Headphones Mix 1 on ¼” TRS (also routed to Outputs 7 & 8)
Stereo Headphones Mix 2 on ¼” TRS (also routed to Outputs 9 & 10)
Digital Channel Outputs (Outputs 11-28) 44.1-192kHz
•
•
•
Stereo S/PDIF Output on RCA
16 x ADAT Outputs on two Optical Connectors, reduces to 8 outputs at 88.2/96kHz and 4 outputs at 176.4/192kHz
Optical Output 2 can be switch to be a copy of the SPDIF RCA output (ADAT Output 2 disabled)
Other I/O
•
•
•
•
Word Clock Input and Output on BNC
2 x 6-pin Firewire S400 sockets
2 x Standard 5-pin DIN MIDI connectors: In and Out
IEC mains power input connector (universal input voltage)
Front Panel Indicators
•
•
•
•
•
•
•
•
8 x 5 segment input meters (switch-able source via Saffire MixControl), -42, -18, -6, -3 and 0dBFS
“Lock” Indicator
“Host Connected” Indicator
MUTE Switch and LED
DIM Switch and LED
MIDI In data activity LED
ADAT1, ADAT2 and SPDIF LED to indicate meter sources
Input source selection LED for each channel (Mic / Line / Instrument)
Weight and Dimensions
•
•
2U Rack Mount unit: approx. 48 x 9 x 23cm (W x H x D)
Weight: 4kg
* IMPORTANT INFORMATION: FOCUSRITE, the FF logo, LIQUID TECHNOLOGY, Liquid Saffire 56 logo are trademarks of Focusrite
Audio Engineering Ltd. DYNAMIC CONVOLUTION is a trademark of Sintefex Ltd. All other product names, trademarks, or trade
names are the names of their respective owners, which are in no way associated, connected nor affiliated with Focusrite or its Liquid
Saffire 56 product and which have not endorsed Focusrite’s Liquid Saffire 56 product. These other product names, trademarks, and
trade names are used solely to identify and describe the third party products the sonic behaviour of which was studied for the Liquid
Saffire 56 product, and to accurately describe the functionality of the Liquid Saffire 56 product. The Liquid Saffire 56 product is an
independently engineered technology which utilises the patented process of Dynamic Convolution to actually measure examples of
the sonic impact of original analogue products upon an audio stream, so as to electronically emulate the performance of the original
product studied. The result of this process is subjective and may not be perceived by a user as producing the same effects as the
original products studied.
Troubleshooting
For all troubleshooting queries, please visit the Focusrite Answerbase where there are articles covering numerous troubleshooting
examples. www.focusrite.com/answerbase.
E & O.E.
29
Pre-amp Emulation Guide
Emulation
Original
(Origin)
Serial
Impedance
Description
TRANY 1 H
API 3124+
(US)
serial #
10149
1150 ohms
(quoted 1500)
The API 3124 is a four channel rack pre-amp. The microphone preamp design is the same as one utilised in all API mixing desks. It
is a Op-amp pre-amp design with RE 115 K input transformer and
the same output transformer used in the API EQs. The API 3124 is a
popular choice for drum kit recordings but will provide a great sound
from classical recording to distorted guitars.
SILVER 2
Avalon VT737SP
(US)
serial #
12545
807 ohms
(quoted 850)
The Avalon VT-737SP is a fully featured 2U channel strip. The unit
features a microphone input transformer. The pre-amp is a highvoltage Class A design featuring two dual vacuum tubes resulting in a
low noise, high headroom circuit.
FF RED 1 H
Focusrite
Red 1
(UK)
serial #
F07858T
1050 ohms
(quoted 1200)
The Red 1 is the classic Focusrite high end sound. The Red 1 is a
hand-built rack unit using the same pre-amp design as found in the
Focusrite Forte Console. The Red range was launched in 1992 and
are still sold to this day. The high performance standard has won
numerous awards over the years, including 2 TEC awards.
SAVILLEROW
Helios
Console
(UK)
serial #
unknown
(Colour
Green)
1541 ohms
(quoted
unknown)
The Legendary Helios Electronics Ltd Olympic mic-pre has achieved
a renowned status through its use by the Beatles, Rolling Stones, Bob
Marley, Led Zepplin and so on. The mic pre-amp is extremely open
and uses an input transformer that is based on the highly desirable
Lustraphone (Olympic Sound Studios) model. It has a unique ‘70s
sonic footprint thanks to all its discrete component design (not a chip
in sight!).
DUNK
Manley
SLAM
(US)
serial #
SLAM120
1806 ohms
SLAM! stands for “Stereo Limiter And Mic pre”. This is the pre-amp
(quoted 2000) from the legendary two channel Limiter and Pre. It is a Class A Tube
design with plenty of gain. The tube pres gives a clean and clear
sound with great results for both aggressive singers and, with enough
gain, for soft singers or low output mics.
NEW AGE 1
Millennia
HV-D3
(US)
serial #
D-367
5455 ohms
(quoted 6200)
The Millennia HV-3D is an eight channel, 2U rack pre-amp. The preamp design is transformerless high-voltage discrete transistors. This
design is perfect for very detailed and transparent recordings.
CLASS A 2A
Neve 1073
(UK)
serial #
7172K
1050 ohms
(quoted 1200)
The Neve 1073 was first released in 1970 and has been used on
countless hit records to this day. It is perhaps one of the most sought
after mic pre amps in the world. It is a hand build and hand wired
transformer based class A pre-amp.
OLD TUBE
Pultec
MB-1
(US)
serial #
6846
153 ohms
(quoted 150)
The Pultec MB-1 was designed for use in radio and television
broadcast, recording studios, P.A. systems and test lab environments.
The Pre amp features a very minimal circuit design based on input
and output transformers and tube gain stage. The MB-1 uses a fixed
gain structure, meaning that resistors needed to be soldered into the
circuit to change the pre-amp gain.
DEUTCH 72
Telefunken
V72
(DE)
serial #
2107.
756 ohms
(quoted
unknown)
The Telefunken is a vintage Valve pre-amp originally built in the late
1940s. The V72 was actually modelled on the V41 (developed in 1928).
It was originally developed for German Radio stations but was later
taken up by most of the European Recording Companies like EMI,
Decca/Telefunken. The V72 is a tube based pre-amp offering fixed
gain stages, and is perfect for bringing the analogue back to digital
sounds.
STELLAR 1B
Universal
Audio M610
(US) serial 484 ohms
# 459
(quoted 500)
The Universal Audio M610 was designed by Bill Putnam and has a
vibrant high frequency response and the deep, prominent bottom-end
that has graced countless recordings. The Universal Audio M610 mic
pre is a popular tool for tracking, whether running a pure analogue
setup or looking to warm up the DAW.
* IMPORTANT INFORMATION: FOCUSRITE, the FF logo, LIQUID TECHNOLOGY, SAFFIRE MIX CONTROL and the LIQUID SAFFIRE 56 logo are trademarks of Focusrite Audio Engineering Ltd.
DYNAMIC CONVOLUTION is a trademark of Sintefex Ltd. All other product names, trademarks, or trade names are the names of their respective owners, which are in no way associated,
connected nor affiliated with Focusrite or its LIQUID SAFFIRE products and which have not endorsed Focusrite’s LIQUID SAFFIRE products. These other product names, trademarks, and trade
names are used solely to identify and describe the third party products the sonic behaviour of which was studied for the LIQUID SAFFIRE products, and to accurately describe the functionality of
the Liquid Mix products. The Liquid Mix products are an independently engineered technology which utilises the patented process of Dynamic Convolution to actually measure examples of the
sonic impact of original analogue products upon an audio stream, so as to electronically emulate the performance of the original product studied. The result of this process is subjective and may
not be perceived by a user as producing the same effects as the original products studied.
30
Notes
31