Download Art DMV Pro Specifications

Transcript
7KH$57
3URJUDPPDEOH 'LJLWDO (IIHFWV 3URFHVVRU
TABLE OF CONTENTS
Introduction .................................................................................................................................................................... 1
Installation ...................................................................................................................................................................... 2
AC Power Hookup .................................................................................................................................................... 2
Audio Connections .................................................................................................................................................... 2
Safety Precautions .................................................................................................................................................... 2
Quick Start Instructions ................................................................................................................................................ 3
Quick Setup .............................................................................................................................................................. 3
With a Mixer .............................................................................................................................................................. 3
Straight into an Amp ................................................................................................................................................. 4
In an Amp’s Effects Loop .......................................................................................................................................... 4
Try It Out ................................................................................................................................................................... 5
Selecting Presets ...................................................................................................................................................... 5
DMV-PRO Front Panel Controls and Indicators ..........................................................................................................6
Processors (A) & (B) ................................................................................................................................................. 6
Power ........................................................................................................................................................................ 6
LCD ........................................................................................................................................................................... 6
Edit Button ................................................................................................................................................................ 6
Processor (A) & (B) Encoder / Switch ....................................................................................................................... 7
Routing Button .......................................................................................................................................................... 7
MIDI/Util Button ......................................................................................................................................................... 7
Store Button .............................................................................................................................................................. 7
Bypass Button ........................................................................................................................................................... 7
Preset Encoder / Switch ........................................................................................................................................... 8
Selection Arrow ......................................................................................................................................................... 8
Processor (A) & (B) Meters ....................................................................................................................................... 8
-i-
Routing LEDs ........................................................................................................................................................... 8
Unloaded Preset Indicator ........................................................................................................................................ 9
Preset Display ......................................................................................................................................................... 9
Special Functions: .................................................................................................................................................... 9
Restoring Presets to Original Factory Settings .................................................................................................. 9
Dry Kill and Global Mix ..................................................................................................................................... 10
Setting Dry Kill and Global Mix ........................................................................................................................ 11
MIDI Dump ....................................................................................................................................................... 11
DMV-PRO Rear Panel Controls and Connections ................................................................................................... 12
Power Jack Input .................................................................................................................................................... 12
MIDI In & MIDI Out ................................................................................................................................................. 12
Outputs #1–4 .......................................................................................................................................................... 13
Output Level Switch ............................................................................................................................................... 13
Inputs #1–4 ............................................................................................................................................................. 13
Input Level Switch .................................................................................................................................................. 13
Tutorial ......................................................................................................................................................................... 14
Introduction ............................................................................................................................................................. 14
Tutorial 1: Starting from Scratch and Changing Effects ......................................................................................... 16
Tutorial 2: Editing Effect Parameters ..................................................................................................................... 18
Tutorial 3: MIDI ....................................................................................................................................................... 19
Editing the Global MIDI Parameters ................................................................................................................ 20
An Effect’s MIDI Parameters ............................................................................................................................ 21
Tutorial 4: Advanced Applications .......................................................................................................................... 23
The Smart Encoder .......................................................................................................................................... 23
Smart Encoder Programming .......................................................................................................................... 24
Using a Smart Encoder Function in Preset Mode ........................................................................................... 24
Smart Encoder Functions while Editing Reverb, Delay, and Rotary Effects ................................................... 25
The DMV-PRO’s Adjustable Parameters .................................................................................................................. 26
Description of Routings and Engines ..................................................................................................................... 26
Description of Classes ............................................................................................................................................ 28
Description of Effects and Their Parameters ......................................................................................................... 28
Common Parameters ....................................................................................................................................... 28
Chamber Reverb .............................................................................................................................................. 31
Room Reverb ................................................................................................................................................... 31
Hall Reverb ...................................................................................................................................................... 31
Plate Reverb .................................................................................................................................................... 31
Digital Delay ..................................................................................................................................................... 35
Pitch Transposer .............................................................................................................................................. 38
- ii -
Modulated Effects ............................................................................................................................................. 40
Chorus ....................................................................................................................................................... 40
Flanger ....................................................................................................................................................... 40
Phaser ....................................................................................................................................................... 40
Tremolo ..................................................................................................................................................... 40
Panner ....................................................................................................................................................... 40
Rotary ............................................................................................................................................................... 44
MIDI/Util Parameters .............................................................................................................................................. 46
Channel Number / MIDI Dump ......................................................................................................................... 46
MIDI Map .......................................................................................................................................................... 46
Dry Kill / Global Mix .......................................................................................................................................... 47
LCD View Angles / Factory Reset .....................................................................................................................47
Reference ..................................................................................................................................................................... 48
DMV-PRO Factory Preset List ................................................................................................................................ 48
LFO Shapes ............................................................................................................................................................ 50
MIDI Implementation in the DMV-PRO ................................................................................................................... 51
MIDI Controllers and Numbers ................................................................................................................................53
Warranty Information .............................................................................................................................................. 54
Service .................................................................................................................................................................... 54
DMV-PRO Specifications ........................................................................................................................................ 56
- iii -
INTRODUCTION
Thank you for purchasing a DMV-PRO and congratulations! You now own one of the most sophisticated pieces of
audio signal-processing technology available. The DMV-PRO uses state-of-the-art DSP techniques combined with
A R T’s proprietary Dynamic Engine Allocation (DEA™) software to give you control over a multitude of brand new,
stunning effects algorithms—many of which have never been heard before. The DMV-PRO is the world’s first
affordable dual true-stereo, multi-effects processor and its straightforward user interface quickly and easily gives you
access to all of its features.
FEATURES:
• Four discrete inputs, outputs, and audio processing channels
• 20 bit A/D – D/A converters on all four inputs and outputs
• 46.875 kHz sample rate
• Radically new effect algorithms: reverb, rotary, phaser, flanger, chorus, panner, pitch shift, tremolo, and delay
• Six algorithmic variations of each effect
• Dynamic effects with parameters that change in response to the input signal level
• A R T’s proprietary Dynamic Engine Allocation (DEA™)
• Performance MIDI™ real-time control
• Fully programmable
• Designed and manufactured in the USA
Fill in the following information for your reference:
Date of purchase ___________________
Purchased from ___________________
Serial number
___________________
416–5004–101
-1-
INSTALLATION
The DMV-PRO may be used in a variety of setups including with mixer channel inserts, mixers with reverb send and
return facilities, and in the effects loop of an instrument or P.A. amplifier. Self-contained in an all-steel, single-height
19” rack-mount enclosure, the DMV-PRO is designed for continuous professional use. Because the unit is compact
and lightweight, mounting location is not critical. However, for greater reliability we recommend that you not place the
DMV-PRO on top of power amps, tube equipment, or other sources of heat.
AC POWER HOOKUP
The DMV-PRO has an external power supply designed to operate at 110 VAC @ 50 to 60 Hz. Units
manufactured for use outside the United States of America have been modified to comply with the required
electrical specifications. Only use the adapter that came with the DMV-PRO. If the adapter becomes lost or
damaged, contact A R T Customer Service for replacement.
AUDIO CONNECTIONS
All audio connections to and from the DMV-PRO are ¼” unbalanced TS (Tip = Hot, Sleeve = Ground). We
recommend using only high-quality shielded cables equipped with high-quality connectors.
SAFETY PRECAUTIONS
Warning: To avoid the risk of shock or fire, do not expose this unit to moisture. Refer all servicing to qualified
personnel. Do not remove the metal covers; there are no user-serviceable parts inside. Only use the power
adapter that came with this unit or one obtained from A R T’s Customer Service Department.
-2-
QUICK START INSTRUCTIONS
You’ve unpacked your DMV-PRO and you’re in a hurry to get it up and running. You probably would rather play with it
than read the manual. Fair enough. First, check out the basics, outlined here, just to get your DMV-PRO on-line. It
should take only a couple of minutes for you to read through this section and then you’ll be ready to fire up your new
unit. Later, when you want to get into more of the details, check out the rest of the manual.
QUICK SETUP:
Plug the AC adapter into the back of the DMV-PRO and then into a wall socket. Make sure that both the Input
Level and Output Level switches (on the back of the unit) are fully out. You may need to depress these
switches later, after the other setup steps are done.
NOTE: For all input and output connections, always use high quality, shielded cables.
WITH A MIXER:
Connect two cords with ¼” plugs between your mixer’s auxiliary sends and the DMV-PRO’s Inputs #1 and #2.
For a mixer with a mono send, use only Input #1. Connect Outputs #1 and #2 to two input channels or the
returns on your mixer.
The DMV-PRO can be used as two separate, stereo effect-processors. Inputs and Outputs #3 and #4
correspond to the DMV-PRO’s second stereo engine. Again, if your mixer has a mono send, use only Input
#3. The DMV-PRO can even be used as four completely independent, mono effect-processors. As you would
expect, Inputs #1–4 correspond with Outputs #1–4.
IMPORTANT: If you are patched in a send/return fashion and mixing an instrument’s dry (unprocessed) signal
with processed sound from the DMV-PRO (on separate faders), you will want to remove all dry signal from
the DMV-PRO’s internal mix buss (signal path). This allows the dry signal to appear only once at the mixing
board and not additionally at the DMV-PRO’s faders. One way to do this is to set EACH preset’s Mix
parameter to 100%. That would be a tedious process! Fortunately, there is a special DMV-PRO function
-3-
called Dry Kill that will conveniently turn off the dry signal path inside the unit. Each preset’s Mix value is still
retained, even though all dry sound is eliminated. To enable Dry Kill, turn on the DMV-PRO and press the
MIDI/Util button. Turn the Preset Encoder (the knob on the far right of the unit) until the top line of LCD (A)
reads: “Dry Kill:” then turn Processor (A)’s encoder until “ON” appears on the bottom line. By enabling Dry Kill,
you have turned off or “killed“ the path for dry sound. Press the MIDI/Util button again to exit the MIDI/Util
Mode. For more information on Dry Kill, see page 10.
STRAIGHT INTO AN AMP:
If you’re patching the DMV-PRO into an instrument amplifier or stereo monitor amplifier, use one cord
between the instrument and the DMV-PRO’s Input #1. Run a second cord from Output #1 to the amp’s input.
If the amp has stereo input capabilities, or if you’re using two amps, connect another cord between the DMVPRO’s Output #2 and the amplifier’s other input. You can also plug a second output from your instrument (or
the output from another instrument) into the DMV-PRO’s Input #2. Don’t forget that the DMV-PRO can also be
used as two separate, stereo processors, or even as four separate, mono processors. Imagine the Power!
IN AN AMP’S EFFECTS LOOP:
If you’re patching the DMV-PRO into a guitar (or other instrument) amplifier’s mono effects loop, use one cord
between the amp’s Effects Send jack and the DMV-PRO’s Input #1. Run a second cord from Output #1 to the
amp’s Effects Return jack. (If the amp has stereo returns, use another cord to connect the DMV-PRO’s
Output #2 to the amp’s other Effects Return jack.) Again, don’t forget that the DMV-PRO has the power to act
as two separate, stereo processors or four separate, mono processors.
-4-
TRY IT OUT:
Turn on your amp or mixer and monitor amplifier.
Make sure that your mixer’s or amp’s send level control is turned up and that a signal is being sent to the
DMV-PRO. Watch the Meters on the front of the unit. Most of the lights (LEDs) should be on, except for the
+6 LED, which should only glow when a really loud, instantaneous signal reaches the unit. If the +6 LED
glows constantly, turn down the send level from your mixer or instrument. If only a few LEDs glow, either turn
up your mixer’s send level, or depress the Input Level switch on the back of the unit and then adjust the
mixer’s send level accordingly.
Now raise the return level on your mixer or amp. You should be hearing the DMV-PRO’s effect. If not, check
your connections and your monitor amp. Make sure that the DMV-PRO’s Bypass button hasn’t been pushed
accidentally; if it has, the Preset Display will read
-,
To turn Bypass either off or on, press the front-
panel Bypass button. If the DMV-PRO’s level seems too high, depress the Output Level switch on the back of
the unit.
SELECTING PRESETS:
The DMV-PRO is in Preset Mode when it is powered up. Select a new preset by turning the Preset Encoder
(on the far right) to any preset number that you desire. Notice that the information on the front-panel has
changed to reflect the new preset’s configuration. Also notice that the Load LED (above the numeric display)
is lit to indicate that you are looking at an unloaded preset. You won’t hear an unloaded preset until you press
the Preset Encoder to load it. For a list of Factory Presets, arranged according to number and type, see page
48. Editing effects will be covered later in this manual.
NOTE: The DMV-PRO can handle up to two stereo channels and up to four mono channels, depending on
how a preset is internally “routed.” Some of the factory presets may use a routing scheme (Twin Stereo,
Cascade, Discrete 4, or Multi FX) that is different from how your rig is currently configured. You may not hear
what you would expect to hear. For instance, you may be set up to only monitor stereo outputs (#1 and #2),
and you may be listening to a preset that creates four separate flangers in a Discrete 4 routing (four effects
with separate inputs and outputs). Obviously, you will not hear all four flangers because you are not listening
to Outputs #3 and #4; you will only hear the two flangers at Outputs #1 and #2. Unmatched routing schemes,
however, can still produce creative results. For example, in the previous situation, the Discrete 4 flanger
preset would yield a stereo flanger, but with completely independent (unlinked) left and right channel sweep
widths and rates! When is the last time you easily created THAT effect? The DMV-PRO has many similarly
unique sounds and features, all of which will be covered in the rest of this manual. For your reference, more
information on the concept of routings can be found on page 26 and a list of all factory presets and their
routings begins on page 48.
-5-
DMV-PRO FRONT PANEL CONTROLS & INDICATORS
PROCESSORS (A) AND (B)
The DMV-PRO contains two audio processors, labeled Processor (A) and Processor (B). Each can be
operated independently from the other. The controls for each processor operate similarly and are outlined
below.
& POWER
The Power switch turns the DMV-PRO on and off. The Numerical Display Window and both LCDs illuminate
when power is on. If the unit does not turn on when this switch is toggled, check the AC power cord and
adapter. Also, make sure the outlet that it is plugged into is “live,” by plugging in another piece of equipment
that you know works (try plugging into another outlet, too). If the outlet is good but the DMV-PRO does not
turn on, consult your dealer or A R T Customer Service. The DMV-PRO is in Preset Mode when it is first
turned on.
' LCD (A) AND (B)
The DMV-PRO contains two Liquid Crystal Displays—LCD (A) and LCD
(B). Both displays separately show information about their corresponding
processor and when the MIDI/Util button is pressed, they both work
together for viewing global parameters.
To set the LCD View Angle of the displays, press the MIDI/Util button and then turn the Preset Encoder to the
right until [
($5 T&+$A] appears in LCD (A). Turn Encoder (A) until the contrast is better for both
LCDs. Press the MIDI/Util button to return to the previous mode.
( EDIT BUTTONS (A) AND (B)
The Edit buttons are used for viewing each processor’s effect parameters. From Preset Mode,
press Edit and turn the same processor’s Encoder to view each effect parameter. To modify a
parameter, press the Encoder and then turn it to change values. Repeatedly pressing the Encoder will toggle
-6-
the Encoder’s function between selecting parameters and changing values. For more information on
parameters, see page 28.
) PROCESSORS (A) & (B) ENCODER / SWITCH
The first two Encoders are used separately to view and modify their corresponding processor’s
parameters and effects. The Encoders can be turned and pressed while editing, and their action is
explained in the previous paragraph. When the MIDI/Util button is pressed, both Encoders work
together to set global parameters: this is explained in the MIDI/Util paragraph below. In Preset Mode, the
Encoders can be turned and pressed to select and load new effects. See the tutorials starting on page 14 for
more information.
* ROUTING BUTTON
Routings control the way that sound is processed through the DMV-PRO and how each Input feeds each
Output. Repeatedly pressing the Routing button will scroll through the four internal, audio routings: Twin
Stereo, Cascade, Discrete 4, and Multi FX. (For a description and diagram of each routing, see page 26.) If
you press the Routing button while editing a preset, the LCDs will display the warning message. BE
CAREFUL! When routings are changed, the DMV-PRO reconfigures its internal architecture and loads in
default effects. The preset’s former effects, class, and parameter values are all replaced.
+ MIDI/UTIL BUTTON
Press the MIDI/Util button to edit the DMV-PRO’s global parameters: MIDI base channel, program change
mappings, Dry Kill/Global Mix settings, LCD view angle; and also to perform a MIDI dump and Factory Reset.
After pressing the MIDI/Util button, turn the Preset Encoder to scroll both LCDs through different lists of global
parameters. When you see the parameter that you want to change in one of the LCDs, turn its corresponding
Encoder to change values.
, STORE BUTTON
The DMV-PRO contains 100 memory locations. To store a preset in one of these locations, press the Store
button. The Preset Display will flash the current preset number. Turn the Preset Encoder to select a preset
number to overwrite or just leave it on the current one, if desired. Press Store again and the current preset will
be saved to the location you selected. If you press any button other than Store or don’t press another button
within 10 seconds, the save command will be aborted. See the tutorial on page 17 for more information on
storing presets.
- BYPASS BUTTON
When the DMV-PRO is bypassed, all processed sound is blocked from reaching the outputs, leaving only dry
(unprocessed) signal. Press the Bypass button to toggle Bypass on and off. (When Bypass is on, the Preset
Display alternates between the current preset number and
-7-
.) Individual effects can also be bypassed; this
-,
option is available as an effect parameter. See the parameter descriptions on page 28 for more information on
bypassing individual effects.
. PRESET ENCODER / SWITCH
The Preset Encoder is used to change presets. As you turn it, the number in
the Preset Display changes, as does the information in both LCDs and the
Routing Display; these are showing you information about the new preset.
Notice that the light on top of the Preset Display is lit once you have turned the
encoder. This light indicates that you have not yet loaded the preset that you
currently are viewing, so you will not be hearing the effects or routing that you see on the front panel. To load
a preset, press the Preset Encoder.
When the MIDI/Util button is pressed, the Preset Encoder is used to scroll through the DMV-PRO’s global
parameters. LCDs (A) and (B) will show a different set of parameters. To change a parameter’s value, turn its
corresponding encoder.
/ SELECTION ARROW
The Selection Arrow appears on the left side of an LCD and is used to
distinguish the active line. For example, in the picture on the right, the
Selection Arrow indicates that Chorus is the selected effect and it will be
affected by turning the encoder or pressing the Edit button. To select the
other line, press the same processor’s encoder. While editing, the Selection Arrow is used to differentiate the
active parameter or value field.
0 PROCESSOR (A) & (B) METERS
The meters show the level of signal entering each processor. They either display the level for the
current effect’s input (while editing) or both combined inputs of each processor (when in Preset mode).
To optimize the levels entering the DMV-PRO, watch the +6 LED. If it is constantly lit, the digital
processor is getting too much input level and may clip; turn down the signal going to the DMV-PRO. For
maximum dynamic range, the meter LEDs should be lit most of the time, with the +6 LED briefly flashing on transients
(high-energy bursts, such as loud snare drum hits).
1 ROUTING LEDS
The DMV-PRO has four signal-routing options: Twin Stereo, Cascade, Discrete 4, and
Multi FX. For a description and diagram of each routing, see page 26. Routings are
selected by repeatedly pressing the Routing button (see the above Routing Button
paragraph).
-8-
2 UNLOADED PRESET INDICATOR
When you turn the Preset Encoder to view presets, the DMV-PRO’s sound won’t
change until you press the Preset Encoder to load the preset. The Unloaded
Preset Indicator is a reminder that you are viewing an unloaded preset.
3 PRESET DISPLAY
The Preset Display shows 3 alphanumeric characters that correspond to the
current preset number, whether it’s presently loaded or not. When the Preset
Display is flashing a preset number, it is because you have entered Store mode
and pressing the Store button will overwrite the current preset number’s contents.
SPECIAL FUNCTIONS:
Restoring Presets to Original Factory Settings
The DMV-PRO can overwrite all stored presets with its original factory settings. This process is called a
Factory Reset.
WARNING: A Factory Reset erases all customized presets.
If you have saved some favorite programs, either scroll through their parameters and write them down, or use
the MIDI Dump feature to off-load your presets to a MIDI storage device before implementing a factory reset.
(See page 11 for information on the DMV-PRO’s MIDI Dump.)
To perform a Factory Reset, follow these steps:
1) Press the MIDI/Util button. 2) Turn the Preset Encoder until [0$11
#(2 %-0 "2-08 $1$2 :]
appears in LCD (B). 3) Press the Edit (B) button and notice that LCD (B) is now flashing [0$11 #(2 2"-T%(0, $1$2 :]. 4) Press Edit (B) again to confirm that you really want to perform a Factory Reset. If
Edit is not pressed again within 10 seconds, or if any other button except for Edit is pressed, the DMV-PRO
will exit from Factory Reset mode with your former presets still intact.
-9-
Dry Kill and Global Mix
Dry Kill and Global Mix are two related functions that allow you to quickly alter the ratio of wet (processed)
and dry (unprocessed) sound coming out of the unit. Normally, the Mix parameter sets this ratio separately for
each preset, but by using Dry Kill or Global Mix, you can change these settings for all presets at once.
Dry Kill is used to remove all dry sound from the DMV-PRO’s internal mix buss. One application for Dry Kill is
when you are using the unit with a mixer. In a typical mixing situation, a channel’s fader controls the level of
the instrument patched into it. To add processing, a portion of the channel’s signal is often sent to an effect
processor and the output of the processor is patched into another channel. Now two faders control the overall
sound; the first fader still controls the instrument’s level (all dry) and the second one controls the DMV-PRO’s
level (normally a mix of wet and dry signal). As you can see, dry sound appears at both faders and can result
in an unbalanced mix of sounds. This is particularly noticeable when using a flanger, phaser, or chorus since
these effects are strongest with an equal mixture of both parts. Also, too much dry signal can result in a
diluted sound. By using Dry Kill to remove all dry signal from the DMV-PRO’s output, each fader will only
control one part of the sound and you will be able to blend the two easily at the mixing console.
With Dry Kill active, a preset’s Mix parameter sets the level of all sound coming out of the DMV-PRO. For
example, with a Mix setting of 0, no sound will come out of the unit because the dry part has been disabled
and zero percent of the wet signal is now allowed to pass.
NOTE: If you are plugging directly into the DMV-PRO and just listening to your instrument through the DMVPRO's outputs, do not set Dry Kill; use each preset’s Mix parameter to balance your sounds.
Global Mix is a function similar to Dry Kill, though it doesn’t necessarily remove all dry sound. Global Mix is a
simple way to set each preset’s Mix parameter to a certain value. For example, if Global Mix is set to 50%, all
presets’ Mix values will become 50% (half dry and half wet), regardless of individual Mix parameter settings.
This function is useful when you quickly want to audition all presets with the same Mix level. The change isn’t
permanent; as soon as you turn off Global Mix, the presets will return to their originally stored Mix levels. You
can change and resave a preset’s Mix level with Global Mix active. You will hear Mix changes as you’re
making and saving them, but as soon as you switch to a different preset or back to the changed one, the
Global Mix value will again override the setting that you just made. Of course, when you turn Global Mix off,
the saved Mix value will be the one that you hear.
Here’s a trick to quickly set several presets’ Mix parameters to a new value: Set Global Mix to whatever value
you desire, call up each of the presets you wish to change and individually save them (just press the Store
button twice). You don’t have to edit anything! When you turn Global Mix off, the newly-saved presets will
have their Mix values set to whatever Global Mix was originally set to. All other presets will remain
unchanged.
- 10 -
Setting Dry Kill and Global Mix:
To adjust Dry Kill or Global Mix, press the MIDI/Util button. Turn the Preset Encoder until [
08
(++A]
appears on the top line of LCD (A). Turn Encoder (A) to switch the bottom line of LCD (A) between ON and
OFF. If Dry Kill is on, the effect’s dry path is disabled. If Dry Kill is off, dry sound is allowed to pass and each
preset’s Mix control governs the ratio of dry and wet signal. Also, if Dry Kill is off, LCD (B) displays the Global
Mix setting. By turning Encoder (B), you can turn Global Mix OFF or set it to a percentage between 0 and
100.
Changing Dry Kill or Global Mix takes effect immediately and does not have to be saved. To exit MIDI/Util
mode, press the MIDI/Util button.
NOTE: The Dry Kill state is retained when turning the DMV-PRO on and off. The Global Mix state, however, is
not retained; the unit defaults to each preset’s stored Mix level when turning power on (i.e., Global Mix OFF).
MIDI Dump
By performing a MIDI Dump, you can save the DMV-PRO’s presets and MIDI Map to an external MIDIrecording device. You can even directly transfer the presets and the MIDI Map from one DMV-PRO to another
one with a MIDI cable.
To perform a MIDI Dump, press the MIDI/Util button.
Turn the Preset Encoder until LCD (B) reads: [0$11
the Edit (B) button, the preset information will be
2
#(2 2- 3,. 0$1$21 :]. When you press
sent and both LCDs will read: [0 T1,(22(T&
]. It may take a few seconds for the operation to complete.
NOTE: Individual presets and the MIDI Map can be dumped or loaded separately if the operation is initiated
by an external MIDI device such as a sequencer or an external controller. See page 51 for more information
on the DMV-PRO’s MIDI implementation.
- 11 -
DMV-PRO REAR PANEL CONNECTIONS
Despite the DMV-PRO’s sophistication, it’s easy to interface the unit with other equipment. All inputs and outputs are
located on the rear panel. Standard ¼” inputs and outputs make patching simple.
Note: For best audio quality, always use high-quality cables.
The DMV-PRO is designed for line level or instrument operation. We don’t recommend plugging microphones directly
into the processor. Instead, either use a preamp, a mixer, or an amp’s preamp section to first boost the mic’s level,
then use the effects loop output or reverb send. High signal level from a preamp or effects loop assures an optimum
signal-to-noise ratio in the DMV-PRO, keeping hiss and distortion to a minimum.
$ POWER JACK INPUT
An external AC adapter powers the DMV-PRO. Plug the adapter into this jack and then into a power outlet.
Only use the adapter that came with the DMV-PRO. If the adapter ever becomes damaged, immediately
discontinue use.
% MIDI IN & MIDI OUT
The MIDI In jack enables you to “talk” to the DMV-PRO from an external source such as A R T’s X-11 or X-15
Ultrafoot, an outboard sequencer, or a computer equipped with MIDI ports and associated software. Use this
jack for receiving program change, continuous controller, note, and system exclusive messages.
Use the MIDI Out jack for performing a MIDI data dump. It connects to any external device capable of
recording MIDI data and allows the DMV-PRO to off-load the contents of its memory. The MIDI Out jack does
not act as a MIDI Thru, so the DMV-PRO should be placed at the end of your MIDI chain.
- 12 -
& OUTPUTS #1–4
All four Outputs are single-ended (unbalanced) ¼” jacks with low impedance. A preset’s routing determines
the use of each Output jack. For example, Cascade and Multi FX Routings do not use Outputs #3 and #4. For
more information on the different configurations of the DMV-PRO’s inputs and outputs, see page 26 and the
tutorial starting on page 14.
' OUTPUT LEVEL SWITCH
The Output Level switch is used for matching the DMV-PRO’s output level to your system. Matched signal
levels are important for controlling the amount of distortion present in the final signal. Too little signal results in
a disproportionate amount of noise, while too much signal sounds distorted and gritty. The Output Level
switch has two positions: in (instrument level) and out (line level). Be sure to check your other equipment’s
manual for hints on setting its appropriate input levels.
NOTE: The Output switch’s setting is global, meaning that it always affects the DMV-PRO’s output level,
regardless of which preset is engaged.
( INPUTS #1–4
All Inputs are single-ended (unbalanced) ¼’ jacks with high impedance. As with the Output jacks, a preset’s
routing determines the use of each Input jack. For example, Cascade and Stereo Routings do not use Inputs
#3 and #4. For more information on the different configurations of the DMV-PRO’s inputs and outputs, see
page 26 and the tutorial starting on page 14.
If any Input (except #1) does not have a plug inserted, it will automatically take its signal from the closest,
lower-numbered, input jack that has a plug inserted. For example, if a ¼” plug is only inserted into Input #1,
then Inputs #2, #3, and #4 will also use the signal from Input #1.
) INPUT LEVEL SWITCH
The Input Level switch is similar to the Output Level switch, but is used for matching the level of the incoming
signal to the DMV-PRO. The Input Level switch has two positions: in (instrument level) and out (line level). Be
sure to check your other equipment’s manual for hints on setting its appropriate output levels.
NOTE: Like the Output Level switch, the Input Level switch’s setting is global, meaning that it always affects
the DMV-PRO’s input level, regardless of which preset is engaged.
- 13 -
TUTORIAL
The best way to understand the DMV-PRO is just to jump in and edit some presets. It doesn’t take long and
you’ll see how easy editing is due to the DMV-PRO’s intuitive layout. This section consists of four tutorials:
Starting from Scratch and Changing Effects, Editing Effect Parameters, MIDI, and Advanced Applications.
After you finish the tutorials, check out the section entitled The DMV-PRO’s Adjustable Parameters, on page
26, for a complete list of each effect’s parameters and parameter ranges.
INTRODUCTION:
The DMV-PRO contains four DSP engines and four separate input and output channels. Typically, an engine
processes one individual channel of audio. Two engines can be combined into stereo groups with separate
audio channels and linked control parameters. Two stereo groups can be run in series to create multiple
effects and there’s even a special routing that runs two mono engines and one stereo group in series to
create even longer multi-effect chains. By the way, each engine or engine group has its own EQ and delay
section and many classes also contain a dynamics sensing section, so effect chains can actually be quite
long. Engines #1 and #2 are always controlled by the DMV-PRO’s Processor (A) section and Engines #3 and
#4 are always controlled by Processor (B). Resource distribution between the inputs and outputs is
automatically handled by our proprietary Dynamic Engine Allocation (DEA™) technology. DEA allows for the
following creative signal-routing options:
Twin Stereo
Twin Stereo routing contains two effect-processors
with two linked engines each. The result is two truestereo
effects.
Each
channel’s
audio
remains
independent, but the effect parameters of each group
are linked to create stereo processing. The first effect
(Inputs, Outputs, and Engines #1 and #2) is edited in
Processor (A) and the second effect (Inputs, Outputs,
and Engines #3 and #4) is edited in Processor (B).
- 14 -
Cascade
Cascade routing also has two effects with two
linked engines, but the output of the first group is
fed into the second. In this routing, you have two
stacked, true-stereo effects. Only Inputs and
Outputs #1 and #2 are used. The first effect
(Engines #1 and #2) is edited in Processor (A),
and the second effect (Engines #3 and #4) is
edited in Processor (B).
Discrete 4 (mono)
In Discrete 4 routing, each engine separately processes one
channel of sound and is just like having four mono effects.
Inputs and Outputs #1–4 correspond to Engines #1–4.
Engines #1 and #2 are edited in Processor (A) and Engines
#3 and #4 are edited in Processor (B).
Multi FX
Multi FX routing combines the signal from Inputs #1 and #2 and runs it in series through Engines #1 and #2.
The signal is then split and fed to both inputs of linked engines #3 and #4, which are running in true-stereo.
The signal from Engine #3 is sent to Output #1 and the signal from Engine #4 is sent to Output #2. Inputs and
Outputs #3 and #4 are not used. Processor (A) controls the two mono effects (Engines #1 and #2) and
Processor (B) controls the true-stereo effect group (Engines #3 and #4).
NOTE: See page 26 for more information on the DMV-PRO’s versatile routing configurations.
- 15 -
TUTORIAL 1: STARTING FROM SCRATCH AND CHANGING EFFECTS
Edit the Routing:
By editing any preset’s routing, you are essentially building a new preset from scratch.
When routings are changed, the DMV-PRO reconfigures its internal architecture and loads
in default effects. The preset’s former effects, class, and parameter values are all replaced.
Repeatedly press the Routing button until the Twin Stereo Routing LED is lit. If Twin Stereo
was already lit, press the Routing button a few times until it becomes lit again. Depending on the
mode that you were last in, the LCDs may initially warn you that a change of routing will erase the current
effects.
Disregard the notice; it’s exactly what we want to do!
After Twin Stereo routing has been selected, notice that both Processor LCDs are displaying the Stereo Hall
effect—this may be different from what was originally there. As mentioned, when you change routings the
DMV-PRO loads in default effects. In the case of Twin Stereo routing, the default effects are both Stereo Hall.
Don’t worry, changing effects is easy; simply turn Encoder (A) to change Processor (A)’s effect or turn
Encoder (B) to change Processor (B)’s effect. As you are scrolling through the effects, notice that all except
for Stereo Hall are flashing. The flashing is a reminder that you are not viewing the preset’s current effect, and
consequently, you will not hear what you are seeing in the LCD. When you have found the effect that you
want to hear, press the Encoder to select it and notice that it is no longer flashing. To try out more effects,
again turn the Encoder and push it to select and hear them.
Effects in the DMV-PRO are always ordered this way: Chamber, Room, Hall, Plate, Delay, Pitch, Chorus,
Flanger, Phaser, Rotary, Tremolo, and Panner. To access effects on the right side of the loaded (nonflashing) effect, turn the Encoder to the right. To access effects on the left side, turn to the left.
Processors (A) and (B) are completely independent and can be edited at the same time. Turn and push
Encoder (B) to change Processor (B)’s effect. However, if you are only monitoring Outputs #1 and #2, you
won’t hear Processor (B)’s effect since its inputs and outputs correspond to Inputs and Outputs #3 and #4.
Mono Routings:
Multi FX and Discrete 4 routings have two separate mono effects on one or both of the processors. (See the
beginning of this tutorial for more information on routings.) Setting two effects per processor is similar to
setting one, like in True Stereo routing.
- 16 -
Repeatedly press the Routing button until the Discrete 4 Routing LED is lit. Observe both LCDs. Again, the
DMV-PRO has loaded default effects for Discrete 4 routing, but notice that there are now two effects in each
LCD.
Look at LCD (A). The top line now corresponds to Effect #1 (at Input and Output #1) and the bottom line
corresponds to Effect #2 (at Input and Output #2). Processor (B) is similar, with its top line representing Effect
#3 and its bottom line representing Effect #4. Notice the “Selection Arrows” on the top-left of both lines. These
arrows indicate that the top effect is the one that will change when the corresponding encoder is turned.
If you press the encoder while viewing a loaded (non-flashing) effect, the Selection Arrow will switch to point
at the processor’s other effect. Now when you turn Encoder (A), you will change the bottom effect.
As usual, you can turn to the left and right to navigate through the bottom line’s list of effects and press the
encoder to load a new one. To switch back to adjusting the top line’s effect, make sure you’re loaded an effect
and then press the encoder. Repeat this procedure to switch back and forth between effect lines.
NOTE: You may have noticed that Rotary and Panner weren’t available as you were scrolling through
effects. These stereo effects are not available in a mono (single-engine) routing.
Store:
After you have changed some of the effects in your preset, you may wish to store your changes. First, press
the Store button. The LCDs will display [$+$"2
0$1$2 < 2- 4$050(2$`] and [2'$T .0$11
2- "-T%(0, :::], and the Preset / Value Display will flash the current preset number.
- 17 -
Follow the instructions: Use the Preset Encoder to select the preset number that you want to overwrite (you
don’t have to turn the encoder if you just want to overwrite the current preset). When you are ready, press the
Store button to confirm the operation. If you press any button other than Store, or if Store isn’t pressed within
10 seconds, the save command will be aborted. After a preset is stored, the DMV-PRO enters Preset mode.
NOTE: If you don’t wish to save your edits, you will hear the changes you have made until the preset is
changed. See the next tutorial for information on changing presets. Also, you can reload the originally stored
preset—the one you started from—by pressing the Preset Encoder twice.
TUTORIAL 2: EDITING EFFECT PARAMETERS
Editing an effect’s parameters is simple. First, turn the Preset Encoder and find a Twin Stereo preset that you
would like to modify. Notice all of the front-panel information that changes as you turn. On the right side, the
Preset Display changes to display preset numbers. The LCDs and Routing LEDs change to reflect each
preset’s configuration and the meters react to the input level of each processor’s active inputs. (For more
information on the meters, see page 8.) You may have noticed that as you view other presets, the DMVPRO’s sound doesn’t change. Also, notice that the Load LED (on the top of the Preset Display) has become
lit.
This light indicates that the preset you are looking at is not currently loaded
and, therefore, will not match what you are hearing. Press the Preset
Encoder to load (and hear) a new preset.
If you don’t want to look for an existing Twin Stereo preset, you could just
build one from scratch by pressing the Routing button a few times until Twin
Stereo is selected. The DMV-PRO will load in default effects, which can be changed by turning and pressing
the corresponding Processor Encoders.
After a Twin Stereo preset has been loaded or created, press the Edit (A) button to edit Processor (A)’s effect
parameters. Notice how the top line of LCD (A) shows a parameter with its corresponding value on the bottom
line.
The Selection Arrow on the left of the “parameter” line indicates that turning Encoder (A) will scroll through the
available parameters. If you press Encoder (A), the arrow will fall to the bottom line to indicate that turning the
encoder will now edit the value of the displayed parameter.
- 18 -
As you can see, the editing operation is simple: Turn the encoder to select a parameter, press and turn the
encoder to change the parameter’s value, press and turn to select another parameter, press and turn to
change the new parameter’s value, and so on. The number of available parameters is dependent on the
current effect. (See page 26 for a complete listing of effects and their associated parameters.) When you are
done, either press the Edit button again to exit from Edit Mode or store your edits by pressing the Store
button, selecting a preset number to overwrite, and again pressing the Store button.
Editing presets that have two effects per processor (Discrete 4 and Multi FX routings) is also straightforward.
Select a preset in one of these routings or create one from scratch by using the Routing button. Notice the
Selection Arrow pointing to LCD (A)’s top effect. The arrow indicates which effect will be edited when you
press the Edit button. If you want to edit the bottom effect, press Encoder (A) to move the Selection Arrow to
the bottom effect and then press the Edit button.
After you have edited one of the effects, press the Edit button to exit Edit Mode. To edit the other effect, first
press the encoder to move the effect’s Selection Arrow to the other effect and then press the Edit button to
edit the other effect’s parameters. Repeat this process to switch back and forth between a processor’s effects.
Processor (B)’s effects are edited in the same manner. Don’t forget that Processors (A) and (B) are
completely independent and can be edited at the same time!
TUTORIAL 3: MIDI
The DMV-PRO has three types of programmable MIDI parameters: channel, program change, and
continuous controller mappings.
Channel Number:
The MIDI channel number is the channel on which the DMV-PRO receives program change and SysEx
messages and transmits SysEx messages. The DMV-PRO’s MIDI channel is global to the whole unit and is
set in MIDI/Util Mode (more on this later). The MIDI Channel is automatically saved when changed.
MIDI Map:
The MIDI Map is used to rearrange the order in which DMV-PRO presets are recalled by MIDI program
change messages. Normally, a received MIDI program change value of 1 would recall DMV-PRO preset #1, a
program change value of 2 would recall DMV-PRO preset #2, and so on. MIDI mappings allow you to change
- 19 -
this ordering. You could, for example, set a received program change value of 1 to recall DMV-PRO preset
#40, a program change value of 2 to recall DMV-PRO preset #5, and a program change value of 3 to also
recall DMV-PRO preset #5. Like MIDI Channel, the DMV-PRO’s MIDI Map is set in MIDI/Util Mode and is
automatically saved when changed.
Controllers 1–4:
The DMV-PRO’s continuous controller mappings are extremely flexible and add a great deal of power to the
unit. Each effect can have up to four MIDI controllers assigned to change parameter values. Discrete 4
routing, which has four separate effects, can have up to 16 MIDI controller mappings per preset! Controller
mappings can, for example, make a synthesizer’s modulation wheel change reverb time, a footswitch bypass
an effect, or even allow keyboard notes to spin up the rotary effect. Changes to a preset’s controller mappings
are edited with the rest of an effect’s parameters.
Editing the Global MIDI Parameters:
The DMV-PRO’s MIDI Channel and MIDI Map are global parameters, meaning that they affect the whole unit,
not just one preset. Global parameters are accessed by pressing the MIDI/Util button. Now the Preset
Encoder is used to scroll both LCDs through their separate listing of global parameters. Each LCD shows a
different parameter and its value. To change a parameter’s value, turn the corresponding Processor Encoder.
Setting the MIDI Channel:
Turn the Preset Encoder to the left until [
1$ ' TA] is in LCD (A). The MIDI Channel can be set
between 1 and 16, or to ALL, for Omni mode. Turn Encoder (A) to change values. If you select ALL, the
DMV-PRO will receive program change and SysEx data on all 16 MIDI channels, but it will only send out
SysEx messages on Channel 1. The MIDI Channel is automatically saved whenever it is changed, so when
you are done, turn the Preset Encoder to view another MIDI/Util parameter or press the MIDI/Util button to
exit this mode.
Setting the MIDI Map:
To change the DMV-PRO’s MIDI map, turn the Preset Encoder until LCD (A) & (B) respectively read
[0-&0
, ' T&$<] and [
= 0$1$2<]:
- 20 -
Next, turn Encoder (A) to select an incoming MIDI program change number that you wish to map. This
control’s range is from 1 to 128. Turn Encoder (B) to set the corresponding DMV-PRO preset number that will
be recalled when the program change number in LCD (A) is received. The range of DMV-PRO preset
numbers is from 1 to 100, or OFF to disable a program change number from recalling any DMV-PRO preset.
Repeat this process to map other program changes.
While setting the MIDI Map, you can also conveniently set the incoming program change number (in LCD (A))
by sending an external MIDI program change message on the DMV-PRO’s MIDI channel. The DMV-PRO will
not internally change patches when this happens; it just sets LCD (A)’s program change number to the
number that it receives.
An Effect’s MIDI Parameters:
Each effect can have up to four controller assignments that modify any of its parameters. Consequently,
presets in Twin Stereo and Cascade routings (with two separate effects) can have up to 8 MIDI controller
assignments, Multi FX presets (with three effects in series) can have up to 12 controller assignments, and
Discrete 4 presets (with four separate effects) can have up to 16 MIDI controller assignments. Each effect’s
four assignments (designated a, b, c, and d) are edited with the rest of its parameters.
Press the Edit button of the effect you wish to modify. In the case of Discrete 4 or Multi FX presets, make sure
you have selected the correct one of the two effects (i.e., the Selection Arrow is pointing to the effect you want
to edit). Turn the encoder to the right and scroll through the effect’s parameters until the LCD reads [
-T20-++$0]. Push the encoder and turn it to select one of the four controller assignments (a, b, c, or d).
Each assignment has separate settings for the following parameters: CC Channel, MIDI CC Number,
Parameter, Value Low Range, and Val. High Range. Press the encoder and turn to the right to view these
parameters.
CC Channel:
This parameter sets the channel that the current controller assignment will receive MIDI commands over. The
CC Channel’s range is from 1 to 16.
MIDI CC Number:
This parameter sets the actual MIDI controller that will modify the current controller assignment’s parameter.
MIDI CC Number’s options are OFF (don’t receive any information), 1 through 119, Note On, Aftertouch, and
Pitchbend. Also, any external MIDI action on this controller’s MIDI channel will automatically set the MIDI CC
Number. (See page 53 for a listing of standard MIDI controller numbers.)
Mode
When Note On, Velocity, or Aftertouch is selected as the MIDI CC Number, another parameter—Mode—
becomes available to help fine-tune the controller’s operation. Mode sets the way a note on, velocity, or
aftertouch message is interpreted; its two choices are Toggle or Continuous. If set to Continuous, the
- 21 -
controller’s value linearly corresponds to the key, velocity, or aftertouch value being played. For example, if
MIDI CC Number was set to Note On and Mode was set to Continuous, then the controller’s value would
equal the key number played.
Key, Velocity, or AT Value
If Mode is set to Toggle, a second parameter becomes available to set the key, velocity, or aftertouch value
that will toggle between the controller values 0 and 127. For example, if MIDI CC Number was set to Note On
and Mode was set to Toggle, the next available parameter is Key. If this is set to C4, the value that the
controller assignment receives will be 0 until a C4 is played. Once a C4 is played, the value goes to 127 until
it is released and the value goes to 0 again.
Parameter:
This control sets the parameter that a received MIDI controller event will change; it can be set to any of the
effect’s parameters.
Value Low Range
This control sets the selected parameter’s value when a MIDI value of 0 is received. The range of this control
is dependent on the selected parameter’s range.
Val. High Range
This control sets the selected parameter’s value when a MIDI value of 127 is received and like Value Low
Range, its range depends on the parameter’s range. Any MIDI values between 0 and 127 will produce
parameter values that are scaled between the Value Low Range and Val. High Range settings.
NOTE: The Value Low Range can exceed the Val. High Range, thus creating MIDI control that acts “upside
down.” That is, a low incoming value can have a greater effect than a high one.
After you have edited the parameters for one controller assignment, you may wish to edit one of the effect’s
other three. Make sure the encoder is selecting parameters (i.e., the Selection Arrow is on the top line) and
turn it to the left until the LCD again reads [ -T20-++$0]. Push the encoder and turn it to select
one of the other controllers (a, b, c, or d) and similarly adjust their parameters.
Finally, save your MIDI edits by saving the preset: Press Store, select a preset number to overwrite, and
press Store again to confirm the save. If you instead press any button other than Store, you will return to
Preset mode and the MIDI edits will not be saved, though they will remain active until you change presets.
- 22 -
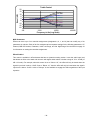
TUTORIAL 4: ADVANCED APPLICATIONS
The Smart Encoder:
The Smart Encoder™
functions allow you to perform real-time
tasks, such as tapping in new delay times or
spinning up and down the rotary effect, by
pressing the Edit and Encoder buttons. Using the encoders this way is called “smart” because
parameters can be automatically changed, instead of by having to manually scroll through a series of menus
and values. The table below lists all of the Smart Encoder functions and the effect-classes they are available
from. Assigning the functions is explained in the next section.
FUNCTION:
AVAILABILITY:
Reverb Test
All Reverb Classes
Tap Delay Time
All Delay Classes Except Mic Placement
Delay Hold
All Delay Classes Except Mic Placement
Rotary Spin HI/LO
All Rotary Classes except Auto Switch
and Dynamic
Reverb
With reverb effects, the Smart Encoder can be used to trigger a reverb test impulse. A reverb impulse is a
short, all-frequency burst for auditioning a reverb’s sound. Use it to test the quality as well as decay time and
front-end characteristics of your reverb programs. Pressing the Encoder on this option will trigger the sound.
Delay
With delay effects, the Smart Encoder can be used to tap in a new delay time or turn on the repeat hold
function.
The Tap Time option allows you to tap in new delay times. Press the Encoder at the desired tempo. The
number of times that you tap doesn’t matter; the DMV-PRO takes the average tempo. As you are tapping, you
will hear the new delay time and see its value in the Display. Repeat this process as often as necessary.
Repeat Hold infinitely loops the delayed sound. Play a phrase and then press the Encoder. The delayed
sound will repeat, at the rate of the delay time, until you press the Encoder again. When Repeat Hold is
activated, no other sound is allowed to go into the delay, so you can solo over the repeated phrase without
cluttering it up. Repeat Hold is not available while editing.
- 23 -
Rotary
The Rotary Spin High/Low option allows the Encoder to toggle the rotary speed between a high and low spin
rate (alternating with each Encoder press).
Smart Encoder Programming:
Smart Encoder operation is set with an effect’s parameters. To program Processor (A)’s Smart Encoder, first
select a preset with a Processor (A) effect and class that uses one of the Smart Encoder functions (see the
table above). For this tutorial, choose a preset that has a reverb effect in Processor (A) and then press the
Edit (A) button. If you’re in a Discrete 4 or Multi FX routing, make sure the Selection Arrow on the left is
pointing to the reverb effect before you press Edit. Now turn Processor (A)’s encoder to the right until [,
02
T"-#$0 ] appears in the LCD.
NOTE: When editing an effect that doesn’t have a Smart Encoder function, this parameter is not available.
By default, OFF is the value on the bottom line. To change this setting, press the encoder and turn it. The
available choices depend on the effect you are editing. For reverb effects, the only choice is [$4$0!
$12].
Using a Smart Encoder Function in Preset Mode:
After you have finished assigning processor (A)’s Smart Encoder function, return to Preset Mode by pressing
the Edit (A) button. Now, when you press and hold the Edit (A) button and then press Encoder (A), you will
trigger thus processor’s Smart Encoder function. In the case of reverb, pressing the encoder will trigger a
reverb impulse for testing the reverb’s sound.
Encoder (B)’s Smart Encoder functions can be assigned to work with Processor (B)’s effects, just repeat the
above steps for this processor. When you are done, don’t forget to save your Smart Encoder settings by
saving the preset.
NOTE: Smart Encoder functions can even be triggered from MIDI, in case you want to use their functionality
but are not near the unit. Just select the Smart Encoder function as the MIDI Parameter in the MIDI section of
a preset. See the previous tutorial (on page 19) for more information on a preset’s MIDI parameters.
- 24 -
Smart Encoder Functions while Editing Reverb, Delay, and Rotary Effects:
Smart Encoder functions are automatically set up to work while editing reverb, delay, and rotary effects. For
Reverb effects, a reverb impulse can be triggered while adjusting any of the reverb’s parameters; this helps
you hear the reverb changes as you are making them. To trigger an impulse while editing, simply press and
hold the Edit button of the corresponding processor and press the Encoder. As soon as the Encoder is
pressed, the impulse will fire. Repeat as often as necessary.
While editing delay effects, you can use the Encoder to tap in a new delay time. To do so, press and hold the
corresponding Edit button and press the Encoder at the desired tempo. The DMV-PRO keeps a running
average of the time between all taps and you will hear the new delay time and see its value in the LCD. The
Delay ±1ms and ±50ms parameters are automatically updated with the new delay time. Repeat this
procedure as often as necessary.
The Smart Encoder can also change the rotary effect’s spin rate while editing Wood Cabinet, Concert, Gated,
or Stereo Split rotary classes. To change speeds (between High and Low), press and hold the Edit button and
press the Encoder. The Rotor Speed parameter is automatically updated with the new setting.
- 25 -
THE DMV-PRO’s ADJUSTABLE PARAMETERS
DESCRIPTION OF ROUTINGS AND ENGINES
The DMV-PRO contains four engines that can be routed in four different ways. Our proprietary Dynamic Engine
Allocation (DEA™) technology ensures that all DSP horsepower is effortlessly configured for your routing choice.
Repeatedly press the Routing button to scroll through the four routings: Twin Stereo, Cascade, Discrete 4, and Multi
FX.
Twin Stereo:
This routing turns the DMV-PRO into two true-stereo
processors. Inputs #1 and #2 feed the first processor
(consisting of grouped Engines #1 and #2) and exit at Outputs
#1 and #2, and Inputs #3 and #4 feed the second processor
(consisting of grouped Engines #3 and #4) and exit at Outputs
#3 and #4. The left and right audio channels of each processor
remain separate, but any modulated parameter, such the LFO
Speed for a chorus, is linked for both channels. With reverbs,
however, the left and right channels are cross-coupled in time to realistically emulate an acoustic space—they
are NOT reduced to mono. For a non-cross-coupled and completely independent stereo reverb (one that
couldn’t exist in the real world), choose Discrete 4 routing and put two identical reverb programs in Engine #1
and Engine #2.
Cascade:
This routing feeds the output of one stereo processor
(grouped Engines #1 and #2) into another (grouped
Engines #3 and #4). It only uses Inputs and Outputs #1
and #2; Inputs and Outputs #3 and #4 are disabled. As
with Twin Stereo, the left and right audio channels of
each
processor
remain
parameters are linked.
- 26 -
separate,
but
modulated
Discrete 4:
This routing configures the DMV-PRO as four mono signal
processors. Each Input feeds its corresponding Output.
However, if any Input (except #1) does not have a jack
inserted, its input will be taken from the closest previous
input that has a plug inserted. For example, if the unit is in
Discrete 4 mode and ¼ inch plugs are only inserted into
Inputs #1 and #3, both Engines #1 and #2 will be fed from
Input #1’s signal and Engines #3 and #4 will be fed from
Input #3’s signal. Similarly, if just Input #1 has a plug
inserted, Engines #1, #2, #3, and #4 will all be fed from the signal at Input #1. This scheme allows for some
interesting processing options. For instance, if Engines #1 and #2 receive material only from Input #1 (just
one input jack inserted), and you are in Discrete 4 routing, you can create “unlinked” stereo effects such as
flangers and choruses with different sweep widths and rates in the left and right channels. You could even
create digital delays and reverbs with similarly unrelated, though “stereo-ized,” channels. Since Engines #3
and #4 are also being fed from the same Input (#1), you could use those engines for two more simultaneous
effects. Remember that each engine still feeds its corresponding output jack, regardless of where its input is
taken from.
Multi FX:
Multi FX routing uses the DMV-PRO’s processors to create a three-engine multi-effect chain. Since most
engines contain a separate effect, EQ, delay, and dynamics sensing section, the actual multi-effect lengths can
be quite long. This routing gives you tons of power to creatively shape your sound.
The Multi FX routing combines the signal from Inputs #1 and #2 and runs it in series through Engines #1 and
#2. The signal is then split and fed to both inputs of linked engines #3 and #4, which are running in true-stereo.
The signal from Engine #3 is sent to Output #1 and the signal from Engine #4 is sent to Output #2. Inputs and
Outputs #3 and #4 are not used. Processor (A) controls the two mono effects (Engines #1 and #2) and
Processor (B) controls the true-stereo effect group (Engines #3 and #4).
- 27 -
DESCRIPTION OF CLASSES
Each effect has six classes, which are effect variations. The class name generally denotes the application for
which the class was optimized. For example, The Vocal class of reverbs is designed to enhance voice-type
inputs. Descriptions of all effects and their classes begin on page 31. The following, though, are some class
generalizations:
Ducking classes use ramped dynamics processing to create smooth “ducking” effects, such as faded, leveldependant delays, choruses, and flangers.
Classic classes emulate the sound of instruments playing through vintage effects. Bandwidth is controlled to
give the effect a musical character. Some parameters are also linked and optimized to create the “classic”
sound and control action.
Concert classes are particularly well suited for live and general studio situations. They have an extended
bandwidth and wider/deeper sweeps. On reverbs, Concert classes have a fuller bottom end and a more “live”
character.
Gated classes contain an auxiliary gate to turn the effect on and off. With reverbs, this class allows for
forward/reverse gated reverb with no decay tail.
Dynamic classes modify certain parameters based on the DMV-PRO’s input level. For example, a Dynamic
Reverb varies the algorithm’s decay time in response to the input signal level. On swept effects, this class
produces triggered sweeps based on input level.
DESCRIPTION OF EFFECTS AND THEIR PARAMETERS
Common Parameters
The following parameters are available in every effect and consist of (Effect) Bypass, Effect Class, Mix, Low EQ, High
EQ, and the effect’s MIDI parameters:
Bypass:
This parameter allows you to bypass the effect you are editing; its choices are Effect Bypassed or Effect
Active. Each effect can be bypassed separately and complete presets can be stored and recalled with one or
more bypassed effects.
Effect Bypass is different from Global Bypass (which is invoked by pressing the front-panel Bypass button) in
that when you enable Global Bypass you are temporarily bypassing all effects of the whole unit, even as you
change presets. The Global Bypass setting is temporary—it cannot be stored. Press the Bypass button to
enable or disable Global Bypass.
- 28 -
Effect Class:
Classes are effect variations and are named after the applications they are optimized for. Each effect has six
classes and their names, sounds, and adjustable parameters vary based on the effect. (See page 31 for a
description of all effects and their classes.)
Mix
This parameter sets the ratio of unprocessed (dry) sound to processed (wet) sound, with a range from 0% to
100% (0 = all dry, 100 = all wet). Enabling Effect Bypass is equivalent to turning the Mix control to 0. If Dry Kill
is active, Mix sets the total output level of the DMV-PRO. (For information on Dry Kill, see page 10.) For
example, if Dry Kill is active and Mix is set to 0, no sound will come from the unit. Conversely, if Dry Kill is
active and Mix is set to 100, the highest effect output level is achieved.
Low EQ
An effect’s low equalization control is inline with the processed (wet) signal. It has a maximum bass boost/cut
amount of ±15 dB (in 1-dB steps) and is musically balanced with variable frequency points and a constant
slope. The boost characteristics of this curve favorably compensate for typical bass losses within audio
systems.
Boost (dB)
Bass Control
20
15
10
5
0
-5
-10
-15
-20
10
100
1000
10000
Frequency in Hz (Log Scale)
High EQ
Like the Low EQ, an effect’s high equalization control is also inline with the processed (wet) signal. It has a
variable slope with a maximum treble boost/cut amount of ±15 dB (in 1-dB steps).
- 29 -
Boost (dB)
Treble Control
20
15
10
5
0
-5
-10
-15
-20
100
1000
10000
Frequency in Hz (Log Scale)
100000
MIDI Parameters
Effects can have up to four controller assignments (designated a, b, c, and d) that can modify any of its
parameters in real-time. Each of the four assignments has separate settings for the following parameters: CC
Channel, MIDI CC Number, Parameter, Value Low Range, and Val. High Range. See the tutorial on page 21
for information on setting the controller assignments.
Effect Enabled
This control is available in effect-classes that have a dynamics sensing section. It sets the audio input level
that allows an effect to be heard and can work with signals either above or below a range of +5 to -24 dB (+5
dB = full scale). For example, when this control is set to ”Above -10,” the effect will only be heard when the
signal’s input level is above -10 dB. If set to “Below -10,” then the effect will only be heard when the signal’s
input level is below -10 dB. A value of “Always” is also available to engage the effect regardless of the input
dynamics.
- 30 -
&+$0%(55(9(5%
The Chamber Reverb simulates a reflective enclosure (perhaps made of wood or concrete) with a sound source at
one end and a microphone near the other. By varying the Size parameter from small to large, you can simulate
spaces as small as a shower stall and as large as an elevator shaft. This reverb is more reflective and has a more
defined echo characteristic than Halls or Rooms.
52205(9(5%
The Rooms in the DMV-PRO approximate the impulse responses of different types of “real” rooms. At large Size
settings, this algorithm simulates a large room such as a ballroom or a nightclub. At mid to small Size and Decay
settings, tighter spaces are realistically simulated, making it particularly useful for voiceovers. By simply varying one
or two parameters, you can quickly dial in just about any post-production, film, or overdub treatment.
+$//5(9(5%
The DMV-PRO’s Hall algorithms emulate actual concert halls. They are clean, open, and sit well in a mix. Echo
density starts out low and builds over time to a lush, balanced decay. This algorithm is excellent on mixed or
orchestral material and with long Decay settings. The Hall’s imaging is big, realistic, and allows for adding ambience
without cluttering the sound.
3/$7(5(9(5%
The Plate algorithm simulates a mechanical plate reverberator. Before the advent of digital reverbs, large metal plates
were suspended in frames to emulate reverberation. A plate reverb’s tone is distinctive; it’s dense and smooth, with
lots of highs and lows. These algorithms have a quick density build, which makes them the ideal choice for percussive
material. The thick density of plate reverbs allows them to be used at higher Size settings for those “really huge
space” sounds, without any clatter. They shouldn’t normally be used at low Size settings unless Decay is set very
short or unless you want an unnaturally dense, metallic type of special effect.
REVERB CLASSES:
Vocal
The Vocal Reverb class can be used to sweeten and enhance the intelligibility or breathy qualities of a sound,
particularly a vocal track. Bandwidth on longer decays is tailored to keep voices balanced in the tail. An
auxiliary gate is available to dynamically process the sound.
- 31 -
Instrument
The Instrument Reverb is tailored for most solo instruments to maintain their tonal quality. High frequency
decays are not limited and low frequencies are controlled to prevent muddiness. An auxiliary gate is available
to dynamically process the sound.
Concert
The Concert Reverb has a neutral high frequency response with a low frequency decay emphasis. It should
be used on sounds or mixes to simulate the “liveness” of a real acoustic location. An auxiliary gate is available
to dynamically process the sound.
Gated
The Gated Reverb class simulates a gated reverb impulse without actually using a noise gate; the effect is
produced within the algorithm. Therefore, both loud and soft sounds will benefit from the effect. This class
provides spaciousness without the clutter of a reverb decay tail.
Ambient
Ambient Reverb is used to capture the early-reflections that are part of reverberated sound. It is excellent for
creating close spaces, matching a dialogue to a room, and adding a sense of distance to close miking.
Though you can increase decay, the bandwidth is controlled to always unmask the early-reflections.
Dynamic
Dynamic Reverb uses input level to switch the Decay time from a minimum setting to a preset length. By
dynamically changing the Decay time you can get both an uncluttered sound and a lush, long reverberation
that is controlled by input level. This class has a flat bandwidth and can be adjusted over a wide range.
Vocal
Instrument
Concert
Gated
Ambient
Dynamic
Predelay
Size
Decay
Depth
Predelay
Size
Decay
Depth
Predelay
Size
Decay
Depth
Predelay
Size
Decay
Depth
Predelay
Size
Decay
Depth
Diffusion
/Density
Shape
Motion
Effect Enabled
Hold/Release
Diffusion
/Density
Shape
Motion
Effect Enabled
Hold/Release
Diffusion
/Density
Shape
Motion
Effect Enabled
Hold/Release
Predelay
Length
Envelope
Diffusion
/Density
Shape
Diffusion
/Density
Shape
Motion
Diffusion
/Density
Shape
Motion
Decay Enabled
Hold/Release
Motion
REVERB PARAMETERS:
Decay:
Sets the reverberation decay time from .3 to 28 seconds. Reverberation time is usually qualified as the
time it takes the reverberated sound to drop 60 dB in level. Depending on the chosen class, the sound’s
bass and treble components may have different decay rates. Typical Decay values range from
approximately 1 to 3 seconds. Shorter decays allow for “vocal ambience” treatments. Longer decays
- 32 -
(greater than 3 seconds) are usually used for “bigger than life” special effects. Both the Decay and Size
parameters should be used together to set the overall impression of the simulated space.
Decay Enabled:
In the Dynamic Class, this control sets the input level range that switches the Decay amount from the
preset value to 0. Signals that fall within this control’s setting (for example, above -10 dB) have the
programmed decay time, otherwise, the decay time is 0.
Depth:
Sets the listener’s position within the reverberant space. This parameter also varies the ratio of earlyreflections to later reverb. The Depth control’s range has 33 positions, from Front to Rear. Low numbers
correspond to placing the microphone close to the sound source and create a sharp attack. Higher
numbers emulate a mic placed further back in the hall, with a slower, swelling attack. When used with
percussive material on the Plate reverb (at reasonable Decay and Size settings), this control adjusts the
attack of the plate and how well it sits in the mix.
Like Size, this parameter gives you considerable control over the reverb’s sound. Normally you should set
Size, Decay, and Diffusion first, and then adjust Depth.
Diffusion (Density for the Plate Effect):
Controls the reverb’s initial echo density and the rate at which echo density builds over time. The range of
Diffusion is from 0 to 10, with 8 working well for most material. A low setting has little initial density and a
slow density build. Low settings improve clarity and openness on vocals and piano tracks. At a setting of
10, the reverb starts with a relatively dense sound that almost immediately builds to maximum density.
Higher settings are usually the best choice with percussive material.
Effect Enabled:
In Vocal, Instrument, and Concert classes, this control sets the audio input level that controls the gating
action of the effect. Signals that fall within this control’s setting (for example, above –10 dB) are heard and
ones that are not are muted.
Envelope:
Sets the overall envelope of the gated reverb in 33 positions, from forward to reverse. For an even
stronger reverse reverb effect, set Envelope to a high setting.
Hold/Release:
On Vocal, Instrument, and Concert classes, the reverb can be gated in or out depending on a preset
audio input level. Hold/Release sets how fast this “gating” occurs. The Hold range is from 5 ms to 2
seconds and the Release range is from 10 ms to 2 seconds.
In the Dynamic class, Hold/Release sets the time that it takes the reverb to go from a minimum decay to
the preset decay time, depending on the audio level. The range of the Dynamic class’ Hold/Release
control is the same as above.
- 33 -
Length:
Sets the length of the gated reverb, from 50 to 500 milliseconds.
Motion:
Sets the movement of the reverberation tail. This control is used to help make long decay times sound
more natural. When turned on, this control’s range is from 1 to 9 and is normally set at 1, producing a very
subtle effect. A setting of OFF turns this control off. You can increase Motion if long Decay times sound
periodic. However, at high settings, a perceived ‘wobbling’ in the reverb tail may be noticed on some
instruments. Use care in applying this parameter.
Predelay: Sets the amount of delay that occurs before the reverberator. It can be adjusted from 0 to 255 milliseconds
in 1-millisecond steps. Predelay is primarily used to maintain intelligibility by moving the start time of the
reverberant sound in relation to the dry signal. Typical predelay values are from 0 to 35 milliseconds.
Increasing this parameter adds apparent depth to the image, up to the point where it becomes an obvious
slap delay/reverb effect at 255 milliseconds.
Shape:
Controls extra early-reflection delays that are used to modify the reverb envelope’s contour. This
parameter has 32 positions that range from short delay times with a forward envelope, to long delay times
with a reverse envelope. Use low Shape settings to modify the initial attack envelope. With settings from 7
to 23, the attack envelope stays constant, but spreads out in time. Settings above 23 create longer delays
and a reverse slap.
Use this control to further shape the front-end of your hall or to create distant echo effects. Normally you
should set Predelay, Size, Diffusion, Decay, and Depth before you adjust Shape since its added delays
are not part of the main reverberator and should only be used for auxiliary reflections and special effects.
Size:
Sets the overall size of the reverberant space, from 15 to 150 feet. This single control affects multiple
components of the algorithm and should be adjusted first when building a totally new reverb sound. It also
has a greater effect on the perceived acoustic space than any other parameter.
Large Size settings create bigger spaces, longer delays between reflections, lower running echo density,
and lower tonal coloration. Small Size settings simulate tighter spaces that are smooth with a high echo
density. Small Sizes should only be used in conjunction with short decay time settings or they may
sound tonal or metallic. When building a new sound, a value of 75 is a good starting point.
- 34 -
',*,7$/'(/$<
These algorithms delay a signal in time. The maximum delay length, per channel, is 1.25 seconds. Up to twelve delay
taps are available and can be equally and unequally spaced within the span of the delay length. Some delay classes
have dynamics sensing, which can use input level to switch the effect in and out or change the Regeneration value.
The Ambient class creates a special miked-speaker simulation.
DELAY CLASSES:
Ducking
The Ducking Delay is the traditional digital delay effect with the addition of dynamics sensing, which can be
used to fade the effect in and out when the Effect Enabled (threshold) setting is crossed. The Attack/Release
control sets the effect’s fade time.
Classic
This class recreates the sound of the “classic” digital delay. Regeneration bandwidth is controlled to produce
the characteristic sound and to emphasize the most recent material.
Concert
The Concert Delay is full-featured with extended regeneration bandwidth.
Gated
The Gated Delay is the traditional digital delay effect with the addition of dynamics sensing, which can be
used to duck the effect in and out depending on the Effect Enabled parameter’s setting.
Mic Placement
This class is a specialized multi-tap delay system for creating
Ca
S iz b in
e et
stereo images. It can simulate close and far miking techniques.
With small Cabinet Size settings, this algorithm emulates a close
miked stereo speaker cabinet. With large Cabinet Size settings,
you can realistically simulate the miking of a wide speaker array,
such as when recording a live concert. This class is not
available with a mono routing.
c
M i nce
ta
D is
M ic P o s
it io n
M ic n
r a t io
S epe
To r ig
ht ou
tp u t
To l e
ft o u t
put
- 35 -
Dynamic
The Dynamic Delay uses input level to switch the Regeneration amount between its preset value and 0.
DUCKING
CLASSIC
CONCERT
GATED
MIC PLACEMENT
DYNAMIC
Delay ±1ms
Delay ±50ms
Regeneration
Number of Taps
Shape of Taps
Effect Enabled
Attack/Release
Delay ±1ms
Delay ±50ms
Regeneration
Number of Taps
Shape of Taps
Delay ±1ms
Delay ±50ms
Regeneration
Number of Taps
Shape of Taps
Delay ±1ms
Delay ±50ms
Regeneration
Number of Taps
Shape of Taps
Effect Enabled
Mic Distance
Cabinet Size
Mic Separation
Mic Position
Delay ±1ms
Delay ±50ms
Regeneration
Number of Taps
Shape of Taps
Regen Enabled
Attack/Release
DELAY PARAMETERS:
Attack/Release:
In the Ducking class, this control sets the fade time of the effect after it has been dynamically triggered. In
the Dynamic class, it sets the time taken for the Regen parameter to switch between the preset amount
and a value of 0, depending on audio level. The Attack range is 1 ms to 11.8 seconds and the Release
range is from 50 ms to 1.18 seconds.
Cabinet Size:
This parameter sets the size of the simulated speaker cabinet. The adjustable dimensions are from 2 X 2
feet to 52 X 14.5 ft.
Delay ±1ms:
Changes the delay time in 1-millisecond steps. The total amount of delay, per effect, is 1.25 seconds.
Delay ±50ms:
Changes the delay time in 50 millisecond steps.
Effect Enabled:
In Ducking and Gated classes, this control sets the audio input level that controls the gating action of the
effect. Signals that fall within this control’s setting (for example, above –10 dB) are heard and ones that are
not are muted.
Mic Distance:
This parameter sets the distance of the “microphones” to the simulated speaker cabinet. This control is set
in feet and its range is based on the Cabinet Size setting.
Mic Position
In the Mic Placement class, this parameter sets the horizontal and vertical positioning of the “microphones”
in front of the simulated speaker cabinet. This control is set in feet and its range is based on the Cabinet
Size setting. Arrow characters (↑ & →) are used to designate the vertical (↑) and horizontal (→) positioning,
- 36 -
starting from the bottom-left speaker. An ‘S’ at the end of the line indicates that both mics pick up sound
from both speakers as with normal Stereo miking. An ‘M’ at the end of the line indicates that both mics are
acting in Mono and are sonically isolated from the opposite speaker. In other words, the left microphone
only picks up sound from the left speaker and the right microphone only picks up sound from the right
speaker. Of course, the ‘M’ mode couldn’t really exist in nature, but it can produce interesting sonic results.
Mic Separation:
Sets the separation between the two microphones, from 0 to 2.2 feet.
Number of Taps:
Sets the number of delay taps taken over the course of the delay length. Up to 12 taps are available in the
amplitude and time pattern set by the Shape of Taps control.
Regen Enabled:
In the Dynamic Class, this control sets the input level range that switches the Regeneration amount from
the preset value to 0. Signals that fall within this control’s setting (for example, above –10 dB) have the
programmed Regeneration amount, otherwise, Regeneration is set to 0.
Regeneration:
Sets the amount of delay feedback, from -99% to +100%. Negative numbers correspond to inverted
feedback.
Shape of Taps:
This parameter sets the spacing, or shape, of the delay taps in both mono and stereo (L/R) patterns. Stereo
taps are designated with an (L/R) in the LCD and are not available with mono routings.
- 37 -
3,7&+75$16326(5
The Pitch Transposer (PT) algorithm can change the base-pitch of a sound. Each PT class contains an auxiliary
digital delay that feeds back into the pitch-shift to create falling or rising pitch effects. Some classes also have
dynamics sensing, which can use input level to switch the effect in and out or trigger the Whammit! effect (see below).
PITCH CLASSES:
Micro 2 Voice
Micro 2 Voice is the ultimate double tracking algorithm. This class’ range of transposition is restricted to ±1.27
half steps, but its transport delay is extremely short, which is perfect for creating doubling or thickening
effects. By taking advantage of the short transport delay and setting a small amount of pitch shift with
regeneration, you can also create “barber pole” flanging effects. This class contains two pitch transposers;
each of which is sent to a separate output. Of course, when used in a mono routing (Discrete 4 or Multi FX),
there is just one PT available.
Classic
This class is optimized for guitar use and emulates the sound of the “classic” pitch transposer. Bandwidth is
controlled to help produce the characteristic sound.
Concert
The Concert PT is full-featured with extended bandwidth.
Gated
The Gated PT contains dynamics sensing that can fade the transposed sound in and out depending on the
Effect Enabled parameter’s setting. The Fade Time parameter sets the envelope release time.
Full 2 Voice
This class contains two pitch transposers. Each transposed channel is sent to a separate output. When
used in a mono routing, this class produces a brighter, one-channel version of the Concert PT.
Whammit!
This class will smoothly glide up or down to the desired transposition amount when the Effect Enabled
parameter’s level is crossed. Fade Time sets the glide rate.
Micro 2 Voice
Classic
Concert
Gated
Full 2 voice
Whammit!
Delay ±1ms
Delay ±50ms
Pitch 1
Pitch 2
Regeneration
Buffer Size
Delay ±1ms
Delay ±50ms
Pitch
Regeneration
Buffer Size
Delay ±1ms
Delay ±50ms
Pitch
Regeneration
Buffer Size
Delay ±1ms
Delay ±50ms
Pitch
Regeneration
Buffer Size
Effect Enabled
Fade Time
Delay ±1ms
Delay ±50ms
Pitch 1
Pitch 2
Regeneration
Buffer Size
Delay ±1ms
Delay ±50ms
Pitch
Regeneration
Buffer Size
Effect Enabled
Fade Time
- 38 -
PITCH PARAMETERS:
Buffer Size:
This control sets the loop length and splicing characteristics of the PT. Two of the four settings, SmoothLong and Smooth-Short, are optimized for the smoothest sound, but need a fixed amount of transport
delay. The other two settings, Smart-Long and Smart-Short, utilize a looping technique that varies the
amount of transport delay based on the Pitch setting. Short transport delays work best on percussive
material, but may sound rough at large Pitch settings or with sustained material. Use your ears to determine
which Buffer Size setting is the best for the current application.
Delay ±1ms:
Changes the predelay time in 1-millisecond steps. The total amount of predelay is 1 second (1000 ms.)
Delay ±50ms:
Changes the predelay time in 50 millisecond steps.
Effect Enabled:
In the Gated class, this control sets the audio input level that controls the gating action of the effect. Signals
that fall within this control’s setting (for example, above –10 dB) are heard and ones that are not are muted.
Whammit! class uses the DMV-PRO’s dynamics sensing to trigger a pitch-glide effect. When a signal falls
within this control’s setting, it will glide to the programmed transposition amount (at the length of time set
with the Fade Time control). The signal remains transposed until its level is no longer within this control’s
range.
Fade Time:
With the Gated class, this control sets the fade time of the effect after it has been dynamically triggered. In
the Whammit! class, Decay sets the amount of time it takes the effect to glide to and from its target pitch
after being dynamically triggered. This control follows a linear curve and its range is from 0 (short) to 31
(long).
Pitch, Pitch 1, and Pitch 2:
Sets the amount of pitch transposition with a range between 12.7 half steps up or down (±1.27 half steps in
Micro 2 Voice class). This range has an extra setting of -24 half steps to produce two-octave bass-doubling
effects. In Micro 2 Voice class, the extra setting goes to -2.4. Pitch 2 is not available in mono routings.
Regeneration:
Sets the amount of delay feedback, from 0 to 99%.
- 39 -
02'8/$7('())(&76
Chorus, flanger, phaser, tremolo, and panner are modulated effects. They use a Low Frequency Oscillator (LFO) to
sweep certain aspects of the effect’s sound. LFO Speed determines the movement (sweep) rate and the LFO Shape
determines the sweep pattern. Some of the classes have dynamics sensing, which can use input level to switch the
effect in and out or trigger the LFO.
&+2586
Chorus is an effect that mixes a signal with slightly detuned copies to produce a rich, moving texture. The chorus
effect is strongest when Mix is set to 50.
)/$1*(5
The Flanger sweeps harmonically spaced filter notches through a signal’s spectrum. The flanger effect is strongest
when Mix is set to 50.
3+$6(5
The Phaser effect sweeps non-harmonically spaced notches through a signal’s spectrum. The phaser effect is
strongest when Mix is set to 50.
75(02/2
Tremolo is a volume effect that fades a signal’s level in and out.
3$11(5
The Panner is a stereo effect that alternately raises and lowers the volume of the left and right channels. Since this is
a stereo effect, it is not available in a mono routing.
MODULATED EFFECT CLASSES:
Ducking
The Ducking class recreates traditional late-70’s effects with the addition of dynamics sensing, which can be
used to fade an effect in and out when the Effect Enabled parameter’ setting is crossed. The Attack/Release
parameter controls the effect’s fade times.
- 40 -
Classic, Jazz Chorus, MXR “Grey,” and MXR “Phase 90,”
These classes recreate the sound of the “classic” effects. The LFO parameters and sometimes Bandwidth are
controlled to produce the characteristic sound and control action. For example, as LFO Speed is increased,
Width is automatically adjusted within a musical range. The MXR “Phase 90” is a 2-notch Phaser.
Concert and MXR “Phase 100”
These classes create high-end, studio effects. They are the full-blown effects with extended bandwidth and
less linking between LFO Width and Speed. The MXR “Phase 100” is a 5-notch Phaser.
Gated
The Gated class adds dynamics sensing to the effects, which can be used to duck them in and out depending
on the Effect Enabled setting. The Gated Phaser is a 2-notch Phaser.
“Boston” Effects
The “Boston” classes create “spatial” effects that can process the difference information in a stereo mix.
Difference information is the part of a mix that does not occur equally in both of the stereo channels, often
such as guitars, backing vocals, and reverb tails. Instruments like lead vocals, bass, and some drums are
often mixed to the center, creating the common information (common between the left and right channels).
These algorithms process either the difference information or the full mix (consisting of both difference and
common information), depending on the Difference Factor setting (see below). Try Factory Preset numbers
48, 58, 68, 84, and 89 with your favorite CDs and then on your own stereo tracks or mixes. Due to their stereo
nature, these classes are not available in Discrete 4 routing.
Dynamic
The Dynamic effects can trigger the LFO through one cycle of its sweep when the input signal crosses above
the level setting of the Effect Enabled parameter.
MXR DUCKING
JAZZ CHORUS
CONCERT
GATED
“BOSTON” CHORUS
DYNAMIC
Delay ±1ms
Delay ±50ms
LFO Rate
LFO Width
LFO Shape
LFO Offset
Effect Enabled
Attack/Release
Delay ±1ms
Delay ±50ms
LFO Rate
LFO Width
LFO Shape
LFO Offset
Delay ±1ms
Delay ±50ms
LFO Rate
LFO Width
LFO Shape
LFO Offset
Delay ±1ms
Delay ±50ms
LFO Rate
LFO Width
LFO Shape
LFO Offset
Effect Enabled
Delay ±1ms
Delay ±50ms
LFO Rate
LFO Width
LFO Shape
LFO Offset
Difference Factor
Delay ±1ms
Delay ±50ms
LFO Rate
LFO Width
LFO Shape
LFO Offset
Sweep Start
MXR DUCKING
MXR “GREY”
CONCERT
GATED
“BOSTON” FLANGE
DYNAMIC
Delay ±1ms
Delay ±50ms
LFO Rate
LFO Width
Regeneration
LFO Shape
LFO Offset
Effect Enabled
Attack/Release
Delay ±1ms
Delay ±50ms
LFO Rate
LFO Width
Regeneration
LFO Shape
LFO Offset
Delay ±1ms
Delay ±50ms
LFO Rate
LFO Width
Regeneration
LFO Shape
LFO Offset
Delay ±1ms
Delay ±50ms
LFO Rate
LFO Width
Regeneration
LFO Shape
LFO Offset
Effect Enabled
Delay ±1ms
Delay ±50ms
LFO Rate
LFO Width
Regeneration
LFO Shape
LFO Offset
Difference Factor
Delay ±1ms
Delay ±50ms
LFO Rate
LFO Width
Regeneration
LFO Shape
LFO Offset
Sweep Start
- 41 -
5-Notch Ducking
MXR “Phase 90”
MXR “Phase 100”
Gated
“Boston” Phaser
Dynamic
Delay ±1ms
Delay ±50ms
LFO Rate
LFO Width
Regeneration
LFO Shape
LFO Offset
Effect Enabled
Attack/Release
Delay ±1ms
Delay ±50ms
LFO Rate
LFO Width
Regeneration
LFO Shape
LFO Offset
Delay ±1ms
Delay ±50ms
LFO Rate
LFO Width
Regeneration
LFO Shape
LFO Offset
Delay ±1ms
Delay ±50ms
LFO Rate
LFO Width
Regeneration
LFO Shape
LFO Offset
Effect Enabled
Delay ±1ms
Delay ±50ms
LFO Rate
LFO Width
Regeneration
LFO Shape
LFO Offset
Difference Factor
Delay ±1ms
Delay ±50ms
LFO Rate
LFO Width
Regeneration
LFO Shape
LFO Offset
Sweep Start
Ducking
Classic
Concert
Gated
“Boston” Trem.
Dynamic
Delay ± 1ms
Delay ± 50ms
LFO Rate
LFO Width
LFO Shape
Effect Enabled
Attack/Release
Delay ± 1ms
Delay ± 50ms
LFO Rate
LFO Width
LFO Shape
Delay ± 1ms
Delay ± 50ms
LFO Rate
LFO Width
LFO Shape
Delay ± 1ms
Delay ± 50ms
LFO Rate
LFO Width
LFO Shape
Effect Enabled
Delay ± 1ms
Delay ± 50ms
LFO Rate
LFO Width
LFO Shape
Difference Factor
Delay ± 1ms
Delay ± 50ms
LFO Rate
LFO Width
LFO Shape
Sweep Start
Ducking
Classic
Concert
Gated
“Boston” Panner
Dynamic
Delay ± 1ms
Delay ± 50ms
LFO Rate
LFO Width
LFO Shape
LFO Offset
Effect Enabled
Attack/Release
Delay ± 1ms
Delay ± 50ms
LFO Rate
LFO Width
LFO Shape
LFO Offset
Delay ± 1ms
Delay ± 50ms
LFO Rate
LFO Width
LFO Shape
LFO Offset
Delay ± 1ms
Delay ± 50ms
LFO Rate
LFO Width
LFO Shape
LFO Offset
Effect Enabled
Delay ± 1ms
Delay ± 50ms
LFO Rate
LFO Width
LFO Shape
Difference Factor
Delay ± 1ms
Delay ± 50ms
LFO Rate
LFO Width
LFO Shape
LFO Offset
Sweep Start
Attack/Release:
This parameter is used in Ducking classes and sets the amount of time it takes the effect to fade in and out
after the Effect Enabled level setting is crossed. The Attack range is 1 ms to 11.8 seconds and the Release
range is from 50 ms to 1.18 seconds.
Delay ±1ms:
Changes the predelay time in 1-millisecond steps. The total amount of predelay is 1 second (1000 ms.)
Delay ±50ms:
Changes the predelay time in 50 millisecond steps.
Difference Factor:
When the “Boston” Class of effect is selected, this parameter sets the Difference Factor, which determines
how much difference information (from a stereo mix) is processed by the Ambient algorithm. The Difference
Factor range is from 0 to 60. Normally, this parameter should be used at its highest setting (60), to only
process the difference material. At low settings, the effect processes the full mix (made up of both
difference and center information). Low settings help to strengthen the effect on material that has a weak, or
mostly mono, image.
- 42 -
Effect Enabled:
In Ducking and Gated classes, this control sets the audio input level that controls the gating action of the
effect. Signals that fall within its setting (for example, above –10 dB) are heard and ones that are not are
muted.
LFO Offset:
Controls the LFO phase difference (in 30° increments) between the two outputs of an engine group
(Outputs #1 and #2, or Outputs #3 and #4). A setting of 0° creates a mono sweep, where both channels’
LFOs start at 0° (low). Any setting other than 0° will offset the second channel’s LFO by that many degrees.
Use this control to create unevenly swept effects. This parameter is not available with mono effects.
Note: With the panner effect, an offset of 180° is not allowed since that would turn the panning effect into a
tremolo effect, where one channel’s LFO starts at 0° (low) and the other channel’s LFO, offset by 180°,
starts at 360° (also equal to 0°, or low). Both channels’ level would rise and fall at the same time. To obtain
the equivalent of a 180° offset, use the actual Tremolo effect.
LFO Shape:
Sets the LFO’s sweep pattern. This parameter’s choices are exponential, sine, triangle, rectified sine,
inverted rectified sine, square, ramp, and inverted ramp. See page 50 for graphs of the various LFO
shapes. Exponential is not available for panner and tremolo.
LFO Speed:
Sets the speed of the LFO between 0 and 10.5 Hz. (cycles per second).
LFO Width:
Sets the width of the LFO’s sweep, from 0% to 100%.
Regeneration:
Sets the amount of feedback, from -99% to +100%. Negative numbers correspond to inverted feedback.
Sweep Start:
Dynamic class uses the DMV-PRO’s dynamics sensing to trigger the LFO through one cycle of its sweep
(at the preset LFO Speed and Width). The LFO is only triggered when the audio level exceeds the Sweep
Start setting. Two qualifiers before the level setting—Low and High—determine whether the LFO starts at
its low or high range. For example, a flanger can be swept up or down. The Low and High settings
determine whether the LFO starts “High” and sweeps down, or if it starts “Low” and sweeps up after the
Sweep Start level is exceeded.
- 43 -
527$5<
The Rotary effect simulates a 2-way rotating-speaker cabinet with a built in crossover network. Rotating speakers are
traditionally used with electric organs, but contemporary uses include with guitars, vocals, drums, and just about any
sound that needs some added motion. Since this effect creates a stereo simulation, it is not available with mono
effects. The rotary effect gives you control over rotor speed, stereo spread, spin up time, spin down time, and volume
mix between the rotating low and high speakers. Some classes also contain dynamics sensing for level-based
ducking and speed control.
ROTARY CLASSES:
Auto Switch
This class a full-featured rotary simulation that automatically switches between high and low spin rates. This
produces a rotary effect that is always changing. The Vocal Rotary will spin up for the length of the Spin Up
Time and then immediately start spinning down. After the programmed Spin Down Time, the effect will repeat
the process and again start spinning up. There is no need to manually switch between low and high
settings—this class is always moving.
Wood Cabinet
This class simulates dual rotating speakers enclosed inside a wood cabinet. It has less “room” sound and is
more focused than the Concert class. Try this class with percussive material.
Concert
The Concert Rotary is the full-featured rotary simulation. It has the widest image and spin.
Gated
The Gated Rotary is the Concert Rotary effect with the addition of dynamics sensing, which can be used to
duck the effect in and out depending on input level.
Stereo Split
This class splits the effect into its low speaker and high horn components and then sends each to a separate
output. The low speaker is sent to Output #1 (or Output #3, depending on which engine you are using) and
the high horn is sent to Output #2 (or Output #4).
Dynamic
The Dynamic Rotary uses dynamics sensing to automatically switch between low and high speeds.
- 44 -
Auto Switch
Wood Cabinet
Concert
Gated
Stereo Split
Dynamic
Spin Up Time
Spin Down Time
Low/High Mix
Speed Adjust
Stereo Spread
Spin Up Time
Spin Down Time
Low/High Mix
Speed Adjust
Rotor Speed
Stereo Spread
Spin Up Time
Spin Down Time
Low/High Mix
Speed Adjust
Rotor Speed
Stereo Spread
Spin Up Time
Spin Down Time
Low/High Mix
Speed Adjust
Rotor Speed
Stereo Spread
Effect Enabled
Spin Up Time
Spin Down Time
Low/High Mix
Speed Adjust
Rotor Speed
Stereo Spread
Spin Up Time
Spin Down Time
Low/High Mix
Speed Adjust
Stereo Spread
Dynamic Speed
ROTARY PARAMETERS:
Dynamic Speed:
Dynamic class can automatically switch between low and high rotor speeds, based on input level. The High
and Low qualifiers determine the rotor speed when the input level exceeds this control’s setting; otherwise,
the rotor speed is at the opposite setting.
Effect Enabled:
In the Gated class, this control sets the audio input level that controls the gating action of the effect.
Signals that fall within this control’s setting are heard and ones that are not are muted.
Low/High Mix:
Sets the volume mix between the rotating low speaker and high horn. The range of this control is from
0 / 100 to 100 / 0, with the ratio representing the percentage of low speaker to high horn.
Rotor Speed:
This parameter is used in Wood Cabinet, Concert, Gated, and Stereo Split classes and determines which
speed (either High or Low) you are currently listening to.
Speed Adjust:
Offsets the high and low rotor speeds, from 50% to 200%. The normal rotary speed is achieved when this
setting is at 100%, but it is adjustable from one half to two times as fast.
Spin Down Time:
Controls the amount of time it takes to go from a high spin rate to a slow spin rate. The range of this control
is from 0 to 20 seconds.
Spin Up Time:
Controls the amount of time it takes to go from a slow spin rate to a high spin rate. The range of this control
is from 0 to 20 seconds.
Stereo Spread:
Sets the stereo-width of the effect. The control has 11 positions, from Mono to Full. When set to Full, the
outputs are full stereo and as this control is decreased, the outputs become mono.
- 45 -
MIDI/UTIL PARAMETERS
The MIDI/Util Parameters affect the whole unit are set in MIDI/Util Mode. To access this mode, press the MIDI/Util
button, then turn the Preset Encoder to scroll both LCDs through their separate list of parameters. To change the
value of any parameter, turn its corresponding Processor Encoder. Changes to MIDI/Util parameters take effect
immediately and do not have to be saved. To exit MIDI/Util mode, press the MIDI/Util button again.
CHANNEL NUMBER / MIDI DUMP
Channel Number
MIDI Dump
This parameter sets the MIDI channel on which the
From this menu, press the Edit (B) button, to perform a
DMV-PRO will transmit SysEx messages and receive
MIDI Dump. While the information is being sent, both
both program change and SysEx messages. The MIDI
LCDs
Channel can be set between 1 and 16, or to ALL, for
2
Omni mode. Turn Encoder (A) to change values. If you
complete.
will
read:
[0
T1,(22(T&
]. It may take a few seconds for the operation to
select ALL, the DMV-PRO will receive program change
and SysEx data on all 16 MIDI channels, but it will only
NOTE: Individual presets and the MIDI Map can be
send out SysEx messages on Channel 1. The MIDI
dumped or loaded separately if the operation is initiated
Channel is automatically saved whenever it is changed,
by an external MIDI device such as a sequencer of
so when you are done, turn the Preset Encoder to view
external controller. See page 51 for more information
another MIDI/Util parameter or press the MIDI/Util
on the DMV-PRO’s MIDI implementation.
button to exit this mode.
MIDI MAP
To set the DMV-PRO’s MIDI Map, turn Encoder (A) to select an incoming MIDI program change number that you wish
to map. This control’s range is from 1 to 128. Turn Encoder (B) to set the corresponding DMV-PRO preset number
that will be recalled when that program change number is received. The range of preset numbers is from 1 to 100, or
OFF to disable the program change number from recalling any DMV-PRO preset. Repeat this process to map other
program change numbers.
NOTE: While setting the MIDI Map, you can also conveniently set the incoming program change number (in LCD (A))
by sending an external MIDI program change message on the DMV-PRO’s MIDI channel. The DMV-PRO will not
- 46 -
internally change patches when this happens; it just sets LCD (A)’s program change number to the number that it
receives.
DRY KILL / GLOBAL MIX
Dry Kill
Global Mix
Dry Kill is used when running the DMV-PRO with a
Global Mix is a convenient way to set each preset’s Mix
mixing board in a send/return fashion. (For a complete
parameter to a certain value. Global Mix is only
description, see page 10.) To enable or disable Dry Kill,
accessible when Dry Kill is off. LCD (B) displays the
turn Encoder (A) to switch the bottom line of LCD (A)
Global Mix setting; by turning Encoder (B), you can turn
between ON and OFF. If Dry Kill is on, the effect’s dry
Global Mix OFF or set it to a percentage between 0 and
path is disabled. If Dry Kill is off, dry sound is allowed
100.
to pass and each preset’s Mix control governs the ratio
of dry and wet signal.
NOTE: The Dry Kill state is retained when turning the DMV-PRO on and off. The Global Mix state, however, is not
retained; the unit defaults to each preset’s stored Mix level when power is turned on.
LCD VIEW ANGLES / FACTORY RESET
LCD View Angle
Factory Reset
This parameter optimizes the viewing angle for the
To restore all presets to their original factory settings,
DMV-PRO’s two LCDs. Turn Encoder (A) until the text
press the Edit (B) button and then press it again after
on the LCDs is the clearest.
LCD (B) reads [0$11
$1$2 :].
You will see
#(2 2- "-T%(0,
)$
in the Preset Display
after the Factory Presets have been restored. If any
other button is pressed at the prompt except for Edit, or
if it is not pressed again within 10 seconds, the DMVPRO will exit from Factory Reset mode (with your
former presets still intact).
- 47 -
REFERENCE: DMV - PRO Factory Preset List
# Name
TOP 19
1 Big Stereo Reverb
2 Tight Stereo Reverb
3 Gated Stereo Reverb
4 Sideways Reverb
5 Big Echo Hall
6 Horror Film
7 Nonlinear Delay 1
8 Rotary
9 Tense Rotary
10 Bass Phaser
11 Phaser 1
12 Phaser 2
13 Water Guitar
14 Flanger 1
15 Flanged Tails
16 Barber Pole Flanger
17 Chorus 1
18 Chorus 2
19 Slight Vibrato
REVERB
20 Ducking Delay → Rvb
21 Reverb FX 2
22 Reverb FX 3
23 MONDO Verb
24 Voice Over
25 Jumping Verb
26 Gated Reverb 1
27 Gated Reverb 2
28 Reverse
29 Four Reverbs
ROTARY:
30 Low Rotary
31 High Rotary
32 Dynamic Rotary
33 Gated Rotary
34 Room Rotaries
35 Subtle Spins
36 Split Rotary
37 Much Motion
38 Rotary Tails
39 Mellow Rotor
PHASER:
40 2X Phaser
41 MXR Phase 90, 100
42 Small Stoned Rhode
43 Mellow Hall
44 Light & Wide
45 Water Guitar 2
46 Phased Tails
47 Almost Stuck P.
48 Boston (L-R) Phaser
49 Four Phasers
Routing
Twin Stereo
Twin Stereo
Twin Stereo
Discrete 4
Multi FX
Multi FX
Discrete 4
Cascade
Cascade
Cascade
Twin Stereo
Cascade
Cascade
Cascade
Cascade
Cascade
Twin Stereo
Cascade
Cascade
In/Out 1
In/Out 2
Concert Hall
Instrument Plate
Gated Plate
Reverb 1 L
Reverb 1 R
Delay → Flanger → Stereo Hall
Pitch → Pitch → Stereo Chorus
Delay 1 L
Delay 1 R
Rotary → Reverb
Vocal Pitch → Vocal Rotary
Phaser → Phaser
Fast Stereo Phaser
Phaser → Reverb
Phaser → Reverb
Flanger → Reverb
Reverb → Flanger
Reverb → Vocal Pitch
Slow Chorus
Chorus → Reverb
Chorus → Reverb
Cascade
Ducking Stereo Delay → Reverb
Cascade
Stereo Reverb → Stereo Reverb
Cascade
Phaser → Reverb
Cascade
Reverb → Reverb
Twin Stereo
Plate Reverb
Multi FX
Phaser → Hall → Stereo Delay
Twin Stereo
Gated Class
Twin Stereo
Reverb + Noise Gate
Cascade
Non-linear Delay → Reverb
Discrete 4
Reverb 1
Reverb 2
Cascade
Cascade
Cascade
Cascade
Twin Stereo
Cascade
Cascade
Cascade
Cascade
Cascade
Rotary → Reverb
Rotary → Reverb
Rotary → Reverb
Rotary → Reverb
Fast Rotary
Rotary → Reverb
Rotary → Reverb
Reverb → Reverb
Reverb → Reverb
Rotary → Reverb
Cascade
Phaser → Phaser
Twin Stereo
Stereo Phaser
Multi FX
Phaser → Tremolo → Stereo Hall
Cascade
Phaser → Hall Reverb
Discrete 4
Phaser 1 L
Phaser 1 R
Cascade
Phaser → Reverb
Cascade
Reverb → Phaser
Cascade
Phaser → Phaser
Twin Stereo
Ambient Phaser
Discrete 4
Phaser 1
Phaser 2
- 48 -
In/Out 3
In/Out 4
Instrument Plate
Gated Plate
Concert Hall
Reverb 2 L
Reverb 2 R
Delay 2 L
Delay 2 R
Slow Stereo Phaser
Fast Chorus
Room Reverb
Reverb + Noise Gate
Gated Class
Reverb 3
Reverb 4
Slow Rotary
Stereo Phaser
Phaser 2 L
Phaser 2 R
Ambient Flanger
Phaser 3
Phaser 4
Chorus
50 Wide Rhode
Multi FX
51 MXR "Yellow"
Twin Stereo
52 Tri-Chorus
Multi FX
53 Direct Strat
Multi FX
54 Warm Space
Cascade
55 Chorus Spread
Discrete 4
56 2X Chorus
Cascade
57 Big Chorus + Reverb Cascade
58 Boston (L-R) Chorus Twin Stereo
59 Four Choruses
Discrete 4
Flanger
60 2X Flanger
Cascade
61 MXR Flanger
Twin Stereo
62 Reverb FX 1
Cascade
63 12 String
Multi FX
64 Hybrid 1
Cascade
65 Hybrid 2
Cascade
66 Light Flange
Twin Stereo
67 Almost Stuck F.
Cascade
68 Boston (L-R) Flanger Twin Stereo
69 Four Flangers
Discrete 4
Delay
70 3.75 sec Delay
Multi FX
71 Filtered Regen 1
Cascade
72 Filtered Regen 2
Cascade
73 Nonlinear Delay 2
Discrete 4
74 Percussion Surround1 Cascade
75 Miked Amp Cabinet
Twin Stereo
76 Arp Delay
Multi FX
77 Percussion Surround2 Cascade
78 A & E Ringers
Discrete 4
79 Four Delays
Discrete 4
Panner
80 Slow Panner
Cascade
81 Crazy
Cascade
82 Panned Tails
Cascade
83 Vocal Eliminator (L-R) Twin Stereo
84 Boston (L-R) Panner Twin Stereo
Tremolo
85 Slow Tremolo
Cascade
86 Tremolo
Cascade
87 Wasteland
Cascade
88 2:1 Tremolo
Discrete 4
89 Boston (L-R) Tremolo Twin Stereo
Pitch
90 Barber Pole Flange
Twin Stereo
91 Double Tracker
Cascade
92 Arpeggio
Discrete 4
93 AC/DC
Twin Stereo
94 Fat Jazz
Multi FX
Combos / Misc.
95 Quad FX 1
Discrete 4
96 Quad FX 2
Discrete 4
97 Quad FX 3
Discrete 4
98 Ripples
Cascade
99 Nose Hall
Cascade
100 Dynamic WaKa
Cascade
Chorus → Tremolo → Stereo Hall
Stereo Chorus
Chorus → Chorus → St. Chorus
Chorus → Chorus → Stereo Hall
Chorus → Reverb
Chorus 1 L
Chorus 1 L
Chorus → Chorus
Chorus → Reverb
Ambient Chorus
Chorus 1
Chorus 2
Flanger → Flanger
Stereo Flanger
Reverb → Flanger
Pitch → Flanger → Stereo Hall
Flanger → Phaser
Flanger → Phaser
Slow Flanger
Flanger → Flanger
Ambient Flanger
Flanger 1
Flanger 2
Delay → Delay → Stereo Delay
Delay → Delay
Delay → Delay
Delay 1 L
Delay 1 R
Ambient Delay → Reverb
Ambient Delay
Pitch → Pitch → Stereo Hall
Ambient Delay → Reverb
Delay 1 L
Delay 1 R
Delay 1
Delay 2
Stereo Chorus
Chorus 2 L
Chorus 2 L
Ambient Phaser
Chorus 3
Chorus 4
Stereo Flanger
Medium Flanger
Ambient Chorus
Flanger 3
Flanger 4
Delay 2 L
Delay 2 R
Ambient Delay
Delay 1 L
Delay 3
Delay 1 R
Delay 4
Panner → Reverb
Pitch → Panner
Reverb → Panner
Ambient Panner
Ambient Panner
Ambient Panner
Ambient Tremolo
Chorus → Tremolo
Chorus → Tremolo
Tremolo → Reverb
Tremolo L
Tremolo R
Ambient Tremolo
Pitch L
Pitch R
Ambient Panner
Vocal Pitch
Vocal Pitch → Reverb
Pitch L
Pitch R
Whammit!
Pitch → Pitch → Stereo Hall
Reverb 1
Reverb 2
Chorus
Flanger
Delay 1
Delay 2
Pitch → Pitch
Phaser → Reverb
Dyn Phaser → Dyn Phaser
- 49 -
Vocal Pitch
Tremolo L
Tremolo R
Dynamic Pitch
Phaser
Phaser
Delay 3
Flanger
Pitch
Reverb
LFO SHAPES (two cycles each)
EXPONENTIAL
These graphs are of the available LFO shapes for Chorus, Fanger,
Phaser, Tremolo, and Panner effects. The large choice of waveforms
will allow you to select the best possible shape for most applications.
Some may sound bizarre while others sound natural.
If the LFOs are used for time modulation effects (Chorus, Flanger, and
The Exponential waveform is not available
on Tremolo and Panner effects.
Phaser), the vertical scale shows short to long delay time moving from
bottom to top. When used for amplitude modulation effects (Tremolo
SINE
and Panner), the vertical scale shows low to high audio level while
moving in the same direction.
When you compare the each waveform's effect on sound, listen to the
transitions in the top and bottom areas. This is where the differences
are most audible. Some of the waveforms will seem to slow as the
limits are reached, others will seem to rip right through the transition.
TRIANGLE
Unfortunately, the visual representations of the waveforms don't
always correspond to the expected sound. For example, when the
Exponential waveform is used with a flanger, the effect sounds smooth
and equal, even though its shape looks lopsided (it moves slowly
towards the bottom and quickly towards the top). This phenomenon
occurs because frequency changes at a logarithmic rate (the number
of frequencies double for each higher octave). The Exponential
waveform moves quicker at the high part of its shape and therefore
RECTIFIED SINE
can sweep through the distantly spaced high frequencies at what is
perceived as a steady rate. The Exponential waveform, by the way,
would look linear (straight) if it were plotted on a logarithmic
(frequency) scale.
If the preceding paragraph sounded confusing, don’t worry–it just had
to be mentioned. The best way to understand the effects of the
different LFO shapes is to try each one with each effect and note the
difference in sound. You will probably find some interesting (and
unexpected) results.
- 50 -
INVERTED RECTIFIED SINE
RAMP
SQUARE
INVERTED RAMP
MIDI IMPLEMENTATION IN THE DMV-PRO
Channel Voice Messages
The DMV-PRO can respond to Note On, Control Change, Program Change, Channel Pressure, and Pitch
Bend messages. In order to respond to these messages, the MIDI Base Channel must be set either to the
same channel of the incoming message, or to "ALL.” The other Channel Voice messages (Note Off and
Polyphonic Key Pressure) are always ignored.
Program Change
Presets can be recalled using the Program Change message. By default, there is a one-to-one mapping of
the requested "program" number to preset numbers in the DMV-PRO. This can be changed by the user (see
page 46). Note that MIDI allows "program" numbers up to 128, while the DMV-PRO has 100 presets.
System Exclusive (SysEx) Messages
The DMV-PRO implements a variety of functions using SysEx messages. Documentation on these messages
and other important details is available by requesting the DMV-PRO MIDI Implementation Guide from A R T.
All SysEx messages start with a common format:
- 51 -
Byte Number
Value (in hex)
Description
1
2
3
4
5
...
(last)
F0
1A
0x
22
??
??
F7
Start of SysEx message.
A R T manufacturer’s ID.
MIDI channel (00 to 0F).
DMV-PRO product ID.
Function ID.
(data, zero or more bytes)
End of SysEx message.
The Function ID is one of the following values and is followed by zero or more bytes of data, as implied by the
function.
Function ID
Function Class
Direction
Description
41
Unit Handshake
to Unit
from Unit
to Unit
Ask DMV-PRO to respond. This may be used to test if a
DMV-PRO is present and listening on the MIDI network.
Handshake response from DMV-PRO.
Ask DMV-PRO to dump presets.
to Unit
from Unit
to Unit
from Unit
Upload a past preset dump from the DMV-PRO.
“Dump Presets” response from DMV-PRO.
Ask DMV-PRO to report system status.
System status response from DMV-PRO.
01
4B
0b
0b
4D
0D
Parameter
Exchange
Unit Status
The SysEx message to make the DMV-PRO dump all presets is:
F0 1A 0x 21 4B F7
Other MIDI Notes
The DMV-PRO ignores inbound Active Sensing messages.
The DMV-PRO does not generate Active Sensing messages.
The System Reset message is ignored.
- 52 -
MIDI CONTROLLERS AND NUMBERS
Here’s a list of MIDI Controllers and their numbers, which may help to avoid conflicts if you control the
DMV-PRO and other MIDI gear in the same setup. The DMV-PRO displays controller numbers as decimal
numbers. The following table lists hexadecimal numbers, their equivalent decimal numbers, and the common
uses for these controller numbers in MIDI. The DMV-PRO’s default controller parameters are intended to
work with the default values of A R T’s foot controller, the X-15. No changes to either unit should be
necessary. Connect a MIDI cable from the X-15’s MIDI Out to the DMV-PRO’s MIDI In, and you’re ready to
go!
Decimal
0
1
2
3
4
5
6
7
8
9
10
11
12–15
16–19
20–31
32
33–63
64
65
66
67
68
69
70–79
80–83
84–90
91
92
93
94
95
96
97
98
99
100
101
102–120
Hexadecimal
00
01
02
03
04
05
06
07
08
09
0A
0B
0C–0F
10–13
14–1F
20
21–3F
40
41
42
43
44
45
46–4F
50–53
54–5A
5B
5C
5D
5E
5F
60
61
62
63
64
65
66–78
Controller Description
Reserved for Bank Select
Mod Wheel
Breath Controller
Undefined
Foot Controller
Portamento Time
Data Entry (MSB)
Main Volume
Balance
Undefined
Pan
Expression Controller
Undefined
General Purpose Controllers (#1–4)
Undefined
Reserved for Bank Select
LSB For Values 0–31
Damper Pedal (Sustain)
Portamento
Sostenuto
Soft Pedal
Undefined
Hold 2
Undefined
General Purpose Controllers (#5–8)
Undefined
External Effects Depth
Tremolo Depth
Chorus Depth
Celeste (Detune) Depth
Phaser Depth
Data Increment
Data Decrement
Non-Registered Parameter Number LSB
Non-Registered Parameter Number MSB
Registered Parameter Number LSB
Registered Parameter Number MSB
Undefined
- 53 -
WARRANTY INFORMATION
Limited Warranty
Applied Research and Technology, Inc. will provide warranty and Service for this unit in accordance with the
following warrants:
Applied Research and Technology, Inc. (A R T) warrants to the original purchaser that this product and the
components thereof will be free from defects in workmanship and materials for a period of five years from the
date of purchase. Applied Research and Technology, Inc. will, without charge, repair or replace, at its option,
defective product or component parts upon prepaid delivery to the factory service department or authorized
service center, accompanied by proof of purchase date in the form of a valid sales receipt.
Exclusions:
This warranty does not apply in the event of misuse or abuse of the product or as a result of unauthorized
alterations or repairs. This warranty is void if the serial number is altered, defaced, or removed.
A R T reserves the right to make changes in design or make additions to or improvements upon this product
without any obligation to install the same on products previously manufactured.
A R T shall not be liable for any consequential damages, including without limitation damages resulting from
loss of use. Some states do not allow limitations of incidental or consequential damages, so the above
limitation or exclusion may not apply to you. This warranty gives you specific rights and you may have other
rights which vary from state to state.
For units purchased outside the United States, an authorized distributor of Applied Research and Technology,
Incorporated will provide service.
SERVICE
The following information is provided in the unlikely event that your unit requires service.
1) Be sure that the unit is the cause of the problem. Check to make sure the unit has power supplied, all
cables are connected correctly, and the cables themselves are in working condition.
2) If you find the unit to be at fault, write down a complete description of the problem, including how and when
the problem occurs. Please write down a description of your complete setup before calling Customer Service.
3) Call the factory for a Return Authorization (RA) number.
- 54 -
4) Pack the unit in its original carton or a reasonable substitute. The packing box is not recommended as a
shipping carton. Put the packaged unit in another box for shipping. Print the RA number clearly on the outside
of the shipping box. Print your return shipping address on the outside of the box.
5) Include with your unit: a return shipping address (we cannot ship to a P.O. Box), a copy of your purchase
receipt, a daytime phone number, and a description of the problem.
6) Ship only your unit and its power cord (keep your manual!) to:
APPLIED RESEARCH AND TECHNOLOGY, INC.
215 TREMONT STREET
ROCHESTER, NEW YORK 14608
ATTN: REPAIR DEPARTMENT
RA# ____________________
7) Contact our Customer Service department at (716) 436-2720 for your Return Authorization number or
questions regarding technical assistance or repairs. Customer Service hours are 9:00 AM to 5:30 PM Eastern
Time, Monday through Friday.
- 55 -
DMV-PRO SPECIFICATIONS:
A/D converters:
20 bit, 64 times oversampled, delta sigma, X4
D/A converters:
20 bit, 128 times oversampled, delta sigma, X4
Sample Rate:
46.875 kHz
Bandwidth:
10 Hz – 20 kHz +0, -2 dB
Dynamic Range:
>93dB
Total Harmonic Distortion:
< .01% @ 1kHz
Audio In/Out:
¼” unbalanced, +4 / -10 dB switchable levels,
>50k ohms input impedance, <750 ohms output impedance
Maximum Delay Time:
5.5 seconds (2.75 seconds X2, in Stereo)
Up to 1.3 seconds per channel in Discrete 4, Twin Stereo, and
Cascade
DSP:
ALU processing 24 MIPS min., 36MIPS avg., and 48MIPS peak
24 bit X 24 bit Multiplier
56 bit internal accumulator
Proprietary Dynamic Engine Allocation (DEA™) software
maximizes DSP algorithms in all routings.
Effect Routing Combinations:
10,000 in Discrete 4 routing mode
144 in Twin Stereo mode
144 in Cascade mode
1,200 in Stereo mode
11,488 Total
Effects Algorithms:
Twin Stereo, Cascade, Multi FX modes:
24 reverb, 6 delay, 6 pitch transpose, 6 chorus,
6 flanger, 6 phaser, 6 rotary, 6 tremolo, and 6 panner.
(72 Total)
Discrete 4 mode:
24 reverb, 6 delay, 5 pitch transpose, 5 chorus,
5 flanger, 5 phaser, 5 tremolo
(60 Total)
MIDI:
MIDI In and Out, full parameter control,
Up to 16 controllers per preset
Other features:
Front-panel encoder switches, audio, and MIDI can be used to:
Trigger sweeps, repeat hold and tap in delay times, spin the
rotary up and down, gate and fade effects, and gate and
dynamically regenerate reverbs
A reverb click is also available via the front panel encoder switch
Displays:
3-digit numeric, two LCDs, dual level meters, and Routing LEDs.
Power requirements:
9 Volts AC @ 450 milliamps, external supply
Designed and manufactured in the United States of America.
- 56 -
A R T maintains a policy of constant product improvement. A R T reserves the right to make changes in design or
make additions to or improvements upon this product without any obligation to install the same on products previously
manufactured. Therefore, specifications are subject to change without notice.
Applied Research & Technology, Inc.
215 Tremont Street
Rochester, NY 14608 USA
(716) 436-2720
(716) 436-3942 (FAX)
This manual was written by David Shaw for Shaw Musical Services, Greeley, Colorado.
© 1998 Applied Research & Technology.
- 57 -