1
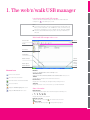
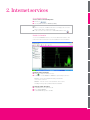
MC/21935/0207
Web‘n’walk USB Manager
User manual
Contents
1. The web‘n’walk USB manager
Launching the web‘n’walk USB manager
Web‘n’walk USB manager main screen
Shortcut icons
Status information
Web‘n’walk USB device
2. Internet services
Accessing the internet
Statistics information
3. Text messaging
Creating and sending messages
Inbox
Outbox
Important, Drafts and Deleted
Report
Text messages on your SIM card
Text messaging settings
4. Phonebook
Phonebook management
Managing the phonebook on your SIM card
Moving contacts between the SIM and Local phonebooks
5. Settings
PIN operations
Choosing a device
Viewing diagnostic Information
Start-up settings
Network settings
Connection settings
6. Technical support
T-Mobile
Safety precautions
7. Specifications
8. Warnings and precautions
9. Acronyms and abbreviations
1. The web‘n’walk USB manager
Launching the web‘n’walk USB manager
To launch the web‘n’walk USB manager, double-click the web‘n’walk USB
manager icon
on the desktop of your PC.
Note:
■ You may be prompted to enter a Personal Identification Number (PIN) code.
Once you have entered the code, click OK. If you enter your PIN incorrectly,
any functions requiring the use of the T-Mobile network, will not be available.
■ The PIN code and PIN Unblocking Key (PUK) code are provided with your
SIM card.
Web‘n’walk USB manager main screen
Menu bar
Shortcut icon bar
Task bar
User work area
Transferred data
Network Connection
Status bar
Network signal &
Network information
New text
message
received
Shortcut icons
Connect to the network.
Disconnect from the network.
Check the statistics of the transferred data.
Access the internet.
Menu bar
Displays the, File, Operation, Tools and Help menus.
Shortcut icon bar
Displays the Connect, Internet, Statistics, Text and Phonebook shortcut icons.
Taskbar
Displays tabs showing both active and inactive functions.
User work area
Displays the contacts data, plus navigation and operating functions.
Status bar
Displays information on the current status of your web‘n’walk USB.
Display the Text Messaging main screen.
Status information
Display the Phonebook main screen.
Network signal
Indicates the signal strength of the network through the following icons:
Network information
Displays information on the network.
Network connection
The network is connected.
The network is disconnected.
Transferred data
Data download is in progress. Data upload is in progress.
1
1. The web‘n’walk USB manager
Web‘n’walk USB device status
The indicator light indicates the status of your web‘n’walk USB
Light
Off
Status
Web‘n’walk USB is off
Blinking green twice every 3 seconds
Web‘n’walk USB is searching for a network
or no network is available
Blinking green once every 3 seconds
GPRS network available
Blinking blue once every 3 seconds
3G network available
On green
Connected via GPRS
On light blue
Connected via 3G HSDPA
On blue
Connected via 3G
2
2. Internet services
Accessing the internet
You can connect to the network by either:
■ Clicking on
■ Selecting File > Connect > T-Mobile (default).
Note:
■ Once a connection is established, the main screen displays the connection
duration, data statistics and transferred rate.
■ To disconnect from the network, choose File > Disconnect or click
Statistics information
You can use the Statistics function to check on the data transfer statistics of the
network. The statistics information is shown in a drill down menu format below.
Viewing the statistic information
■ Click
to display the drill down menu.
■ Double click on either Statistics or Transfer to expand/collapse the menu.
Transfer – view the uploaded/downloaded speed and data
of the current connection.
Statistics – view the current connected duration, last reset time
and daily/monthly/yearly uploaded and downloaded data.
Resetting the statistic information
■ In the drill down menu, right-click a tab.
■ Choose Reset statistics.
■ In the Confirm dialogue box, click Yes.
3
3. Text messaging
The web‘n’walk USB manager
enables you to edit, send,
receive and view text
messages on your PC.
Creating and sending messages
■ Click
to display the Text main screen.
■ Click
to display the New screen.
■ Enter the recipient number by either:
■ Clicking on Send To... then select a phone number in the Select
Number screen.
■ Enter the recipient number directly.
■
■
■
■
■
Compose your message.
After you have finished typing in your message, you can either
Click Send to send the message.
Click Save to save the message as a draft.
Click Close to exit the current message. If you click Yes in the
Confirm dialogue box, the message will be saved in the Drafts.
Note:
■ You can send a group message to up to 20 different recipients.
Just type in each phone number, separated with a comma.
■ Each message can contain a maximum of 160 letters. If the message
exceeds this size, the system will automatically split your message into
several smaller messages.
Inbox
The inbox stores all your received messages. Messages are saved as either:
Read messages.
Unread messages.
To access the Inbox:
■ Click on
to display the Text main screen.
■ Choose Local > Inbox to enter the Inbox.
Searching for a message
Search for a message in your inbox by clicking on
. Then enter either the
name or phone number of the sender or alternatively part of the message or
the time the message was received.
A list of any matched messages will then be displayed. If no matches can
be found, the dialogue box will be empty.
New messages
With the text message prompt enabled, on receipt of a new text message:
■
flashes in the status bar
■ the Prompt dialogue box pops up in the bottom right of your PC screen
■ To read the message, click View in the dialogue box
Unread messages
When there is an unread message:
■
flashes in the status bar. When you move the cursor over the icon,
the number of unread messages is displayed.
■ Double-click on
to display the Text Messaging main screen.
The list of unread messages is then displayed.
4
3. Text messaging
To view a message in your inbox
■ Select Text from the menu bar.
■ Click on your selected message. The name and phone number of the
message sender, together with the message and the time the message
was received are all displayed below the message list.
■ Right-click the message to:
■ Reply to the message sender.
■ Forward the message to another person.
■ Save Number in the New Contact screen, where you can enter
additional information and save the contact.
■ Delete the message.
■ Delete All messages in the inbox.
Text shortcut icons
You can also use the shortcut icons above the message list to:
Reply to a selected message.
Forward the selected message.
Delete the selected message.
Note:
■ To select the message in your list you can press and hold Shift or Ctrl and
click on the messages you require or you can press Ctrl + A to select all the
messages in the list.
■ Messages deleted from your inbox are transferred to Deleted.
■ You can forward only one message at a time.
Outbox
The Outbox stores all sent messages, including any messages
that have not been successfully sent:
The message has been sent.
The message has not been sent
To access the Outbox
■ Click
to display the Text main screen.
■ Choose Local > Outbox to access the Outbox screen.
Messages can also be viewed in the outbox. In addition, you can Send,
Forward, Save Number, Delete and Delete All. For details, see Inbox on page 4.
Important, Drafts and Deleted
Important allows you to store your most important messages
separately from the main inbox/outbox.
Drafts stores drafts of messages which you edit and save later.
Deleted stores any messages deleted from either the inbox, outbox,
drafts or favourites.
You can Save Number, Delete and Delete All messages from your Important,
Drafts or Deleted boxes. For details, see Inbox on page 4.
Note:
■ Deleted does not store any messages deleted from the SIM card.
■ Beware, deleting any messages in Deleted, will permanently delete them.
Report
Report stores the delivery notifications of sent messages. You can View, Save
Number, Delete and Delete All the status reports.
5
3. Text messaging
Text messages on your SIM Card
You can view and move messages saved on the SIM card.
■ Click
to access the Text main screen.
■ Choose SIM.
■ Click on your selected message. The name and phone number of the
message sender, together with the message and the time the message
was received are all displayed below the message list.
■ Right-click the selected message(s) to:
■ Move to Local to move the selected messages from your SIM
card to the inbox/outbox in web‘n’walk USB manager.
■ Move All to Local: to move all the messages from your SIM card
to your inbox/outbox.
■ In the Confirm dialogue box, click OK.
Note:
■ When any messages on your SIM card are moved to web‘n’walk manager
inbox/outbox they are automatically deleted from the SIM card.
■ Messages moved from your SIM card are automatically moved to the
corresponding inbox or outbox.
Text message settings
Choose Tools > Option, and click Text.
Text message alerts settings
In the Text Message Handling area, you can select both the display
and audio prompts.
Visual prompt
on incoming text
messages
Audio prompt
on incoming text
messages
If you select Show a notification when a new text message arrives, when
you receive a new message, a dialogue box opens. You can then:
■ Click View to view the new message.
■ Click Close to view the message later.
If you select Play a sound when a new text message arrives you can:
■ Click Browse to select a text message tone.
■ Click Test to play the text message tone; click Stop to stop playing
the text message tone.
On receipt of a new message, the selected text message tone is played.
Setting the SMSC number and message validity
The Message Service Centre (SMSC) number is automatically pre-loaded onto
the SIM card. When the SIM card is inserted into the web‘n’walk USB, the
information is updated automatically. If the information is missing or you delete
the information by accident, contact T-Mobile free on150 from your mobile
phone or by calling 0845 412 5000 (local rates apply).
The message validity is the time period that T-Mobile will try to deliver the text
message if the receiving phone is unavailable. The validity period can be set for
12 hours, 24 hours, 30 days and Maximum.
Requesting a delivery report
Select Request delivery report to activate the delivery report function. When
the function is enabled, the network delivers a status report of a sent message.
6
4. Phonebook
You can easily manage
your contacts in the
phonebook using the
web‘n’walk USB manager.
■
■
■
■
Create, modify and delete contacts.
Manage contacts by groups.
Import/export contacts into the phonebook.
Select a number from the phonebook to send a message.
Phonebook management
To enter the web‘n’walk USB manager phonebook:
■ Click
to access the Phonebook menu.
■ Click Local.
Creating a contact
■ Click
to display the New Contact screen.
■ Enter the information.
■ Click OK to save the contact.
Note:
The contact information cannot contain spaces.
Searching for a contact
■ Click
■ Then enter the contact information you are looking for.
Note:
■ You can enter part of the contact information to search.
■ When you search the matched contacts are then displayed.
If no matches are found, the dialogue box will be empty.
Viewing a contact
■ Go to the phonebook, and select a contact to view.
■ Click the selected contact.
■ The contact name, mobile number, office number, home number, email
address and remarks are displayed below the contact list.
■ Right-click the selected contact, and you can:
■ Edit Contact to change any information.
■ Delete Contact.
■ Send a message or name card to the mobile number of the contact.
Shortcuts
You can also click the shortcut icons above the contact list to:
■
Edit the selected contact.
■
Delete the selected contact.
■
Send a message or name card to the mobile number of the contact.
7
4. Phonebook
Group management
You can set up groups to manage your contacts.
■ Right-click Local in the contacts menu, and choose New Group.
■ Enter the group name.
Note:
■ The group name must be unique.
■ You can only manage contacts by group within your web‘n’walk USB
manager contacts list.
Change a group name
■ Select a group to change.
■ Right-click the selected group, and choose Rename Group.
■ Enter the new group name.
Note:
You cannot rename the two default groups, Local and SIM Card.
Adding a contact
You can add a contact to a group by:
■ Selecting a group from the navigation tree.
■ Click
or right-click in the contact list and choose New Contact.
■ Enter the information.
You can also add a contact from Local to another group by:
■ Select one or more contacts in Local.
■ Drag the selected contacts to another group.
Note:
■ Press and hold Ctrl to copy contacts to another group.
■ Drag selected contacts to move to another group.
Removing a contact
■ Select a group to view the contact list.
■ Select a contact to remove.
■ Right-click the selected contact and choose Remove from Group.
Note:
The contact is removed from the group but not deleted.
Deleting a Group
■ Right-click a group in the navigation tree and choose Delete Group.
■ Click OK.
Note:
When you delete a group, contacts in the group will not be deleted. They are
still held in the phonebook.
8
4. Phonebook
Managing your phonebook on your SIM Card
You can manage and use contacts saved on your SIM in the same way as
contacts stored locally. You can create a New Contact, Delete a Contact and
Edit a Contact as well as Sending a Text Message or Send a Name Card
using contacts stored on the SIM.
Moving Contacts between the SIM and Local phonebooks
■ Select text message and drag and drop to the Local or SIM on the left
hand side.
■ You will need to map the Fields in one phonebook to the other. The
web’n’walk manager will make a suggestion. If you want to change the
mapping, drag and drop an item in the Value column into the From Field.
The Field column shows how the item will be displayed in the web’n’walk
manager.
Importing contacts
You can import the contacts from a *.csv file to the local phonebook or the
SIM card.
Importing contacts from a file to the local phonebook
■ Click
to access the Phonebook.
■ Click Local.
■ Right-click the contact list and choose Import Contacts.
■ Choose a file to import. Click Open to display the Map screen.
■ You will need to map the items in the file with the items on the web’n’walk
manager. The web‘n’walk manager will make a suggestion. If you want to
change the mapping, drag and drop an item in the Value column into the
From column. The Field column shows how the item will be displayed in
the web‘n’walk manager.
■ Click OK.
Importing contacts from a file to the SIM card
to access the Phonebook.
■ Click Icon
■ Click SIM from the menu.
■ Right-click the contact list and choose Import Contacts.
■ Choose an imported file. Click Open to access the Map screen.
■ You will need to map the items in the file with the items on the web’n’walk
manager. The web’n’walk manager will make a suggestion. If you want to
change the mapping, drag and drop an item in the Value column into the
From column. The Field column shows how the item will be displayed in
the web‘n’walk manager.
■ Click OK.
Note:
■ The maximum number of contacts that can be saved onto the SIM card
is determined by the capacity of the SIM card.
■ If you export contacts to your SIM card, and it has reached its maximum
capacity, then the import will automatically stop. The contact data will not
be affected.
9
4. Phonebook
Exporting contacts
You can export contacts from the local phonebook and the SIM card.
The exported contacts can only be saved in a *.csv file.
Exporting contacts from the web‘n’walk USB manager phonebook to a file
■ Click
to access the Phonebook.
■ Click Local in the menu and choose one of the following:
■ Right-click the contact list and choose Export All Contacts.
■ Choose one or more contacts and right-click to choose
Export Select Contacts.
■ Browse your PC directory to find the folder where you want to save the
contact information.
■ Enter the file name and click Save.
Exporting contacts from the SIM card to a file
■ Click
to access the Phonebook.
■ Click SIM and choose from one of the following:
■ Right-click the contact list and choose Export All Contacts.
■ Choose one or more contacts and right-click to choose
Export Select Contacts.
■ Browse your PC directory to find the folder where you want to save the
contact information.
■ Enter the file name and click Save.
Note:
■ To select all your contacts, press and hold Shift or Ctrl and click the
selected contacts; or alternatively press Ctrl + A.
10
5. Settings
PIN operations
If a SIM card is used, the Personal Identity Number (PIN) code protects your
card from unauthorised use. You can modify the PIN code and enable/disable
the PIN verification.
Note:
■ The PIN code and PIN Unblocking Key (PUK) code are provided along
with your SIM card.
Enabling/disabling the PIN verification
If PIN verification is enabled, you will need to verify the PIN code each time
you plug the device in.
■ To enable: Choose Tools > PIN Operations > Enable PIN Verification.
■ To disable: Choose Tools > PIN Operations > Disable PIN Verification.
Modifying the PIN code
■ Choose Tools > PIN Operations > Modify PIN.
■ In the Modify PIN dialogue box, enter the current PIN code and the new
PIN code.
■ Enter the new PIN code again.
■ Click OK to complete the change.
Note:
■ The PIN code should be a number between 4 and 8 digits long.
Entering the PIN code
When the PIN verification is enabled, you will need to enter the correct PIN
code to use any network-dependent functions.
■ When the web‘n’walk USB manager is launched, the Enter PIN dialogue
box will appear.
■ Enter the correct PIN code.
■ Click OK.
Note:
■ If you enter the wrong PIN code, the SIM card may lock and you will be
unable to use it until you enter the PUK code. The web‘n’walk USB
manager prompts you with the remaining number of attempts for entering
the PIN code or the PUK code.
■ When the SIM card is locked, you are still able to make emergency calls.
Unlocking the PIN
■ When the SIM card is locked, the Unlock PIN dialogue box automatically
opens when you launch the web‘n’walk USB manager.
■ Enter the correct PUK code.
■ Enter the new PIN code.
■ Click OK to complete the modification.
11
5. Settings
Choosing a device
The web‘n’walk USB manager can support different terminal products. When
the web‘n’walk USB manager is launched, it automatically searches for the
matched terminal. If two or more terminals are found, the connected terminals
are displayed on the Choose Devices screen. Select a terminal and click OK.
If two or more supported terminals are connected to the PC, you can change
or choose a device while the web‘n’walk USB manager is running.
■ Choose Tools > Choose Device.
■ Select a device from the device list.
■ Click OK to terminate the current terminal and switch to the selected one.
Viewing diagnostic information
Choose Tools > Diagnostics to view all the information held on the web‘n’walk
USB manager and SIM card, such as the number of messages and contacts
saved in the SIM card, firmware version, hardware version and IMSI number.
Note:
■ The number of messages/contacts in the SIM card is displayed as XX/YY.
XX means the number of messages/contacts and YY means the capacity
of the SIM card.
Start-up settings
You can set the web‘n’walk USB manager to launch automatically
along with Windows.
■ Choose Tools > Options.
■ Select General from the menu.
■ Choose from the following options:
■ Launch on Windows startup: The web‘n’walk USB manager
launches automatically along with Windows.
■ Minimise window on startup: The web‘n’walk USB manager
main screen is automatically minimised after the web‘n’walk
USB manager is launched.
■ Click OK to complete the settings.
Network settings
To access the Network menu, either:
■ Choose Tools > Options.
■ From the menu, click Network.
12
5. Settings
Selecting a network type
You can select different network types to quickly search and access
the network.
■ Click the Network Type tab.
■ From the Network Type drop-down list, select the corresponding
network type.
■ From the Band down-drop list, select the corresponding frequency band.
■ Click Apply.
■ Click OK to save and to activate the settings.
Selecting a registration mode
Once the network type has been selected, you can enable the searching
and registration mode.
■ Click the Registration Mode tab.
■ Select Auto search and register or Manual search and register.
Auto search and register
When you select Auto search and register, the web‘n’walk USB manager
automatically searches for a registered network.
Manual search and register
■ Select Manual search and register.
■ Click Refresh.
■ Select an operator name in the list.
■ Click Register.
Connection Settings
Connection profile settings
To access Profile Management:
■ Choose Tools > Options.
■ From the menu, click Profile Management.
■ Click the Dial-Up tab to display the Dial-Up interface.
Creating a dial-up profile
■ Click New to set up the profile name, access number, user name,
password, Access Point Name (APN) and APN status, and select
a default device.
■ Click Advanced to set the IP information, authentication protocol, Domain
Name Server (DNS) and Windows Internet Name Service (WINS).
■ Click OK to save the advanced settings and return to the Dial-Up menu.
■ Click OK and the Prompt dialogue box is displayed.
■ Click Yes to save the settings; or click No to cancel the settings.
13
5. Settings
Editing a dial-up profile
■ From the Profile Name drop-down list, select a setting.
■ Click Edit to modify the profile name, access number, user name,
password, APN name and APN Status, and select a default device.
■ Click Advanced to set the IP information, authentication protocol, DNS
and WINS.
■ Click OK to save the advanced settings and return to the Dial-Up menu.
■ Click OK and the Prompt dialogue box is displayed.
■ Click Yes to save the settings; or click No to cancel the edits.
Note:
You cannot edit or delete the T-Mobile (default) profile.
Deleting a dial-up profile
■ From the Profile Name drop-down list, select a setting.
■ Click Delete and the Prompt dialogue box is displayed.
■ Click Yes to delete the setting; or click No to cancel the deletion.
Importing a dial-up profile
■ Click Import to access the import main screen.
■ Choose from the following:
■ Select the 3G/GPRS network operator(s) in the list.
■ Click Browse and choose a *. prof file to import. Then click Open.
■ From the Import menu, click OK.
Exporting a dial-up profile
■ Click Export to access the Export main screen
■ Select one or more network operators and click OK.
■ Select the path to save the file and enter the file name.
■ Then click Save.
Note:
The dial-up profile of the selected operator is exported to a *. prof file
(a configuration file).
14
6. Technical support
T-Mobile
For technical help including FAQ’s, troubleshooting and downloads go to
www.t-mobile.co.uk/datacardhelp. If you can’t find what you’re looking for
on the website, then call us on 0845 412 2993 (charged at local rate).
If you have a more general enquiry then please call 150 free from your mobile
or 0845 412 5000 (charged at local rate).
T-Mobile Customer Services is open from 7am to 10pm everyday.
Safety precautions
Before using the web‘n’walk USB, please read the safety precautions
carefully, so that you can use your wireless device correctly and safely.
Do not switch on your web‘n’walk USB when it is prohibited to use wireless
devices or when the device may cause interference or danger.
Do not use your web‘n’walk USB while driving.
Follow any rules or regulations in hospitals and health care facilities.
Switch off your web‘n’walk USB near medical apparatus.
Switch off your web‘n’walk USB on airplanes. The device may cause
interference to control signals of the aircraft.
Switch off your web‘n’walk USB near high-precision electronic devices.
The device may affect the performance of these devices.
Do not attempt to disassemble your web‘n’walk USB or its accessories.
Only qualified personnel are allowed to service or repair the device.
Do not place your web‘n’walk USB and its accessories in containers
with strong electromagnetic fields.
Do not place magnetic storage media near your web‘n’walk USB.
Radiation from the wireless device may erase the information stored on them.
Do not put your web‘n’walk USB in a high-temperature place or use
it in a place with flammable gas such as a petrol station.
Keep your web‘n’walk USB and its accessories away from children.
Do not allow children to use the device without guidance.
Observe any laws or regulations on the use of wireless devices.
Respect others’ privacy and legal rights when using your web‘n’walk USB.
15
7. Specifications
Item
Description
Technical standard
3GPP R5
USB interface standard
USB2.0 full speed standard
Radio system
GSM/GPRS/EDGE:900 MHz/1800 MHz/1900 MHz
HSDPA/WCDMA:2100 MHz
GSM/GPRS/EDGE 900 MHz
UL:800 MHz - 915 MHz
DL:925 MHz - 960 MHz
GSM/GPRS/EDGE 1800 MHz
UL:1710 MHz - 1785 MHz
DL:1805 MHz - 1880 MHz
GSM/GPRS/EDGE 1900 MHz
UL:1850 MHz - 1910 MHz
DL:1930 MHz - 1990 MHz
HSDPA/WCDMA 210 MHz
UL:1920 MHz - 1980 MHz
DL:2110 MHz – 2170 MHz
Radio frequency band
Radio power output
HSDPA/WCDMA 2100 MHz: Power Class 3, +24 dBm+1/-3
GSM/GPRS 900 MHz: Power Class 4, +33 dBm±2
GSM/GPRS 1800 MHz: Power Class 1, +30 dBm±2
GSM/GPRS 1900 MHz: Power Class 1, +30 dBm±2
EDGE 900 MHz: Power Class E2, +27 dBm±3
EDGE 1800 MHz: Power Class E2, +26 dBm±3
EDGE 1900 MHz: Power Class E2, +26 dBm±3
Services
Data Service:
GSM CS: UL 9.6 kbit/s/DL 9.6 kbit/s
GPRS: UL 26.8 kbit/s/DL 53.6 kbit/s
EDGE: UL 118.4 kbit/s/DL 236.8 kbit/s
WCDMA CS: UL 64.0 kbit/s/DL 64.0 kbit/s
WCDMA PS: UL 384.0 kbit/s/DL 384.0 kbit/s
UL WCDMA/DL HSDPA: UL 384 kbit/s/dl 3.6 Mbit/s
Text messaging service:
GSM, GPRS, WCDMA, HSDPA, EDGE
Dimensions (D x W x H)
89.37mm x 42.61mm x 14.50mm
Weight
About 50g
Power supply method
Through two USB ports
Operating temperature
-10ºC to +55ºC
Storage temperature
-40ºC to +70ºC
16
8. Warnings and precautions
Electronic device
■ Switch off your web‘n’walk USB near high-precision electronic devices.
The device may affect the performance of these devices.
■ If you are using an electronic medical device, consult the device
manufacturer and confirm whether radio waves affects the operation of the
device. Such devices include hearing aids, pacemakers, fire alarm systems,
automatic gates, and other automatic-control devices.
Hospitals
■ Do not take your wireless web‘n’walk USB into an operating room (OR),
intensive care unit (ICU), or coronary care unit (CCU).
■ Do not use your wireless device at places for medical treatment where it
is prohibited to use wireless devices.
Places containing flammable or explosive materials
In any areas with inflammable or explosive materials, disconnect your
web‘n’walk USB from your PC and turn off the PC to avoid explosion and fire.
Areas with inflammables and explosives include:
■ Fuel or chemical product stores.
■ Petrol stations.
■ Areas for storing fuels (such as the bunk under the deck of the ship).
■ Devices/vehicles for transporting and storing fuels or chemical products.
■ Areas with airborne chemical substances and particles (such as: granule,
dust, metal powder) Areas with the warning sign explosives.
■ Areas with a warning sign to turn off bi-direction wireless equipment.
■ Areas where it is suggested to stop the engine or a vehicle.
Traffic safety
■ Please observe the relevant regulation of the area or country you are in.
Do not use your wireless device while driving.
■ Secure the wireless device in its holder. Do not place the wireless device
on a seat or any other place where it could become loose during a sudden
stop or collision. Only use the device after the vehicle has stopped
in a safe place.
■ Do not place the wireless device over an air bag or in the air bag
distribution area. Otherwise, the wireless device may cause injury when
the air bag inflates.
■ Observe the rules and regulations of airline companies. Disconnect the
wireless device from your PC and turn off your PC before boarding an
aircraft. Otherwise, the wireless signal of the wireless device can disturb
the aircraft control signals.
Storage environment
■ Do not place magnetic storage media such as magnetic cards and floppy
disks near the wireless device. Radiation from the wireless device may
erase the information stored on them.
■ Do not put your wireless device in containers with strong magnetic fields,
such as an induction cookers or microwave ovens. Otherwise, circuit failure,
fire, or explosion may result.
■ Do not leave your wireless device in a very hot or cold place. Otherwise,
malfunction of the product, fire, or explosion may result.
■ Do not put your wireless device in a back pocket, to avoid inadvertently
damaging the device damage while seated.
17
8. Warnings and precautions
Children safety
■ Put your wireless device in places beyond the reach of children.
Do not allow children to use the wireless device without guidance.
■ Do not allow children to touch the device. Suffocation or choking may
occur if children swallow the small parts.
Operating environment
■ The device is not water-resistant. Keep it dry. Protect the device from water
or steam. Do not touch the device with wet hands. Otherwise, short-circuit
and malfunction of the product or electric shock be caused.
■ Do not use the device in dusty, damp and dirty places or places with
magnetic fields. Otherwise, malfunction of the circuit can be caused.
■ When you carry or use the device, keep it at least one inch (2.5 centimetres)
away from your body, to avoid negative impact on your health caused by
radio frequency leakage.
■ Do not use your device outdoors during a thunderstorm.
■ Do not touch the device when it is running. This may affect call quality
and cause the wireless device to operate with more power.
■ The device may cause interference with nearby TV sets and radios.
■ In accordance with the international standards for radio frequency and
radiation, use wireless device accessories only approved by Huawei.
Cleaning and maintenance
■ Before you clean the device, disconnect from your PC and turn off the
PC. Otherwise, electric shock or short-circuit may occur.
■ Do not use any chemical detergent, powder, or other chemical agent
(such as alcohol and benzene) to clean the device. Otherwise, part
damage or a fire can be caused. You can clean the device with a damp,
soft antistatic cloth.
■ Do not scratch the casing of the device. Otherwise, the fragments may
cause skin allergies. Once it happens, stop using the device at once and
go and see a doctor.
■ If the device or any of its fittings do not work, call T-Mobile for help.
Environmental care
Please observe the local regulations regarding the disposal of packaging,
old wireless devices. Do not burn, otherwise, an explosion may occur.
Certification information (SAR)
THIS DEVICE MEETS THE GOVERNMENT'S REQUIREMENTS FOR
EXPOSURE TO RADIO FREQUENCY ELECTROMAGNETIC FIELD.
Your wireless device is a low-power radio transmitter and receiver. When it
is running, it emits low levels of radio frequency energy (also known as radio
waves or radio frequency fields).
Governments around the world have adopted comprehensive international
safety guidelines, developed by scientific organisations, e.g. ICNIRP
(International Commission on Non-Ionizing Radiation Protection) and IEEE
(Institute of Electrical and Electronics Engineers Inc.) through periodic and
thorough evaluation of scientific studies. These guidelines establish permitted
levels of radio wave exposure for the public. The levels include a safety margin
designed to assure the safety of all persons, regardless of age and health, and
to account for any variations in measurements.
18
8. Warnings and precautions
Specific Absorption Rate (SAR) is the unit of measurement for the amount
of radio frequency energy absorbed by the body when using a wireless device.
The SAR value is determined at the highest certified power level in laboratory
conditions, but the actual SAR level of the wireless device while operating can
be well below the value. This is because the wireless device is designed to use
the minimum power required to reach the network.
All models of Huawei’s wireless device are designed to meet radio frequency
exposure guidelines such as European Council Recommendation and Federal
Communications Commission Notice (United States).
European Council recommendation: Before a wireless device model is
available for sale to the public, it must be tested according to the technical
standard-EN 50361 and does not exceed the limit established by the European
Council Recommendation: 1999 /519/EC for safe exposure. l.
The SAR limit adopted by the 1999/519/EC is 2.0 watts/kilogram (W/kg)
averaged over ten gram of tissue. The highest SAR value for this device when
tested is 1.20 W/kg.
Federal Communications Commission notice (United States): Before a
wireless device model is available for sale to the public, it must be tested and
certified to the FCC that it does not exceed the limit established by the
government-adopted requirement for safe exposure.
The SAR limit adopted by the USA and Canada is 1.6 watts/kilogram (W/kg)
averaged over one gram of tissue. The highest SAR value reported to the FCC
and IC for this device type when tested for use is 0.59 W/kg.
FCC Statement
This equipment has been tested and found to comply with the limits for a Class
B digital device, pursuant to Part 15 of the FCC Rules. These limits are
designed to provide reasonable protection against harmful interference in a
residential installation. This equipment generates, uses and can radiate radio
frequency energy and, if not installed and used in accordance with the
instructions, may cause harmful interference to radio communications.
However, there is no guarantee that interference will not occur in a particular
installation. If this equipment does cause harmful interference to radio or
television reception, which can be determined by turning the equipment
on and off, the user is encouraged to try one of the following measures:
■ Reorient or relocate the receiving antenna.
■ Increase the separation between the equipment and receiver.
■ Connect the equipment into an outlet on a circuit different from that
to which the receiver is connected.
■ Consult the dealer or an experienced radio/TV technician for help.
This device complies with Part 15 of the FCC Rules and with RSS-210 of
Industry Canada. Operation is subject to two conditions: (1) this device may
cause harmful interference and (2) this device must accept any interference
received, including interference that may cause undesired operation.
Warning:
Changes or modifications made to this equipment not expressly approved
by HUAWEI may void the FCC authorisation to operate this equipment.
19
9. Acronyms and abbreviations
3G
APN
DNS
GPRS
GSM
PIN
PUK
SIM
WINS
Third Generation Network
Access Point Name
Domain Name Server
General Packet Radio Service
Global System for Mobile communications
Personal Identification Number
PIN Unblocking Key
Subscriber Identity Module
Windows Internet Name Service
20