1
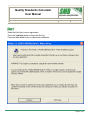
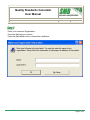
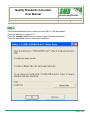
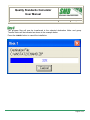
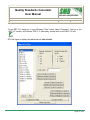
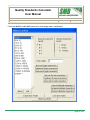
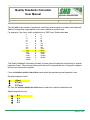
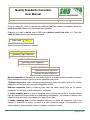
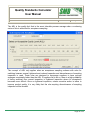
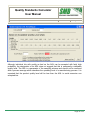
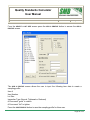
Quality Standards Calculator
User Manual
Quality Standards Calculator
User Manual
Version No.: 1.0
Date: 3/20/2007
Page 2 of 23
System Requirements:
Page 2 of 23
Quality Standards Calculator
User Manual
Version No.: 1.0
Date: 3/20/2007
Page 3 of 23
Before you begin:
Before you begin, you should close all open programs on your computer.
Take a note of the CD-key and User Name.
The CD-key and User Name are located
(laser inscribed) on the surface cover of the
disc.
To install;
You are now only eight short steps from being able to use QSC 2.2.
You can install QSC 2.2 from a CD (recommended) or a file downloaded directly
from the SMB website.
Insert the CD into the CD-ROM, or DVD-ROM drive.
The installation process should start immediately and automatically.
However, if it does not, or if you have the AUTORUN feature disabled, access the START
MENU, go to your RUN command and type:
X:\setup.exe
(Replace the letter X with the letter of your CD-ROM drive)
The setup Wizard will begin. Follow the prompts and QSC 2.2 will be installed in your system.
Page 3 of 23
Quality Standards Calculator
User Manual
Version No.: 1.0
Date: 3/20/2007
Page 4 of 23
Read the End User License agreement.
Press the CONTINUE button to begin the Set Up.
Press the EXIT SETUP button to cancel the installation.
Page 4 of 23
Quality Standards Calculator
User Manual
Version No.: 1.0
Date: 3/20/2007
Page 5 of 23
Enter your name and Organization.
Press the OK button to continue.
Press the EXIT SETUP button to cancel the installation.
Page 5 of 23
Quality Standards Calculator
User Manual
Version No.: 1.0
Date: 3/20/2007
Page 6 of 23
Choose the destination folder in which you want QSC 2.2 will be installed.
Press the OK button to install to C:/
Press the CHANGE FOLDER button to select an alternate folder destination.
Press the EXIT SETUP button to cancel the installation.
Page 6 of 23
Quality Standards Calculator
User Manual
Version No.: 1.0
Date: 3/20/2007
Page 7 of 23
Press the large (computer icon) button to install QSC 2.2 files to destination folder.
Press the CHANGE FOLDER button to select an alternate folder destination.
Press the EXIT SETUP button to cancel the installation.
Page 7 of 23
Quality Standards Calculator
User Manual
Version No.: 1.0
Date: 3/20/2007
Page 8 of 23
Select an existing program group or create a new group.
Press the CONTINUE button to add to the selected group.
Press the CANCEL button to cancel the installation.
Page 8 of 23
Quality Standards Calculator
User Manual
Version No.: 1.0
Date: 3/20/2007
Page 9 of 23
The program files will now be transferred to the selected destination folder and group.
Transfer status will be indicated as shown in the example below.
Press the CANCEL button to cancel the installation.
Page 9 of 23
Quality Standards Calculator
User Manual
Version No.: 1.0
Date: 3/20/2007
Page 10 of 23
When the program files have been transferred to the selected destination folder and group.
Transfer status will be indicated as shown in the example below.
Press the OK button to complete the installation.
Page 10 of 23
Quality Standards Calculator
User Manual
Version No.: 1.0
Date: 3/20/2007
Page 11 of 23
Enter the User Name and CD-Key (as printed on the front of the CD).
Press the AUTHORIZE button to complete the installation.
To run QSC 2.2, simply go to your Windows “Start” menu, select “Programs”, then go to the
“QSC 2.2” section, and choose “QSC 2.2”.
NOTES:
An instruction manual, should you need one, is located in the root directory of the CD in PDF
format or from the SMB website at http://smbvalidation/eliterature.html
If you have any questions or comments, please feel free to contact us any time at
[email protected]
Page 11 of 23
Quality Standards Calculator
User Manual
Version No.: 1.0
Date: 3/20/2007
Page 12 of 23
To run QSC 2.2, simply go to your Windows “Start” menu, select “Programs”, then go to the
“QSC 2.2” section, and choose “QSC 2.2. Alternately, double click on the QSC 2.2 Icon.
Qsc.ico
QCS will open to display the “SELECT A LOT SIZE SCREEN”
Page 12 of 23
Quality Standards Calculator
User Manual
Version No.: 1.0
Date: 3/20/2007
Page 13 of 23
Press the ABOUT button.
The ABOUT screen displays the software version number of the Quality Standards Calculator.
Press EXIT to return to the “SELECT A LOT SIZE SCREEN”.
Page 13 of 23
Quality Standards Calculator
User Manual
Version No.: 1.0
Date: 3/20/2007
Page 14 of 23
From the SELECT A LOT SIZE screen a lot size range menu is displayed.
Page 14 of 23
Quality Standards Calculator
User Manual
Version No.: 1.0
Date: 3/20/2007
Page 15 of 23
The LOT SIZE is the number of production units from which sample is to drawn and inspected.
Select the range that is appropriate for the LOT or BATCH of product units.
For example: if you have a LOT or BATCH size of 2800 units. Select 1201- 3200.
2
9
16
26
51
91
151
281
501
1201
3201
10001
35001
150001
500001
to
to
to
to
to
to
to
to
to
to
to
to
to
to
+
8
15
25
50
90
150
280
500
1200
3200
10000
35000
150000
500000
The Quality Standards Calculator provides for three general inspection levels and four special
inspection levels. These seven levels permit the user to balance the cost of inspection against
the amount of protection required.
From the GENERAL INSPECTION LEVELS menu select the required general inspection level.
General Inspection Level
I (One)
~
II (Two)
{
III (Three)
{
Or, from the SPECIAL INSPECTION LEVELS menu select the required inspection level.
Special Inspection Level
~
{
{
{
S-1
S-2
S-3
S-4
Page 15 of 23
Quality Standards Calculator
User Manual
Version No.: 1.0
Date: 3/20/2007
Page 16 of 23
Once an inspection level is selected the CODE LETTER field located immediately below the
INSPECTION LEVEL Menu will automatically be populated.
Example: for a LOT or BATCH size of 2800 and a GENERAL INSPECTION LEVEL of 1 (One) the
CODE LETTER H will be automatically populated.
Code Letter
H
Select the required Inspection scheme.
Normal Single Inspection
Tightened Single Inspection
Reduced Single Inspection
Normal Double Inspection
Tightened Double Inspection
Reduced Double Inspection
Normal Multiple Inspection
Tightened Multiple Inspection
Reduced Multiple Inspection
Normal inspection is that which is used where there is no evidence that the quality of product
being submitted is better or poorer than the specified quality level.
Tightened inspection under a sampling procedure plan uses the quality level as for normal
inspection, but requires more stringent acceptance criteria.
Reduced inspection under a sampling plan uses the same quality level as for normal
inspection, but requires a smaller sample for inspection.
A single sampling plan is a type of sampling plan by which the results of a single sample
from an inspection lot are conclusive in determining acceptability. The number of sample units
inspected shall be equal to the sample size given by the plan.
A double sampling plan involves sampling inspection in which the inspection of the first
sample to a decision to accept, to reject or to take a second sample. The inspection of a
second sample, when required, leads to a decision to accept or reject.
Page 16 of 23
Quality Standards Calculator
User Manual
Version No.: 1.0
Date: 3/20/2007
Page 17 of 23
The INSPECTION LEVEL: screen.
The CODE LETTER and SAMPLE SIZE will be displayed in the top Left Hand Upper quadrant of
the INSPECTION LEVEL SCREEN.
The SAMPLE SIZE is the number of units of product that will be drawn from the LOT or BATCH.
Samples should be drawn at random throughout the LOT or BATCH without regard to their
quality.
Select an ACCEPTABLE QUALITY LIMIT (AQL) to calculate the ACCEPT/REJECT RATE. The AQL is
the quality limit that is the worst tolerable process average when a continuing series of lots is
submitted for acceptance sampling.
Page 17 of 23
Quality Standards Calculator
User Manual
Version No.: 1.0
Date: 3/20/2007
Page 18 of 23
The AQL is the quality limit that is the worst tolerable process average when a continuing
series of lots is submitted for acceptance sampling.
The concept of AQL only applies when an acceptance sampling scheme with rules for
switching between normal, tightened and reduced inspection and discontinuance of sampling
inspection is used. These rules are designed to encourage suppliers to have process
averages consistently better than the AQL. If suppliers fail to do so, there is a high probability
of being switched from normal inspection to tightened inspection where lot acceptance
becomes more difficult. Once on tightened inspection, unless corrective action is taken to
improve product quality, it is very likely that the rule requiring discontinuance of sampling
inspection will be invoked.
Page 18 of 23
Quality Standards Calculator
User Manual
Version No.: 1.0
Date: 3/20/2007
Page 19 of 23
Although individual lots with quality as bad as the AQL can be accepted with fairly high
probability, the designation of an AQL does not suggest that this is necessarily a desirable
quality level. The AQL is a parameter of the sampling scheme and should not be confused
with a process average which describes the operating level of a manufacturing process. It is
expected that the product quality level will be less than the AQL to avoid excessive non
accepted lots.
Page 19 of 23
Quality Standards Calculator
User Manual
Version No.: 1.0
Date: 3/20/2007
Page 20 of 23
From the SELECT A LOT SIZE screen press the ADD A PROFILE button to access the ADD A
PROFILE screen.
The ADD A PROFILE screen allows the user to input the following item data to create a
sampling profile:
Item #
Item Number
Lot Size
Inspection Type (Normal, Tightened or Reduced)
# Concurrent “good” to reduce
# Concurrent “fail” to tighten
Press the SAVE PROFILE button to save the sampling profile for future use.
Page 20 of 23
Quality Standards Calculator
User Manual
Version No.: 1.0
Date: 3/20/2007
Page 21 of 23
From the SELECT A LOT SIZE screen press the SELECT A PROFILE button to access the SELECT
A PROFILE screen.
Use the menu slider to select a previously saved sampling profile. Once an item number is
selected the CODE LETTER is automatically populated in the code letter field located below the
menu slider and the item name is automatically displayed.
Select the required Inspection scheme.
Page 21 of 23
Quality Standards Calculator
User Manual
Version No.: 1.0
Date: 3/20/2007
Page 22 of 23
From the SELECT A LOT SIZE screen or any of the INSPECTION LEVEL screens press the MAKE
LOG ENTRY button to access the ENTER LOG DATA screen.
Page 22 of 23
Quality Standards Calculator
User Manual
Version No.: 1.0
Date: 3/20/2007
Page 23 of 23
The ENTER LOG DATA screen allows the user to input the following data to create a sampling
log, import or export log data and print the sampling result:
Enter the date of sampling into the Date Field:
Enter the LOT or BATCH number
Enter the Item Number
Select PASS or FAIL
Select (Normal, Tightened or Reduced)
Press the SAVE LOG button to save the sampling log for future use.
Press the PRINT LOGS button to print the sampling results.
Press the BACKUP/EXPORT button to select the backup/export folder destination.
Press the RESTORE/IMPORT button to select the previously backed up data storage location
and name.
Page 23 of 23