1
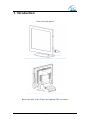
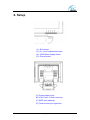
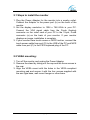
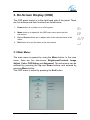
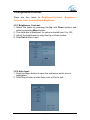
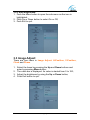
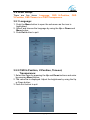
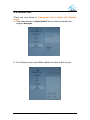
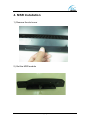
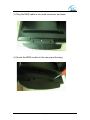
EC-TS-1515 Touch Screen Monitor
User Manual
1. Introduction
Front view with stand
Back view with 15-pin D-sub and optional PS2 connector
EC TS-1515 Touch Monitor User Manual ® Copyright 2010
P. 1
1.1 Accessories:
z
z
z
z
VGA Signal Cable
12VDC, 1.5A Power Adaptor
PS/2 cable for MCR (optional)
USB cable for Touch Screen (optional)
EC TS-1515 Touch Monitor User Manual ® Copyright 2010
P. 2
2. Setup
(1)—Exit button
(2), (3)—Level adjustment button
(4)—OSD Menu display button
(5)—Power button
(A) Power adaptor port
(B) VGA 15-pin, D-sub connector
(C) MCR port (optional)
(D) Touch screen port (optional)
EC TS-1515 Touch Monitor User Manual ® Copyright 2010
P. 3
2.1 Steps to install the monitor
1. Plug the Power Adaptor for the monitor into a nearby outlet.
Connect the Adaptor to the power port (b) on the back of the
monitor.
2. Set the display resolution to 1024 x 768 60Hz in your PC.
Connect the VGA signal cable from the D-sub (Analog)
connector on the video card of your PC to the 15-pin, D-sub
connector (a) on the back of your monitor. If your monitor
displays an image, installation is complete.
3. If your monitor have touch screen or MCR function, connect the
touch screen cable from port (D) to the USB of the PC and MCR
cable from port (C) to the PS/2 keyboard plug of the PC.
2.2 VESA mounting:
1. Turn off the monitor and unplug the Power Adaptor.
2. Remove the stand by taking out the cap and the three screws in
the rear.
3. Align the VESA mount with the holes in the VESA compliant
mounting pad and secure it with the four screws supplied with
the arm-type base, wall mount hanger or other base.
EC TS-1515 Touch Monitor User Manual ® Copyright 2010
P. 4
3. On-Screen Display (OSD)
The OSD panel control is in the right hand side of the panel. There
are five buttons and their functions are listed below:
1.
Power button is to power on or off the panel.
2.
Menu button is to open/exit the OSD main menu and enter the
sub-menus.
3.
Up and Down buttons are to adjust level of the selected items in the
menu.
4.
Exit button is to quit the items in the sub-menus.
3.1 Main Menu:
The main menu is opened by using the Menu button. In the main
menu, there are five sub-menus: Brightness/Contrast, Image
Adjust, Color, OSD Setup and Advanced. The sub-menus can be
selected by pressing the Up and Down buttons and entered by
pressing Menu button.
The OSD menu is exited by pressing the Exit button.
EC TS-1515 Touch Monitor User Manual ® Copyright 2010
P. 5
3.2 Brightness/Contrast:
There are four items in Brightness/Contrast: Brightness,
Contrast, Auto level and Auto Brightness.
3.2.1 Brightness, Contrast:
1. Select the items by pressing the Up and Down buttons and
enter by pressing Menu button;
2. The value bar is displayed. Its value is started from 0 to 100;
3. Adjust the brightness by using the Up or Down button;
4. Push Exit button to quit.
3.2.2 Auto level:
1. Push the Menu button to open the sub-menu as the icon is
highlighted;
2. Push Menu button to start Auto level or Exit to quit.
EC TS-1515 Touch Monitor User Manual ® Copyright 2010
P. 6
3.2.3 Auto Brightness:
1. Push the Menu button to open the sub-menu as the icon is
highlighted;
2. Push Up or Down button to select On or Off;
3. Push Exit to quit.
3.3 Image Adjust:
There are four items in Image Adjust: H-Position, V-Position,
Clock and Phase.
1. Select the items by pressing the Up and Down buttons and
enter by pressing Menu button;
2. The value bar is displayed. Its value is started from 0 to 100;
3. Adjust the brightness by using the Up or Down button;
4. Push Exit button to quit.
EC TS-1515 Touch Monitor User Manual ® Copyright 2010
P. 7
3.4 Colour:
There are four items in Colour: 6500K, 9300K, Native and
Custom colour.
1. Press Up and Down then Menu buttons to select the items
2. When selecting 6500K, 9300K and Native, it will have a tick
next to the words.
3. For Custom colour, press Menu buttons to select R, B and G
and adjust by pressing Up and Down. Then push Exit to quit.
EC TS-1515 Touch Monitor User Manual ® Copyright 2010
P. 8
3.5 OSD Setup:
There are five items: Language, OSD H-Position, OSD
V-Position, OSD Timeout and OSD Transparence.
3.5.1 Language:
1. Push the Menu button to open the sub-menu as the icon is
highlighted;
2. Select and choose the language by using the Up or Down and
Menu button;
3. Push Exit button to quit.
3.5.2 OSD H-Position, V-Position, Timeout,
Transparence:
1. Select the items by pressing the Up and Down buttons and enter
by pressing Menu button;
2. The value bar is displayed. Adjust the brightness by using the Up
or Down button;
3. Push Exit button to quit.
EC TS-1515 Touch Monitor User Manual ® Copyright 2010
P. 9
3.6 Advanced:
There are two items in Advanced: Input select and Factory
recall.
1. Two items shown in Input select but our device would only
support Analogue;
2. For Factory recall, push Menu button to start or Exit to quit.
EC TS-1515 Touch Monitor User Manual ® Copyright 2010
P. 10
3.7 Product Specification
Viewing Area
15 inches
Resolution
1024 x 768
Active Display Area
(mm)
304.128(W) x 228.096(H)
Display Color
16.2 M colors
Response Time (max.)
13ms
Contrast Ratio
700:1
Viewing Angle
Up/Down/Left/Right
65°/ 60°/ 70°/ 70°
Luminance
225 cd/m2
Video Input
VGA Signal
RGB Analog
Power
Adaptor
Input
Universal AC100~240V,
50/60Hz
Output
DC +12V
Management
VESA DPMS
Consumption
≦15W
Storage Temperature
-25℃ ~ 70℃
Operating Temperature
0℃ ~ 40℃
Operating Humidity
10% ~ 85%
Mounting
Standard
VESA compliant
100mm)
Optional
Glass
Strengthen Glass or Touch screen
Panel
Power
Environment
EC TS-1515 Touch Monitor User Manual ® Copyright 2010
(100mm
x
P. 11
4. MSR Installation
1) Remove the slot cover
2) Get the MSR module
EC TS-1515 Touch Monitor User Manual ® Copyright 2010
P. 12
3) Plug the MSR cable to the small connector as shown
4) Screw the MSR module to the rear panel housing
EC TS-1515 Touch Monitor User Manual ® Copyright 2010
P. 13
5) Finish
EC TS-1515 Touch Monitor User Manual ® Copyright 2010
P. 14