1
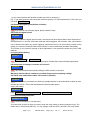
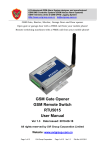
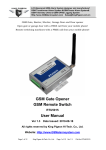
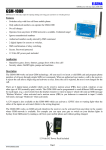
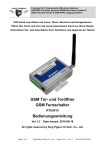
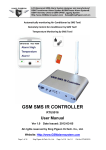
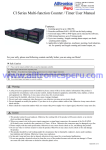
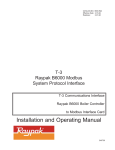
www.securitywireless.co.za
GSM Gate, Barrier, Shutter, Garage Door and Door opener
Open gate or garage door with a FREE call from your mobile phone!
Remote switching machines with a FREE call from your mobile phone!
GSM Gate Opener
GSM Remote Switch
G-Auto
User Manual
Ver 1.1 Date Issued: 2009-12-18
All rights reserved by Wireless Alarms
Website: Http://www.securitywireless.co.za
Page 1 of 11
Wireless alarm
Page 1 of 11 Ver 1.1
File No.:G-Auto
www.securitywireless.co.za
Table of contents
1.
Brief introduction ------------------------------------------------------------3
2.
Safety Directions ------------------------------------------------------------3
3.
Standard Packing list -------------------------------------------------------4
4.
Physical Layout --------------------------------------------------------------4
5.
Features -----------------------------------------------------------------------5
6.
Settings ------------------------------------------------------------------------5
7.
Installation -------------------------------------------------------------------- 8
8.
Technical specifications
9.
Important information ------------------------------------------------------10
10.
Maintenance------------------------------------------------------------------10
11.
Quality Warranty ------------------------------------------------------------10
Page 2 of 11
------------------------------------------------ 9
Wireless alarm
Page 2 of 11 Ver 1.1
File No.:G-Auto
www.securitywireless.co.za
1. Brief introduction
The GSM Gate Opener G-Auto is a very simple device which can be used for authorized door access,
controlling gates, switching of remote equipments, car parking systems. Actually the GSM Gate
Opener G-Auto can be used in places which require to turn ON/OFF your system, machines,
equipments remotely with a FREE call from your mobile phone and protect your assets.
Just dial from Authorized User number then the Barrier and doors are opened, or the machine are
turn on or off by the GSM Gate Opener. There are no call costs, the GSM Gate Opener rejects the call
from authorized number then carries out the turn ON/OFF action.
Moreover, the G-Auto with 2 digital inputs for digital inputs, when any one of the inputs triggered, will
start the siren or switch on the light, in the meanwhile, the G-Auto will send SMS Alert the to owners
immediately. This is very useful if you need protect your assets with low cost solution.
2.Safety Directions
Safe Startup
Do not use GSM Gate Opener when using GSM equipment is prohibited or might bring
disturbance or danger.
Interference
All wireless equipment might interfere network signals of GSM Gate Opener and
influence its performance.
Avoid Use at Gas Station
Do not use GSM Gate Opener at a gas station. Power off GSM Gate Opener when it
near fuels or chemicals.
Power it off near Blasting Places
Please follow relevant restrictive regulations. Avoid using the device in blasting places.
Reasonable Use
Please install the product at suitable places as described in the product documentation.
Avoid signal shielded by covering the mainframe.
Use Qualified Maintenance Service
Maintenance can be carried out only by qualified maintainer.
Page 3 of 11
Wireless alarm
Page 3 of 11 Ver 1.1
File No.:G-Auto
www.securitywireless.co.za
3. Standard Packing List
Control Unit X1, GSM ANT X1, User Manual X1, Connetor X1
Optional Accessories: (Wired Sensors)
PIR Motion Sensor, Glass Break Sensor, Magnetic Window Sensor,Temperature Sensor,Infrared
Beam Fence, Vibration sensor, Siren.
4. Physical Layout
4.1 Control Unit physical layout
Interface Instruciton
Relay
Relay Status, calling in, the relay will work, this LED Indicator will on.
When the wired sensor triggered, the LED indicator will on, Otherwise, is off.
GSM
When insert the SIMcard into the Solt, will flash per0.5S with red color;
When registered GSM Network successful, will flash per 0.5S with Yellow color.
When calling in, the relay works, will flash per 0.5S with red and yellow color.
Power
External 12VDC Power LED indicator
O1 +
Output 1+, the relay rating is 3A/240VAC,connect to the switch of the lock or devices.
O1 -
Output 1 -, the relay rating is 3A/240VAC, connect to the switch of the lock or devices.
Page 4 of 11
Wireless alarm
Page 4 of 11 Ver 1.1
File No.:G-Auto
www.securitywireless.co.za
Siren+
NA
Siren connector, connect to the Siren Positive.
If need the siren start when the sensor triggered, must connect this connector with
12VDC connector. If not use the siren, then needn’t connect it.
Connect to the NA Point, when sensor triggered, will start the siren for 90Seconds.
12VDC
Also, it can be connected to wired sensor to supply 12VDC power for sensors if need.
Common, connect to Siren Negative, another wire of the two wired sensors.
IN1+
Digital input 1+, connect to one wire of the first wired sensor.
IN2+
Digital input 2+, connect to one wire of the second wired sensor.
+12VDC
The external power input. 12VDC,1A.
5. Features
1. No call charges. the GSM Gate Opener rejects the call from authorized number then carries out
the turn ON/OFF action on the first 'ring;
2. Multiple applications. (gates, bollards, barriers, garage doors, shutters and access doors or
machines);
3. Secure - Using caller ID for identification, unknown callers are ignored;
4. Can be operated from anywhere, no distance limit;
5. Add or remove users by SMS Text command;
6. No need to provide a remote control for different users;
7. Up to 64 authorized phone numbers can be configured;
8. Two Digital inputs for door sensor, motion sensors or other sensors to protect your door and
windows, when any one of them triggered, will send SMS alert message and start the siren
immediately;
9. One output with relay rating 3A/240VAC for connecting the switch of the door or machines;
10. The relay action will return a SMS confirmation to the owner, this function is editable by user;
11. Based on GSM Network, applied to many applications.
6. Settings
Notice:
1. The deflaut Password is 1234.
2. All the settings are through SMS commands, please edit the below SMS commands in your
cellphone, then send to the G-Auto Unit.
3. You can program the GSM Gate Opener with SMS commands using your phone. It is safe
to do so because in addition to the fact that other people may not know the number of the
Page 5 of 11
Wireless alarm
Page 5 of 11 Ver 1.1
File No.:G-Auto
www.securitywireless.co.za
4.
5.
6.
7.
8.
9.
10.
11.
SIM inserted in it, we also use a Password that makes it impossible for anybody, who
doesn't know it, to access the system by chance.
The relay output will change the close or open status by every call in, please note it. Means
the first time call it, it will close the relay to switch on the lock, if the second call in is in the
setting time, then the unit will ingore the setting time, and open the relay, to switch off the
lock or machine.
The functions of the two inputs are the same. The two digital inputs will be in armed mode
after 15minutes from the last call-in.
Remember that commands must be CAPITAL LETTERS. It is PWD not pwd, CAP not Cap
etc. Don't add spaces or any other character.
The pwd in the commands is means the password, when you use it, please instand of it by
the digital number; the capital letters PWD is the command letter, use PWD directly.
If you use this model for gate open, you only need to change the password and setup the
authorized numbers.
In some GSM operators they use different SMS parameter, the units can’t return the SMS
confirmation is normal. is not product problem.
Please write down the Authorized number list in a paper for review in further.
The SMS commands that you will certainly use in the GSM Gate Opener are the following:
6.1 Setup New Password
pwd#PWDnewpassword#PWDnewpassword#
if successful, the unit will return:Password modified OK.
For example, the original password is 1234, you want change it to 6666, then you can send the
command below: 1234#PWD6666#PWD6666#
6.2 Setup Authorized number
pwd#TELAuthorized Number#Serial Number#
E.g.: if you want to setup 13570810254 as the first user number, and the password is 1234,then you
can send 1234#TEL13570810254#01# to the G-Auto unit.
Tips: 1. the authorized number means the one who can dial the G-Auto unit to open it.
2.We strongly recommend that the serial number of 01 and 02 are cellphone number, because
of the alarm message only send to the first and second position numbers;
3. The Serial Number is the position to store the authorized number, from 01~64.
6.3 Inquiry the Serial Number’s Authorized number
pwd#TELSerial Number?
E.g.: If you want to know the authorized number at position 2, and the password is 1234,then you can
send 1234#TEL02?to check it.
6.4 Remove the Authorized Number
pwd#TEL#Serial Number?
Page 6 of 11
Wireless alarm
Page 6 of 11 Ver 1.1
File No.:G-Auto
www.securitywireless.co.za
(or you can overwrite with another number you wish to change it).
E.g.: if you want to remove the authorized number at position 12, and the password is 1234, then you
can send 1234#TEL#12?
6.5 Disable the digital inputs(Deflaut is disable)
pwd#DA#
Tips: if you want to use the digital inputs, please enable it firstly.
6.6 Enable the digital inputs
pwd#EA#
Tips: if you enable the digital inputs function, the sensors will enter Armed status after 10minutes of
the lastest dial-in. in the first 10minutes, when the sensor triggered, will not alarm, after 10minutes,the
unit in armed mode, when any sensor triggered, will start the siren (if you connected) or switch on the
light(if you connect it) and send SMS to the Position 01 and 02 authorized numbers immediately.
This function is very useful for garage or other applications. It can protect the assets for you by GSM
Network.
6.7 Inquiry Alarm Setting
pwd#AL?
Reply:Disable Aalrm or Enable Alarm
Tips: Disable alarm means disable the digital inputs, Enable alarm means Enable digital inputs.
6.8 Setup allow all calling in numbers can access it
pwd#AA#
Tips: This command allows anybody calling the SIM number to access it.
Warning! with the above command you allow free access to anybody calling!
6.9 Setup only authorized number can access it (Deflaut)
pwd#AU#
Tips: With the above command you allow only people that are in the authorized number list can
access the G-Auto. This is the standard and recommended option.
Inquiry this setting
pwd#AC?#
Relpy: Allow all numbers can access it or Allow User Number can access it only.
6.10 Setup the relay close time
pwd#GOTTime#
#
Tips: The time should be in 0~9.5seconds.
This command is useful in case you need to keep the relay closed (or button pressed) longer. The
deflaut time is 0.5seconds (500 ms). You can change it with the GOT command. The relay colsed
Page 7 of 11
Wireless alarm
Page 7 of 11 Ver 1.1
File No.:G-Auto
www.securitywireless.co.za
time is twice as the number you set, e.g.: if you set pwd#GOT19#, means the relay closed
19/2=9.5Seconds.
To check the value, you can use the command pwd#GOT? , the unit will reply the current value.
If you want to let the relay always closed until you call it next time, then you can set the time as 00, the
format is pwd#GOT00#, the relay will be always closed untill next time call in. in this case, only the 1st,
2nd, 3rd authorized number can access it. The other authorized numbers can not access the unit. This
is very useful for remote switch on or switch off the electricity appliance or equipment or device for a
long time.
6.11 Modify the digital input type
pwd#KEYNC#
Modify
the digital input type as NC, if the sensor you used with this unit is NC, the you should set the
#
unit as NC type.
Tips: when you set the digital inputs as NC, if you don’t use the input, please connect the digital
inputs by a wire to short it. Otherwise, it will alarm. E.g.: if you only use the input 2, then you should
use a wire to connect the input and GND point to make it as Normal Close.
pwd#KEYNO#
Modify
the digital input type as NO, if the sensor you used with this unit is NO, the you should set
#
the unit as NO type. The default is NO.
6.12 Check GSM signal quality
pwd#CSQ?
#
Check
GSM signal quality. This command is useful to see what is the GSM network signal level your
GSM Gate Opener is receiving. If you send the command.You should receive a SMS with signal
quality in range 0 to 32 (if it is 0 we doubt it will ever answer). You should have a signal above 12 to
be sure of being able to open the gate in any condition. Better if above 16. You should add an
external GSM antenna if this is not the case, or eventually even change operator with another that
serves your area better.
6.13 Enable return SMS confirmation when Relay action
pwd#R#
#
Tips: if you enable it, when the relay action, close or open, the unit will return a SMS confirmation to
you. You can disable it by the following command: pwd#N#. deflaut is no return SMS confirmation
when relay action. This is very useful when you use the G-Auto to control the equipments remotely.
To check the settings, you can use the command: pwd#M? it will return: Retrun SMS or Not Retrun
SMS
6.14 Modify the Alarm SMS message when inputs triggered
The user can modify the digital inputs alarm SMS message by the following command, the SMS Alert
Page 8 of 11
Wireless alarm
Page 8 of 11 Ver 1.1
File No.:G-Auto
www.securitywireless.co.za
message should less than 30 letters. When the sensor triggered, these SMS message will send to the
Position 1 and Postion 2 cellphone numbers to alert the user. the default SMS Alert message is : Door
Open Alarm!
pwd##TEXT1xxxxxxxxxxxxx#
# above command is use to modify the digital input 2 alarm SMS text message.
The
pwd##TEXT2xxxxxxxxxxxxx#
The
# above command is use to modify the digital input 1 alarm SMS text message.
E.g.: Modify the digital input1 alarm SMS Text message as Left Windows Open! If the password is
1234, then you can send 1234##TEXT2Left Windows Alarm!#
Tips:
1. This command includes two ##;
2. The xxxxxxxx in this command is indicates the message contents;
3. The TEXT1 is part of the command, refer to the input 2 message;
4. The TEXT2 is part of the command, refer to the input1 message.
7. Installation
Before installing the control unit and sensors and sirens, please help to test the system firstly,
including wired sensor, power supply, gsm signal, etc.
7.1 Insert SIMcard into Control Unit
In the backside of the control unit, please install the GSM SIM card.
7.2 Connecting the Wired Sensors
Please help to see below wiring diagram, then fixed the related wired sensors, the sensors
connect to the related digital inputs, the siren should connect to the Siren and Com connection
port.
7.3 Connecting the Electronic Lock or Electricity equipments
Page 9 of 11
Wireless alarm
Page 9 of 11 Ver 1.1
File No.:G-Auto
www.securitywireless.co.za
7.4 Install the Mainframe
The mainframe should be installed in the postion that person can not get it, and there’ re with a
power source as well as enough GSM signal coverage.
8. Technical specifications
Rated Voltage: 12VDC 1 A
Page 10 of 11
Wireless alarm
Page 10 of 11 Ver 1.1
File No.:G-Auto
www.securitywireless.co.za
Working temperature:
-10℃~+60℃
Storage temperature:
-20℃~+60℃
Relative humidity:
10-90%, No condensation
Work frequency:
900/1800MHz
Communication protocol: GSM PHASE 2/2+ (include data service)
Wired Zones: 2
Related Voltage of the Output Relay: 3A/240V AC
Net Weight: 0.50Kg
9. Important information
1)
2)
3)
4)
Please read the User Manual carefully before you install the Control Unit and set the Control Unit.
Install the system in a hidden place.
Avoid getting water into the Control Unit.
Have a secure connection to the main power supply.
10. Maintenance
1) In case of failure, please contact the distributor or manufacturer.
2) If the remote control works, but the Control Unit fails to send SMS texts, switch the power of
Control Unit off and switch it on after one minute. Test this system after another minute, or check
the settings are correct and the GSM Signals are strong enough.
3) If the Control Unit can run and sensors work, but cannot send SMS texts, please change SIM
Card to check it.
4) If the problem cannot be solved, please contact the distributor or manufacturer.
11. Warranty
1) This system is warranted to be free of defects in material and workmanship for one year from the
date of purchase.
2) This warranty does not extend to any defect, malfunction or failure caused by abuse or misuse
by the Operating Instructions. In no event shall the manufacturer be liable for any alarm system
altered by purchasers.
The End!
Any questions please help to contact us feel free.
Email Us: [email protected]
Http://www.securitywireless.co.za
Http://www.securitywireless.co.za
Page 11 of 11
Wireless alarm
Page 11 of 11 Ver 1.1
File No.:G-Auto