1
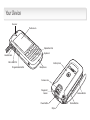
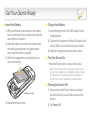
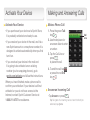
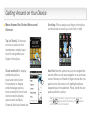
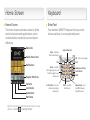
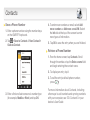
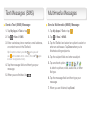
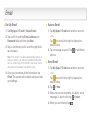
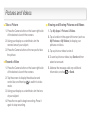
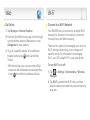
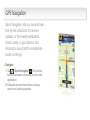
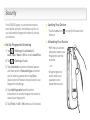
Get started
All you need to know to get going.
MOTOROLA ES400S
Welcome!
Sprint is committed to developing technologies that give you
the ability to get what you want when you want it, faster than
ever before. This booklet introduces you to the basics of
getting started with Sprint and your new Motorola ES400S.
The services described in this guide may require a subscription to a service plan and/or may incur additional charges. Not all
services will work on all devices. Coverage is not available everywhere.
Important Privacy Message. Sprint’s policies often do not apply to third-party applications. Third-party applications may access your
personal information or require Sprint to disclose your customer information to the third-party application provider. To find out how a
third-party application will collect, access, use, or disclose your personal information, check the application provider’s policies, which
can usually be found on their website. If you aren’t comfortable with the third-party application’s policies, don’t use the application.
©2010 Sprint. SPRINT and the logo are trademarks of Sprint. Other marks are property of their respective owners.
Your Device
Receiver
Touchscreen
Optical Nav Pad
Keyboard
Headset Jack
Micro USB Port
Programmable Button
Battery Cover
Microphone
Camera Lens
Fingerprint
Reader
Camera Button
Volume Buttons
Power Button
Stylus
Get Your Device Ready
Charge the Battery
Insert the Battery
1.With your thumbs, press down on the battery
cover on the back of your device and slide the
cover down to remove it.
2.Align the battery’s contacts with those inside
the battery compartment and gently press
down until the battery is seated.
3.Slide the orange battery lock latch down to
secure the battery.
1.Insert the larger end of the USB cable into the
charging head.
2.Connect the smaller end of the USB cable to the
micro USB port on the left side of your device.
3.Plug the charging head into a power outlet.
Turn the Device On
•Press the Power button on top of the device.
Tip: The first time you turn the device on, you will see a
splash screen followed by a calibration window. Remove
the stylus from the back of the device and follow the
onscreen instructions to calibrate your touchscreen.
Turning the Device Off
Battery Lock Latch
4.Replace the back cover.
1.Press and hold the Power button for at least
five seconds until you see the power options
screen.
2.Tap Power Off.
Activate Your Device
Activate Your Device
•If you purchased your device at a Sprint Store,
it is probably activated and ready to use.
•If you received your device in the mail, and it is a
new Sprint account or a new phone number, it is
designed to activate automatically when you first
turn it on.
•If you received your device in the mail and
it is going to be activated on an existing
number (you’re swapping phones), go to
sprint.com/activate and follow the instructions.
When you have finished, make a phone call to
confirm your activation. If your device is still not
activated or you do not have access to the
Internet, contact Sprint Customer Service at
1-888-211-4727 for assistance.
Making and Answering Calls
Make a Phone Call
1.Press the green Talk
key
.
2.Use the keyboard or
onscreen dialer to enter
a number.
3.Tap the Call Line or
press
to place the call.
Call
Line
4.To end the call, tap
or press the red End
key
.
Answer an Incoming Call
•Tap Answer or press
.
Tip: To ingore the incoming call and send it directly to
voicemail, tap Ignore.
Getting Around on Your Device
Move Around the Device Menus and
Screens
Scrolling: Flick or swipe your finger or the stylus
on the screen to scroll up, down, left, or right.
Tap (or Touch): To choose
an icon or option on the
touchscreen, simply tap or
touch it using either your
finger or the stylus.
Touch and hold: To display
additional options,
touch and hold an item.
For example, to display
email message options,
from an email list, touch and
hold an email to display
options such as Reply,
Forward, Mark as Unread, etc.
Nav Pad: Use the optical nav pad to navigate the
screen either as a 4-way navigator or as a mouse
cursor. Move your thumb or finger across the nav
pad to move the cursor or to highlight options,
depending on the selection. Press (click) the nav
pad to select an option.
Tip: To switch between 4-way and cursor, press and
hold .
appears briefly for 4-way, and
appears
briefly when cursor is enabled.
Home Screen
Keyboard
Home Screen
Enter Text
The home screen provides access to all the
device’s features and applications, and is
customizable to maximize your workplace
efficiency.
Your device’s QWERTY keyboard lets you enter
text as easily as on a computer keyboard.
Status Bar
Simple Home Card
Notifications
Program Shortcuts
Contacts
Lock Device
Applications
Start Menu
Tip: For a convenient overview of your device’s setup
options, tap Start
> Getting Started.
Scan – Activate
Bar Code Reader
Optical Nav Pad
OK – Close open apps
Talk
End
Email – Launch
Messaging; press and
hold to toggle 4-way
and cursor
fn (Function) – Access
alternate (orange)
characters
Backspace/Delete
Return/Enter
Shift
Start – Launch
Start menu
Space/Sym – Use
with fn to display
Symbols menu
Voicemail
Set Up Your Voicemail
All unanswered calls are automatically
transferred to your voicemail, even if your phone
is in use or turned off. You should set up your
voicemail and personal greeting as soon as
your phone is activated:
1.Press and hold 1 or press
and then tap
and hold 1 on the phone keypad.
2.Follow the system prompts to create your
password and record your name and greeting.
Voicemail Password
(do not share): _______________________
Sprint strongly recommends setting a voicemail
password. Without a password, anyone who
has access to your phone can access your
messages.
Retrieve Your Voicemail
From your device:
1.Press and hold 1 or press
and then tap
and hold 1 on the phone keypad.
2.Enter your password.
From any other phone:
1.Dial your wireless phone number.
2.When your voicemail answers, press .
3.Enter your password.
*
Contacts
Save a Phone Number
1.Enter a phone number using the number keys
on the QWERTY keyboard.
2.Tap > Save to Contacts > New Contact >
Outlook Contact.
4.To enter more numbers or email, select Add
more numbers or Add more e-mail/IM. Select
the Info tab at the top of the screen to enter
more types of information.
5. Tap OK to save the entry when you are finished.
Retrieve a Phone Number
1.From the home screen, tap Contacts. Scroll
through the entries or tap the Enter a name field
and begin entering the contact name.
2. To display an entry, tap it.
3.To call the entry’s default phone number,
press
.
3.Enter a first and last name and a number type
(for example, Mobile or Work) and tap OK.
For more information about Contacts, including
other ways to add contacts and syncing contacts
with your computer, see “2D. Contacts” in your
device’s User Guide.
Text Messages (SMS)
Send a Text (SMS) Message
1.Tap My Apps > Text or tap
2.Tap
Send a Multimedia (MMS) Message
1.Tap My Apps > Text or tap
.
> New > SMS.
2.Tap
3.Enter a wireless phone number, email address,
or contact name in the To: field.
Tip: To enter numbers, press fn
twice (you will
see
at the bottom of the screen). Press fn
again
to return to regular text entry.
4.Tap the message field and then type your
message.
5.When you are finished, tap
Multimedia Messages
.
.
> New > MMS.
3.Tap the To field and select an option to select or
enter an addressee. Tap Done when you’re
finished adding recipients.
4.Tap the subject field and enter a subject.
5.Tap an attach option (
)
to attach a picture, video, audio file, or other
file type.
6.Tap the message field and then type your
message.
7. When you are finished, tap Send.
Email
Set Up Email
1.Tap My Apps > E-mail > Setup E-mail.
2.Tap and fill in both the E-mail address and
Password fields and then tap Next.
3.Tap or use the nav pad to scroll through fields
as necessary.
Note: If the system is unable to automatically retrieve an
account’s settings, you will need additional information
such as account type (POP or IMAP), mail server names,
user name and password, and domain name.
4.Once you’ve entered all the information, tap
Finish. The system will complete setup and test
your settings.
Access Email
1.Tap My Apps > E-mail and select an account.
– or –
Tap
and scroll left or right to display the
desired inbox.
2.Tap a message to open it. Tap for additional
options.
Send Email
1.Tap My Apps > E-mail and select an account.
– or –
Tap
and scroll left or right to display the
desired inbox.
2.Tap > New.
3.Enter one or more recipients, a subject, and a
message. To attach a file, tap > Insert.
4.When you are finished, tap
.
Pictures and Videos
Take a Picture
1.Press the Camera button on the lower-right side
of the device to launch the camera.
2.Using your display as a viewfinder, aim the
camera lens at your subject.
3.Press the Camera button or the nav pad to take
the picture.
Record a Video
1.Press the Camera button on the lower-right side
of the device to launch the camera.
2.Tap the screen to display the status bar and
control bar, and then tap
to switch to video
mode.
3.Using your display as a viewfinder, aim the lens
at your subject.
4.Press the nav pad to begin recording. Press it
again to stop recording.
Viewing and Sharing Pictures and Videos
1.Tap My Apps > Pictures & Videos.
2.Tap a location in the upper left corner (such as
My Pictures or My Videos) to display your
pictures or videos.
3.Tap a picture or video to view it.
4. To send a picture or video, tap Send and then
select an account.
5.Address the message, add any additional
information, and tap
or Send.
Web
Go Online
1.Tap My Apps > Internet Explorer.
2.From the SprintWeb home page, scroll through
current articles, launch a Web search, or tap
Categories for more options.
3.To go to a specific website or for additional
browser options, tap
and use the Web
Toolbar.
•With the toolbar open, you can enter a Web
address in the address bar, access favorites,
or tap
for additional options and tools.
Wi-Fi
Connect to a Wi-Fi Network
Your ES400S lets you connect to available Wi-Fi
networks for fast email connections, corporate
intranet plans, and Web browsing.
There are two options for managing your device’s
Wi-Fi settings, depending on your usage and
security needs. For information on managing
Wi-Fi, see “2E. Using Wi-Fi” in your User Guide.
To turn Wi-Fi on or off:
1.Tap
> Settings > Connections > Wireless
Manager.
2.Tap Wi-Fi to enable the Wi-Fi radio, and then
select a network and enter any required security
keys, etc.
GPS Navigation
Sprint Navigation lets you see and hear
turn-by-turn directions to a known
address, or find nearby restaurants,
stores, banks, or gas stations. Get
information about traffic and alternate
routes on-the-go.
Navigate
1.Tap
> Sprint Navigation . (The first time,
follow the prompts to download and set up the
application.)
2.Follow the onscreen instructions to access,
launch, and use the application.
Sprint WorldwideSM Wireless Service
Activating Sprint Worldwide Service
Activating Global Roaming Mode
Before using your ES400S internationally in
global roaming mode, you must activate Sprint
Worldwide service.
You can set your device to enter global roaming
mode automatically when you travel
internationally.
Visit sprint.com/international.
1.Tap
> Settings > Connections > Phone
Network Setup.
•Click Chat with us to talk online with a Sprint
international support representative.
– or –
•Click Email us to send an email to a Sprint
representative.
You can also call Sprint Worldwide Customer
Support at 1-888-226-7212, option 2.
For additional information on Sprint Worldwide
services and availability, visit sprint.com/sww.
2.Tap the Band tab at the bottom and then tap
Network type > CDMA First (to communicate
first with CDMA networks) or GSM/UMTS First
(to communicate first with GSM/UMTS
networks abroad).
Tip: If you’re travelling in a country with voice-only CDMA
coverage and voice-and-data GSM coverage, you will
need to select GSM/UMTS First to access data services.
Note: While in the U.S., your device will only operate in
CDMA mode; domestic GSM networks will not be
accessible with this device.
Bar Code Scanning
Activate DataWedge
DataWedge lets you use the 3.2MP digital
camera on your ES400S to scan and decode
bar code information.
1.Tap
> Settings > System > DataWedge.
2.Tap Running to enable scanning. The radio
button will change to “Yes” and status will
show “Ready.”
3.Tap Basic configuration > Barcode input,
ensure that Camera Scanner Driver is
selected, and tap OK.
Scan a Bar Code
1.With DataWedge activated (see previous
instructions), launch an application that
supports text input, such as Excel Mobile or
Word Mobile. (Tap My Apps > Excel Mobile
2010 or Word Mobile 2010.)
2.Aim the camera lens at a barcode.
3.Press and hold the Scan key. You’ll see the bar
code on the display screen. Use the red aiming
line to scan the bar code.
4.You’ll hear a beep when the scan is complete.
The bar code information will be recorded in the
open application.
Note: You cannot use the device’s camera while
DataWedge is enabled, so make sure to disable
DataWedge when you’re finished. Tap
> Settings >
System > DataWedge > Running to disable it and
re-enable your camera.
Security
Your ES400S gives you enhanced control
over device security, including an option to
use a biometric fingerprint reader to unlock
your device.
Set Up Fingerprint Unlocking
1.Tap
> Settings > LockSwitch >
Lock Plus > Save > OK to enable Lock Plus.
2.Tap
> Settings > Lock.
3.Tap Auto lock and select a timeout period,
and then select a Password type and enter
and re-enter a password and tap Save.
(Auto lock and Password must be set to use
fingerprint unlocking.)
4.Tap Add fingerprint and follow the
instructions to use the fingerprint reader to
record your fingerprint.
5.Tap Finish > OK > OK when you’re finished.
Locking Your Device
•Tap the Lock icon ( ) or wait for the auto lock
timeout.
Unlocking Your Device
•With the lock screen
displayed, swipe your
fingerprint over the
scanner.
– or –
•Drag the gray bar
down, enter your
password, and
press the nav pad.
Manage Your Account
Online: www.sprint.com
•make a payment, see your bills, enroll in
online billing
•check minute usage and account balance
•see or modify the details of your Sprint
service plan
•get detailed instructions and download
content
From Your Sprint Phone
*
•press 3
to make a payment
*
•press 2
to access a summary of your
Sprint*
service plan or get answers to other
•press 4
to check minute usage and
account balance
questions
*
•press 7
to add a new line of service,
upgrade your phone, purchase accessories, or
access other account services
From Any Other Phone
•Sprint Customer Service:
Dial 1-888-211-4727
•Business Customer Service:
Dial 1-800-927-2199
Helpful Sprint Information
Total Equipment Protection
The protection you need so you can
be worry free
Should anything happen to your phone, you’ll
have a worry-free way to ensure that you get
connected again soon.
•Coverage includes:
Loss, theft, routine maintenance, physical or
liquid damage, mechanical or electrical
problems, failure from normal wear and tear.
•For more information:
See the Total Equipment Protection brochure
available at any participating retail location
or go to sprint.com/tep for more details.
To enroll within 30 days of activation, call
1-800-584-3666.
Total Equipment Protection is a service provided by Asurion Protection
Services, LLC, Continental Casualty Company’s (a CNA company)
licensed agent for the customers of Sprint.
Sprint 411
Dial 411 for nationwide listings, movie show
times, restaurant reservations, driving directions
and more. Spanish-speaking operators are
available. See sprint.com for pricing and
more details.
Resources For Your Phone
•This Get Started Guide to get you up and running.
•User Guide – View the comprehensive
User Guide to the Motorola ES400S.
•Web – Go to sprint.com/support to download the
latest version of the User Guide, and to access
troubleshooting and other resources.
Printed in China
72-142420-01