1
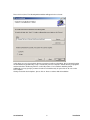
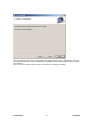
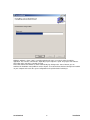
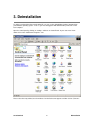
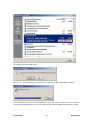
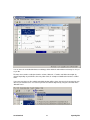
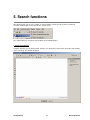
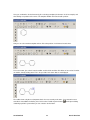
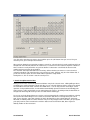
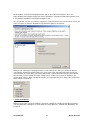
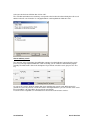
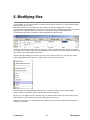
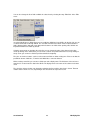
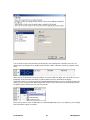
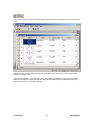
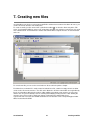
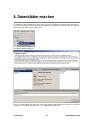
ensochemSheet
Version 1.4
User manual
enso Software GmbH
Schulhohlstraße 10a
64711 Erbach
Tel.
+49 (6062) 910888
Fax
+49 (6062) 910886
E-mail [email protected]
Contents
1.
Overview
1
2.
Installation
2
3.
Deinstallation
7
4.
Opening files
10
5.
Search functions
13
6.
Modifying files
18
7.
Creating new files
22
8.
Combining data sheets
23
ensochemLab
i
Contents
1. Overview
This user manual explains the administration (installation, definition of settings) as well as the usage of
ensochemSheet.
ensochemSheet is an application for easy tabular management of structures in SD files. Additionally, you can
create, modify and view an arbitrary number of fields containing alphanumerical data. A number of functions
makes the data management and search process easier than ever. The user is guided though a comfortable
multi-window system that enables you to work a with multiple files concurrently.
The part of this documentation that explains the usage of ensochemSheet is written as a continuous line of
lessons. We recommend all new users reading the chapters from 1 to 8 before beginning their daily work with
ensochemSheet.
Thank you for choosing products of enso Software GmbH. We wish you an easy and pleasant work with
ensochemSheet. Visit our homepage at:
www.enso-Software.com
ensochemLab
1
Übersicht
2. Installation
In order to install ensochemSheet on a single workstation PC, you just have to execute the file „Setup.exe“ on
your installation CD-ROM and follow the Steps on your screen. Please note that you need administrative
permissions on the respective computer.
The setup program will check the existence of some system services first and, if necessary, install or
upgrade them. Therefore, you may need to restart your computer at this step of the setup process.
After the installation program has loaded, you will see the following window:
This dialog just contains some informative notices and the legal copyright notice. You do not need to enter
any data here.
ensochemLab
2
Installation
Please click on „Next“. The following window window will appear in the assistant:
In this dialog, you can select in which directory you want to install ensochemSheet. We recommend keeping
the default directory predefined by setup. It is located in your local computer’s default directory for programs
and beneath that a subdirectory which is used for all products of enso Software GmbH by default.
Additionally, you may specify if you want to install ensochemSheet only for yourself or for all users on the
local computer.
Having selected the desired options, please click on “Next” to continue with the installation.
ensochemLab
3
Installation
This screen indicates that setup is ready to perform the actual installation process. Until this time, setup has
not changed any part of your system configuration (excluding the system service upgrade before the installer
was launched).
Click on “Next” to install ensochemLab now or click on “Back” to change your settings.
ensochemLab
4
Installation
While this window is shown, setup is currently performing the steps necessary in order to install the
application. This can take some minutes, depending of your computer’s speed. The progress bar indicates
the position of the step that is currently executed.
Please wait until the next window is shown automatically. By clicking on the “Cancel” button, you can
terminate the installation. Setup will then remove all parts of ensochemSheet that have already been installed
on your computer and restore the system configuration to the position before launching it.
ensochemLab
5
Installation
When this screen es shown, ensochemSheet has been installed successfully. You can now start it by clicking
on “Programs -> enso Software GmbH -> ensochemSheet -> Launch ensochemSheet” in your start menu.
Please notice that you need to install a separate Java Virtual Machine when running ensochemSheet on
Windows XP with Service Pack 2 or later. You can download such an engine from
http://www.java.com/en/download/windows_automatic.jsp
at not charge.
ensochemSheet is multilingual. At startup, the program determines whether it is running on an English or a
German system and then chooses the appropriate language. You can either change your language by using
the windows-integrated language options in your control panel or override this decision by starting the
application with the command-line parameter /LNG=DE for German or /LNG=EN for English.
ensochemLab
6
Installation
3. Deinstallation
To delete ensochemSheet from a workstation PC, you can use the deinstallation functions integrated into
your Windows operating system. To do so, you must be logged in with administrative permissions on the
local computer.
Open the control panel by clicking on “Settings” and then on “Control Panel” in your start menu. Noew
double-click on the “Add/Remove Programs” icon:
Please select the entry entitled „ensochemSheet” from the list that now appears and then click on „Remove“:
ensochemLab
7
Deinstallation
The following question box will appear:
Click on “Yes”. The Deinstallation procedure of the ensochemSheet setup program will be launched:
Please wait while setup removes the ensochemSheet components from your system. This process may take
some minutes depending on the speed of your computer. After the Deinstallation has finished successfully,
ensochemLab
8
Deinstallation
no explicit information message will be displayed. ensochemSheet will just be removed from the list of
installed applications without any further notice.
Some files, however, will not be deleted from you system as they are libraries that are shared between a
large number of applications from enso Software GmbH. We recommend keeping this files. You should only
delete them, if no other applications from enso Software GmbH are installed on your computer:
•
•
•
ensoChemSearch.dll
ensoChemViewer.dll
ensoChemRoutines.dll
All of these files are located in your „Windows\System32“ directory where „Windows“ is your Windows
installation folder. Once again, we do not recommend at deleting any of these files at all.
ensochemLab
9
Deinstallation
4. Opening files
At this position of the manual, you should already have at least one SD file that you can fully modify. For
testing and education purposes, we recommend not using productive data files, but to work with copies of
them. Additionally, a sample SD file can be downloaded from our homepage.
After starting the program, please click on the „Open“ symbol in your toolbar:
In the dialog that appears, please select the file that you want to open and then click on “OK”. Within the
ensochemSheet program window, a new sub ordinary window, the data sheet, will be opened. While the data
is being initialized, it contains just a small information hint. Depending on the speed of your computer, it can
take several minutes to index a large SD file. While the initialization process is running, you cannot terminate
the program or work with that file, but you can open other files.
After the initialization process has finished, the first data of your SD file will already be shown. A progress bar
in the status bar indicates the status of the full load operation. If this indicator has reached 100 percent, you
file has fully been loaded an all its data is visible in the data sheet.
Even before this time, you can already view the visible data and modify all its data fields. This manual will
explain in a later chapter how you can modify data.
ensochemLab
10
Opening files
You can move the embedded window to an arbitrary position within the main window and change its size just
as you like.
The data sheet contains a table that show the columns “Molecule”, “Formula” and “Molecular weight” by
default. Depending on your SD-File, there may other fields, for example an identification number or a trivial
name.
If you open more than one file, multiple embedded windows will be shown, that can also be arranged to each
other as you want them to be. You can also perform an automatic alignment by using the commands in the
“Window” menu:
ensochemLab
11
Opening files
The following image shows the result of the selected function „Arrange vertically“ with two different files open:
In addition, you can find all alignment functions in the toolbar, too:
The symbols in the toolbar correspond exactly to the images in the menu.
ensochemLab
12
Opening files
5. Search functions
After opening a file, you can use a number of search functions to find a specific record or a number of
records in it. All functions can be found in the “Search” menu:
This chapter will focus on all three search options on the following pages.
1. Search for molecules
Using this function, you can either perform structure or a substructure search in the current file. After clicking
on the menu item, this window will appear:
ensochemLab
13
Search functions
Here you can draw the desired structure by first selecting a template (the benzene circle for example) and
then clicking at a position of the canvas. The template will then be inserted at this position:
Now you can select another template an then click at the position of a C-Atom to insert it there:
To insert an atom, just select it from the toolbar on the left side and then click either on free end of a bond or
on another, already existing atom. This is also possible for C-atoms that are not displayed.
The toolbar shows only the most important, that is the most recently used atoms. If you want to insert an
atom that is not available in that list, please click on the “Periodic System” button (
containing a periodic system where you can select the desired atom:
ensochemLab
14
). It will open a dialog
Search functions
Just click on the atom that you want to select and then press the „OK“ button. Now you can use it in your
structure just as you use the preselected atoms.
After you have drawn the structure that you want to search for, select the desired search mode from the list at
the right side of the window (Structure or substructure). A search for an exact structure only finds substances
whose structures exactly match the one you have drawn. A substructure search finds all structures that
contain your query structure at any position.
The checkbox “Consider tetrahedral stereo chemistry” defines whether you want to use stereo chemical
comparison methods. This function makes your search more exact, however, may also slow it down a bit. If
you do not check the option, all stereo bonds will be regarded as single bonds.
Having done so, click on “Search” start the search process.
2. Search for alphanumerical data
When you click on the “Search for alphanumerical data” entry in the “Search” menu, a dialog will open where
you define your search parameters. On the left side, you can select the field you want to search in. By default,
ensochemSheet offers the fields “Formula” and “Molar mass”. You can only search in one field per search
operation. In the predefined fields, ensochemSheet automatically separates between text and floating point
value searches. In file-specific field, you can only perform text searches. According to that, the data fields on
the right side will change whenever you click on a data field of another type.
As you can see in the image below, text searches can be performed by first entering a text and then selecting
the search mode. When doing an exact search, the text in the data file has to exactly match your search
term. If your select the “starts with” function, the text in the data file just has to begin with your query term.
After that, an arbitrary number of other characters may occur. By using the mode “ends with”, you specify that
your query term has to be located at the end of the data to make it a hit. Before that, there may be an
arbitrary number of other characters.
ensochemLab
15
Search functions
Die Auswahlbox „Groß-/Kleinschreibung beachten“ gibt an, ob bei der Suche zwischen Groß- und
Kleinschreibung unterschieden werden soll. Ist das Feld aktiviert, so werden nur Datensätze gefunden, auch
in der jeweiligen Schreibweise der Eingabe angegeben sind.
The selection box „Perform case-sensitive comparison” constitutes whether your search term has to be in the
same case letters as the text in the database. By default, this option is not checked.
When you are searching for a floating point value, ensochemSheet also offers you a number of different
search modes (shown in the picture below). The “exact search” finds only values that match exactly your
entered number. The “lower than” and “greater” than functions search for all values that are lower / greater
than the value you have entered. The option “Range search” enables you to search for all numbers in a
specific range of values. When selecting this function, you are prompted to enter a lower and a greater value
that specify the search range.
3. Search for duplicates
When you click on the “Search for duplicates” menu item, a window for selecting the data filed you want to
search for duplicates in will appear. In every SD file, the fields “Molecule”, “Formula” and “Molar Mass” are
predefined.
ensochemLab
16
Search functions
Select your desired search field an then click on “OK”.
The “Consider tetrahedral stereo chemistry” corresponds to the functions that have already been discussed
with the molecule search function. It is only applied when searching within the “Molecule” field.
After an arbitrary search
The status bar of the current data sheet will display a progress bar that indicates how much of the search
process has already completed. While the search is running, you can continue to work with the program
normally. The whole work is done in the background. If you want to cancel the search, just press the “Esc”
key.
As soon as the search is finished, another data sheet containing your search results will be opened. In
general, the source file you have searched in remains unchanged. However, you cam save the search result
into a new SD file – this topic will be discussed in the next chapter.
A search result is a regarded as a normal data sheet and can be used for future searches.
ensochemLab
17
Search functions
6. Modifying files
In every SD file, you can change all fields except the formula and the molar mass as they are automatically
generated out of the structure.
Every other field can be checked with one click and then be edited by clicking into it once again.
ensochemSheet automatically detects if you have selected a structure or alphanumerical data and shows the
appropriate edit control: Either the structure editor as explained in chapter 5 will be displayed or
ensochemSheet will create an edit field for data manipulation directly in the table:
The dialog for modifying structures looks exactly as the one discussed in the previous chapter, except that
you cannot select a search mode and that the application does not allow you to enter special query atoms. All
other functions are available without restrictions.
Instead of directly modifying your structure, you can use the “Import” function, too. Just open the context
menu by right-clicking on the “Molecule” cell you want to change and select “Import”:
A standard “file open” dialog will appear where you can select the mol file you want to import into the
datasheet. Please note that the current content of the cell will be replaced!
Of course, it is as simply to export a structure from your datasheet into a mol file: First click on the “Export”
button and then select a location and a filename where you want to save it.
However, these functions are only available for the “Molecule” field. You cannot export other data into files
using these commands.
ensochemLab
18
Modifying files
You can also change the list of fields available in a data sheet by selecting the entry “Edit fields” in the “Edit”
menu:
ensochemLab will open a dialog where you can modify the definition of your SD file. On the left side, you can
see all the fields that are already defined. The selection mark left of the column names indicate whether a
field is displayed in the data grid or not. Only marked columns are visible. After opening a file, all fields are
imported and marked as visible by default.
Using the green arrows on the right side of the list, you can change the order of the columns in the data
sheet. By clicking on the down arrow, you can move a column one position towards the back. By clicking on
the up arrow, you can move a field one position towards the beginning.
The “plus” and “minus” buttons can be used to create new fields or delete existing ones. Please note that the
predefined columns “Molecule”, “Formula” and “Molar Mass” cannot be deleted.
When creating a new field, you can enter a field name and a display name. The field name is the reference
name that is used to locate the data in the SD file. The display name is the name of the columns in the data
sheet.
The check box “Show selection row” determines whether the first row in the data sheet is shown. That row
contains either a mark or a cross, depending on the selection of the respective record.
ensochemLab
19
Modifying files
You can delete records from a SD file by deselecting the corresponding rows in the data sheet. This can
either be done by clicking on the activation mark in the first column of the data sheet or by using the context
menu.
After you have deselected the record, there will be a red X at its right side. When you save the file (see next
paragraph), all deselected records will be excluded. However, they are still visible in the display.
If you want to delete a record from the display immediately without having to first save and then freeload your
SD file, you can use the function “Delete deselected records” in your context menu to automatically clean up
the display. Please note that this does not save your file!
After you have done a search, modified data or combined multiple data sheets (see chapter 8), your resulting
data sheet will be marked as modified:
ensochemLab
20
Modifying files
You can save it either by clicking on the disk symbol in the toolbar or by selecting the „Save“ entry in the „File“
menu:
Now you only have to enter a file name and select a location for your data sheet to save your data to disk,
CD-Rom or a network share!
It can take some minutes to save large data sheets into SD files, depending on the speed of your computer.
While ensochemSheet is saving your data, the status bar will contain a progress indicator that shows you
how much of the process is already completed.
ensochemLab
21
Modifying files
7. Creating new files
ensochemSheet can also be used to create new SD files and then insert structures into them. Of course, you
can also insert new structures into existing files!
To create a new file, just click on the “New” symbol in the toolbar ( ) or select the “New” entry in the “File”
menu. ensochemSheet will then create a new, empty data sheet that does not have a name before it is saved
first. It will be named “ensochemSheet1” and the next new file will be assigned the name “ensochemSheet2”
and so on.
To save the new file, you can use the save function as discussed in the previous chapter.
Each data sheet, no matter if it is newly created or loaded from a file, contains an empty row at its end that
can be used to insert new structures. Just click on the “Molecule” cell of the row and then once again directly
into it. ensochemSheet will open the structure editor enabling you to draw a new structure. Its is the same
editor as the one you have already used for searching and modifying existing structures. After drawing the
structure, please click on “OK” to apply your changes and return to the updated data sheet.
If you do not enter a structure, the row will contain the text “No-Structure” and a corresponding placeholder
will be inserted into the SD file.
ensochemLab
22
Creating new files
8. Datenblätter mischen
To combine the data of multiple data sheets in one data sheet, to build the intersection of two data sheets or
to perform a subtraction, you can use the “Combine data sheets” function in ensochemSheet. It is located in
the main menu at “Edit / Combine data sheets”:
The following window will appear:
Here you can select which two data sheets you want to combine using what kind of function. Please note that
you have to select two different data sheets. The combination operations are:
ensochemLab
23
Datenblätter mischen
Combine equal molecules
Combine all records
Remove right side molecules from
the left side
Remove left side molecules from the
right side
This function combines all molecules with an equal
structure. The resulting data sheet will contain the equal
molecules from both lists (duplicated). Molecules that can
only be found in one list, are not returned.
This function combines all records from both data sheets to
one, new data sheet. A structure need not be included in
both lists to be a result.
This function deletes all molecules from the list selected on
the right side that are also included in the list selected at the
left side. The result list contains only those records that are
in the left side list exclusively.
This function deletes all molecules from the list selected on
the left side that are also included in the list selected at the
right side. The result list contains only those records that
are in the right side list exclusively.
After you have selected your search function, you can either enter a new name for the result list or accept the
name created by ensochemSheet. This name should not be a file name as the list result will not saved
automatically. Afterwards, click on “OK”, to start combining your records.
This process may take a few minutes, depending on the speed of your computer. ensochemSheet has to
check each single molecule against all molecules in the other list and then, if it is a hit, sort it into the result
list. While the process is being performed, you can see a status bar at the bottom of the window that
indicates how much data has already been processed. By clicking on the “Cancel” button, you can abort the
combination at any time.
After the combination is done, the dialog will be closed automatically and the result will be shown as a new
data sheet. If the combination does not return any hits, ensochemLab will show an appropriate error
message.
ensochemLab
24
Datenblätter mischen
ensochemLab
1
Datenblätter mischen


![[incr tsdb()]](http://vs1.manualzilla.com/store/data/005780303_1-7064634619abc733efac654e2a82e90d-150x150.png)