1
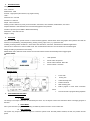
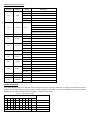
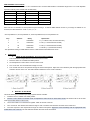
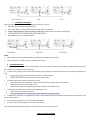
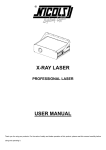
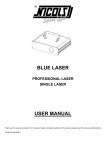
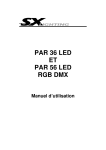
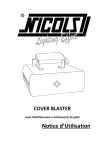
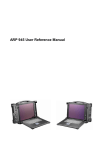
GLAM LASER PROFESSIONAL LASER USER MANUAL Thank you for using our products. For the sake of safety and better operation of this product, please read this manual carefully before using and operating it. 1. GENERAL INSTRUCTIONS a. UNPACKING Thank you for purchasing this product. Please read the user guide for safety and operations information before using the product. They contain important information about the security of the facility and on the use and maintenance of equipment. Keep this manual for future reference. In case of sale of equipment to another user, it is important that this manual is attached to the equipment to the new user has the necessary information to use and can read the warnings on safety. It is essential that the user duly follows the safety instructions and warnings mentioned in that user manual. The dealer won’t be able be responsible for the defaults or any other problems due to the mishandling from the user and the non following of the instructions included in that user manual. This product is suitable for creating perfect laser programs and high-quality laser effects. This unit is designed to produce decorative effect lighting and is used in light show systems. This product is a so-called show laser emitting radiation with a wavelength spectrum and producing lasers for shows. Please refer to the safety instructions specific for lasers. Before any first use, unpack the set and make sure there was no damage during transport. Check for missing any part supplied with the laser: - 1 x GLAM LASER - 1 x POWER CABLE - 1 x USER MANUAL b. GENERAL SAFETY INSTRUCTIONS This fixture must be earthed to in order to comply with the safety regulations and to avoid any electrical shock. Before using, please be assure that the voltage is appropriate with the information mentioned at the rear panel of the unit. Ot avoid any shock hazard, do not open or remove the cover. This unit is designed for indoors use. Do not expose the unit to rain or moisture. The working temperature of the unit is from 18 to 30°C. Do not use it at higher temperature. Do not switch on and off many times to avoid reducing the life duration of the fixture. Do not use the unit for more than 4 hours in order not to decrease the life duration of your fixture. Always unplug the unit when we do not use it for a long time or before servicing. Do not place metal objects or spill liquids in/over the unit. If it occurs, please disconnect the unit from the mains at once. Keep the device away from flammable or hot sources. The fixture should be placed in a ventilated area and fixed at 50 cm at least from the walls. Do not cover the ventilation openings as it may result in overheating. Do not use the unit id dusty environment. Please use soft cloth to remove dust that would be place in the external lens. Clean the unit regularly. Keep away from children or any non qualified persons. During the installation of the units, do not let the inexperienced people come around and operate the device. Make sure that the area below the installation is free from unwanted persons. The installation should be carried out qualified persons only according to the regulations for safety rules. Do not remove the stickers placed on the unit. It is forbidden to make any unauthorized modifications to the unit due to safety reasons. If some parts are visibly damaged (power cord, lens, plug, casing brackets), please do not use the unit and contact your dealer The unit does not have user serviceable parts inside. Refer to qualified persons or contact your dealer. Always use parts of same type. Never repair a fuse or bypass the fuse holder. Please use the original packaging for transporting the device. In the event of serious problems, stop using the device contact your dealer. Do not open the cover. Never look at the light source directly! Do not use the unit effects in the presence of persons suffering from epilepsy. c. SAFETY INTRUCTIONS FOR LASERS According to EN/IEC 60825-1 regulations, this laser is classified under 3B class. Direct eye exposure can be dangerous DANGER: LASER RADIATION! UNIT UNDER 3 B CLASS AVOID DIRECT EYE EXPOSURE. LASER RADAITION CAN CAUSE EYE DAMAGE AND/OR SKIN DAMAGE AVOID EXPOSTION TO LASER RADIATION ALL PROTECTIVE MEASURES MUST BE APPLIED FOR MAKING THE USE OF LASERS SAFE This product is a so-called show laser emitting radiation with a wavelength spectrum and producing lasers for shows. A laser (Light Amplification by Stimulated Emission of Radiation) is a device that emits light trough a process of optical amplification and produce electromagnetic radiation of different wavelengths due to the controlled stimulated emissions process. In addition to the secondary effects due to the operating laser conditions, fire risks or burning hazards, the most important danger comes from the light source. The damages on eyes depend on the laser wavelengths specifications, the eye distance and the elements linked to the eye specifications. This danger is amplifies if the laser beams are focused to tiny spots; that is why the effects on eyes are even more important while using lasers. 3B class can be dangerous under specific conditions 4 class should be ruled under strict safety warnings. INSTALLATION OF THE UNIT The units from 3B class and 4 class, exclusively used in open air, should be installed by experienced and qualified professionals, trained to the specific risks of lasers and should handle a user manual. The area reserved for the public should be limited up to 3 meters above the ground and to 2.5 meters from the public. This zone should be indicated and marked on the ground. In this area, it is not possible to make “pencil beams” (through the output being a narrow beam which is diffraction-limited) in the direction of people, whatever the laser class is, except if a determined area has been defined of 4 meters radius from the public and visibly marked on the ground. Only laser beams of wavelengths divergence concentrated their power at a large distance are authorized. OPERATION OF THE UNIT The use of lasers is out of the reach of people when considering: - That the unit is situated at 3 meters above the floor at least - That a safety area is defined within 5 meters radius - The user takes the responsibility that the units under 3B class or 4 class are mounted by a qualified technician and experienced to the risks of lasers. This technician must stay around during all the time the lasers work and he must be able to stop the units in case some technical problems would occur. While the installation is on, the technician should wear protective glasses. Please remind the following remarks: - Laser light is different from any other light source with which you may be familiar. The light from this product can potentially cause eye injury if not set up and used properly. - Laser light is thousands of times more concentrated than light from any other kind of light source. This concentration can cause instant eye injuries, by burning the retina. Even if you can not feel heat from a laser beam, it can still injure or blind you or the audience. - Never look at the laser aperture or laser beams. - Do not direct the laser beam to people. - Do not leave the device running without the presence of qualified professionals. EXPELEC can not liable for damages caused by incorrect installations and unskilled operation. 2. SPECIFICATIONS Voltage : 230V/50Hz Fuse : 2A/250V Rated Power : 50W Scanner : High speed optical scanner, big angle scanning Laser : Green 532 nm / 100 mW Red 650 nm / 200 mW Purple : 405 nm /200 mw Working modes : DMX 512 (12 CH), Sound activation, Auto-beam, Auto-animation, Master/Slave, PC control Graphics & Effects : 256/128 beam show and animated graphics show patterns Interface 3 pin XLR jack for DMX or Master/Slave linking Dimensions : 263x 305x 155 mm Weight : 4.08 kg 3. FEATURES Animation laser with high optical scanner to create animated graphics, 256/128 beam show and graphics show patterns and with the function of unique blanking, frequently flashing, rotating, moving, split, zoom (+/-), speed and color. Including 6 working modes as DMX 512, sound active auto-animation, auto-beam, master/slave for different applications The unit has 14 channels to control in DMX mode. The unit has blackout function. The unit will shut off if no DMX signal. Design according to performance and security. Master/Slave mode, DMX 512 mode and PC control mode will shut off laser automatically without trigger signal. FRONT PANEL 1. Laser aperture 2. Sound active microphone 3. Sound active Indicated : Blue LED 4. Power indicator : Red LED REAR PANEL 1. Power Jack 2. Cooling Fan 3. Audio sensitivity knob 4. Pattern size knob 5. DMX or linking jack 6. Built-in program or ILDA mode conversion switch 7. 4. Function of built-in program setting dipswitch FUNCTIONS AND SETTINGS a. FUNCTIONS i. MUSIC MODE The change in the shape of the laser is controlled by the music. So, the rhythm of the music controls the effect of changing program of the laser. ii. AUTO MODE Auto cycles the built-in programs without being controlled by external sources. It has no laser OFF. iii. DMX CONTROL The system only accepts the DMX 512 signal to control the system mode: the laser pattern ON/OFF, the size, the position and the speed. DMX Control Parameters Chart Channel Function CH1 Mode Value Description 0~49 Sound Active mode 50~99 Auto-Beam mode 100~149 Auto-Animation mode 150~199 Manual mode to Auto run 200~255 Manual mode to Sound Active run AL-100: closed~no blanking~moving blanking~flash blanking~blanking CH2 Dimmer AL-600RGY: closed~red~green~yellow~ 0~255 fixed color~random single color~random three-color~moving three-color~fixed color CH3 Pattern Select CH4 Moving-Y CH5 Moving-X CH6 0~255 256 or 128 pattrens 0~127 Manual to up to down moving 128~191 Auto to down moving 192~255 Auto to up moving 0~127 Manual to left to right moving 128~191 Auto to right moving 192~255 Auto to left moving 0~127 Manual rolling 128~255 Auto rolling 0~127 Manual rolling 128~255 Auto rolling 0~127 Manual rotation 128~191 Auto clockwise rotation 192~255 Auto counter clockwise rotation 0~85 Auto zoom(+) 86~170 Auto zoom(-) 171~255 Manual zoom(+/-) Rolling-X CH7 Rolling-Y CH8 Rotation CH9 Zoom(+/-) CH10 Pattern Size 0~255 0 is Moderate, 1 is small, 255 is big CH11 Display Dot 0~255 0 is display dot, 255 is best brightness 0~127 Auto drawing mode 1 CH12 Drawing 128~255 Auto drawing mode 2 FUNCTION SETTINGS First, setting "Built-in program or ILDA mode switch" to Built-in program or ILDA mode. Second, If it is setting to ILDA mode, then use PC software to control laser light. If the first step setting to Built-in program mode, setting built-in program dipswitches to mode that include SOUND ACTIVE, AUTO, SLAVE mode, see the Built-In Program Function Chart 0=OFF 1=ON X=OFF or ON DIPSWITCH CHART FUNCTION #1 #2 #3 #4 #5 #6 #7 #8 #9 #10 0 0 0 X X X X X X 0 SOUND ACTIVE 1 0 0 X X X X X X 0 AUTO-BEAM 1 1 0 X X X X X X 0 AUTO-ANIMATION 0 0 1 X X X X X X 0 SLAVE MODE 1 DMX MODE SET DMX ADDRESS DMX ADDRESS CALCULATION In DMX mode, the DIP switch from # 1 to # 9 should be set to record a DMX address. The address ranges from 1-511. Each dipswitch represents a binary value. Please refer to table below. Dipswitch VALUE Dipswitch VALUE #1 1 #6 32 #2 2 #7 64 #3 4 #8 128 #4 8 #9 256 #5 16 #10 DMX, on "1" Each unit has 12 channels. So each product may be receiving a 12-channel DMX address at least. If you assign an address on 16 channels, the DMX address is: 16*N +1, N=0, 1, 2, 3…. One loop address=1, two loop address=17, three loop address=33, four loop address=49 Loop Address Binary Dipswitches 1 1 100000000 #1 (#1 switch is ON, the others are OFF) 2 17 100010000 #1+#5 (#1 and #5 switches are ON) 3 33 100001000 #1+#6 (#1 and #6 switches are ON) 4 49 100011000 #1+#5+#6 (#1,5,6 switches are ON) The dipswitches setting for DMX address see the " DMX Address Quick Reference Chart ". 5. OPERATION a. STAND ALONE OPERATION : Sound activation and AUTO This mode allows a single device to react to the sound of music. 1. Place the device in a suitable and stable position. 2. Set the dipswitch to select AUTO or Sound active mode. 3. Turn on the unit. The unit resets then it begins to work. 4. The unit will react to low frequencies through the internal microphone. Adjust the sound sensitivity with the appropriate knob located at the rear of the unit. The LED indicates whether the music mode is activated. b. MASTER / SLAVE MODE This mode allows you to connect up to many together without controller. 1. Install the unit in a suitable and stable position. 2. Choose a unit to function as master mode, set dipswitch to select AUTO or Sound active mode. The others must be set in slave mode. Set the DIP switch to slave mode. 3. Use an XLR cable to connect devices together. Taken at the rear of the unit. 4. Turn on all units. The devices reset and then begin to work. The slave units will react the same as the master unit. 5. The units respond to low frequencies through the internal microphone. Adjust the sound sensitivity with the appropriate knob located at the rear of the unit. The LED indicates whether the music mode is activated. c. UNIVERSAL DMX MODE This mode allows you to use the DMX 512 console to operate your devices. 1. Install the unit in a suitable and stable position. 2. Use an XLR cable to connect devices together. Taken at the rear of the unit 3. Assign a DMX address for each device using the DIP switch. Please refer to the chart on the last page. 4. Turn on all devices. The units reset, then begin to start working. 5. Use a DMX console to control your devices. NOTE: 1. DMX console can not be operated in Master / Slave (AUTO / SOUND ACTIVE mode) 2. There must be only 1 single master unit in Master / Slave mode 6. 1. TROUBLESHOOTING If the power indicator does not lit up and the device does not work, please check the power cable is properly connected and if the input voltage is compatible with that of the device. 2. In Stand alone operation, if the power indicator lights up and sound active indicator does not lit up and the light beam does not work. 3. 4. 5. a. The sound is too low. Increase the volume of music or sound sensitivity. b. Check if the device is in slave mode then set up in master mode. In Master / Slave mode, the slave units does not work a. Make sure there is only 1 single unit in the master channel and the other units are set as a slave. b. Make sure you are not using a DMX console c. Make sure the cables are of good quality and the connections are properly made. In DMX mode, the beam does not work and the DMX signal is off. a. Make sure the DMX mode is activated. b. Make sure the cables are of good quality and the connections are properly made. In DMX mode, the laser is not controlled by the DMX console, DMX signal indicator flashes. Make sure the console and the units have the same channel. 6. If the direction of the beam is not correct, restart the machine. 7. If the unit does not work properly, turn the unit off then back on. If the unit meets other operational problems, we recommend that you contact your dealer. TABLE SET DMX ADDRESS