1
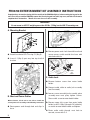
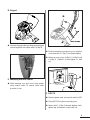
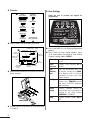
PRO4700 ENTERTAINMENT KIT KEYPAD, CONSOLE AND LCD-TV WITH MOUNTING ARM ASSEMBLY AND OPERATIONS INSTRUCTIONS PRO4700 ENTERTAINMENT KIT CONTENTS Console Box Contents: PRO4700 Entertainment Console PRO4700 Entertainment Keypad Audio Jack Assembly Audio Cable Keypad Cable Media Control (TV) Cable Heart Rate Cable Assembly and Operations Instructions PRO4700 ENTERTAINMENT KIT KEYPAD, CONSOLE AND LCD-TV WITH MOUNTING ARM Console Hardware C-1 #2 Phillips C-2 ASSEMBLY AND OPERATIONS INSTRUCTIONS #2 Phillips C-3 #2 Phillips C-4 *Hardware illustrated to scale; not actual size. 1 LCD-TV Mounting Arm Box Contents: LCD-TV Mounting Arm Mounting Bracket for LCD-TV Console Back Covers (R and L) LCD-TV Mounting Arm Hardware (selected items only) L-1 Coaxial Cable L-2 L-3 L-6 L-4 L-5 LCD-TV Box Contents: LCD-TV Power Cord Remote Control (not pictured) LCD-TV User Manual (not pictured) 2 PRO4700 ENTERTAINMENT KIT ASSEMBLY INSTRUCTIONS Complete these instructions during initial assembly of the PRO4700 elliptical, after mounting the keypad on the mast. For a fully-assembled PRO4700, remove the console, keypad and cable, top cover, and left side shroud to complete these instructions. *Retain all screws for use in this assembly. WARNING! Do not mount an LCD-TV weighing more than 8.5 lbs. (3.8 kg) on the LCD-TV mounting arm. A. Mounting Bracket Secure excess power cord outside of base Route coaxial cable and power cord up mast. Attach bracket to LCD-TV using C-1 (Qty 4). Insert L-1 (Qty 2) part way into top shaft of bracket. Remove power cord slack from within unit and secure excess cable outside the base with attached cable tie. Cables not shown C. Audio Jack Remove bottom screw from water bottle holder. Connect audio cable to audio jack assembly (not illustrated). B. Mast and Power Cables With assistance, tilt the unit to one side to install and secure power cord according to the following instructions: Route power cord through hole and clips in base. 3 Loosen screws on audio jack assembly; place assembly over mast plate; tighten screws. Secure with screw to water bottle holder. Remove upper left screw from water bottle holder; insert C-2 (Qty 1) through C-4 (cable tie); re-attach to water bottle holder and tighten. Route audio cable through mast hole to console; secure with C-4. D. Keypad Connect keypad cables per diagram on keypad; attach keypad to mast plate with C-3 (Qty 4). Position mounting arm against mast; attach to mast plate with L-1 (Qty 1) and finger-tigthen. TV Coax Attach to mast using L-2 (Qty 1), L-3 (Qty 1) and L-4 (Qty 2). Tighten L-2; then tighten L-1 with L-6. Power E. Mounting Arm and Cables Hold mounting arm near mast; route power cord, coaxial cable, TV control cable under brackets in arm. (Cables not shown) F. LCD-TV Connect power cord and coaxial cable to LCD. Hang LCD-TV bracket on mounting arm. Attach with L-1 (Qty 2) through bottom shaft;. tighten top and bottom screws with L-6. 4 G. Console H. User Settings Keypad (black, 14-pin) Heart Rate (white, 3-pin) Console to Base (white, 14-pin) Fan (white, 2-pin) TV Control (white, 8-pin) Audio Pedal the unit to activate the keypad for programming. EXIT WITHOUT SAVING Handlebar Control (white, 6-pin) C-SAFE (white, 5-pin) PRESS AND HOLD Console Ground (metal; green wire) EXIT AND SAVE Route cables (Qty 9) through mast plate. C-SAFE (white, 5-pin) Console Ground Software Update (black) (metal; green wire) Console to Base (white, 14-pin) Heart Rate (white, 3-pin) Handlebar Control (white, 6-pin) Press and hold / to display programming options. Press Enter to view setting options; press to select option and move to next setting. (Factory setting shown in BOLD.) Warm-Up Fan (white, 2-pin) Audio Jack (bottom edge of board) Keypad TV Control (black, 14-pin) (white, 8-pin) Match cable connectors to sockets on console back; connect. Clock Direction Max Workout Time Unit Type Stride Length Beep Attach console and covers to mast plate with C-2 (Qty 4). 5 VIEW OPTIONS Controls 3-minute warm-up: ON or OFF Controls clock counting: UP or DOWN Sets limit for workout time: 1 to 99 minutes (factory-set at 30:00). Press Enter to scroll in 15-minute increments, or enter value using number keypad. Controls weight and distance display units: ENGLISH (pounds and miles) or METRIC (kilograms and kilometers) Controls software setting for stride length; must match physical position of the stride linkage: JOGGING or RUNNING Controls console sounds: ON or OFF. TV Menu Accesses TV MENU CONTROL on your LCD. Use / and Enter to scroll through and set TV options just as you would with your handheld TV remote. (Refer to LCD-TV User’s Manual for more information.) Press Pause Clear to exit TV MENU CONTROL and return to user settings. TV Default Channel Note: If the user turns TV off manually, TV will power on to the channel last viewed. Brightness Controls brightness of the console LEDs: 1 (dim) to 8 (bright). Exit Press Enter to Exit and save settings. Press Pause Clear twice to exit without saving. Note: VOL () is “Left” and VOL () is “Right”, and PREV is “Return” in TV MENU CONTROL. TV Auto On Controls TV power at the start of workout: NO (leave TV in current state–on or off) or YES (turn TV on if it is off). TV Auto Off Controls TV power at the end of workout: NO (leave TV in current state–on or off) or YES (turn TV off after workout). Sets TV to specified channel before elliptical enters sleep mode. Use number keypad to set channel. If you do NOT want TV to go to a specific channel automatically, set channel to 00. Press Enter when “Exit” is displayed to save selections. Press Pause Clear twice to exit without saving changes. I. Complete Installation Replace top cover and left side shroud, or, return PRO4700 Assembly Instructions to complete assembly of new unit. Media Keypad Buttons The table below describes the buttons controlling media functions on the PRO4700. Refer to PRO4700 Operations Manual for descriptions of the elliptical programming buttons on the keypad. Mute CC VOL (/) CH (/) (Power) Prev TV (numeric keypad) – (numeric keypad) Enter Turn TV audio on/off. Activate/de-activate TV closed-captioning. Increase/decrease TV audio volume; Move left () or right () in TV MENU CONTROL. Move backward () or forward () through TV channels. Turn TV on/off. Jump to last-viewed TV channel; Return to previous menu option in TV MENU CONTROL. Press to activate numeric keypad for input of TV channel numbers. Enter as the sub-channel separator in HDTV channel numbers (e.g. 45-1) Use to program TV options. Learn More at www.octanefitness.com Log on to www.octanefitness.com for additional information about product features and answers to many common questions and tips on using your elliptical. If you would like to speak to an Octane Fitness Customer Service specialist, please call 1-888-OCTANE4 or 763-757-2662, extension 1. 6 Are you passionate about your workout and the results? Share your story with others on the Octane Fitness web site. Go to: www.octanefitness.com/testimonials Then click on “Share My Story” and show the world how fueled you are. www.octanefitness.com www.youtube.com/user/octanefitness www.facebook.com/octanefitness F U E L Y O U R Octane Fitness US & Canada, Latin America, Asia & Asian Pacific 9200 Wyoming Avenue North Suite 380 Brooklyn Park, MN 55445 Phone: 888.OCTANE4 (US and Canada) 763.757.2662 (Latin America, Asia and Asian Pacific) Fax: 763.323.2064 L I F E ™ Octane Fitness International Europe, Middle East, Africa Rivium Weestlaan 19 2909 LD, Capelle a/d Ijssel The Netherlands Phone: +31 10 2662412 Fax: +31 10 2662444 ©2010 Octane Fitness, LLC. All rights reserved. Octane Fitness and Fuel Your Life are registered trademarks of Octane Fitness. Any use of these trademarks, without the express written consent of Octane Fitness, is forbidden. 105173-001 REV A