1
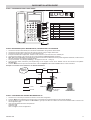
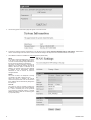
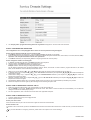
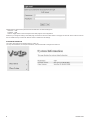
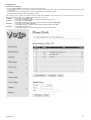
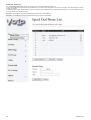
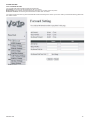
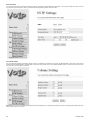
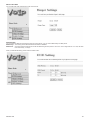
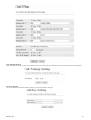
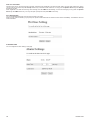
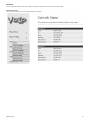
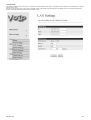
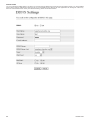
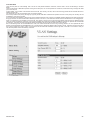
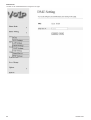
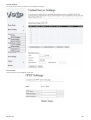
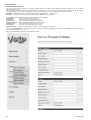
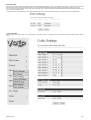
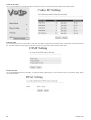
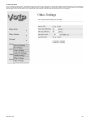
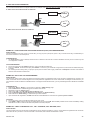
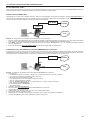
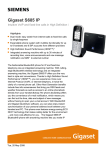
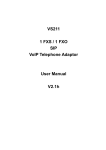
Mod.
4501
DS 4501-002
LBT 8249
“DOMUS VOIPHONE” TELEPHONE
Ref. 4501/5
VO
L+
P.B
OO
K
7 PQ
RS
8 TUV
0
RE
DIA
L
HO
# SE
LD
TR
AN
SF
I
ER
5 JKL
9 WX
CAL
6 MN
G D
EL/M
NU
EN
TER
DO
WN
M1
CO
LIN
LIN
E-2
O
LIN
FO
RW
AR
D
M2
M3
3 DEF
ND
PS
ME
NF.
YZ
PIC
K
S
UP
UTE
2 ABC
VM
L-
L LO
1
4 GH
RE G
VO
M4
E-1
E-3
DN
D
VM
S
UP
TN
QUICK INSTALLATION GUIDE
&
USER MANUAL
INDEX
QUICK INSTALLATION GUIDE ......................................................... 3
USER MANUAL.................................................................................. 7
1. Introduction ............................................................................ 7
2. Features................................................................................. 7
3. Standard Compliances .......................................................... 7
4. LED Indicators ....................................................................... 7
5. Installations & SIP Configurations ......................................... 7
6. Default Reset by Using Keypads ........................................... 7
7. Configurations by Web Browser ............................................ 7
8. LCD Display with Keypads Settings .................................... 34
9. VoIP Application Examples.................................................. 37
10. Trouble Shooting for Web Configurations............................ 39
11. Glossary............................................................................... 40
INFORMATIVE NOTES
DECLARATION OF CONFORMITY
The manufacturer Urmet Domus S.p.A. whose legal offices are in via Bologna n° 188/C – 10154 Torino (TO) Italy, declares that this device
complies with the requirements of the European Parliament and Council Directive 1999/5/CE dated 9 march 1999 regarding radio apparatures,
telecommunications terminal apparatures and the reciprocal recognition of the conformity thereof, sed by means of
INTENDED USE OF THE DEVICE
This device has been designed and realized for connection to national telephone network (PSTN) or for Urmet Domus switchboard (PABX)
extension using, or for a local network (LAN). Therefore his installation, and his programming – where necessary – must be done by qualified
staff.
PACKAGING
Check that packing and content are not visibly damaged. Contact the retailer immediately if parts are either missing or damaged. Do not
attempt to use the device in this case. Send the product back in its original packing if it is damaged.
RECOMMENDED INSTALLATION LOCATION
It is advisable to use the telephone in sheltered environments with temperature in the range from 5 to 40° and relative humidity in the range
from 20 to 75%.
Keep the telephone away from directly sunlight or sources of heat.
It is advisable not to install the telephone in particularly dusty environments because the accumulation of dust can compromise the correct
operation of moving parts.
TELEPHONE INSTALLATION ADVICE
The VoIPhone telephone was designed to work with power supply.
CLEANING THE TELEPHONE
Use a moist or antistatic cloth for cleaning the telephone only. Do not use volatile liquids, like petrol, alcohol, solvents, etc., or chemically
treated cloths; they could damage the surface finish.
Normally the phone feet do not mark the surface it is rested on but in consideration of the variety of materials available, it is advisable to
clean the resting points regularly.
CONTENTS OF THE BOX
• n.1 telephone
• n.1 telephone table support
• n.1 handset
• n.1 handset spiral cord
• n.1 telephone plug/plug line cord
• n.1 Ethernet cable (RJ45)
• n.1 adapter kit
• n.1 “CONSUMER RIGHTS” list
• n.1 “WEEE DISPOSAL INFORMATION NOTE” sheet
• n.1 instruction manual
• n.1 CD
Urmet Domus reserves the right to change the product specifications and performance without prior notice.
2
DS4501-002
QUICK INSTALLATION GUIDE
STEP 1: VOIPHONE KEYPAD E REAR PANEL
DC POWER
REG
VOL+
VMS
MENU
ENTER
UP
DOWN
1
M1
VOL-
M2
M3
P.BOOK
CALL LOG DEL/MUTE
CONF.
M4
2
LINE-1
1
4
2
GHI
5
ABC
JKL
3
6
3
LINE-2
DEF
4
LINE-3
MNO
5
DND
FORWARD
7
PQRS
8
TUV
9
WXYZ
6
VMS
PICK UP
0
REDIAL
HOLD
#
SEND
PSTN
7
TRANSFER
Id.
1
2
3
4
5
6
7
8
9
WAN
KEY
M1…M3
LINE-1
LINE-2
LINE-3
DND
VMS
PSTN
LAN
PSTN
HEADSET
DESCRIPTION
MEMORY DIAL
1st SIP ACCOUNT
2nd SIP ACCOUNT
3rd SIP ACCOUNT
DO NOT DISTURB
VOICE MESSAGE
PSTN
SPEAKER PHONE
MICROPHONE
8
9
STEP 2: BROADBAND (ADSL MODEM/CABLE). CONNECTIONS FOR VOIPHONE
1.
2.
3.
4.
5.
6.
Connect the VoIPhone RJ45 WAN port to the ADSL Router/Modem using a direct network cable.
Connect the VoIPhone RJ45 LAN port to the LAN port of the PC using a straight, direct cable.
Connect the VoIPhone RJ11 PSTN port to a PSTN telephone line.
If telephone headset with amplifier Ref. 1362/62 is used, connect it to the VoIPhone RJ11 Headset port.
Connect the DC adapter. The LCD will light up and the message ‘Loading Program!’ will appear.
Date, Time and the ‘No service’ message will then appear on the LCD if no SIP account has yet been registered. Otherwise, if a SIP account
has been registered, the registered name will appear.
7. Pick up the handset. The message ‘IP Dialing…’ will appear on the LCD. 1. Hang up.
8. Press the Menu button, followed by the sequence 4_5 on the keypad to check the IP address used for the VoIPhone LAN (default:
192.168.123.1).
9. Press the Menu button to open and close the menu. Press the Up/Down buttons and the Enter button to confirm selections.
Example of connection of the VoIPhone to an ADSL Router/Modem
Telephone
network
Splitter
Data
Router/Modem
ADSL
192.168.101.1
Audio
Tel 1
Tel n
PSTN
2 wires
WAN
VoIPhone
Ethernet
LAN
192.168.123.1
(default)
192.168.123.150
STEP 3: CONFIGURATION VIA WEB BROWSER AND PC
1. Connect a PC to the LAN port and start a browser to access web configuration.
2. Press the Menu button followed by the sequence 4_5 on the telephone keypad to display the WAN and IP addresses.
3. Assuming that the LAN port IP address is 192.168.123.1, type http://192.168.123.1:9999 in the web browser address field to connect to the
web configuration page.
4. Login using the default username and password:
Username: root
Password: test
Click on “Login” to access configurations.
DS4501-002
3
5. The following system information page will appear on the web browser.
6. Program the following network configurations in the left-hand column: Phone, Network WAN/LAN Settings, SIP Settings. Remember to
click on “Save Change” and then save to confirm and activate settings: the telephone will be restarted with the new settings.
7. Three different modes are available for WAN configurations (WAN mode).
DHCP:
This mode is used if the telephone is connected
to an ADSL router with enabled DHCP server,
i.e. which can automatically assign addresses to
the PCs and to the devices connected to it.
This option is used for assigning a dynamic IP
address and is generally chosen as WAN IP
address. When this option is selected, the IP
address, the Subnet mask and the Gateway
IP address will be automatically assigned.
Remember to click on Submit to make the
changes effective.
PPPoE:
This mode is used if the telephone is directly
connected to an ADSL modem, like a PC.
When this option is selected, the PPPoE
username and password must be entered and
the IP address will be automatically assigned to
the WAN port.
Fixed IP:
This option is used to manually program the
IP address, the Subnet mask and the Gateway
IP, if this is necessary due to the presence
of a previously configured network or specific
address allocations (static IP connection) given
by a provider (ITSP).
4
DS4501-002
Two configuration modes are possible for the LAN (LAN mode):
NAT (default):
By using this mode, the WAN and LAN ports refer to two separate interfaces; in this case, as shown in the example above, the PC connected
to the LAN port will obtain the address from the telephone (192.168.123.x).
Bridge:
By using this mode, the telephone will behave transparently (as an Ethernet hub/bridge) and in this case, the PC connected to the LAN port
will obtain the address from the ADSL Router/Modem to which the telephone is connected (192.168.101.x in the mentioned example).
This mode cannot work without a router which assigns the addresses and may be useful in presence of a company network in which you want
the PC to take the address from the network.
8. SIP configurations:
In order to use the VoIP service, a SIP account registered at one of the many SIP providers is needed. Register to obtain the account
connection data.
Registration to the Eutelia server is shown by way of example. Connect to the site.
http://www.euteliavoip.com
Follow the instructions for registering and activating the account. You will be asked to choose a telephone number and will receive connection
data like those shown below):
Login
01119838123
(this is the user name of account, which is the same in this case of the telephone number chosen)
Password
********
Domain
voip.eutelia.it
Sip Proxy Server
voip.eutelia.it
Sip Proxy Socket
5060
Stun Server
stun.voip.eutelia.it
Stun Server Socket 3478
These data will then be requested during the SIP account configuration step on the telephone, as we will see below.
The Stun connection data may be needed if the device is connected to a router to which several PC and devices are connected, typically
a large network, where the router works as a NAT, i.e. filters and re-routes packages to the various devices.
Refer to the following paragraph for entering Stun data.
There are many VoIP providers offering this type of services, in addition to Eutelia. Only some are listed here.
Messagenet
CheapVoIP
Squillo
(http://www.messagenet.it/)
(http://www.cheapnet.it/supporto/guide/voip/)
(http://www.ngi.it/squillo/)
The various providers offer different services with different prices and policies. Choose the provider, from the list or others, who offer the
service most in line with your needs.
The user can configure up to 3 SIP registrations (realms) in the Service Domain Settings configurations.
It may be useful to have several configured accounts if several different people use the telephone or if you want to use several SIP providers
at the same time because they are more convenient for certain services.
Account (realm) 1 (default for the first SIP account registration). For example:
Active (state of the telephone):
ON
Display Name (shown on the telephone display):
Mario
User Name (registered at the SIP provider):
01119838123
Register Name (registered at the SIP provider):
01119838123
Register Password (password registered at the SIP provider):
********
Proxy Server (server + registration port, provided by the SIP provider):
voip.eutelia.it:5060
Domain Server (server + registration port, provided by the SIP provider):
voip.eutelia.it:5060
Outbound Proxy:
Accounts (realm) 2 & 3 (for the second and third SIP account registration, similar to the previous registration)
Active:
ON
Display Name:
Lucia
User Name:
01119838124
Register Name:
01119838124
Register Password:
********
Proxy Server:
voip.eutelia.it:5060
Domain Server:
voip.eutelia.it:5060
Outbound Proxy:
Number selection for SIP account
With three registered SIP accounts, the VoIPhone can receive all incoming calls from the three SIP servers. Accounts (Realms) 1, 2, and
3 are used to configure the registered numbers for the first, second and third SIP service, respectively. The VoIPhone can register different
telephone numbers on different SIP servers. Press LINE-2 to select the second SIP server. The “Display name” programmed during the
registration step to that SIP server will appear on the display. Press 2_*_Speaker to select the second SIP server. Similarly, press LINE-3
(or 3_*_Speaker) to select the third SIP server. LINE-1 is used by default. Make sure that the Accounts (Realm) 1, 2 and 3 are all registered
and that the REG LED is ON.
DS4501-002
5
9. The “Display name” programmed during SIP server registration will appear on the LCD if this was successful.
STEP 4: CONFIGURATION VIA KEYPAD
The configurations seen in the paragraph above via PC can also be performed using the keypad.
How to program Password and SIP account via the keypad:
1. Press Menu followed by the sequence 7_4, the message ‘Password’ will appear on the display.
2. Enter the password using the telephone keypad in alphanumeric test mode (press button 8 twice, 3 three times, 7 five times, 8 twice, Enter).
Important: enter the password before access other parameters.
3. Press Menu followed by the sequence 5_Enter for configuring the first SIP account (realm).
How to configure IP address via the keypad:
1. IP address for WAN and LAN ports: Press Menu followed by 4_5 sequence.
2. WAN port status: Press Menu followed by the sequence 4_1_1.
3. LAN port status: Press Menu followed by the sequence 4_2.
Example: Static IP network settings via keypad (M=Menu; E=Enter).
For the WAN IP parameters there are three possibilities: static IP, DHCP, and PPPoE. In case of static IP, program the static IP, the Subnet
Mask, the IP addresses of the IP Gateway and the DNS server.
1. Static IP: Key in the sequence M_4_E_1_E_M_M_M to select static IP and then switch the telephone off and back on.
2. IP address setting: Key in sequence M_4_E_2_1, then 192*168*101*112 followed by the sequence E_M_M_M_M_M to switch the telephone
off and back on again.
3. Subnet Mask setting: Key in sequence M_4_E_2_2, then 255*255*255*000 followed by the sequence E_M_M_M_M_M to switch the
telephone off and back on again.
4. Gateway IP address setting: Key in sequence M_4_E_2_3, then 192*168*101*001 followed by the sequence E_M_M_M_M_M to switch the
telephone off and back on again.
5. Server DNS IP address setting: this is not usefully needed, unless you want to use a specific address provided by the provider.
6. Switch the telephone off and on again by disconnecting and reconnecting the power cord.
STEP 5: HOW TO MAKE POINT-POINT SIP CALLS
1. Select one of the three SIP servers. Pick up the handset: you will hear the dial tone.
2. Key in 123456# to call number 123456 registered to the SIP server. Note that # is used to forward the call immediately. You will hear the
calling tone. Wait for the called party to pick up.
3. For other applications, refer to the user manual for other VoIP application examples.
STEP 6: HOW TO MAKE PSTN CALLS
1. Press the PSTN button to key 0* to engage the line.
2. Dial the required number.
How to put a call on hold
Press the HOLD button to put a call on hold. Press it again to resume the communication.
How to transfer a call
To transfer a call to a PSTN line, press the TRANSFER button and then the PSTN button and then the number to which you want to transfer the
call.
If you have difficulties in configuring VoIPhone, please refer to the chapter 10 for trouble shootings.
6
DS4501-002
USER MANUAL
1. INTRODUCTION
The Domus VoIPhone is a SIP protocol based IP telephone for Voice Over IP applications (VoIP). It is provided with a PSTN port for connecting
to the traditional telephone line.
Connect to the Internet and to a PSTN, the Domus VoIPhone can be used to make VoIP calls and traditional telephone calls.
The Domus VoIPhone has a WAN port for ADSL connections, a LAN port for connecting to the PC and two RJ11 ports for connecting to the
PSTN telephone line (FXO) and a headset. By means of the internal DHCP, VoIPhone can be easily configured to adapt to the various network
architectures by means of a web browser and telephone keypad.
Note that the VoIPhone requires an IP address, a subnet mask and the Router IP gateway address for use on the Internet. These three parameters
will be supplied by your Internet Service Provider. The VoIPhone can activate PPPoE or DHCP functions for automatically obtaining a dynamic
IP address assigned by the Provider. Refer to the configurations made by means of a Web Browser described in section 7 for more detailed
information.
2. FEATURES
Equipped with two RJ11 connector and two RJ45 connectors VoIPhone is featuring as the following
• Two LED Indicators: REG for registration, VMS for voice mail.
• RJ45 x 2 for WAN and LAN ports + RJ11 x 2 for Headset and FXO ports.
• Configurations by Web Browser and Telephone Keypads.
• Embedded NAT/DHCP Server.
• PPPoE/DHCP Client for Dynamic IP plus NAT, DNS, and DDNS Clients.
• Support STUN server for NAT Traversal.
• Support registrations for up to 3 SIP Servers.
• Hot Line Mode.
• Dial Plan Settings.
• Speaker Phone, Voice Mail (VMS) for incoming IP calls.
• Call Forward/Transfer/Waiting/Hold, and 3-Way Conference Call features.
• Auto Configurations by TFTP, HTTP, or FTP server.
• Remote Firmware Upgraded with HTTP or TFTP server by Web PC.
• Direct IP/URL Dial without SIP Proxy or Dial number via SIP server.
• Telephone features: Volume Adjustment, Phone book, Redial.
• Function Keys: Speed Dial, 3 SIP Registration Lines, DND, VMS, and Pickup.
• Out-Band DTMF (RFC 2833) / In-Band DTMF / Send DTMF SIP Info.
3. STANDARD COMPLIANCES
The Domus VoIPhone supports for the following standards
VoIP Protocol:
IETF RFC3261
SIP Authentication: IETF RFC2069 and RFC 2617 for MD5
Speech Codec:
ITU-T G.711, G.723, G.729A/B, VAD and CNG
Echo Cancellation: ITU-T G.165/168
4. LED INDICATORS
On the front panel of VoIPhone, there are two LED indicators as the following
REG:
“Green On” indicates successful registration at SIP server.
VMS:
“Red Flashing” indicates there are voice messages for incoming VoIP call.
To hear the message you may press the Speaker Phone key then VMS function key (function usable with IPPBX and external service).
5. INSTALLATIONS & SIP CONFIGURATIONS
Refer to the ‘Quick Installation Manual’ for SIP installation and configuration.
6. DEFAULT RESET BY USING KEYPADS
Press Menu / 7.Administrator / 3.Default setting / 1.Load default by using Menu and arrow keys to reset back to factory defaults, and the LCD
panel will show Set Default…. In 5 seconds, the LCD will start showing Loading Program and System Initialized. The VoIPhone will reset to
default and restart.
Press Menu / 7.Administrator / 7.Restart to reboot VoIPhone. In 5 seconds, the LCD will start showing Loading Program and System
Initialized.
7. CONFIGURATIONS BY WEB BROWSER
You may enter the IP address from PC Web browser to configure VoIPhone.
Please enter the default IP address http://192.168.123.1:9999 from PC Web browser.
The following Web page shall be displayed on PC. If you have difficulties accessing the Web page from the PC Web browser, the subnet IP of
PC might be different from 192.168.123.xxx. In this case, please refer to Chapter 10 for trouble shooting.
DS4501-002
7
Please enter the username and password into the blank field. The default settings are:
Username: root
Password: test
Click the “Login” button to enter the System information page for web configurations.
Whenever you change the setting in each Web page, remember to click the “Submit” button in the page, and click the “Save” button to save into
the non-volatile memory and click the “Reboot” button to activate the new settings.
SYSTEM INFORMATION
The system information shows firmware version, Codec, etc.
You may click the buttons, for example Phone Book, at the left hand side to configure the VoIPhone.
8
DS4501-002
PHONE BOOK
PHONE BOOK SETTINGS
You may add/delete Name up to maximum 140 entries in Phone book list.
• To add a phone name, you need to enter the position, the name, and the phone URL. When you finished a new phone list, just click the “Add
Phone” button.
• To delete a phone name, please select the phone name then click “Delete Selected” button.
• To delete all phone names, please click “Delete All” button.
After dialing a phone number, the VoIPhone will first match with the Name in the phone book. If matched, VoIPhone will send out the
corresponding URL instead. If not, the same dialed number will be sent out.
Example 1:
Name: 333, URL: 192.168.1.100
Press 333# on telephone, and the phone at 192.168.1.100 will start ringing.
Example 2:
Name: 201, URL: 14081234567
Press 201# on telephone, and VoIPhone will call the registered number 14081234567.
Example 3:
Name: 301, URL: 192.168.1.100:5062
Press 301# on telephone, and VoIPhone will call at 192.168.1.100 with port 5062.
Example 4:
No Name 401 in phone book.
Press 401# on telephone, and VoIPhone will call the registered number 401.
DS4501-002
9
SPEED DIAL PHONE LIST
You can add/delete Speed Dial number up to maximum 10 entries in Speed Dial Phone List.
If you need to add a phone number into the Speed Dial list, you need to enter the position, the name, and the URL. Click the “Add Phone” button
to finish the setting.
To delete a phone number, please select the phone number you want to delete then click “Delete Selected” button. If you want to delete all phone
numbers, please click “Delete All” button.
Example 1: Press 2# from keypad to Speed Dial the phone number 2 immediately.
Example 2: Press M2 function key will Speed Dial the phone number 2 immediately.
10
DS4501-002
PHONE SETTING
CALL FORWARD SETTING
You can select the forward mode and enter the forward URL.
All Forward: All incoming call will forward to the URL you choose.
Busy Forward: The incoming call will forward to the URL when you are busy and on the phone.
No Answer Forward: The incoming call will forward to the URL when no answer.
You need to set the Time Out ring which will initiate No-Answer forwarding to the number you choose. When you finished the setting, please click
the “Submit” button.
DS4501-002
11
SNTP SETTINGS
You can setup the primary and the second SNTP Server IP Addresses to get the date/time information. You may also set the Time Zone, and how
long need to synchronize again. When you finished the setting, please click the “Submit” button.
VOLUME SETTINGS
You can setup the Handset Volume/Gain, Ringer Volume, and Speaker Volume/Gain in this page. Handset/Speaker Volume is to set the volume
hearing from the handset/Speaker. Handset Gain is to set the volume send out from the handset. Speaker Gain is to set the volume send out from
the microphone at the bottom of VoIPhone.
Important: Due to the variable, diversified signal levels of the telephone lines, setting a high telephone volume could generate background noise.
Select a lower volume in this case.
12
DS4501-002
MELODY SETTINGS
You can select the ringer melody type for the imcoming call.
DND SETTINGS
You can setup the DND (Do Not Disturb) to keep the phone slience. You can choose DND Always or DND period..
DND Always: All incoming call will be blocked until the feature is disabled.
DND Period: Set a time period and the phone will be blocked during the time period. If the “From” time is large than the “To” time, the block
time will from Day 1 to Day 2.
When you finished the setting, please click the Submit button.
DS4501-002
13
AUTO ANSWER SETTING
You may enable the Auto Answer function to answer the incoming call by VoIPhone FXO port. When the ring count exceeds the number set in
Auto Answer Counter, the FXO port will auto answer and allow for extension calls from VoIP to PSTN and vice vesa.
For the incoming call from the Internet, the FXO port will answer with a PSTN dial tone and allow caller to redial to PSTN phone number. For the
incoming call from PSTN, the VoIPhone FXO port will answer with a short beep tone and allow caller to redial to VoIP number. PIN Code is used
to prevent from call piracy. The caller needs to enter the right PIN code followed by “#” to get the PSTN dial tone. Incorrect PIN Code will result
in call disconnect. The Anto Answer is disabled at default.
DIAL PLAN SETTINGS
Dial plan and auto dial timer settings can be set in this page. The dial plan allows you to map the dialing into an easy-to-remember phone number
system. The auto dial timer specifies the elapse time between the dialing digits. When Drop prefix is ON and the dialing prefix is matched, the
prefix will be dropped and replaced by the rule digits and followed by the rest of dialing digits. When Drop prefix is OFF and the dialing prefix is
matched, the rule digits will be added before the dialing digits in accord with the settings:
Symbol
x or X
+
Representations
0, 1, 2, 3, 4, 5, 6, 7, 8, 9
or
Example 1: Drop Prefix: No, Replace rule 1: 002, 8613+8662
a) Pressing 8613xxx will result in dialing out 002+8613+xxx.
b) Pressing 8662xxx will result in dialing out 002+8662+xxx.
Example 2: Drop Prefix: Yes, Replace rule 2: 006, 002+003+004+005+007+009
a) Pressing 002xxx will result in dialing out 006+xxx.
b) Pressing 003xxxx will result in dialing out 006+xxxx.
Example 3: Drop Prefix: No, Replace rule 3: 009, 12
a) Pressing 12xxx will result in dialing out 009+12xxx.
Example 4: Drop Prefix: No, Replace rule 4: 007, 5xxx+35xx+21xx
a) Pressing 5xxx will result in dialing out 007+5xxx.
b) Pressing 534 will result in dialing out 534 (not matched for the rest 3 digits).
c) Pressing 35xx will result in dialing out 007+35xx.
d) Pressing 356 will result in dialing out 356 (not matched for the rest 2 digits).
e) Pressing 35668 will result in dialing out 35668 (not matched for the rest 2 digits).
Example 5: Dial Now: *xx+#xx+11x+xxxxxxxx
a) Pressing *00, *01, *02.. *99 will result in dialing out the same *xx immediately.
b) Pressing #00, #01, #02.. #99 will result in dialing out the same #xx immediately.
c) Pressing 110, 111,.. 119 will result in dialing out 11x immediately.
d) Pressing 12345678 (8 digits) will result in dialing out 12345678 immediately. This implies that the phone numbers with 9 or more digits are
prohibited.
Auto Dial Timer: The inter-digit timer. Default is 5 seconds.
When you finish the setting, please click the Submit button.
Click the Save button. The changes you have made will be saved into the system and the system will reboot automatically.
14
DS4501-002
CALL WAITING SETTING:
When call waiting is set ON, you will hear an interrupt “dodo” tone over the phone to remind that there is an incoming call from the third party.
SOFT KEY SETTING
You can configure the pickup and VMS key setting to co-work with IP PBX in this page.
DS4501-002
15
PICK UP & VOICE MAIL
VoIPhone may pick up the incoming call for another VoIPhone when registered in the same IP PBX. When you hear other VoIPhone is ringing,
you may pick up you phone and press Pick Up function key to answer for that VoIPhone. You may press the Speaker Phone key then Pick Up
function key as well.
When registered in IP PBX with incoming voice message, the LED VMS will start flashing. To hear the message you may press the Speaker
Phone key then VMS function key. You may also pick up the phone and press VMS function key.
HOT LINE SETTINGS
You can enable/disable and set Hot Line phone number in this page.
When Hot Line mode is enabled, you just pick up the phone and the VoIPhone will call the Hot line number immediately. The default for Hot Line
mode is disabled.
ALARM SETTINGS
You can configure the Alarm setting in this page.
16
DS4501-002
NETWORK
You can check the Network status, and configure the WAN, LAN, DDNS, and VLAN settings in this section.
NETWORK STATUS
You can check and show the current Network setting in this page.
DS4501-002
17
WAN SETTINGS
The WAN setting is used to configure the Ethernet port connects to the ADSL Modem/Router.
The default setting is NAT mode for IP PHone, and this enables the embedded NAT router between the LAN port and PC port. You may change
to Bridge Mode if you need NOT use the embedded NAT router. When setting to Bridge Mode, the WAN and the LAN ports will be bridged.
There are three selections for WAN: Fixed IP, DHCP Client, and PPPoE modes. The WAN default is at DHCP Client Mode.
For Fix IP Mode, please make sure the IP address. Net Mask, Gateway, and DNS settings are suitable in your current network environment.
For PPPoE Mode, you have to enter correct username and password to get the IP address from your Internet Service Provider.
When you finished the setting, please click the Submit button.
18
DS4501-002
LAN SETTINGS
The default IP address is 192.168.123.1 for VoIPhone, with Net Mask 255.255.255.0., and DHCP Server enabled. The IP addresses for DHCP
are from 150 to 200.
Connect your PC to the PC port, set your PC as DHCP Client mode, and then the PC will get an IP address from the VoIPhone automatically.
When you finished the setting, please click the Submit button.
DS4501-002
19
DDNS SETTINGS
You can configure the DDNS setting in this page. You need to have the DDNS account and input the informations properly. You need a DDNS
account with a public IP address then others can call you via the DDNS account. Most of the VoIP applications are working with a SIP Proxy
Server as well as DDNS Server. When you finished the setting, please click the Submit button.
20
DS4501-002
VLAN SETTINGS
There are two parts for VLAN settings. One is to set for VoIP packets related to VoIPhone, and the other is for the VLAN setting in the NAT
Mode.
There are two kinds of destination packets coming to the WAN port, one is VoIP packets for VoIPhone, and the other will go through the WAN
port to the LAN port.
VLAN Packets: If you enable VLAN Packets and set the VID, User Priority, and CFI, then all the incoming packets will be checked with the IP
Address and the VID.
VID: Please set your VID in accordance with your service provider.
User Priority: Defines user priority with eight (2^3) priority levels. IEEE 802.1P defines the operation for these 3 user priority bits. Usually, this will
be defined by your service provider.
CFI: Canonical Format Indicator is always set to zero for Ethernet switches. CFI is used for compatibility between Ethernet type network and Token
Ring type network. If a frame received at an Ethernet port has a CFI set to 1, then that frame should not be forwarded as it is to an untagged port.
When you enable the VLAN Packets and set the VID, User Priority, and CFI, then all the incoming packets with VoIPhone IP address and the
same VID will be accepted by VoIPhone. If the incoming packets with VoIPhone IP address but different VID then the packets will be discarded
by VoIPhone. The Other incoming packets with different IP address will go through the WAN port to the LAN port.
NAT VLAN Setting: When set in embedded NAT mode, the VoIPhone will filter out the wrong incoming packets. You can separate the other
devices connected behind the embedded NAT into 4 VLAN groups by assigning different VID for these 4 groups. VoIPhone will check the VID of
the incoming packets from ADSL modem. If the packet is not with VoIPhone IP address and the right VID, or the VID is not of these 4 VIDs you
set, then the packets will be discarded by VoIPhone.
DS4501-002
21
DMZ SETTING
The DMZ can be enabled/disabled and configured in this page.
22
DS4501-002
VIRTUAL SERVER
The Virtual Server IP and Port numbers can be configured in this page.
PPTP SETTING
The PPTP Server can be set ON/OFF in this page.
DS4501-002
23
SIP SETTINGS
SERVICE DOMAIN SETTINGS
You can setup the Service Domain, Port Settngs, Codec Settings, RTP Setting, RPort Setting and Other Settings for SIP Proxy Server
registrations in this page.
You may register up to three SIP Servers for three Realms in the VoIPhone. You can receive the incoming calls from all the three SIP Servers.
For outgoing calls, you may select the registration SIP server first, and then call the associated registration phone number.
Example 1: To select SIP Server 1 (default), please pickup the phone, press 1_*, then hangup.
Example 2: To select SIP Server 2 (or 3), you may press 2_*_Speaker (or 3_*_speaker).
Click “Active” ON to enable the Service Domain, then enter the following items:
Display Name:
enter the name you want to display.
User Name:
enter the User Name given by your ITSP.
Register Name:
enter the Register Name given by your ITSP.
Register Password: enter the Register Password given by your ITSP.
Domain Server:
enter the Domain Server given by your ITSP.
Proxy Server:
enter the Proxy Server given by your ITSP.
Outbound Proxy:
enter the Outbound Proxy of ITSP. If not provided, you may skip this.
When it shows “Registered” in the Register Status, it indicates a successful registration to the ITSP, and the “REG” LED will turn ON. The
VoIPhone is then ready for VoIP call.
After you finished the setting, please click the “Submit” button.
24
DS4501-002
PORT SETTINGS
The SIP Port and RTP Port numbers are default at 5060 and 60000, respectively. The RTP port number must be even number. If you have more
than one VoIP phones under the same NAT router, it is recommended that different RTP port numbers be assigned to each of IP Phones.
You may need to program specific ports for the various devices on the router if the devices are differentiated and call forwarding problems occur
(e.g. in case of symmetric NAT).
In order to do this, according to the router model, follow the instructions shown in http://portforward.com/routers.htm for VoIP applications.
CODEC SETTINGS
You can setup the Codec priority, RTP packet length, and VAD function in this page. When you finished the setting, please click the Submit
button.
DS4501-002
25
CODEC ID SETTINGS
You can set the Codec ID to meet the other device’s requirement. When you finished the setting, please click the Submit button.
DTMF SETTINGS
You can setup the options for DTMF function in this page. The options include RFC2833 (Outband DTMF), Inband DTMF, and Send DTMF SIP
info. If you are making two-stage callings for extension to PSTN, you might need to select RFC2833 DTMF option.
RPORT FUNCTION
You can enable/disable the RPort in this page. To change this setting, please follow your ISP information. When you finished the setting, please
click the Submit button.
26
DS4501-002
OTHER SETTINGS
You can setup the Hold by RFC, Voice/SIP QoS and SIP expire time in this page. To change these settings please following your ISP information.
When you finished the setting, please click the Submit button. The QoS setting is to set the voice packets’ priority. Higher value for voice packets
will get higher priority to the Internet. It is required that all the Internet routes are with the QoS function for voice priority.
DS4501-002
27
NAT TRANSVERSAL
STUN SETTING
You can Enable/Disable and configure STUN Server IP address in this page. This function helps IP Phone working properly behind NAT. To
change these settings please follow your ISP information. When you finished the setting, please click the Submit button.
28
DS4501-002
OTHERS
You can setup Auto Config, FXO port, MAC Clone, Tone and Some Advanced Settings in this page.
AUTO CONFIGURATION SETTING
Auto Configuration function can be used to download the configuration file stored in the TFTP, HTTP, or FTP server. This function must co-work
with the Auto Config Server. After enabling the function, please click the “Submit” button. Remember to click “Save” in the Save Change section.
The IP Phone will then reboot and automatically download the configurations from the corresponding server. Note that the TFTP download works
only for public IP address.
FXO PORT SETTING
The FXO Port is to configure and match the PSTN line impedance for each country. When you finished the setting, please click the Submit
button.
MAC CLONE SETTING
The MAC Clone function is to clone the MAC when only one MAC is available from ITSP. This is to share with the PC using the same MAC. When
you finished settings, please click the Submit button.
DS4501-002
29
TONES SETTINGS
The Tone setting can be adjusted to generate Dial tone, Ring tone, Ring Back tone, and Busy tone for different countries. When you finished with
the settings, please click the Submit button.
ADVANCED SETTING
The advanced settings might be useful for some network requirements. The ICMP function is to echo when someone ping this device. This can
prevent from haker attacking the device by not echoing. When you finished the setting, please click the Submit button.
30
DS4501-002
SYSTEM AUTHORITY
The user login name and password can be changed in this page.
SAVE CHANGE
If you want to save the changes you have made for new setting in the VoIP Phone, You have to click the Save button. After you click the Save
button, the VoIP Phone will automatically restart and the new setting will get effective.
DS4501-002
31
UPDATE
UPDATE FIRMWARE
The IP Phone provides two methods, HTTP or TFTP, to update new firmware as the following steps:
• Select the firmware code type, Risc or DSP code. (mostly for Risc code)
• Click the “Browse” button to choose the updated file location for HTTP download.
Or
• Select TFTP and enter the IP address of TFTP server for firmware download, then click the “Update” button.
32
DS4501-002
AUTO UPDATE SETTINGS
The IP Phone provides two methods, HTTP or TFTP, to update new firmware as the following steps.
RESTORE DEFAULT SETTINGS
You can restore the VoIP Phone to factory default in this page. Click the Restore button, then the IP Phone will restore to default and automatically
restart again.
REBOOT
If you want to restart the VoIP Phone, you can just click the Reboot button, and then the VoIP Phone will restart automatically.
DS4501-002
33
8. LCD DISPLAY WITH KEYPADS SETTINGS
KEYPAD DESCRIPTIONS
Key Name
“1”, “-“, “_”, “!”, “?”
2
“2”, “a”, “b”, “c”, “A”, “B”, “C”
3
“3”, “d”, “e”, ”f”, “D”, “E”, “F”
4
“4”, “g”, “h”, “I”, “G”, “H”, “I”
5
“5”, “j”, “k”, “l”, “J”, “K”, “L”
6
“6”, “m”, “n”, “o”, “M”, “N”, “O”
7
“7”, “p”, “q”, “r”, “s”, “P”, “Q”, “R”, ‘S”
8
“8”, “t”, “u”, “v”, “T”, “U”, “V”
9
“9”, “w”, “x”, “y”, “z”, “W”, “X”, “Y”, “Z”
0
“0”, “space”
*
“*”, “o”, “:”, “@”
#
Start dialing process
REDIAL
HOLD
“REDIAL” the last previous number again
“HOLD” the current call
TRANSFER
“Transfer” to the other phone number
MENU
The “Menu” key is to set the IP Phone
ENTER
The “Enter” is for setting selections
VOL +/-
This is for phone volume settings
UP/DOWN
P. BOOK
Up↑ and Down↓ keys for LCD display
To show the phone book list
CALL LOG
To show Incoming/outgoing calls history
DEL/MUTE
To delete or to mute IP phone
CONF.
For 3-Way Conference Calls
M1~M4
These are for 4 speed dial numbers
LINE 1~LINE 3
DND
FORWARD
VMS
PICK UP
PSTN
SPK
34
Descriptions
1
For Realm 1 to Realm 3 SIP registrations
To enable/disable DND for call reject
This is for forward function
This is for voice messages
To pick up incoming call for other IP Phones
Press the key to switch to PSTN line
This is for Speaker Phone
DS4501-002
LCD DISPLAY WITH KEYPAD SETTINGS
1. Phone Book
1.1 Search:
1.2 Add entry:
1.3 Speed dial:
1.4 Erase all:
Search Phone Book
Add new phone number to phone book
Add speed dial phone number to speed dial list
Erase all phone number from Phone Book
2. Call history
2.1 Incoming calls:
2.2 Dialed numbers:
2.3 Erase record:
2.3.1 All:
2.3.2 Incoming:
2.3.3 Dialed:
Show all incoming call
Show all dialed call
Delete call history
Delete all call history
Delete all incoming call
Delete all dialed out call
3. Phone setting
3.1 Call forward:
3.1.1 All Forward:
3.1.1.1 Activation:
To Enabled/Disabled this function
3.1.1.2 Number:
Forward to a registered or URL Number
3.1.2 Busy Forward.
3.1.2.1 Activation:
To Enabled/Disabled this function
3.1.2.2 Number:
Forward to a registered or URL Number
3.1.3 No Answer Forward.
3.1.3.1 Activation:
To Enabled/Disabled this function
3.1.3.2 Number:
Forward to a registered or URL Number
3.1.4 Ring Timeout:
Set the Ring times to start the No Answer Forward function
3.2 Do not Disturb:
3.2.1 Allways:
Block all calls
3.2.2 By Period:
Block calls by the period time
3.2.3 Period Time:
Set the start time and end time to Block calls
3.3 Alarm Setting:
3.3.1 Activation:
Enable/Disable alarm
3.3.2 Alarm Time:
Set the alarm time
3.4 Date/Time setting:
3.4.1 Date & Time:
Set the IP Phone Date and Time
3.4.2 SNTP setting:
3.4.2.1 SNTP:
Enabled / Disable SNTP
3.4.2.2 Primary SNTP:
Set Primary SNTP server IP address or URL
3.4.2.3 Secondary SNTP:
Set Secondary SNTP server IP address or URL
3.4.2.4 Time zone:
Set Time zone
3.4.2.5 Adjustment Time:
Set adjustment time period
3.5 Volume and Gain:
3.5.1 Handset volume:
Set Handset volume from 0~15 (max.) for you to hear
3.5.2 Speaker volume:
Set Speaker phone volume from 0~15 (max.) for you to hear
3.5.3 Handset Gain:
Set Handset Gain from 0~15 (max.) for remote site to hear
3.5.4 Speaker Gain:
Set Speakerphone Gain from 0~15 (max.) for remote site to hear
3.6 Ringer:
3.6.1 Ringer volume:
Ringer volume selection from 0~15 (max.)
3.6.2 Ringer type:
Ringer tone selection from 1~4
3.7 Auto Dial:
Auto Dial time selection from 3~9 seconds
4. Network
4.1 WAN Setup:
4.1.1 IP Type:
4.1.1.1 Fixed IP client
4.1.1.2 DHCP client
4.1.1.3 PPPoE client
4.1.2 Fixed IP setting:
4.1.2.1 Host IP
4.1.2.2 Subnet mask
4.1.2.3 Gateway IP
4.1.3 PPPoE setting:
4.1.3.1 User name
4.1.3.2 Password
4.2 LAN Setup:
4.2.1 Bridge
4.2.2 NAT
4.3 DNS Server:
4.3.1 Primary DNS
4.3.2 Secondary DNS
4.4 VLAN:
4.4.1 Activation
4.4.2 VID
4.4.3 Priority
4.4.4 CFI
4.5 Status:
Show IP addresses of WAN, LAN and MAC address (use UP/Down keys)
DS4501-002
35
5. SIP Settings
To set the SIP setting from keypad, you have to press Menu_7_4 to input the password first, or the SIP setting may not be allowed to
access.
5.1 Service Domain:
5.1.1 First realm:
5.1.1.1 Activation
5.1.1.2 User name
5.1.1.3 Display name
5.1.1.4 Register name
5.1.1.5 Register password
5.1.1.6 Proxy server:
Proxy Server IP Address
5.1.1.7 Domain server:
Domain Server IP Address
5.1.1.8 Outbound proxy:
Outbound Proxy IP Address
5.2 Codec:
5.2.1 Codec type:
5.2.1.1 G.711 uLaw:
G.711 uLaw
5.2.1.2 G.711 aLaw:
G.711 aLaw
5.2.1.3 G.723:
G.723.1
5.2.1.4 G.729:
G.729A
5.2.1.5 G.726-16:
G.726 16Kbps
5.2.1.6 G.726-24:
G.726 24Kbps
5.2.1.7 G.726-32:
G.726 32Kbps
5.2.1.8 G.726-40:
G.726 40Kbps
5.2.2 VAD: Voice Activity Detection Enable/Disable
5.3 RTP Setting:
5.3.1 Outband DTMF:
Outband DTMF Enabled/Disabled
5.3.2 Duplicate RTP:
5.3.2.1 No duplicate:
No resend voice packets
5.3.2.2 One duplicate: Resend voice packets once
5.3.2.3 Two duplicate: Resend voice packets twice
5.4 RPort Setting:
RPort Enabled/Disabled
5.5 Hold by RFC:
Hold by RFC3261 Enabled/Disabled
5.6 Status:
Use Up/Down keys to show the SIP Proxy register status
6. NAT Transversal
6.1 STUN setting:
6.1.1 STUN:
STUN Enabled/Disabled
6.1.2 STUN server: Server IP Address or URL
7. Administrator:
7.1 Auto Config:
7.1.1 Config Mode:
7.1.2 TFTP server:
7.1.3 FTP server:
7.1.4 FTP Login Name:
7.1.5 FTP Password:
7.2 Upgrade System:
7.2.1 Upgrade Now:
7.2.2 Upgrade via:
7.2.3 Status
7.2.4 Reset Time:
7.3 Default setting:
7.4 System Authority:
7.5 Version:
7.6 Watch Dog:
7.7 Restart:
36
Select Disable/TFTP/FTP/HTTP for auto config function with server
Set the TFTP server IP address
Set the FTP server IP address
Set the login name to the FTP server
Set the Password to the FTP server
You can restore to the default setting
Select Yes/No to upgrade with the upgrade Server
Select Disable/TFTP/FTP/HTTP to do upgrade
Set Yes/No to reset time
To load/abort the default setting
Must enter the password first for SIP setting. Default is “test”
This shows the firmware version
This enables Watch Dog function for debugging
This function will restart your IP Phone
DS4501-002
9. VOIP APPLICATION EXAMPLES
You can use PC Web browser to configure VoIPhone. For example, enter http://192.168.123.1:9999 from PC web browser.
A. ADSL Connections without Router for VoIPhone
ADSL Modem
INTERNET
WAN
LAN
PSTN
PC IP: 192.168.123.1
PSTN
B. ADSL Connections with Router for VoIPhone
ADSL Modem
INTERNET
Router
WAN
LAN
PSTN
PC IP: 192.168.123.1
PSTN
EXAMPLE 1: PUBLIC SWITCHED TELEPHONE NETWORK (PSTN) CALLING/ANSWERING
APPLICATIONS
VoIPhone is default at the VoIP mode. For PSTN calls, you may just pick up the phone, press 0* key or PSTN function key, and dial directly to
the PSTN number like a normal telephone.
CONFIGURATION
1. The “Auto Answer” is OFF at default, and the function of extension call from SIP to PSTN is disabled. The FXO port is for PSTN only and
no configuration is needed.
CALLING/ANSWERING
2. Pick up the phone and press PSTN function key, and you should hear a dial tone.
3. Press, e.g. 7654321, to call the PSTN party with 7654321. In a moment, you should hear a ring back tone, and wait for the called PSTN party
to answer.
4. For receiving PSTN incoming calls, you just pick up the phone to answer when ringing. Please refer to Examples 3 and 4 for more details of
extension calls between PSTN and SIP.
EXAMPLE 2: SIP-TO-SIP CALLING/ANSWERING
APPLICATIONS
The SIP-to-SIP calling works when both calling and answering parties are registered to SIP server with given registered phone numbers. The
ADSL connections can be as in either Diagrams A or B. Both parties are registered to SIP server under Router. For Diagram A without Router, you
may select NAT mode to enable the embedded Router. For Diagram B with external Router, you may select Bridge mode to disable the embedded
NAT.
CONFIGURATION
1. Select either “NAT“ or “Bridge” in accord with your network in “WAN settings” page.
2. Select “DHCP Client” to automatically get an IP address from Router.
3. Remember to click the “Submit” button.
4. Select Active “ON” in the “SIP settings / Service Domain” page.
5. Enter the Register Name, Register Password, Proxy Server, and Outbound Proxy.
6. Select “ON” in the “STUN setting”, if Outbound Proxy is NOT available.
7. Upon successful SIP registration, the REG LED indicator will be ON and the LCD will show registered <phone number>.
CALLINGS
8. Pick up the phone, and you should hear a dial tone for VoIP mode.
9. Press 1688# or 1688 to call the party with the registered SIP phone number 1688. Note that # key will dial out the number immediately. Dialing
without # will not dial out until the auto dial timer (default=5 seconds) elapsed.
EXAMPLE 3: 3-WAY CONFERENCE CALL, CALL TRANSFER, CALL WAITING, HOLD
APPLICATIONS
The Call Transfer and 3-Way Conference Call applications are for calls among Parties A, B, and C. Three parties are registered to SIP server with
either fixed real IP or private IP. There are two kinds of call transfer; Blind Transfer and Attendant Transfer.
DS4501-002
37
BLIND TRANSFER
1. Party A calls Party B.
2. While in conversation, Party B may press Transfer key, and should hear a dial tone.
3. Party B press [Party C number] # and hang up to transfer to Party C.
ATTENDANT TRANSFER
1. Party A calls Party B.
2. While in conversation, Party B may press Transfer key, and should hear a dial tone.
3. Party B press [Party C number] # and talk to Party C.
4. Hang up from Party B, and then Party A will transfer and connect to Party C.
3-WAY CONFERENCE CALL
1. Party A calls Party B.
2. While in conversation, Party B may press Hold key to hold the call, and should hear a dial tone.
3. Party B calls Party C.
4. While in conversation, Party may press Conf. key to join in Party A for three-way conference.
CALL WAITING APPLICATION
When a new call is coming while you are talking, you will hear an interrupt “dodo” tone and you can press Hold key to answer the new incoming
call. You may press Hold key to switch back to the previous call.
CALL HOLD APPLICATION
You may press Hold key to hold the current call for a while, then press Hold key again to resume conversations.
EXAMPLE 4: SIP TO DIRECT IP CALLING
APPLICATIONS
The application is for the calling party with ADSL connection as in either Diagrams A or B. The calling party is registered to SIP server with either
fixed real IP or private IP under Router. The answering party is with fixed real IP. You may also use the Phone Book to call Direct IP Address.
CONFIGURATION
1. Same as in Example 2.
2. Select “ON” in “STUN setting” page, if Outbound Proxy is NOT available.
3. Upon successful SIP registration, the LCD will show registered <phone number>.
CALLINGS
4. Press Speakerphone key, and you should hear a dial tone.
5. Press 211*21*191*4# or 211*21*191*4 to call the party with the real IP address of 211.21.191.4. In a moment, you should hear a ring back
tone, and wait for the VoIP called party to answer.
EXAMPLE 5: DIRECT IP TO DIRECT IP CALLING/ANSWERING
APPLICATIONS
The applications are for ADSL connection without Router as in Diagram A. Both parties are with fixed real IP. The Direct IP calling works when
both calling and answering parties are with known fixed IP. SIP server registrations are not required in this application.
CONFIGURATION
1. Select “Fixed IP” in the “Network / WAN settings” page.
2. Enter the items of IP, Subnet Mask, Gateway IP.
3. Click the “Submit” button.
CALLINGS
4. Pick up the phone, and you should hear a dial tone.
5. Press 211*21*191*4# or 211*21*191*4 to call the party with the real IP address of 211.21.191.4. Note that # key will dial out the number
immediately. Dialing without # will not dial out until the auto dial timer (default=5 seconds) elapsed. In a moment, you should hear a ring back
tone, and wait for the VoIP called party to answer.
38
DS4501-002
10. TROUBLE SHOOTING FOR WEB CONFIGURATIONS
DO NOT HEAR DIAL TONE?
When you pick up the phone and hear a busy tone, it indicates the WAN port is NOT connected. The LCD will show Ethernet Error! Make sure
the ADSL Ethernet cable is connected to the WAN port of VoIPhone and Power Reset again.
CAN NOT ACCESS WEB PAGE?
Web Browser is a useful tool to configure VoIPhone. When you have difficulties in accessing the default IP address http://192.168.123.1 of
VoIPhone as in the following figure, the most possibility is that the PC might have different subnet IP settings from 192.168.123.xxx. In this case,
you must change VoIPhone IP address to the same subnet as PC and Router.
ADSL Modem
INTERNET
Router
WAN
LAN
PSTN
PC IP: 192.168.123.1
PSTN
Example: To change VoIPhone IP address to the same subnet as PC and Router:
1. If there is a router with enabled DHCP service for address allocation, press Menu followed by the sequence 4_1_1_2 top enable Client DHCP
mode. VoIPhone will restart and the LED will blink during acquisition of the IP address from the router DHCP server.
2. Press Menu_4_5 to read IP Addresses for WAN and LAN Ports, for example, 192.168.62.51 or 10.1.1.27, note that the address is different
from the initial address.
3. Enter from web browser http://192.168.62.51:9999 to login VoIPhone web page for configurations.
CONFIGURE PC’S IP SETTINGS FOR VOIPHONE EMBEDDED NAT FUNCTION?
If you don’t have a router to connect both PC and VoIPhone for sharing the only one IP address from ADSL/Cable modem, you should enable the
embedded NAT function inside VoIPhone. You need to change your PC’s IP settings to recognize VoIPhone as the default gateway. In this case,
you should enable the embedded Router of VoIPhone to provide more than one IP addresses for PC and VoIPhone.
ADSL Modem
INTERNET
WAN
LAN
PSTN
PC IP: 192.168.123.1
PSTN
Example: To change PC IP address to the same subnet as 192.168.123.1 for VoIPhone:
1. As in Windows:
• At “Network and Dialup Connections”, right click on “Local Area Connection”, then click on property.
• The “Local Area Connection Properties” window will pop up.
• Double click on “Internet Protocol (TCP/IP)”.
• The “Internet Protocol (TCP/IP) Properties” window will pop up.
• Click on “Use the following IP Address”.
• Enter IP: 192.168.123.50 (50 can be any number other than 1, which is used by VoIPhone).
• Enter Subnet mask: 255.255.255.0.
• Enter Default gateway: 192.168.123.1.
• Click on OK button.
2. At browser, type http://192.168.123.1.
3. Follow the example in “Advanced Settings for Embedded NAT” for web login.
4. At LAN setting, turn on DHCP server.
5. At WAN setting, choose “DHCP client” to work with your ADSL/Cable modem.
6. Save change, wait for VoIPhone to reboot.
7. Change your PC’s “Internet Protocol (TCP/IP) Properties” back to “obtain an IP address automatically”.
8. You may press Menu_4_5 to read IP Addresses for WAN and LAN Ports.
DS4501-002
39
11. GLOSSARY
SIP account: SIP service registration parameters supplied by a service provider (see step 3 of the quick configuration for examples).
ADSL: Asymmetric Digital Subscriber Line: Modems attached to twisted pair of copper wiring that transmit from 1.5Mbps to 12Mbps downstream
(to the subscriber) and from 16kbps to 1280kbps upstream, depending on line distance.
CODEC: Abbreviation for Coder-Decoder. It is an analog-to-digital (A/D) and digital-to-analog (D/A) converter for translating the signals from the
outside world to digital, and back again.
DNS: Short for Domain Name System (or Service or Server), an Internet service that translate domain names into IP addresses.
DTMF: Dual Tone Multi Frequency. The standard tone-pairs used on telephone terminals for dialing using in-band signaling. The standards define
16 tone-pairs (0-9, #, * and A-D) although most terminals support only 12 of them (0-9, * and #).
DHCP: The Dynamic Host Configuration Protocol (DHCP) is an Internet protocol for automating the configuration of computers that use TCP/IP.
DHCP can be used to automatically assign IP addresses, to deliver TCP/IP stack configuration parameters such as the subnet mask and default
router, and to provide other configuration information such as the addresses for printer, time and news servers.
FXO: Foreign exchange Office: analogic line port on PBX or similar devices.
ITSP/ISP: Internet Service Provider.
LAN: Local Area Network.
NAT: Network Address Translation. This technique modifies the IP address of the packages transiting on a network. It is usually implemented in
routers and used to connect different devices to a router to diversify them. All devices will be presented to the network with the common router
address.
PPPoE: Point-to-Point Protocol over Ethernet is a network protocol for encapsulating PPP frames in Ethernet frames. It is used mainly with cable
modem and DSL services.
PSTN: Public Switched Telephone Network. The phone service we use for every ordinary phone call, or called POT (Plain Old Telephone), or
circuit switched network.
Realm: this term is commonly used to refer to the connection data of a SIP service (see SIP Account).
SIP: Session Initiation Protocol, An IP telephony signaling protocol developed by the IETF (RFC3261).
SIP is a text-based protocol suitable for integrated voice-data applications. SIP is designed for voicetransmission and uses fewer resources and
is considerably less complex than H.323.
STUN: Simple Traversal of UDP over NATs is a network protocol allowing clients behind NAT (or multiple NATs) to find out its public address,
the type of NAT it is behind and the internet side port associated by the NAT with a particular local port. This information is used to set up UDP
communication between two hosts that are both behind NAT routers. The protocol is defined in RFC 3489. STUN will usually work well with nonsymmetric NAT routers.
TFTP: Trivial File Transfer Protocol, is a very simple file transfer protocol, with the functionality of a very basic form of FTP; It uses UDP (port 69)
as its transport protocol.
VAD: Voice Activity Detection or Voice Activity Detector is an algorithm used in speech processing wherein, the presence or absence of human
speech is detected from the audio samples.
VLAN: A virtual LAN, known as a VLAN, is a logically-independent network. Several VLANs can coexist on a single physical switch. It is usually
refer to the IEEE 802.1Q tagging protocol.
VoIP: Voice over the Internet. VoIP encompasses many protocols. All the protocols do some form of signaling of call capabilities and transport of
voice data from one point to another. e.g.: SIP, H.323, etc.
WAN: Wide Area Network.
DS 4501-002
FILIALI
20151 MILANO - V.Gallarate 218
Tel. 02.380.111.75 - Fax 02.380.111.80
00043 CIAMPINO (ROMA) V.L. Einaudi 17/19A
Tel. 06.791.07.30 - Fax 06.791.48.97
80013 CASALNUOVO (NA) V.Nazionale delle Puglie 3
Tel. 081.193.661.20 - Fax 081.193.661.04
30030 VIGONOVO (VE) - V.del Lavoro 71
Tel. 049.738.63.00 r.a. - Fax 049.738.63.11
66020 S.GIOVANNI TEATINO (CH) - V.Nenni 17
Loc. Sambuceto Tel. 085.44.64.851
Tel. 085.44.64.033 - Fax 085.44.61.862
LBT 8249
SEDE
URMET DOMUS S.p.A.
10154 TORINO (ITALY)
VIA BOLOGNA 188/C
Telef.
+39 011.24.00.000 (RIC. AUT.)
Fax
+39 011.24.00.300 - 323
Area tecnica
servizio clienti +39 011.23.39.810
http://www.urmetdomus.com
e-mail:[email protected]