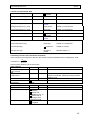
1
Safety Instructions Important: Read Before Commissioning • The user must ensure that all operators are familiar with this operating manual and follow it at all times. • The operating manual must be read carefully before the instrument is mounted, installed and commissioned. • • All actions taken must follow the operating manual. • • • • When the instrument is connected to mains voltage, it must not be opened. Installation and commissioning may only be carried out by appropriately qualified personnel with due regard for all rules and regulations that are in force. If the instrument is visibly damaged, it must not be installed, wired up or commissioned. If the instrument does not work after commissioning, it must be disconnected from the mains. Any further laws, standards, guidelines, etc. relevant to this product must be complied with. Additional information on EML 1101 Maximum Demand Controller • Loads which may cause damage or danger when disconnected by EML1101 must not be connected to the load channels. • The responsibility for correct load settings, such that proper operation is guaranteed and no damage or danger arises, remains 100% with the customer. Contents PRELIMINARY User Manual EML1101 Contents Section Page 1 Quick Start 5 1.1 Programming via Front Fascia................................................................................................5 2 Description 7 2.1 FRAKO System options S, M and L........................................................................................8 3 Installation 8 3.1 Mounting .................................................................................................................................8 3.2 Electrical Connections ............................................................................................................8 3.2.1 Power Supply Voltage ........................................................................................................8 3.2.2 Connecting Inputs...............................................................................................................9 3.2.3 Connecting Load Channels ................................................................................................9 3.2.4 Alarm Contact for Hardware Error ......................................................................................9 3.2.5 Alarm contact......................................................................................................................9 3.3 Installing the OPT-SW software........................................................................................... 10 3.3.1 Hardware requirements: .................................................................................................. 10 3.3.2 Software requirements:.................................................................................................... 10 3.3.3 Installation........................................................................................................................ 10 4 Commissioning 11 5 Response in exceptional conditions 11 5.1 Self Monitoring ..................................................................................................................... 11 5.2 Restarting............................................................................................................................. 11 5.3 Memory ................................................................................................................................ 11 6 Operation 12 6.1 Keyboard .............................................................................................................................. 12 6.2 Programming mode.............................................................................................................. 12 6.2.1 Selecting program items .................................................................................................. 12 6.2.2 Activating programming mode......................................................................................... 12 6.2.3 Setting parameters .......................................................................................................... 12 6.2.4 Accepting settings............................................................................................................ 12 6.3 Menu Structure..................................................................................................................... 13 7 Basic Settings 14 7.1 Target maximum demand P1, P2, P3 and P4 ..................................................................... 14 7.2 . Current target maximum demand P1, P2, P3 and P4.................................................... 14 7.3 . Initial value target maximum demand P1, P2, P3 and P4.............................................. 14 7.4 . Upper limit target maximum demand P1, P2, P3 and P4 .............................................. 14 7.5 Peak power P1, P2, P3 and P4 ........................................................................................... 15 7.6 Control delay ........................................................................................................................ 15 7.7 Control Application Point...................................................................................................... 15 7.8 Emergency mode activated at XX% of total sheddable load power .................................... 15 7.9 Other settings....................................................................................................................... 15 7.9.1 Measuring period ............................................................................................................. 15 7.9.2 Counter constant ( P_act1, P_act2) ............................................................................ 16 P_act2) ........................................................... 16 7.9.3 Current transf. ratio Ip/Is: (P_act1, Q, P_act2) ........................................................ 16 7.9.4 Voltage transf. ratio Vp/Vs: (P_act1, Q, P_act2).............................................................................. 16 7.9.5 Average over (P_act1, Q, 7.9.6 Counter constant (Q) ....................................................................................................... 16 7.9.7 Cosphi Alarm at cosphi <XX............................................................................................ 16 7.9.8 Bus address..................................................................................................................... 16 7.9.9 Auto summer/winter time changeover ............................................................................. 16 7.9.10 Options............................................................................................................................. 16 7.9.10.1 Number of Profiles Used 16 7.9.10.2 Highest EMD Address 16 7.9.10.3 Type of profile switching 17 7.9.10.4 Active Pulse Monitoring Alarm 19 7.9.10.5 . Group 19 7.9.10.6 Units 19 2 User Manual EML1101 8 8.1 8.2 8.3 8.4 8.5 8.6 8.7 8.8 8.9 8.10 8.11 8.12 9 9.1 9.2 9.3 9.4 9.4.1 9.4.2 9.5 9.6 9.7 9.8 9.9 9.10 10 10.1 10.2 10.3 10.4 11 12 13 14 15 16 17 17.1 17.2 17.3 17.4 17.4.1 17.4.2 17.5 18 18.1 18.2 18.3 18.4 18.5 19 19.1 19.1.1 19.1.2 19.2 19.3 19.4 Contents Load settings 20 Load name ........................................................................................................................... 20 Priority .................................................................................................................................. 20 Power ................................................................................................................................... 21 Preference............................................................................................................................ 21 Channel Status..................................................................................................................... 21 Minimum OFF time............................................................................................................... 21 Maximum OFF time.............................................................................................................. 21 Minimum ON time ................................................................................................................ 22 . Group.............................................................................................................................. 22 Changing load settings of group channels........................................................................... 22 Output................................................................................................................................... 22 Function testing.................................................................................................................... 22 Printer routines 23 Printing basic settings .......................................................................................................... 23 Printing load settings............................................................................................................ 23 Power failures ...................................................................................................................... 23 Errors.................................................................................................................................... 23 Error list............................................................................................................................ 24 Resetting error counters .................................................................................................. 24 Printing present day's power curve...................................................................................... 24 Printing previous day's power curve .................................................................................... 24 Power maxima of the last 50 days ....................................................................................... 25 Power maxima of the last 48 months................................................................................... 25 Event list............................................................................................................................... 25 Deleting printer queue.......................................................................................................... 26 Add-on stations 26 Activating/deactivating stations............................................................................................ 26 Displaying stations ............................................................................................................... 26 Virtual add-on units .............................................................................................................. 27 Activating virtual EMD .......................................................................................................... 27 External synchronisation 27 Setting time 28 Counters 28 Write protect 28 Info device 28 Technical Data 29 Troubleshooting 30 Checking programmed values ............................................................................................. 30 Control on the instrument..................................................................................................... 30 Printout from a directly connected printer ............................................................................ 30 Checking the system when running ..................................................................................... 30 Standard display .............................................................................................................. 30 Display of switching channels.......................................................................................... 30 Sources of error ................................................................................................................... 31 Application instructions 33 Bus cable longer than 1 km ................................................................................................. 33 Shielding .............................................................................................................................. 33 Target Maximum Demand ................................................................................................... 33 Operating OPT-SW via modem ........................................................................................... 34 Technical terms/Glossary .................................................................................................... 34 Annex 36 Instrument software.............................................................................................................. 36 EML software update....................................................................................................... 36 Update preparation .......................................................................................................... 36 Table of settings................................................................................................................... 40 Form for Basic Settings........................................................................................................ 42 Form for load settings .......................................................................................................... 45 3 Quick Start PRELIMINARY User Manual EML1101 19.5 Terminal assignments .......................................................................................................... 46 19.6 Connection diagram ............................................................................................................. 47 19.7 Dimensions .......................................................................................................................... 48 20 Appendix 49 20.1 Glossary of Terms................................................................................................................ 49 20.2 Preference............................................................................................................................ 50 20.2.1 Power preference ............................................................................................................ 50 20.2.2 Time preference............................................................................................................... 50 4 User Manual EML1101 Quick Start 1 Quick Start The instrument is commissioned as follows: a) Copy and fill out Form for Basic Settings (page 42) and Form for Load Settings (page 45) before commissioning. b) Remove stoppers from the PG cable glands and connect the EML 1101 as shown in Figure 1 on page 47. Please observe the directions in chapter 3 page 8. c) Switch on power supply. The EML 1101 then performs a self-test. d) Check if the inputs are functioning correctly: − Active pulse input: The status display for Active pulse blinks. − Time pulse input: The remaining time is reset and the next measuring period starts when a time pulse is received. ‘No time pulse’ should not appear in the third line at the end of a measuring period. e) Carry out the settings procedure. This means programming of basic settings and load settings using buttons on the front fascia or over a PC using OPT-SW software supplied. The second option makes the configuration easier to understand. For this reason it is recommended to use the PC software when installing for the first time. Refer to online help in OPT-SW if you require further information. Installation: Start the program OPT-SW under Windows (e.g. Win 95 with the ‘Start’ button and the menu item ‘run’, then enter >A:\setup.exe< A:\SETUP in the dialog box). 1.1 Programming via Front Fascia 1) Fascia keys: Use ‘arrow’ keys to choose menu items/Numbers. ‘CR’ key confirms menu item choice/Changes to next digit. ‘Menu’ key changes one menu level back/Accept choices. 2) Choose the menu item Basic settings. 3) The sub-menu item Target maximum demand P1 is displayed. Select this by pressing CR button. To prevent unauthorised use or accidental changes to Target maximum demand P1: the instrument, a prompt is given for ID number. This 6500.0kW is shown only if no data has been entered for more than 1 hour. The last four characters of the serial number are to be entered as ID number. These are given on the label on the top face of the terminal compartment. Use the ‘arrow’ keys to choose numbers. Change to next number with the ‘CR’ key. When ID is entered (e.g. 0631), press ‘Menu key’. If the ID is correct an underscore appears in the display. 1) 2) 3) 4) Enter values for target maximum demand and peak power according to Form for Basic Settings. Peak power is the maximum permissible active power. Enter a peak power value that is high enough to prevent short high active power from causing a shut off. To set measuring period, select menu item Basic settings | Other settings | Measuring period. Measuring periods of 10, 15, 30 or 60 minutes can be chosen using cursor buttons. List of settings in this sub-menu: − − − − − − Measuring period Maximum target demand P1,P2,P3, and P4 current target maximum demand P1,P2,P3, and P4 Current transf. ratio Ip/Is: (P_act1, Q, P_act2) P_act2) Voltage transf. ratio Vp/Vs: (P_act1 ,Q, Counter constant (P_act1, P_act2) 5 Description − − − − − PRELIMINARY User Manual EML1101 Counter constant (Q) Average over (P_act1, Q, P_act2) Cosphi alarm when cosphi < XX% Bus address Auto summer/winter time changeover Note: Settings made are immediately adopted by control system. Please note that when a new Target maximum is selected, this value comes in effect immediately. Load settings listed below can be set individually for every load channel and for every profile. Load settings Power Priority Channel status Output status Minimum OFF time Maximum OFF time Minimum ON time 6 Values 0 – 6500.0 0 1–3 4 – 98 99 Always ON Always OFF Controlled NC NO 0 – 999:59 0 – 999:59 0 – 999:59 Description Value in kW or MW Load is always switched on Load is only included in control system during emergency mode Load is included in control system Load is always switched off Selected state for all profiles Inverting of the contact state ON/OFF Value in minutes:seconds Value in minutes:seconds Value in minutes:seconds User Manual EML1101 Description 2 Description Customers with a power consumption above typical values of about 30 kW are charged not only according to their consumption for energy, but also according to the maximum power they draw. In this context the term consumption refers to an average that is determined over a measuring period. Usually the average is determined over a period of 10, 15, 30 or 60 minutes. The beginning and the end of a measuring period are sent to the EML1101 by the energy supplier via pulse output on the counter. If a measuring period of 15 minutes is defined, the energy supplier subdivides every day into 24 x 4 = 96 measuring periods. At the beginning of each measuring period, an energy meter is set to zero. The amount of consumed energy at the end of each measuring period is divided by ¼ of an hour and thus becomes the mean power drawn during that particular measuring period. There are various methods of charging maximum demand, but they all use a monthly basis of calculation. In a 30 day month there are 96 x 30 = 2880 maximums, the highest of these mean power values is charged by the utility. At the end of each month, maximum demand in kW is charged at a certain rate of $ x / kW. Example: Monthly maximum demand: Rate: Maximum demand charge: 110 kW $ 8.00 per kW per month $ 880.00 A very frequent example for charging maximum demand on a yearly basis: The 3 highest values over a 12 month period are determined, These 3 values are then averaged and the result is charged with, for example, $ 102.00/kW/year. The relay outputs of the EML 1101 can be used to switch loads off. The EML 1101 has 4 switching channels and an emergency channel for shedding loads. Extension stations with 8 switching channels each can be connected over a 2 wire bus connection . There are further outputs on the EML 1101 which will, however, not be dealt with in this introductory chapter. The EML 1101 is supplied with all relevant data for automatic maximum demand control over the inputs. A trend is calculated with the current power used and the remaining time in the measuring period. If this trend is higher than the set target maximum demand, channels are switched off, in as much as their min/max times are maintained. If a trend is lower than the set target maximum demand, deactivated channels with appropriate power demand can be switched on again Time pulse rate: kWh pulse rate: 1 per measuring period. dependent on counter constants, current and voltage transformer ratios Example: 15 Imp/kWh W_max = P_max/T Prognosis at t = t1: No need of action. Prognosis at t = t2: Need of action: Loads are switched off until the trend falls below W_max. 7 Installation 2.1 PRELIMINARY User Manual EML1101 FRAKO System options S, M and L The EML 1101 is available in the following system options: EML 1101 S4/S12/S20 - EML 1101 EML 1101 Bus prepared max. 2 EMD ( 4+2•8 = 20 channels) Output inversion Additionally: FRAKO Starkstrombus available + 2 EMD (Max. 4) 3 Active pulse inputs with summation Target maximum demand adjustment Additionally: + 6 EMD (Max. 10) Grouping Upgrades to higher system options are carried out with a PC is not necessarily require the assistance of a service technician. For ease of understanding the FRAKO system options are differentiated in the text as follows: Function as of FRAKO system option: Function as of FRAKO system option 3 Installation 3.1 Mounting The EML 1101 is vertically screw mounted. 3.2 Electrical Connections All cable connections are connected with plug-in terminal blocks. Connections are as shown in Figure 1 Connection diagram. page 47. Stoppers should be left in PG cable glands which are not in use. 3.2.1 Power Supply Voltage Power supply voltage should be 230 VAC, 50/60 Hz. The device is protected by an internal fine-wire fuse ( 250 mA slow-blow ). Important: 8 The connections for power supply must be externally protected by a 2 A semi-time lag fuse. When working on EML 1101, the unit must be switched off. If the alarm contact is also used to signify power failures, then the alarm circuit must be protected separately otherwise any failure of the 2 A fuse cannot be monitored. User Manual EML1101 Installation 3.2.2 Connecting Inputs The inputs for active pulse, time pulse and profile switching complies to S0 definition. The power supply required is provided by the inputs. Both potential free contacts and electronic contacts can be connected. There are two inputs for profile switching, thus allowing 4 profiles to be selected. Status of profile input 1 Status of profile input 2 Selected profile Counter open open P1 1 close open P2 2 open close P3 1 close close P4 2 As can be seen from the table above, one of the 2 counters is chosen simultaneously with profile input 1. Profile input 2 does not influence the counter. Caution: No external voltages are to be applied to contacts 7 to 14 as this can destroy the input circuit. Important: When working on EML 1101, ensure that the unit is disconnected from mains. Although the EML 1101 is disconnected from mains, the circuits leading to switch contacts may still be connected to power voltage. 3.2.3 Connecting Load Channels EML 1101 load channels consist of switching contacts which consist of a normally open (NO) and normally closed(NC) contact. The NC part of the switching contacts takes on the following states in the listed operation conditions of EML. Load on: Load off: No power supply: NC of the relay is closed NC of the relay is open. NC of the relay is closed Every channel of the add-on stations of the EMD1101 have only NC contacts. These can be used either as NO or NC contact in the load settings. The position of the relay in emergency/power off can be set with a DIP switch row on the EMD. 3.2.4 Alarm Contact for Hardware Error The alarm contact for hardware error is a potential-free contact. The relay is open in normal operation and energises if the processor of EML 1101 fails. Important: The switching and alarm contacts may only have a maximum rating of 250 V / 4 A. 3.2.5 Alarm contact The contact is a potential free switching contact. The relay reacts when one of the following errors occur: - Target maximum demand exceeded Peak power exceeded Cosphi exceeded (too small) 9 Commissioning - PRELIMINARY User Manual EML1101 EMD error/add-on bus error FRAKO Starkstrombus defect No time pulse No pulse in input 1 (only with activated active pulse control) No pulse in input 2 (only with activated active pulse control) No pulse in input 3 (only with activated active pulse control) Mains power off Error in clock component Error writing to EEPROM The relay remains in this condition until the error has been corrected. If there is an error, contact 29/30 is closed. 3.3 Installing the OPT-SW software 3.3.1 Hardware requirements: • • • • • • • IBM compatible computer with CPU 80386/33MHz or higher 4 MB RAM 3½" 1.44 MB floppy disk drive Hard disk with at least 40 MB Serial communication ports COM1 and COM2 or COM 1 and PS2 VGA graphics card and mouse Modem (optional) 3.3.2 Software requirements: • Windows 98/NT/2000/XP • Basic knowledge of Windows 3.3.3 Installation Select File | Run in Program Manager Windows 95/98/NT Press Start button on the bottom left of the screen Select Run Enter A:\SETUP to start installation 10 User Manual EML1101 Commissioning 4 Commissioning a) Fill in all data in the basic settings form and the load settings form. b) Remove the PG covers from the necessary openings and connect the EML 1101 as in Figure 1 Connection diagram. on page 47: EML1101 MAXIMUM DEMAND CONTROLLER Version 2.11 L c) Switch on the power supply. The EML 1101 then carries out a self test. The following is dependant on program version and the FRAKO system option. d) The standard display is then shown. P_act 0.0kW cosphi 1.0 P_acc. 0.0kW Time rem. 15.00 P1 e) Check that all inputs are functioning correctly: - Input pulse: the status display, Active pulse1 blinks at the same frequency as the active pulse. - Time pulse input: the display of time remaining jumps to the pre-set measuring period as soon as the time pulse is given. If then “Time pulse missing” is not shown, the function of time pulse input is correct. - Profile switching: The profile identified on the contacts 11 and 12 is shown in the second line. (e.g. P1 for profile 1) 5 Response in exceptional conditions 5.1 Self Monitoring The EML 1101 has an integrated self-monitoring system. It identifies power failures and system errors. These events are then entered in a power failure table that can be printed out. A power failure is then only registered if power supply is disconnected for more than 2 seconds. 5.2 Restarting The EML 1101 automatically begins to operate after power supply is restored. 5.3 Memory Data programmed is retained for approximately 10 years in the event of a power failure. Note: The programmed values should be rechecked if the unit is isolated from power supply for a long period. 11 Operation PRELIMINARY User Manual EML1101 6 Operation 6.1 Keyboard Cursor buttons − Navigating in menu structure − Changing values and settings − Setting numbers Carriage Return button − − − − Selecting a menu Moves cursor to next position Activating stations Printing MENU button − Ascend to the next higher menu level − Proceed to display mode after reset − Accepting values and settings 6.2 Programming mode 6.2.1 Selecting program items Use one of the two cursor buttons to call up the settings menu. 6.2.2 Activating programming mode A prompt is given for the ID number when the appropriate item is seen in the display. The last 4 digits of serial number are to be entered. If the ID number has already been prompted from a previous entry, then it will not be prompted again for the next hour. 6.2.3 Setting parameters If a cursor appears in the display, then the individual numbers can be adjusted by pressing the cursor buttons. Pressing CR button moves the cursor to the next position. 6.2.4 Accepting settings The setting are accepted by pressing MENU button. If an invalid entry (e.g. time/date) has been entered, the old settings will appear. In this case repeat the entry. 12 User Manual EML1101 6.3 Operation Menu Structure Basic settings Target maximum demand P1, P2, P3 and P4 [ current target maximum demand P1,P2,P3 and P4] (section 7.1/7.2) • Initial value target maximum demand P1, P2, P3, and P4 (section 7.3) • Upper limit target maximum demand P1, P2, P3 and P4 (section 7.4) • Peak power (section 7.5) • Control delay (section 7.6) • Control application point at XX% of target maximum demand (section 7.7) • Emergency mode activated at XX% of total sheddable load power (section 7.8) • Other settings (section 7.9) ♦ Measuring period ♦ Counter constant (P_act1, Q, ♦ Current transf. ratio Ip/Is (P_act1, Q, ♦ Voltage transf. ratio Vp/Vs (P_act1, Q, (section 7.9.1) P_act2) (section 7.9.2, 7.9.6) P_act2) P_act2) (section 7.9.3) (section 7.9.4) ♦ Average over (P_act1, Q, ♦ Cosphi alarm at cosphi <XX% (section 7.9.7) ♦ Bus address (section 7.9.8) ♦ Auto summer/winter time changeover (section 7.9.9) ♦ Options P_act2) (section 7.9.5) (section 7.9.10) − Number of profiles used − Highest EMD address (section 7.9.10.2) − Type of profile switching (section 7.9.10.3) − Time pulse edge (section 7.9.10.3.1) − − Self adjusting target maximum demand (section 7.9.10.1) (section 7.9.10.3.2) − Active / non active (section 7.9.10.3.3) − Resetting via external signal/ resetting via internal date (section 7.9.10.3.4) Active pulse monitoring alarm − Allow grouping (section 7.9.10.4) (section 7.9.10.5) − Units Load settings (section 7.9.10.6) (section 8) • (section 8) Profile 1..4 (Depends on the number of profiles used) ♦ Enter station and channel no.: EML / 1..4, EMD1..EMD10/1..8 (section 8) − Name: − Priority: (section 8.2) − Channel status (section 8.5) − Output (section 8.11) − Group (section 8.1) (section 8.9) − Minimum OFF-time: − Maximum OFF-time: (section 8.7) − Minimum ON-time: (section 8.8) − Preference (section 8.4) − Power: (section 8.3) Printer routines (section 8.6) (section 9) • Printing basic settings (section 9.1) • Printing load settings (section 9.2) • Power failures (section 9.3) • Errors (section 9.4) • ♦ Error list ♦ Resetting error counters Present day’s power curve (section 9.4.1) (section 9.4.2) (section 9.5) 13 Basic Settings PRELIMINARY User Manual EML1101 • Previous day’s power curve • Power maxima of the last 50 days (section 9.7) • Power maxima of the last 48 months (section 9.8) (section 9.6) • Event list (section 9.9) • Delete printer jobs (section 9.10) Add-on stations (section 10) • Activate/deactivate stations (section 10.1) • Display stations (section 10.2) External synchronisation (section 11) Clock (section 12) Counters (section 13) Write protect (section 14) Instrument info (section 15) 7 Basic Settings Basic settings 7.1 Select Basic settings menu item by using cursor buttons and program this by using CR button to enter the setting mode or the next menu level. Target maximum demand P1, P2, P3 and P4 Target maximum demands for profiles 1 to 4 is entered here. There is an individual menu item for each profile (e.g. Target maximum demand P3). Depending on the profile activated, one of the four target maximum demand settings is valid. The target maximum demand is, the more cost savings is going to be. However, there is danger of loads connected may be switched off too often or for too long due to emergency mode being activated. Therefore, an optimal compromise should be found. It is advisable to sink the target maximum demand step by step until you have an optimal compromise between load availability and cost saving. Do not forget to take seasonal variations into consideration e.g. additional costs for heating/cooling etc. 7.2 . Current target maximum demand P1, P2, P3 and P4 If under basic settings|other settings|options the self adjusting target maximum demand is activated, the current target maximum demand will be displayed instead of the menu item target maximum demand. This is the momentary target maximum demand for the appropriate profile. If the target maximum demand is exceeded, it is automatically set to the new value as long as this is not higher than the set upper limit. If a value greater than the upper limit is set, the upper limit is automatically set as the current target maximum demand. In this case there is no further target maximum demand correction, as the upper limit has been reached. 7.3 . Initial value target maximum demand P1, P2, P3 and P4 If under basic settings|other settings|options the self adjusting target maximum demand is activated, the initial value of the self adjusting target maximum demand must be entered here. This is set at the beginning of an electricity company calculation period. The number of initial values depends on the number of profiles used. If a value is greater than the upper limit (see section 7.4) is set, the upper limit is automatically set as the initial value of the target maximum demand. In this case there is no further target maximum demand correction, as the upper limit has been reached. 7.4 . Upper limit target maximum demand P1, P2, P3 and P4 If under basic settings|other settings|options the self adjusting target maximum demand is activated, the upper limit of the target maximum demand can be entered here. Every time there is a power excess, it is checked if this limit has been exceeded. If this is the case there is no further target maximum demand correction above this limit. ‘Upper limit reached’ is then entered in the event list. 14 User Manual EML1101 Basic Settings If the upper limit is set too low and the initial value and the current target maximum demand are set higher, these values will be set automatically to the set upper limit. 7.5 Peak power P1, P2, P3 and P4 The absolute limits for actual power P_act is set here for every profile. This function is an extra function provided by EML1101; not to be confused with the control of maximum demand. Depending on the profile activated one of four peak powers is valid. As soon as P_act exceeds this peak power limit, an alarm is activated and loads are shut off one after the other until P_act falls below this limit. Loads are shut off according to the following rules: Loads with low priority are shut off first. The minimal on times and maximum off times are not taken into consideration. Loads with priority 0 and loads that are set to ON in the OPT-SW are not shut off. The peak alarm is not shut off until P_act has dropped lower than 95% of the peak power. Loads are turned back on according to the following rules: Loads remain off at least as long as their set minimum OFF time. Loads where the minimum OFF time expires first are turned back on first. If a number of loads minimum OFF times have expired, the loads with the highest priority are turned on first. The individual switching follows according to the set control delay time. Before the loads are switched on a check takes place to ensure that this will not cause a new peak power excess. This function prevents overloading of transformers and generators, blowing of main fuse or tripping of main circuit breaker. All of these may become very costly for e.g. a manufacturing plant. 7.6 Control delay The control delay serves to force pauses between the ON/OFF switching of loads. This avoids over reaction of the controller in form of unnecessary switching of loads. If a large number of switching channels are used the control delay time should be set low (1-10 seconds) in order to avoid long periods of inactivity. Control delay is not taken into consideration in emergency mode and in the last 2 minutes of a measuring period, as an especially fast reaction time here is absolutely necessary. Factory default setting is 10 seconds, it can be set from 1 to 60 seconds. 7.7 Control Application Point Factory default setting is 35% and the range is from 0 to 75%. Smaller values mean more sensitive control. 7.8 Emergency mode activated at XX% of total sheddable load power If loads switched on reached a specified size, then the EML 1101 can no longer maintain the condition stated and activates the emergency mode. In the emergency mode channels with priorities 1-3 are normally included (see section 8.2). As a last consequence the emergency channel will be activated. The emergency mode is activated when P_corr is higher than the percentage X of the nominal power of all loads included in the regulation. Factory default setting is 45%, the possible settings range from 10 to 80%. Smaller values lead to more sensitive control: Emergency mode is activated more readily. 7.9 Other settings You can change to the next menu level with this menu item. Change with the CR button. 7.9.1 Measuring period The measuring period used by electricity company is set here. Possible settings are 10, 15, 30 and 60 minutes. 15 Basic Settings PRELIMINARY User Manual EML1101 7.9.2 Counter constant ( P_act1, P_act2) Here the number of pulses emitted per kWh by the energy meter is entered. The parameter P_act2 of the 2nd active pulse input can be set for EML 1101 M and L. 7.9.3 Current transf. ratio Ip/Is: (P_act1, Q, P_act2) Enter the ratio of the current transformer(CT) in use here. This is printed on the CT. If there is no CT 1 is entered. 7.9.4 Voltage transf. ratio Vp/Vs: (P_act1, Q, P_act2) With medium voltage measurement the transformer ratio of the voltage transformer (VT) must be entered. Enter the ratio of the VT in use here. This is printed on the VT. If there is no voltage transformer used, i.e. for low voltage measurements (e.g. 400 V), the value 1 is entered. 7.9.5 Average over (P_act1, Q, P_act2) This setting serves to calculate an average of the registered number of pulses in nets with high transient power variations. If this function is used, transient power variations are smoothed and unnecessary load switchings can be avoided. 7.9.6 Counter constant (Q) Enter the pulse values of the pulse counter here. 7.9.7 Cosphi Alarm at cosphi <XX This setting sets the threshold value for triggering power factor alarm. If a value of 0 is set, the power factor alarm function is disabled and the standard display shows the correction value P_corr instead of the cosphi value. If the limit is exceeded the error message cos(ϕ) – error is displayed and the alarm is activated. The error is deleted when the lower limit is exceeded. 7.9.8 Bus address This setting assigns an individual address for EML1101 so that the central unit EMIS 1500, the EMG 1500-PN, the communication processor EMP 1100 or the system timer EMT1101 can identify the EML 1101 at the FRAKO Starkstrombus. Both bus systems, the FRAKO Starkstrombus and the add-on bus apply to the field bus standard EN 50170. If the EML is not to be run on a bus, ignore this setting. After reset the bus address is set to 0. Be sure when setting the bus address that no other instrument connected to the bus has the same bus address. 7.9.9 Auto summer/winter time changeover Automatic daylight saving time changeover can be activated in this menu item. The changeover occurs on the last Sunday in March at 2 am and the last Sunday in October at 2 am. 7.9.10 Options This menu item allows access to the next menu level. This is done by pressing CR button. 7.9.10.1 Number of Profiles Used This setting enables the number of profiles to be used according to requirements. The number of profiles used determines how many sets of basic and load settings are to be used. A maximum of 4 profiles is possible. 7.9.10.2 Highest EMD Address The highest possible EMD address enables the number of add-on stations activated to be limited. Consequently, only data for the corresponding number of EMD 1101 can be displayed and changed. 16 User Manual EML1101 System option Basic Settings Max. number of add-on stations S M L The factory default setting is 0. 2 4 10 Corresponds with: EML+ EMD 4 + 2 • 8 = 20 Channels 4 + 4 • 8 = 36 Channels 4 + 10 • 8 = 84 Channels 7.9.10.3 Type of profile switching Please clarify with your electricity company how invoicing with tariff switching is carried out. There are three settings which can be chosen. Setting Immediate switching Immediate switching, P_acc = 0 Switching at the begin of measuring period Description Immediately after a profile switch, the new settings for the new profile take effect. Immediately after a profile switch, the new settings for the new profile take effect. The accumulated value is reset to 0. Regulation runs with the last set values. The new values take effect at the beginning of the new measuring period The factory default setting is Immediate switching. 7.9.10.3.1 Time Pulse Edge This setting tells the EML 1101 which time pulse edge is used for it to respond. This setting is used to optimise target maximum demand and relays for inverting time pulses are not required. The type of edge used by electricity company counter resulting in an end of a measuring period and the start of the next can be either positive or negative. The four possibilities are shown in diagram below: HI: Contact open LO: Contact closed Opener 1 + 4 2 + 3 positive edge negative edge 7.9.10.3.2 . Shutter Self adjusting target maximum demand If the EML 1101 cannot keep to the set target maximum demand, e.g. because the basic load is too high, an excess occurs. In this case it is sensible to adjust the target maximum demand to the level of the excess, as the electricity company will use the registered value for the current billing period. In the case of electricity contracts where only the maximum value reached is billed, it is sensible to set the initial value under the lowest annual maximum. In this way it is possible to take advantage of the seasonal variations The most important channels should be set to ‘Time’ preference, in order to retain their switching times in emergency mode. 17 Basic Settings PRELIMINARY User Manual EML1101 If the current target maximum demand is exceeded the registered value is adopted as the new target maximum demand. The settings for the self adjusting target maximum demand can be set under this menu item. Term Description Initial value target Target maximum demand that is to be set as current target maximum demand maximum demand at the beginning of a new billing period Upper limit target Determines up to which limit self adjusting target maximum demand maximum demand can be carried out Current target maximum This is the value to which regulation will be carried out. Changes of demand this value will be immediately included in regulation! The self adjusting target maximum demand resets the target maximum demand after an excess to the level of the excess. The upper level target maximum demand determines the highest level to which target maximum demand can be adjusted. If this is exceeded there will be no adjustment . All adjustment or excesses will be entered in the event list (see chapter 9.9 Event list on page 25). At the beginning of the adjustment it can occur that the instrument operates in emergency mode for a longer period because the initial value is set too low. The initial value must then be set higher. If you wish to retain the low initial value and some channels should retain their switching times, choose ‘Time preference’ in the load settings. (8.4 Preference on page 21) Programming: 1) Enter upper limit for the individual profiles. 2) Enter initial value target maximum demand for the individual profiles. Choose a lower value than the one that has been set until now. Initial value target maximum demand must be set lower than the upper limit! Initial value target maximum demand is first adopted as the current target maximum demand when a reset via contact or date has taken place. The current target maximum demand should be set to initial value target maximum demand during the first configuration. 7.9.10.3.3 Active/inactive You can choose to activate/deactivate the self adjusting target maximum demand with the cursor buttons. 7.9.10.3.4 Resetting via external signal/ resetting via internal date Choose reset via contact if your electricity company gives you a potential free contact for synchronisation of the billing period. Set the type of the reset edge with the front fascia buttons. Positive/contact opens negative/contact closes both/closing and opening Edge 18 Edge User Manual EML1101 Load settings Choose reset via date when the electricity company carries out the counter reading (e.g. at an exact time given every month on the 27th day at 4am.) The reset day and time are set with the front fascia buttons. 7.9.10.4 Active Pulse Monitoring Alarm The maximum time that may elapse between two active pulses before an alarm is triggered can be entered here. ) a time must be entered that is If a number of inputs are used (as of FRAKO system option distinctly higher than the maximum time between two pulses. The input with the lowest pulse rate dictates this value. If one of the 3 inputs exceeds this time, an alarm is activated and it is entered in the event list. The factory default setting is 0. This setting disables this monitoring function. 7.9.10.5 . Group Grouping means that groups can be formed with related loads. An example for grouping in a sheet metal work. In this case it should be switched as follows: Turn off 1) Stop material supply 2) Turn off heat 3) Stop roller 4) Stop cooler Turn on 1) Turn on cooler 2) Start roller 3) Turn on heat 4) Start material supply Load 1, priority 10 Load 2, priority 8 Load 3, priority 6 Load 4, priority 4 If the minimal off time is not fulfilled in the above example, the load will not be switched on. Loads that do not belong to a group can be switched, between the individual switching of the group. Up to 8 groups are possible. The group numbers serve to differentiate the individual groups. The switching order of the groups themselves, is determined alone by the priority of the individual channels. (See section 8.9 . Group). 7.9.10.6 Units This menu item enables a changeover from kW to MW. The highest adjustable maximum demand is 6500kW or 6500MW. 19 Load settings PRELIMINARY User Manual EML1101 8 Load settings Programming load settings can be done through the front fascia of EML 1101 or through OPT-SW software (see section 3.3.3 Installation). Program the load characteristics for every load channel used. Programming via the front fascia: Select menu item Load settings with cursor buttons Load settings and press CR button. Load settings Profile 1 Select the profile for which the load settings are to be changed with cursor buttons and press CR button. The EML 1101 prompts for an entry of the station, whereby station means EML 1101 or EMD 1101 Addon Station connected. Using cursor buttons, first select the station. Then press CR button. Then select the channel in the station. After the CR button is pressed the channel name is shown and can only be changed with the OPT SW software. From this menu item, use cursor buttons to proceed to other load settings. If an incorrect value is entered, press MENU button to return to previous display and repeat the steps again. Load settings Enter station and channel no.: EML / 1 Parameters to be set: − Power: Entry as four-figure number in kW − Define channel status − Minimum ON time: Up to 999:59 minutes:seconds − Maximum OFF time: Up to 999:59 minutes:seconds − Minimum OFF time: Up to 999:59 minutes:seconds − Output: Opener/closer − Define channel status: On/off/controlled − Priority: two-figure number Group − 8.1 Load name This can only be changed using the configuration tool OPT-SW supplied. As factory settings, load names are set as in the following example: Channel 3 in EMD 2 Please note that when overwriting the entry with the OPT-SW, a unique name must be assigned for every consumer. The name can have a maximum of 20 characters. 8.2 Priority Priority 0 1 1-3 4-98 98 20 Description Always on in this profile Most important channel Channels that are only switched off in emergency mode. It is not possible to set a min. ON time and a max OFF time for priorities 1-3 under ‘POWER’ preference, as they are only switched in emergency mode. The set time are also observed in emergency mode under ‘TIME’ preference. These priorities are switched in normal mode and in emergency mode. Least important channel User Manual EML1101 Load settings 99 8.3 Always OFF in this profile Power This parameter is used by the EML 1101 to determine whether if a particular load is suitable to be switched back on after switching off. Hereby each OFF load is controlled if the trend would remain under the target maximum demand after switching. If this is the case, the load can be switched ON (see 7.5 Peak power P1, P2, P3 and P4 and 7.1 Target maximum demand P1, P2, P3 and P4). 8.4 Preference With the setting preference you can choose whether the set target maximum demand or the channel switching times should be in the forefront for the regulation of this channel. Preference Power preference Description Max. OFF time Min. ON time Min. OFF time Are not observed in emergency mode. Emergency mode activation see section 7.8 The settings: max. OFF time - min. OFF time - min. ON time are observed in emergency mode. Time preference It is not possible to set a min ON time and a max. OFF time for the priorities 1-3 with power preference. This menu item is not available for group channels (group set unequal 0 ). 8.5 Channel Status Consumer EML / 1 channel constantly OFF Channel Status Constantly OFF Constantly ON Controlled 8.6 This setting can be used to bring the individual channels to a defined status. Using this setting, one of three of the following status modes can be allocated to status modes. Description If a channel is assigned this status, then the consumer is not available to the control system and is continually switched off. With this setting the channel is also not available to the control system and is continually switched on. If the channel is defined as controlled then it is available for the control system. Minimum OFF time This is the length of time the load must be isolated from the power supply after being switched off. For example, with refrigeration devices, it is necessary to keep the compressor isolated from the mains for suction purposes. This parameter has been included for load protection purposes. 8.7 Maximum OFF time This is the maximum time for which a particular load may remain in off condition. If this time has elapsed, then the load has to be switched back on by the maximum demand controller. This usually means other loads must be switched off. In the case of power preference, this time can be exceeded in emergency mode. (See 8.4 Preference) 21 Printer routines 8.8 PRELIMINARY User Manual EML1101 Minimum ON time This is the minimum time a particular load must remain on before the maximum demand controller can switch it off again. In the case of power preference, this time can be exceeded in emergency mode. (See 8.4 Preference). 8.9 . Group As of the FRAKO system option it is possible to group channels. This means that the individual channels of a group are switched strictly according to their priority (see section 7.9.10.5 . Group). The setting "Group" only appears when power preference is set. 8.10 Changing load settings of group channels Important: If group channels are defined, the load (e.g. conveyor belt and roller) which are in the group channels, must be disconnected from the mains. It is not guaranteed that the group priority will be maintained in the setting phase! In the case of changes of the priority or group, the new setting will be adopted for all profiles. All further settings are not relevant for the switching order and can show various values in the individual profiles. Turn off load assigned to group If, however, changes are attempted per front fascia -> Drop new parameter buttons in group settings, a message is displayed. Turn off load assigned to group -> Accept new parameter If the load is disconnected from the mains and you wish to accept the changed settings, choose with the cursor buttons and confirm with the CR button. 8.11 Output Every channel can be configured as normally open or normally close with the output inversion. 8.12 Function testing After the programmed values have been checked, a function check should also be carried out. The switching response for individual channels can be checked by reducing target maximum demand temporarily so that the controller is forced to switch off channels. A check of each individual load can be carried out by changing ist channel status(see 8.5 Channel Status). 22 User Manual EML1101 Printer routines 9 Printer routines Either a PC or a serial printer can be connected to EML 1101 through a built-in RS232 interface. The printer must be configured as follows (EPSON LX300): − − − − − − − − − − − − − Character interval Zero with/without oblique line Ignore Page perforation Symbol table Auto. line forward Page length Automatic separation Tractor Interface Baud rate Parity Word length ETX/ACK 10cpi 0 (not critical) Off (not critical) PC437 Off (not critical) 12 inch(depending on paper) Off (not critical) Individual Auto. selection (10 sec.) 9600bps None 8 bit Off Assigning the printer cable: If a printer is connected to EML 1101, then the previous day's power curve is printed out daily just after midnight (see section 9.6). If, during this time, a PC is connected to the serial interface and the program OPT-SW is active, the data will be sent to Windows standard printer. If EML 1101 cannot detect a printer or the printer is not online, then the message "Printer off-line or no printer" is displayed when menu item "Printer routines“ is selected. If a printer is connected the menu items described in sections 9.1 to 9.710 are shown here. 9.1 Printing basic settings All set values for the menu item Basic settings are given over the printer. 9.2 Printing load settings The load settings for each profile are printed out on the printer one after the other. Due to the large amount of data, there may be a long delay from the time CR button is pressed and the time printing begins. 9.3 Power failures The last 10 power failures are printed. 9.4 Errors After selecting this menu item, you can choose to print or delete the errors in another menu. 23 Printer routines PRELIMINARY User Manual EML1101 9.4.1 Error list Press CR button when the display shows "Print Error" when a printout is required. The print out lists the number of errors since last deleted. The following errors are identified: − − − − − − − No time pulse Error at extension bus Error at FRAKO Starkstrombus Power failure Target maximum demand exceeded Peak power exceeded Cosphi exceeded 9.4.2 Resetting error counters To reset the error counter, press the CR button. On deletion, all error counters are reset to 0 and the date and time is stored in an internal memory. The date and time of the deleting is then printed out at the next print out under the error list. 9.5 Printing present day's power curve The power curve of the current day until the current time point is printed out. The maximum value of the power maximum is marked with a ‘*’. If this is higher than the set target maximum demand, this is marked with a ‘+‘ . Every time the target maximum demand is exceeded, it is marked with a ‘>’. P1, P2, P3 and P4 marks the active profile of the time. ---------------------------PRESENT DAY'S POWER CURVE--------------------------------Tuesday 25.07.99 0% 50% 100% => Pset 00:00¦ Target power = 2600.0kW => 100% ¦ 00:00¦===============¦ ¦ 1260.2kW, P1 00:15¦===============¦ ¦ 1200.0kW, 00:23 P2 00:30¦============== ¦ ¦ 1120.6kW, P2 00:45¦============== ¦ ¦ 1121.5kW, 00:45 P3, 00:50 P4, 00:53 P3 00:57 P1 01:00¦============== ¦ ¦ 1120.6kW, P1 01:09¦ Target power = 1300.0kW => 100% ¦ 01:15¦===============¦================ ¦+ 1250.0kW, P1 9.6 Printing previous day's power curve The power curve of the previous day between 0 and 24 hours is printed out under this menu item. ----------------------Previous day's power curve----------------------------Tuesday 26.07.99 0% 50% 100% => Pset 00:00¦ Target power = 2600.0kW => 100% ¦ 00:00¦===============¦ ¦ 1160.2kW, P1 00:15¦============== ¦ ¦ 1010.0kW, 00:25 P2 00:30¦============== ¦ ¦ 1080.6kW, P2 00:45¦===============¦= ¦ 1250.5kW, 00:45 P3, 00:50 P4, 00:53 P3 00:57 P1 01:00¦============= ¦ ¦ 940.6kW, P1 01:09¦ Target power = 1300.0kW => 100% ¦ 01:15¦===============¦================ ¦+ 1250.0kW, P1 24 User Manual EML1101 9.7 Printer routines Power maxima of the last 50 days Maximum demand values for the previous 50 days is printed out. In this printout are no indications of highest values. The times of the day's maximum values are only given by the printer when OPT-SW configuration software is used. ------------------MAXIMUM POWER VALUES FOR THE LAST 50 0% 50% 100% => Pset DO 14.02.¦===============¦======== ¦ 470kW, at Fr 15.02.¦===============¦========== ¦ 502kW, at Sa 16.02.¦===============¦== ¦ 170kW, at So 17.02.¦============== ¦ ¦ 142kW, at Mo 18.02.¦============== ¦===============¦+ 602kW, at Tu 19.02.¦============== ¦============== ¦ 578kW, at Do 20.02.¦===============¦============== ¦ 582kW, at . . . Do 03.04.¦===============¦============== ¦ 581kW, at Printout from Friday, 04.04.99 9.8 DAYS------------------------09:45 10:00 11:30 10:00 11:30 11:00 13:15 for for for for for for for P1=600kW P1=600kW P2=300kW P2=300kW P1=600kW P1=600kW P1=600kW 11:15 for P1=600kW Power maxima of the last 48 months The month's maximum values for the past 48 months is printed out here. -------------------MAXIMUM POWER FOR THE PAST 48 months----------------------0% 50% 100% => Pset 13 May 99¦===============¦======== ¦ 470kW, at 09:45 for P1=600kW 28 Jun 99¦===============¦========== ¦ 502kW, at 10:00 for P1=600kW 31 Jul 99¦===============¦== ¦ 170kW, at 11:30 for P2=300kW 07 Aug 99¦============== ¦ ¦ 142kW, at 10:00 for P2=300kW 02 Sep 99¦============== ¦===============¦>+ 602kW, at 11:30 for P1=600kW 30 Oct 99¦============== ¦============== ¦ 578kW, at 11:00 for P1=600kW 18 Nov 99¦===============¦============== ¦ 582kW, at 13:15 for P1=600kW . . . 02 Jun 98¦===============¦============== ¦ 581kW, at 11:15 for P1=600kW Printout for Friday, 04.12.99 9.9 Event list All events are stored here with date and time. Example: ---------------------------EVENT LIST--------------------------------17.03.99, 16.45.30 : Time pulse detected! 17.03.99, 17.00.00 : No time pulse! 18.03.99, 09.37.34 : Target power excess ended! 18.03.99, 09.40.20 : Target power exceeded! Event Event release Target power exceeded! Peak power exceeded! Cos(phi) outside lower range! Emergency mode activated! Target power adjusted! Target power reset per contact! Target power reset per deadline! Target power over limit! Target power changed via FRAKO bus! Target power changed via keyboard! Add-on bus error! No time pulse ! Time pulse before end of measuring period! No pulse at input 1! No pulse at input 2! No pulse at input 3! Counter reset Power supply failure! Reset carried out External synchronization carried out Work counter reset Time set by master XX ! Time set by user! Error in clock module! Error writing to EEPROM! Target power excess ended! Peak power excess ended! Cos(phi) outside lower range ended! Emergency mode deactivated No message No message No message No message No message No message Add-on bus error ended! Time pulse detected No message Pulse at input 1 detected! Pulse at input 2 detected! Pulse at input 3 detected! No message Power supply switched on again No message Time pulse after external synchronization No message No message No message Clock module operating correctly! No message 25 Add-on stations PRELIMINARY User Manual EML1101 9.10 Deleting printer queue This option allows the cancellation of printing. For example, it may be used to delete unprinted data due to paper jam or other printer errors. 10 Add-on stations In this menu item EMD 1101 Add-on Station can be switched on for the control system and displayed. 10.1 Activating/deactivating stations In this menu item the status of EMD 1101 Add-on Station is shown. The first EMD 1101 activated is shown in the first line EMD Adr: 1 2 3 4 A X X X of the display. Others stations are deactivated. Status display: A Station activated. X Station deactivated. Move between the individual stations using the cursor buttons. By pressing CR button the status is changed (e.g. deactivated or activated). Pressing MENU button will revert back to the standard display. Exception: When the parameter "highest EMD-address" of the EML 1101 is set to 0, the following message is displayed when you change to the ‘Add-on stations’ or ‘Activate/deactivate stations’. Press the CR button to change the "highest EMDaddress". You then access the setting for the "highest EMD-address" in in: Basic Settings|Other Settings|Options. After setting press the ‘MENU’ button repeatedly until the standard display appears. If no change is desired press the ‘MENU’ button. The factory setting for the "highest EMD-address" is 0 ! No activation possible due to highest EMD-address set to 0 10.2 Displaying stations In this menu item, EMD 1101 Add-on Stations and load status can be displayed. Changing between the station display 1..3 to 8..10 is done with cursor buttons. EMD No.: Load: 1 2 XXXXXXXX 3 XXXXXXXX Status display: Load switched on by control system Load switched off by control system X Deactivate station Displaying a constantly on channel (relay: closed) Displaying a constantly off channel (relay: open) Displaying a channel that has been activated by the system timer EMT 1101. (See section 18.5 technical terms/glossary.) Displaying a channel that has been deactivated by the system timer EMT 1101. (See section 18.5 technical terms/glossary.) 26 User Manual EML1101 External synchronisation Exception: When the parameter "highest EMD-address" of the EML 1101 is set to 0, the following message is then displayed when you change to ‘Add-on stations’, ‘Display stations’. No display possible due to highest EMD address set to 0 Factory setting for the parameter "highest ENDaddress is 0. 10.3 Virtual add-on units Add-on units can be defined as virtual channels when the EML 1101 operates in connection with a PLC or BMS. Virtual add-on units are used for switching channels that are not physically present at the FRAKO devices. The information is accessible to a PLC or BMS with the help of the Communication Processor EMP1100 (18.5 Technical terms/glossary).The switching is then carried out by the PLC or BMS as suggested by the EML 1101. Caution: The configuration of virtual add-on stations can only be carried out using the OPT-SW software supplied. 10.4 Activating virtual EMD Activation can only be done using the OPT-SW software. The item ‘Configure Add-on Stations’ can be selected in the menu EML configuration. It is possible to give the individual EMD its own name and to activate it according to your requirements. Only that number of add-on units are shown under this menu item as for under: • Basic settings|Other settings|Option|Highest EMDaddress (see section 7.9.10.2) In order to configure an EMD as a virtual device, the item EMD must be active and activated by mouse click to be virtual. In order to make the settings active in this window the ‘Write’ button must then be pressed in order to inform EML 1101. When this is done then the status values can be read out via EMP 1100 and processed with a PLC OR BMS. Important: For virtual stations no error message is given with poor communication of PLC with EML 1101. 11 External synchronisation If the CR button is pressed then a new measuring period starts. Normally the start begins with the time pulse of the electricity company. External synchronisation Press ENTER for period begin Caution: A peak power value may occur after a forced time synchronisation. If synchronisation is executed towards the end of measuring period and loads are in off condition, then load channels are activated due to new start of measuring period. As the measuring period of electricity company has not ended, a peak value may occur. If a temporary profile switching should take place immediately, that is usually carried out with the electricity company pulse, a forced synchronisation can occur. 27 Setting time PRELIMINARY User Manual EML1101 12 Setting time The date and the time can be set here. Date time setting 29.04.99 14:05:12 Monday Important: If the time or date is incorrectly set, then there are breaks in the data listed. - Set the digits with the cursor buttons. - Change from places with the ‘CR’ button. - Accept the settings with the ‘MENU’ button. If a value is set outside the limits, (e.g. 31.02.99 12:14:26) the new setting will be dropped. The day is automatically calculated and set by the instrument after the set values have been adopted. 13 Counters P1 0000000000.0 P2 0000000000.0 This menu item shows the counter status P1 for profiles 1/3 and P2 for profiles 2/4. To reset the counter status the CR button must be pressed but Caution: the cumulative counter values up to this time point are permanently deleted when CR button is pressed. If profile 1 or 3 is active then this is counted on counter P1, active profile 2 or 4 is counted on counter P2. A reactive work counter is not available. 14 Write protect If this menu item is activated, then a data entry with identification numbers only is possible. Independent of this entry, the EML 1101 Maximum Demand Controller automatically switches to write protect if no button is pressed within 1 hour. The last 4 numbers of the serial number are used as the ID number to be entered. 15 Info device All data relating to the EML 1101 can be accessed under this menu item. No changes are possible here. 28 User Manual EML1101 Technical Data 16 Technical Data EML1101 Maximum Demand Controller: Power supply Voltage: Frequency: Power consumption: Inputs General: 2 active pulse inputs (one of which can be used for resetting target maximum demand) 1 reactive pulse input: 1 time pulse input: 2 profile inputs: Outputs 4 relay contacts(Switching channel): 1 relay contact (emergency load shedder): 1 operating fault contact: 1 hardware fault contact: 1 serial interface: 230 VAC, -15 to +10% 45 to 65 Hz 26 VA S0 interfaces to connect to potential-free contacts Voltage for open contact: 24 V Max. resistance: 800 Ω Short-circuit current: 15 mA 0.1 to 20 Hz 0.1 to 20 Hz 10, 15, 30, 60 minutes For selecting 4 profiles 1 add-on interface: 1 FRAKO Starkstrombus interface 4 changeover contacts 250V / 4A 1 changeover contact 250V / 4A 1 changeover contact 250V / 4A 1 NC contact 250V / 4A 9-pole Sub-D jack RS232 for connecting a PC or printer (9600 baud, 1 start bit, 1 stop bit) For connecting 2/4/10 EMD1101 For connecting to FRAKO Energy Management System. Operating elements Four membrane buttons Display element Four row illuminated LCD Connections 7x PG cable gland entry to removable contact blocks in housing, 1x sub-D connector Cable diameter Max. 2.5 mm² Fuse Max. 2A external as required Mechanical construction Dimensions: Ingress protection: Weight: Protection class: Housing: Mounting: Operating conditions Ambient temperature: Storage temperature: OPT-SW Software 296 x 260 x 133 mm (W x H x D) see Figure 2: Enclosure on page 48 IP53 Approx. 3.6 kg 1 Flammability UL94-HB/1,41 With screws 0°C to +45°C -20°C to +60°C Hardware-requirements PC: 80386 40MHz CPU, 4MB RAM, VGA graphics card Software requirements Operating system2: Windows 95, Windows 98, Windows NT, Windows2000 1 The entry entered is a standard value which is determined by the standardized check devices. The scaling concerns the raw material. Variations may occur due to the effects of processing and other material thicknesses 2 Windows is a registered trademark of the Microsoft Corp. 29 Troubleshooting PRELIMINARY User Manual EML1101 17 Troubleshooting 17.1 Checking programmed values 17.2 Control on the instrument First check all the settings entered. The individual measuring points, as with the settings, are to be checked thoroughly and their values shown on the display and compared with their entries. 17.3 Printout from a directly connected printer Select the ‘Printer routines’ sub-menu on the EML. Jump to the menu item ‘Basic settings’ with cursor buttons and initiate printout by pressing CR button. Jump to ‘Load settings’ menu item and confirm by pressing CR button. This is only possible if there is a printer connected to the serial interface. To check the previous measuring periods, print out the event protocol as well as the daily power curves and the maximum curves under ‘Printer routines’. 17.4 Checking the system when running The EML 1101 Maximum Demand Controller can be checked during operation. To do this, the EML 1101 has power displays to enable the actual status to be determined and observed. 17.4.1 Standard display P_act 0.0kW P_act : cosphi: P_acc.: Time rem.: P1: cosphi 1.0 P_acc. 0.0kW Time rem. 15.00 P1 Current value of active power Current power factor value Total accumulated power Time remaining in current measuring period Current active profile 17.4.2 Display of switching channels The current status of the switching channels is shown in the bottom line of the display. Channel is switched on by the control system Channel is switched off by the control system X Station deaktiviert Channel is constantly switched on (NC contact is closed) Channel is constantly switched off (NC contact is opened) Channel is switched on by system timer EMT 1101(NC contact is closed) Channel is switched off by system timer EMT 1101(NC contact is opened) Note: In the emergency mode, loads with constantly ON/OFF status and switches ON/OFF by EMT1101 are not included in the control system. 30 User Manual EML1101 Troubleshooting 17.5 Sources of error Error No bus access possible Possible causes a) Correct bus setting? b) Channel A, B interchanged? c) Screening on the master (EMIS 1500,…) and EML grounded. The screening should be grounded at one point only. No modem connection possible a) EML- Modem has not been configured with a terminal program with baud rate set to 9600. b) Incorrect command order during the configuration Individual bus faults a) Are the FRAKO Starkstrombus and the Add-on bus connected ? (Contacts 1-3 and 4-6) Solution: Disconnect buses. There should be no connection between the two. EMD X not active a) EMD set to wrong bus address b) Channel A, B confused c) No power on EMD There is an adjustment screw for the display contrast in the contact compartment. Turn this until the display can be read Display is difficult to read Reset reactance To printer Contact 1-3 Adjustment screw Channels are not switched by control All channels are OFF Time gaps in the days power curve It is not possible to set the min. Off time. A group does not appear in load settings. Preference does not appear in load settings a) Always OFF/Always ON instead of controlled b) They are switched ‘time controlled’ by the EMT1101 a) Peak power set too low Solution: Enter a value that is so high that the present peak does not lead to deactivation (see 18.5 Technical terms/Glossary). b) Peak power and target maximum demand confused during setting (See 18.5 Technical terms/Glossary). Was the clock changed in the time period in question? Check: Printout of the event list (see section 9.9) max. OFF times< desired setting Solution: First enlarge max. OFF time Preference must be set to power Solution: First set power preference Group of this load must be entered as 0 Solution: First set group =0 31 Troubleshooting Error 32 PRELIMINARY Possible causes User Manual EML1101 User Manual EML1101 Error Self adjusting target maximum demand does not work Application instructions Possible causes a) Self adjusting target maximum demand is not active under Basic settings|Other settings|Options Changed initial value, self adjusting a) 'Upper limit self adjusting target maximum demand' has maximum demand been changed on the front fascia buttons on the EML 1101 to a value lower than the initial value self adjusting target maximum demand. Changed current target maximum a) Target maximum demand was exceeded in a previous demand measuring period b) Upper limit target maximum demand has been changed on the front fascia buttons of the EML 1101 or via OPT-SW to a value lower than the current target maximum demand No access possible via serial a) Correct COM port selected under menu item ‘Connections’. interface b) Max. length of 15m exceeded. c) Wrong cable. S u b D 9 p o l. B u . S u b D 9 p o l. B u . GND GND RXD RXD TXD TXD RTS RTS CTS CTS DSR DSR DCD DCD DTR DTR 5 5 2 2 3 3 7 7 8 8 6 6 1 1 4 4 EM L 1101 PC Correct connections of cable. 18 Application instructions 18.1 Bus cable longer than 1 km To extend the bus cable length, a Starkstrombus repeater EMB1101 can be used for the FRAKO Starkstrombus and the add-on bus. 18.2 Shielding The shieldings of FRAKO Starkstrombus and extension bus have to be isolated galvanically, from each other. If a bus cable is used in which both bus cores are laid and the shielding on EMIS 1500 or EMG 1500PN is grounded, then the shielding at EML 1101 is not to be grounded. Do not connect the shielding to the metal cable gland, it should only be connected to the GND terminal 3. If this is not done, then errors can occur in FRAKO Starkstrombus and result in EML 1101 not being recognised on the bus. 18.3 Target Maximum Demand This entry is limited to 6,500 MW or 6500 kW depending on the setting of unit. Changing unit on the EML from kW to MW. Can be done unsing OPT-SW software or with the front fascia buttons of the EML 1101 as follows: Basic settings|Other settings|Option|Units 33 Application instructions PRELIMINARY User Manual EML1101 18.4 Operating OPT-SW via modem The EML modem is configured via a terminal program. Important: Be sure that the baud rate of the terminal program is set to 9600 baud! The baud rate set in the terminal program is adopted by the modem. If the wrong baud rate is set, no connection can be made. Command AT&F AT&D0 ATS0=1 ATQ1 ATE0 AT&W0 Meaning Reset modem to manufacturer's configuration Modem ignores DTR signal Automatic pick-up after ringing once Switch off register codes Switch off echo (Caution: All commands will no longer be shown if the terminal program "local echo" is switched off.) Saving the configuration as configuration profile 0 The following settings must be set on the PC modem in this order: Command AT&F AT&D0 ATX3 Meaning Reset modem to manufacturers configuration Modem ignores DTR-Signal Turn off dialing tone recognition AT&W0 Save the configuration as configuration profile 0 The maximum baud rate of the modem must be at least 14400 baud. Only use a modem cable to connect the modem to the PC or the EMIS 1500. The modem configuration can be carried out over any common terminal program. In OPT-SW the following settings must be carried out when connected. The instrument to which the modem is connected must be selected under the item instrument connection. The prompt above configures access from OPT-SW software via a modem connected to EML, EMP or EMIS 1500. 18.5 Technical terms/Glossary Term Accumulated power P_acc Communication processor EMP 1100 34 Meaning Amount of energy measured since the beginning of current measuring period divided by the duration of measuring period. Interface module which enables data exchange with a PLC or BMS according to the Protocol 3964R/RK512. User Manual EML1101 Term Correction power P_corr Emergency load shedder channel Emergency mode Load groups Measuring period Normally close (NC) Normally open (NO) Peak power Priority Profile Remaining time Self adjusting target maximum demand Status display System Timer EMT1101 Target maximum demand Trend power P_trend Annex Meaning P _ corr = (P _ max − P _ trend) ⋅ T T−t Control detects the necessary switching on the basis of the correction power. Negative value means switching off. This channel is switched off last. When P_corr > set % of total sheddable load, the emergency mode is activated. The priorities 1-3 are included in control and channels with power preference can be switched off longer than their max. OFF times, and switched on for less then their ON times. A group of channels that are switched strictly according to the priorities of the channels within the group. The length of the measuring period is dictated per time pulse provided by the electricity company. It's duration typically is 15 min. Channel off: Contact opens Channel OFF: Contact closed. Peak power is the maximum active power allowed. When exceeded loads are shedded very quickly by EML. This function, however, is suplementary. Switching order when all temporal conditions (e.g. min ON time) are met. 4 profiles are possible that can be changed per input or EMT 1101 (via FRAKO Starkstrombus). Time to the end of the measuring period. Automatic adjustment of the target maximum demand after an current target demand has been exceeded (see section 7.9.10.5). Symbols in the 4th Line of the EML display . The same symbols are used under the menu item ‘Show add-on stations’ for the condition of the individual channels of the add-on stations. The System Timer carry out time switching of individual channels of the EML1101 or the EMD1101. In this way channels can be cut out of control for an certain time period and during which time switching can be applied. Maximum allowed average power at the end of a measuring period. Forecast average power for the current measuring period. 35 Annex PRELIMINARY User Manual EML1101 19 Annex 19.1 Instrument software 19.1.1 EML software update The program update can be carried out over the serial interface of the EML 1101. To update the EML 1101 to a new software version you must first order an update. You will be sent two 3.5” disks. Install the software OPT-SW on your PC (see section 3.3.3Installation page 10). You can carry out the update over the serial interface with the help of the OPT-SW configuration software. Carry out an instrument upgrade to the FRAKO system option order. or in the same First read this section carefully. If a prompt in the PC software or the instrument is not understandable, first consult the handbook before you confirm anything. You must not confirm anything inside a particular period. 19.1.2 Update preparation Save all settings of the EML 1101 with the old version of the OPT-SW, by choosing ‘Read from EML ‘ under the menu item ‘EML configuration. Now choose ‘Save as‘ under ‘EML configuration’ and name the file (e.g. with the current date 090799.EML). Please note that saved data from instruments with a software version lower than 1.20, cannot be opened in the new version. In this case you should make a printout of the basic settings and load settings, in order to enter them manually later. Use the old configuration software EML SW for this. Deinstall the old OPT-SW or EML-SW from your PC. Install the newest OPT-SW version before the update. This is on the update disk set. For this start the file manager/Windows explorer, insert disk 1 in the drive, change to drive A: and click on ‘Setup.exe’. After this follow the prompts of the installation program. You must start the update manually. For this choose EML-software update in the menu item ‘Settings’. Important: Carry out the update only with the software delivered. Do not switch the instrument off during the transfer. Do not interrupt the connection to the PC during the procedure. All of the items described above can cause a loss of programming in unfavourable conditions so that the instrument can only be put in order by FRAKO service personnel. For this reason please take great care and follow the instructions exactly. To avoid mistakes please read the prompts carefully and follow the instructions. After choosing the menu item ‘Settings/EML-software-update’, the authorisation code is prompted. This can be found on the product activation certificate. 36 User Manual EML1101 Annex OPTSW: Authorisation of an instrument update Authorisation code Run update After the authorisation code has been entered the following warning appears: Attention Please read the following instructions completely! If the instructions are not followed correctly, the instrument may require service. !!!ATTENTION!!! - Control does not function during the update process! All recorded data will be lost! Do you still wish to continue? Yes No 37 Annex PRELIMINARY User Manual EML1101 Important! Disconnect the instrument from the FRAKO Starkstrombus by pulling the left connection (contact 1-3) in the contact compartment. If this is not disconnected the update will be interrupted after the transfer of the boot loader. If this should have happened follow the following instructions: 1. Disconnect the EML from the mains for ca. 10 seconds 2. Turn the EML on again. The display remains empty. 3. Press the reset button for ca. 5 seconds. (see 19.1 factory settings) in the contact compartment of the EML. 4. After ca. 30 seconds the EML should start with the old software version. 5. You can now start the software update again. In order to carry out a software update OPT-SW disk 1 must be inserted in drive a: The FRAKO bus connection (contact 1-3) may not be connected! Do you wish to continue? Yes No After confirmation of this prompt the settings and the historical data will be saved. The data transfer is carried out over the serial interface after the settings are saved. The progress of data transfer is displayed in the form of a status bar. If problems should arise a message will appear in the dialog window. Loading progress is shown in two progress windows. EML Software-update: Transfer from boot loader and program! Status Transferring boot loader! 728 bytes Progress Data transfer 1% Cancel EML Software-update: Transfer from boot loader and program! Status Transferring program! 1232 bytes 38 User Manual EML1101 Annex Progress Data transfer 15% Stop The display does not change on the EML during the update. The LCD display does not change until the data has been copied into the FLASH EPROM: Please wait... The EML is ready when the normal power display is shown. After the EML is initialised the settings and historical data are automatically written back to the EML. The end of this process is confirmed by the following message: The EML is now ready! Click OK to conclude the update! OK Program update error. Check if the FRAKO bus is disconnected and that the instrument is switched on. Should one of these be the case remedy it and restart the update. Upgrade to or An upgrade to a higher FRAKO system option can only be carried out with EML software version 1.70 or higher. If this is not the case a software update is necessary. The upgrade is started over the same menu item (Settings/EML software update) as a software update. The activation code tells OPT-SW to which version or system option the EML is to be updated/upgraded. No data is lost in the case of an upgrade to a higher FRAKO system option. 39 Annex PRELIMINARY User Manual EML1101 19.2 Table of settings Item Designation Basic settings 1 Target maximum demand P1, P2, P3, P4 2 Current target 3 Description Units Set target maximum demand Profiles 1, 2, 3, 4 kW/MW 0-6500 Current target maximum demand Profiles maximum demand 1, 2, 3, 4 with activated self adjusting target maximum demand P1, P2, P3, P4 Initial value target maximum demand Initial value Profiles 1, 2, 3, 4 with activated self target maximum adjusting target maximum demand demand P1, P2, Value range kW/MW 0-6500 kW/MW 0-6500 P3, P4 4 5 6 7 Upper limit target maximum demand P1, P2, P3, P4 Peak power P1, P2, P3, P4 Control delay Control application point 8 Emergency mode active at X% Other settings 1 Measuring period 2 Counter constant. Upper limit target maximum demand Profiles 1, 2, 3, 4 with activated self adjusting target maximum demand kW/MW 0-6500 Set peak power Profile 1, 2, 3, 4 kW/MW 0-6500 Pause between individual switchings As of how many % Σ P of the set target maximum demand control is to become fully effective. Application pint of the emergency mode. s % 1-60 0-75 % 10-80 Pre-set time by electricity company Counter constant referenced to 1kWh 10,15,30,60 1-99999 3 P_act1, P_act2 Voltage transfer Voltage transformer ratio P_act2, U_primary/U_secondary 1-9999 4 P_act1, Q Current transfer Current transformer ratio P_act2, I_primary/I_secondary 1-9999 5 6 7 8 9 40 P_act1, Q Counter constant. Q Average over (P_act1, P_act2, Q) Cosphi Alarm at Cosphi < XX % Bus Address Auto winter/summer time changeover Counter constant referenced to 1kWh 1-99999 Number of active pulses for mean value. Only affects display. 1-99 Limiting value for cosphi alarm. 0.00 - 0.99 Address of EML at FRAKO Starkstrombus Activates / deactivates automatic setting of summer and winter time 9-125 Yes/ No User Manual EML1101 Pos. Designation Options 1 Number of profiles used. 2 Highest add-on address 3 Type of profile switching 4 5 Reset pulse edge 5a Activation 5b Reset by date 5c 6 7 8 Self adjusting target maximum demand Reset by contact Active pulse monitoring Grouping function Units Annex Description Units Limits profile dependant entries in the basic and load settings. Limits the add-on stations to the set value. 1-4 0-2, M 0-4, L 0-10 Determines how the profile switching affects the control system. 1) Immediate switching 2) Immediate switching. P_acc= 0 3) Switching at beginning of next measuring period positive/negative Determines the edge of the reset pulse Menu for setting the self adjusting target maximum demand. Determines if the self adjusting target maximum demand is to be carried out. Reset takes place at a particular date. active/ inactive Day: 1-31 Hour: 0-24 Minute: 0-59 positive / negative / both Reset takes place over contact 8. Grouping function Monitors if this time period between 2 active pulses is exceeded. Activates / deactivates the grouping function. s Determines whether the power settings are in kW or MW. Power Min. ON Max. OFF Min. OFF Preference Time/ Date 1 Date 2 Time Maximum power drawn by load Minimum ON time. Maximum OFF time Minimum OFF time Determines if the switching times are kept to in emergency mode. Current date Current time 0-9999 0 = OFF Yes/No kW/MW Load related programming 1 Priority Importance of load. Cyclic switching: equal importance 2 Channel inversion Determines the switching polarity. 3 Identifies to which group the load is Group assigned. 2 3 4 5 6 Value range 0-99 kW min:sec min:sec min:sec NC/NO contact 0-8 0 = No groups assigned 0-6500 0-999:59 0-999:59 0-999:59 Time preference / Power preference TT.MM.YY HH.MM.SS 41 Annex PRELIMINARY User Manual EML1101 19.3 Form for Basic Settings Customer: Plant: ID: _________________________________ _________________________________ ________________ Remarks: Date: ________________ Station: ________________ _________________________ Target maximum demand P1 (Self adjusting target maximum demand inactive) , kW Target maximum demand for profile 1 Current target maximum demand P1 , kW Current Target maximum demand for Profile 1 Initial value target maximum demand P1 , kW Initial value Target maximum demand for Profile1 Upper limit target maximum demand P1 Peak power P1 Target maximum demand P2 (self adjusting target maximum demand inactive) , kW Upper limit self adjusting target maximum demand for Profile 1 , , kW kW Peak power for profile 1 Target maximum demand for profile 2 Current target maximum demand P2 , kW Current target maximum demand for profile 2 Initial value target maximum demand P2 , kW Initial value target maximum demand for profile 2 Upper limit target maximum demand P2 Peak power P2 Target maximum demand P3 (Self adjusting target maximum demand inactive) , kW Upper limit self adjusting target maximum demand for profile 2 , , kW kW Peak power for profile 2 Target maximum demand for profile 3 Current target maximum demand P3 , kW Current Target maximum demand for profile 3 Initial value target maximum demand P3 , kW Initial value target maximum demand for Profile 3 Upper limit target maximum demand P3 Peak power P3 Target maximum demand P4 (self adjusting target maximum demand inactive) , kW Upper limit self adjusting target maximum demand for Profile 3 , , kW kW Peak power for Profile 3 Target maximum demand for Profile 4 Current target maximum demand P4 , kW Current target maximum demand for Profile 4 Initial value target maximum demand P4 , kW Initial value target maximum demand for Profile 4 Upper limit target maximum demand P4 Peak power P4 , kW Upper limit self adjusting target maximum demand for Profile 4 , kW Peak power for Profile 4 42 User Manual EML1101 Annex Counter and transformer data Counter constant(P_act1) Voltage transformer (P_act1) Imp/kWh Imp/Wh Ratio Up/Us Printed on U-transformer Current transformer (P_act1) Ratio Ip/Is Printed on I-transformer Average over (P_act1) Standard settings = 1 Voltage transformer (P_act2) Number of Pulses Ratio Up/Us Printed on U-transformer Current transformer (P_act2) Ratio Ip/Is Printed on I-transformer Counter constant (P_act2) Printed on counter Voltage transformer (Q) Imp/kWh Imp/Wh Number of pulses Ratio Up/Us Printed on U-transformer Current transformer (Q) Ratio Ip/Is Printed on I-transformer (P_act2) Counter label (Q) Imp/kVarh Average over (Q) Number of pulses Printed on counter Standard setting = 1 Printed on counter Standard setting = 1 Calculating Counter and Transformer Constants If the counter print out is given in Wh then the counter constant evaluated must be multiplied by 1000. Transformer = X primary X secondary Note that both values are in the same units. Other settings Measuring period min Average over (P_act1, pulses P_act2, Q) Cosphi-Alarm at Cosphi<XX% Bus-Address Winter-/Sommer time Changeover Options Number of profiles used Highest EMD-address Type of profile switching Time pulse edge Yes No 10,15, 30 or 60 min Counter compatibility standard setting = 1 Only when the pulse output of a reactive work counter is connected. Setting according to profile usually 0.9 ind. 1-125 Yes = automatic changeover Number of profiles actually necessary Switch over immediately Switch over immediately Pacc =0 Switch over at beginning of next measuring period positive negative 43 Annex PRELIMINARY Self adjusting target maximum demand User Manual EML1101 active inactive over external signal positive negative both over internal date Day: Hour: Minute: Active pulse monitoring Allow grouping Units 44 Min Yes No kW MW Determines units of power entries. Station Chan Load name Priority Group Power Min.OFF. Max.OFF. Min. ON. (min:sec) (min:sec) (min:sec) Status Output Preference User Manual EML1101 Annex 19.4 Form for load settings 45 Annex PRELIMINARY User Manual EML1101 19.5 Terminal assignments Terminal No. Description 1 2 3 4 5 6 7 FRAKO Starkstrombus channel A FRAKO Starkstrombus channel B FRAKO Starkstrombus GND Add-on bus channel A Add-on bus channel B Add-on bus GND Active pulse input1 8 9 Active pulse input2 / Reset input self adjusting target maximum demand Reactive pulse input 10 Time pulse input 11 Profile input 1 12 Profile input 2 13 14 15 16 17 18 19 20 21 22 23 24 25 26 27 Ground Ground Load 1 Load connection Load connection Load 2 Load connection Load connection Load 3 Load connection Load connection Load 4 Load connection Load connection Hardware alarm indication contact 28 Hardware alarm indication contact 29 30 31 32 33 34 35 36 37 38 39 Alarm contact Alarm contact Alarm contact Emergency load shedder power supply Emergency load shedder connection Emergency load shedder connection 46 Power connection L Power connection N Power connection PE Notes Can be connected to ground via jumper + (For connection to a potential-free contact against ground) + (For connection to a potential-free contact against ground) + (For connection to a potential-free contact against ground) + (For connection to a potential-free contact against ground) + (for connection a potential-free contact against ground) + (For connection a potential-free contact against ground) - (Ground connection for all inputs) - (Ground connection for all inputs) Common NC contact NO contact Common NC contact NO contact Common NC contact NO contact Common NC contact NO contact Common with hardware version 1.3 upwards. NO contact (closed on alarm) with hardware version 1.3 upwards. Common NC contact (open on alarm) NO contact (close on alarm) Pole NO contact NC contact 230VAC User Manual EML1101 Annex 19.6 Connection diagram Important: When working on EML 1101, ensure that the unit is disconnected from mains. Although the EML 1101 is disconnected from mains, the circuits leading to switch contacts may still be connected to power voltage. Figure 1 Connection diagram. If a load is switched off the relay opens. (If the EML is switched off or in the case of a power failure the relays are closed). 47 Annex PRELIMINARY User Manual EML1101 19.7 Dimensions All Dimensions are in millimeter Units. Figure 2: Enclosure Up cursor button Figure 3: Buttons 48 Down cursor button CR button MENU button User Manual EML1101 Annex 20 Appendix 20.1 Glossary of Terms Maximum demand – The maximum amount of power drawn, measured in kW, during a measuring period. Measuring period – The time period which EML 1101 limits maximum demand to target maximum demand for different profiles. Normally electricity companies provide time pulses that indicate the start and end of a measuring period. An internal reset for measuring period will occur if the EML 1101 does not receive a time pulse that indicates the end of a measuring period. Also, time pulse edge determines which edge of the time pulse is used to indicate the start of a new measuring period. Remaining time – Time required to reach the end of current measuring period. Target maximum demand – an arbitrary limit used by EML 1101 control system so that average powers do not exceed this limit. Accumulated power – Amount of energy measured since the beginning of current measuring period divided by the duration of measuring period. It is abbreviated by P_acc. Trend power – The extrapolated accumulated power based on energy consumption trends when end of current measuring period is reached. It is abbreviated by P_trend. Profiles – This feature enables different settings to be used by EML 1101 to cater for the following conditions: • Tariff switching triggered by electricity companies. • Different production requirements. • Time dependent loads. Control application point – Sets P_acc level for EML 1101 to start limiting P_trend to target maximum demand. Monitoring and control is immediately active at the start of a measuring period (see figure below). P_trend is allowed up to twice the target maximum demand value initially. Then, it is reduced linearly with P_acc until control application point. P_trend is limited to target maximum demand after control application point. Emergency mode – A condition activated when the control characteristics can no longer be maintained under pre-set conditions. The following characteristics are valid during emergency mode: • Minimum ON time and maximum OFF time are ignored. Minimum OFF time, however, is still taken into account. • Loads with priorities 1 to 3 are included in the control system. • The emergency load shedder channel is activated if EML 1101 cannot reduce P_trend within limits during this mode. 49 Annex PRELIMINARY User Manual EML1101 Emergency load shedder channel – An additional load channel which is activated last during emergency mode. Correction power – As difference between target maximum demand P_max and P_trend multiplied by measuring period divided by the remaining Time in the actual mesuring period. It is abbreviated by P_corr. If P_corr is positive, then extra power is available to switch on loads without P_trend exceeding target maximum demand. If P_corr is negative, then loads will be switched off intelligently to prevent P_trend from becoming too high. The switching off of loads is performed according to priorities and other criterions. P _ corr = (P _ trend − P _ max) ⋅ T T−t Status displays – Symbols appearing at the bottom left of dot matrix display of EML 1101. It shows the statuses of channel/instrument. Virtual add-on units – These are switching channels not physically present but only to provide information using an EMP 1100 of a PLC control system. The switching procedures are then carried out by the PLC according to settings of EML 1101. Stations – Refers to either EML 1101 or EMD 1101 Add-on Station. Channels – Individual load channels that can switch on or off loads. On the hardware side, there is one relay for each channel. 20.2 Preference With software version 1.52 of EML 1101 and software version 2.21 of Opt-SW it is possible to set the value „preference“ in load settings. This setting is only possible by means of the configuration software Opt-SW. 20.2.1 Power preference In case of power preference the maximum demand is more important than the time settings of the single loads. If the emergency mode is active, the loads will be switched off even if the minimum on-time is not reached. For the loads which are already switched off, it is possible to extend the off time against the setting of maximum off time. 20.2.2 Time preference If the time settings are more important than the maximum demand, set this load to time preference. In this case the time settings are sure in any working condition of EML1101. For example in the emergency mode this load would be switched on, even if there is an exceeding power demand. If the emergency mode occurs and the minimum on-time is not reached, the load would not be switched off. 50