1
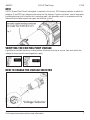
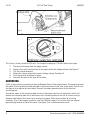
V 3.02
8489031
9/10 HP Pool Pump
User Manual
Please read and understand all instructions before use. Retain this manual for future reference.
V 3.02
8489031
9/10 HP Pool Pump
SPECIFICATIONS
CSA
CSA 180264
Application
Pumping Pool Water
Horsepower
9/10 HP
Max. Flow Rate
5,800 GPH
Flow Rate @ 5 ft.
5,500 GPH
Flow Rate @ 10 ft.
5,300 GPH
Flow Rate @ 15 ft.
5,150 GPH
Discharge Port
1-1/2 in.
Max. Lift
68 ft.
Operating Temperature Range
5° to 35° C (41° to 95° F)
Motor
Up-rated Efficient PSC Motor
Voltage Rating
115 / 230 volt
Current Rating
9.5 / 4.75 amperes
Housing Material
ABS Plastic
Impeller Material
Reinforced Polycarbonate
Contents
Pump with Screen Strainer
INTRODUCTION
Swimming pool pumps are a part of a water filtration system for swimming pools. These pumps
circulate water as part of an in-ground or an above-ground swimming pool.
IMPORTANT SAFETY PRECAUTIONS
WARNING! Read and understand all instructions before using this device. The operator must
follow basic precautions to reduce the risk of personal injury and / or damage to the device. Before
allowing someone else to use this device, make sure they are aware of all safety information.
2
For technical questions call: 1-800-665-8685
8489031
9/10 HP Pool Pump
V 3.02
WARNING! The warnings, cautions and instructions discussed in this instruction manual cannot
cover all possible conditions and situations that may occur. Common sense and caution are factors
that cannot be built into this product, but must be supplied by the operator.
NOTE: Keep this manual for the safety warnings, precautions and operating, inspection and
maintenance instructions.
WORK AREA
1.
2.
3.
4.
Operate in a safe work environment. Keep your work area clean and well lit.
Do not install in the presence of flammable gases or liquids.
Keep anyone not wearing the appropriate safety equipment away from the work area.
Always lock up tools and keep them out of the reach of children.
NOTE: Minimize distractions in the work environment. Distractions can cause you to lose control
of the device.
PERSONAL SAFETY
CAUTION! Wear protective equipment approved by the Canadian Standards Association (CSA) or
American National Standards Institute (ANSI) when using the device.
1.
2.
3.
4.
5.
Dress properly, wear protective equipment. Use breathing, ear, eye, face, foot, hand and
head protection. Always wear ANSI approved impact safety goggles, which must provide
both frontal and side protection. Protect your hands with suitable gloves. Protect your head
from falling objects by wearing a hard hat. Wear an ANSI approved dust mask or respirator
when working around chemical dusts and mists. Wear ANSI approved earplugs. Protective,
electrically non-conductive clothes and non-skid footwear are recommended when working.
Wear steel-toed boots to prevent injury from falling objects.
Control the device, personal movement and the work environment to avoid personal injury or
damage to the device. Stay alert, watch what you are doing and use your common sense.
Keep articles of clothing, jewelry, hair, etc., away from moving parts to avoid entanglement
with a tool.
Do not operate any machine / tool when tired or under the influence of drugs,
alcohol or medications.
Do not overreach when operating a tool. Proper footing and balance enables better control of
a tool in unexpected situations.
SPECIFIC SAFETY PRECAUTION
1.
2.
3.
Do not run the pump if there is no water in the system.
Shock hazard. Disconnect the pump from the power source before servicing.
GFCI is required. The unit must be properly grounded. All electrical components in the
system must be bonded together for proper grounding. The location must be well ventilated,
out of the sun, out of sleeping areas, away from flammable liquids. Keep out of wet areas.
Close the valves before opening the strainer cover and drain the housing before opening the
pump housing.
Entrapment hazard. Pumps installed with only one suction outlet can trap, disembowel and
drown swimmers. Install the pump only in a pool plumbing system that meets the ANSI
requirements. Two suction outlets at least 3 feet apart are required. All suction fittings must
be agency approved for anti-entrapment, anti-hair entanglement, correctly installed and not
damaged. Do not use the pool if the drain or outlet covers are broken or missing.
Visit www.princessauto.com for more information
3
V 3.02
4.
5.
6.
7.
8.
9.
10.
11.
12.
13.
9/10 HP Pool Pump
8489031
Mechanical hazard. The pump contains moving parts. Switch off and disconnect the pump
from the power source before performing any maintenance on the pump. The pump is
designed for permanent pool applications only. Any other use could be hazardous.
Explosion hazard. Use water to pressure test. Compressed air could cause the pump to
explode violently. Securely tighten and center the basket clamp ring prior to pressure testing
the system. Bleed off all trapped air in the system before pressure testing. Never use air or
gas to detect leaks. Do not use a leak test pressure greater than 25 PSI. Higher pressure
will permanently damage the pump. Use only piping and fittings that are designed for pools.
Never leave water in the pump or filter during freezing weather. Ice will cause the
housing to break.
Water under pressure. Water under pressure could cause serious bodily injury. Keep people
and pets away from fountains, jets and outlets while filling the pool or spa.
Do not expose the wiring to water
Do not power this device with anything other than a 115 / 230 volt power source.
Wear safety glasses at all times when installing or performing maintenance to the pump.
The unit MUST be wired into a properly grounded GFCI (Ground Fault Circuit Interrupter)
circuit. Contact a qualified electrician for the proper installation of a GFCI circuit.
Risk of explosion. Pump only clear water. Do not pump flammable or explosive fluids such as
gasoline, fuel oil, kerosene, etc. Do not use the pump in a flammable and / or
explosive atmosphere.
This pump must be installed by a licensed or certified electrician that is familiar with
swimming pool / spa operations.
Risk of fire and / or burn hazard. Motors run at high temperatures. Do not allow leaves,
debris, or foreign matter to collect around the pump motor. Keep the ventilation holes open.
Allow the motor to cool before handling or servicing. Keep flammable liquids away
from the pump.
ELECTRICAL SAFETY
1.
2.
Disconnect the device from the power source before servicing.
Protect yourself against electric shocks when working on electrical equipment. Avoid body
contact with grounded surfaces. There is an increased chance of electrical shock if your body
is grounded.
CAUTION! A qualified electrician should perform all wiring.
TOOL USE AND CARE
1.
2.
3.
4.
4
Do not alter any parts of the device. All parts and accessories are designed with built-in
safety features that may be compromised if altered.
Make certain that the power source conforms to the requirements of your equipment.
When wiring an electrically driven device, follow all electrical and safety codes, as well as the
most recent Canadian Electrical Code (CE) and the Canadian Centre for Occupational Health
and Safety (CCOHS).
Always disconnect cables from the power source and ground cable prior to repairs. Always
reconnect cable to the power source and the ground cable after the repairs.
For technical questions call: 1-800-665-8685
8489031
9/10 HP Pool Pump
V 3.02
UNPACKING
1.
2.
3.
Carefully remove the device from the box.
Inspect the parts carefully to make sure the device was not damaged while shipping.
Do not discard the packaging material until you have carefully inspected and satisfactorily
operated the device.
WARNING! If any part is missing, do not operate the device until the missing parts are replaced.
Failure to do so could result in serious personal injury.
PARTS IDENTIFICATION
A
Discharge
B
Suction Inlet
1
Pump
2
Lid
3
Gasket
4
Strainer
INSTALLATION
LOCATION
1.
Locate the pump as close to the swimming pool / spa as possible on a non-combustible
surface. Install the pump on a hard, level surface that is dry, well ventilated and away from
direct sunlight.
NOTE: The surrounding area should provide protection from the elements and ample room
for maintenance and service. Ensure the drainage will flow away from the pump.
2.
Mount the pump below the water level for easy priming. If the pump must be located above
the filled water level, keep the vertical distance to a minimum.
CAUTION! Excessive pipe strain caused by incorrect alignment may cause pump-housing failure.
DRAINS, SUCTION FITTINGS AND JETS
1.
2.
Have a licensed professional inspect all suction outlets.
Ensure that the drain covers are ANSI / APSP-16 (2011) certified and wall vacuum fittings are
self closing / self latching.
ENTRAPMENT PROTECTION
Refer to the latest ANSI guidelines to avoid suction entrapment. The pump suction must be designed to
eliminate the possibility of suction entrapment or hair entrapment / entanglement.
Visit www.princessauto.com for more information
5
V 3.02
9/10 HP Pool Pump
8489031
OUTLETS PER PUMP
Provide at least two hydraulically balanced main drains, with covers for each swimming pool pump
suction line. The centers of the main drain’s suction fitting must be at least 3 feet apart. See figure 1.
Fig. 1
SOLVENT WELDED CONNECTIONS
Use rigid or flexible PVC pipe. Ensure that the pipe ends are clean and free of any flash caused by the
cutting operation. Use the proper adhesive for the type of pipe selected.
NOTE: Use an adhesive primer to ensure the adhesive joints are secure. Primers are available with a
purple tracer to qualify in areas where codes specify that a primer must be used.
Consider climactic conditions when applying adhesives. Atmospheric conditions with high humidity will
make the adhesive action of certain glues less effective. Follow the manufacturer’s instructions.
WARNING! Explosion / fire hazard: Only apply adhesive in a well-ventilated area.
THREADED CONNECTIONS
Use only plumber’s seal tape or equivalent on threaded plumbing connections. Other pipe compounds
may damage the threads. Do not use silicone or petroleum based compounds. Do not over tighten.
Hand tightening plus a half turn is sufficient.
ELECTRICAL INSTALLATION
CAUTION! A licensed or certified electrician must install this pump.
WARNING! Verify the supply voltage matches the nameplate voltage. Incorrect voltage can cause a
fire or seriously damage the motor and voids the warranty.
NOTE: Use copper conductors only.
WARNING! Electric shock hazard. Connect this pump to a properly grounded GFCI receptacle that is
rated for at least 15 amps. Test the operation of the GFCI receptacle according to the manufacturer’s
recommended intervals.
6
For technical questions call: 1-800-665-8685
8489031
9/10 HP Pool Pump
V 3.02
GFCI
A GFCI (Ground Fault Circuit Interrupter) is required in the circuit. GFCI tripping indicates an electrical
problem. If the GFCI trips, determine the reason for the tripping. If you are uncertain, have a licensed or
certified electrician that is familiar with swimming pool / spa operations and is in accordance with the
National Electric Code inspect and repair the electrical system.
Fig. 2
VERIFYING THE EXISTING PUMP VOLTAGE
A qualified or certified electrician should perform all electrical wiring or service. You must match the
voltage of the pump to the existing power supply.
HOW TO CHANGE THE VOLTAGE SELECTOR
Visit www.princessauto.com for more information
7
V 3.02
9/10 HP Pool Pump
8489031
Fig. 2
Fig. 3
This Pump is factory wired for 230 volts. To change the voltage to 115 volts follow these steps:
1.
2.
3.
4.
5.
6.
Disconnect the pump from the power source.
Remove the cover from the back of the motor to find the voltage selector. See figure 2.
Pull the selector knob out.
Rotate the selector knob to the correct voltage setting. See figure 3.
Push the selector knob back in place.
Reinstall the cover to the back of the motor.
GROUNDING
Install all ground wiring according to local or National Electric Code requirements. Permanently ground
the motor. Use the ground terminal provided in the terminal box on the back of the motor. Use the size
and type of wire required by local codes. Connect the motor ground terminal to the electrical
service ground.
Ground the motor to the swimming pool structure. Grounding connects all metal parts within and
around the swimming pool with a continuous wire. Grounding reduces the risk of current passing
between metal objects that could cause an electrical shock. Refer to local codes for all wiring
standards. Use a solid copper conductor, size No. 8 AWG or larger. Run the wire from the external
grounding lug located on top of the motor (See figure 2) to a reinforced rod or mesh.
8
For technical questions call: 1-800-665-8685
8489031
9/10 HP Pool Pump
V 3.02
OPERATION
PRIMING THE PUMP
Prime the pump before attempting to operate. To prime pumps located above the water level, remove
the strainer cover and fill the strainer body with water, then replace the cover. If the pump and all piping
are located below the water level, the pump will self-prime. After the pump has been primed, open all
suction and discharge line valves and the run the motor. If no flow is observed in five minutes, stop
the motor and re-prime. If the pump fails to operate, check for air leaks. Refer to the trouble shooting
section. After 10 minutes of operation, check the return fittings for air bubbles. A continuous flow of air
indicates leaks in the suction line. Locate and correct any leaks immediately.
WARNING! Suction hazard. Do not block the pump suction with your body. Failure to do so will
result in death or serious personal injury.
CAUTION! Do not operate the pump without the strainer. Foreign material may interfere with the
impeller causing the pump to stop suddenly.
WARNING! This unit is not designed for use in sump, septic tanks or underground wells. Never use
the pump in hazardous or explosive locations.
The motor is equipped with an internal thermal protection circuit to guard against overheating.
The maximum ambient temperature for motor operation must not exceed the rating on the motor
model plate.
If the thermal overload protection in the motor trips or if the GFCI trips, determine the cause and
correct the problem before re-starting the pump.
CAUTION! Do not operate the pump with closed or partially closed suction or discharge vents.
WATER CHEMISTRY
Proper and consistent use of chemicals is necessary to manage a water system. Chlorine is the most
commonly used chemical to provide clean, sanitary water. Daily administration of dry or liquid chlorine
(calcium or sodium hypochlorite) is essential.
MAINTENANCE
1.
2.
3.
The pump motor is self-lubricating therefore no additional lubrication is required.
Visually inspect the motor for blockage of air vents on the motor shell. Remove any debris
after shutting off the breaker.
Replace worn seals.
HAIR AND LINT STRAINER
1.
2.
3.
4.
5.
6.
7.
8.
9.
Switch the power Off.
Close the valves in the suction and return line.
Turn the strainer cover counterclockwise and remove the strainer cover.
Lift the strainer basket out of the pump.
Clean and then reposition the basket in the pump. Take care to seat the basket properly.
Clean the O-ring and re-lubricate with petroleum jelly if necessary.
Clean the O-ring seats on the cover of the pump.
Refit the cover and the strainer locking-ring. Hand tighten only.
Open the valves then switch On the power to return the pump to operation.
Visit www.princessauto.com for more information
9
V 3.02
9/10 HP Pool Pump
8489031
WATER LEAKING AROUND THE MOTOR
A water leak in the area of the motor to the pump connection indicates a mechanical seal failure and a
shock hazard. Take the pump out of service and replace the seal immediately to avoid damage to other
components and to reduce the risk of electric shock.
WINTERIZING
Always protect the system from freezing temperatures. Drain the system if there is a possibility of
freezing. To drain the system:
1.
2.
Units with a filter:
a. Sand filter: Backwash for 3 to 5 minutes and then set the dial valve to the
winterize position.
b. Cartridge filter: Clean the filter element and store in a dry area.
Drain the system by removing both drain plugs and removing the strainer cover. Removing
the strainer cover will facilitate the draining procedure. Store the drain plugs in the strainer
basket and then re-attach the strainer cover.
SPRING START-UP
1.
2.
3.
4.
Clean and replace the drain plugs.
Lubricate the strainer O-ring with petroleum jelly if needed.
Clean the O-ring seat, the strainer basket and install the O-ring and the lid.
Fill the strainer body with water and refer to the Operation section.
DISPOSING OF THE DEVICE
If your device has become damaged beyond repair, do not throw it out. Bring it to the appropriate
recycling facility.
TROUBLE SHOOTING
Problem(s)
Possible Cause(s)
Suggested Solution(s)
Motor does not start.
1. The switch or circuit breaker is in
the Off position.
1. Reset the breaker.
2. Fuses blown or the thermal overload
is open.
2. Check the voltage.
3. Disconnected or defective wiring.
3. Check the wiring.
Motor does not reach
its full speed.
1. Low voltage.
1. Check the voltage settings.
2. Motor windings are connected to
the wrong voltage.
2. Inspect the motor
voltage selector.
Motor overheats
(protector trips).
1. Low voltage.
1. Check voltage settings.
2. Motor windings are connected to
the wrong voltage.
2. Inspect the motor
voltage selector.
3. Inadequate ventilation.
3. Remove the obstructions
around the pump.
10
For technical questions call: 1-800-665-8685
8489031
9/10 HP Pool Pump
V 3.02
Problem(s)
Possible Cause(s)
Suggested Solution(s)
The pump does not
deliver water.
1. Pump is not primed.
1. Prime the pump as directed in
the Operation section.
2. Suction or discharge valve is closed.
2. Open the valve.
3. Leakage or air into the
suction system.
3. Eliminate leaks in the
suction line.
4. Hair and lint strainer is full.
4. Clean the strainer (See the
Maintenance section).
5. Water level in the swimming pool is
too low.
5. Fill the swimming pool to the
proper level.
1. Plugged basket in the skimmer or
hair in the lint strainer.
1. Clean the skimmer and
lint strainer.
2. Valve in the suction line is
partly closed.
2. Open all valves
during operation.
3. Vacuum hose is plugged or
too small.
3. Check for collapsed hose
and replace.
4. Pump is not supported properly.
4. Add additional support.
1. Valve in the suction or discharge
line is partly closed.
1. Open all valves.
2. Suction or discharge line
is too small.
2. Use a larger supply line.
3. Plugged basket in the skimmer or
hair in the lint strainer.
3. Clean the skimmer
and lint strainer.
4. Dirty filter.
4. Clean the filter. (see the
filter’s manual).
Leakage of water
at the shaft.
Shaft seal requires replacement.
Replace the seal.
High pump pressure.
1. Discharge valve is closed.
1. Always run with the
valves open.
2. Return lines are too small.
2. Replace with larger lines.
3. Dirty filter.
3. Clean the filter (see the
filter’s manual).
Noisy pump
and motor.
Low pump capacity.
Visit www.princessauto.com for more information
11
V 3.02
9/10 HP Pool Pump
8489031
Problem(s)
Possible Cause(s)
Suggested Solution(s)
Air bubbles collecting
in the strainer.
1. Leakage of air into the suction line
at the connections or valve stem.
1. Eliminate leaks in the
suction line.
2. The strainer cover is leaking.
2. Remove and clean the O-ring.
3. Restriction in the suction line.
3. Increase the suction line seize.
4. Low water level in the
swimming pool.
4. Fill the swimming pool to the
correct level.
12
For technical questions call: 1-800-665-8685