1
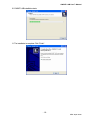
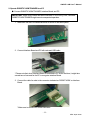
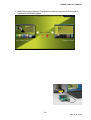
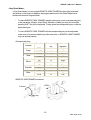
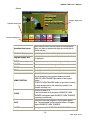
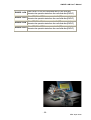
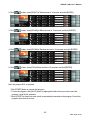
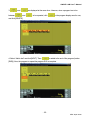
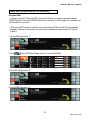
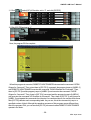
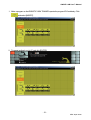
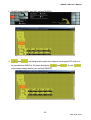
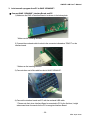
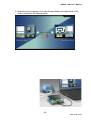
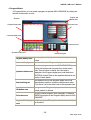
OWIKIT-LAB User’s Manual
OWIKIT-LAB
User’s Manual
Version 1.0.0
-1©EK Japan 2008
OWIKIT-LAB User’s Manual
For Your Safety Use
Thank you for your purchase of the OWIKIT-LAB (OWI-0762-USB).
This document explains how to set up and operate OWI-0762-USB. For proper operation of
OWI-0762-USB, please read this document before use.
■ WARNING
•
•
•
•
Stop the operation of the Interface Board immediately if smoke, odor or unusual sound is being
emitted from the Interface Board. Such smoke, odor, or unusual sound could be a cause of
electric shock or fire. In such case, turn off the power switch immediately and consult with OWI
Inc. for further correspondence.
Never disassemble or remodel the Interface Board or cable, or it could cause injury, electric
shock or fire.
Never let liquid or flammable objects reach the interior of the Interface Board, or it could cause
injury, electric shock, or fire. If by any chance such liquid or objects get inside the Interface Board,
stop the operation immediately.
Do not touch either the Interface Board or a computer with a wet hand to avoid electric shock or
any hazardous situation.
■CAUTION
•
•
•
•
•
•
•
Keep Interface Board out of the reach of small children, or it may drop or fall down and cause
physical injury.
Do not place Interface Board unstable places such as an unstable table or uneven surface, or it
may drop or fall down and cause physical injury.
Do not bend, drop, or damage Interface Board or cable, nor allow anything to rest on it, or it may
cause malfunction or physical injury.
Do not place Interface Board in areas with dust or high humidity, or it may cause electric shock
or fire.
Interface Board is a precision electronic device. Keep it away from the static electricity to avoid
damage.
Do not use Interface Board near devices such as radio, TV, or any audio appliances; Interface
Board emits high-frequency signals which may cause noise from such devices mentioned
above.
When not in use, do not keep Interface Board in the following locations, or Interface Board may
suffer damage;
- with direct sunlight or near a heating appliance
- with large temperature difference
- with dust or dirt
- with high humidity
- subject to vibration or shock
- near a device, such as a speaker, that generates magnetic or electromagnetic interference.
-2©EK Japan 2008
OWIKIT-LAB User’s Manual
■Notes
1. Under the copyright laws, this document may not be reproduced, in whole or in part, without the
written express permission of OWI Inc.
2. The contents, specifications and the form of OWIKIT-LAB are subject to change without prior
notice.
3. OWI Inc. is not liable for any consequence whatsoever from an improper use or operation or
inability to use or operate this software and this textbook.
4. OWI Inc. does not guarantee the data in your PC or any other products of a similar nature.
Additionally, OWI Inc. is not liable for the opportunity loss or lost time caused by the trouble or
improper use by a user of the software and the hardware.
5. OWI Inc. is not liable for any damages or troubles caused by the repair or change done by a user
or any other parties than OWI Inc. or its duly authorized dealers.
6. Interface Board included in OWIKIT-LAB is manufactured exclusively for the hardware of this
product, i.e. ROBOTIC ARM TRAINER, and WAO “KRANIUS”. Use of Interface Board included in
OWIKIT-LAB with a hardware or any other software than is included in this product for operating
other products or components, other than ROBOTIC ARM TRAINER and WAO “KRANIUS”, not
approved by OWI Inc. is strictly prohibited without the written express permission of OWI Inc..
7. Considerable effort has been made to ensure that this textbook is free of inaccuracies and
omissions. If you have found any inconvenience or incorrect information contained therein, please
contact us.
-3©EK Japan 2008
OWIKIT-LAB User’s Manual
Table of Contents
For Your Safety Use
----------------------------------------------------------------■Notes
-----------------------------------------------------------------------------
2
3
1. OWIKIT-LAB SET UP
----------------------------------------------------● Check the hardware and system requirements ----------------● How to install ----------------------------------------------------------------● SET-UP procedure
-----------------------------------------------------
5
5
5
6
2. Operate ROBOTIC ARM TRAINER from PC -------------------------------● Connect ROBOTIC ARM TRAINER, Interface Board, and PC -● Start up OWIKIT-LAB ----------------------------------------------------< Key Direct Mode >
----------------------------------------------------< Program Mode >
----------------------------------------------------<< Programming in Program Mode >> -----------------------------
11
11
13
15
17
21
3. Let’s transmit a program from PC to WAO “KRANIUS”! --------------● Connect WAO “KRANIUS”, Interface board, and PC --------------● Start up OWIKIT-LAB -------------------------------------------------------< Program Mode >
----------------------------------------------------<< Programming in Program Mode >>
----------------* Program transmission and execution
----------------< Simulation Mode >
-----------------------------------------------------
36
36
37
39
42
51
52
4. Troubleshooting
54
-----------------------------------------------------------------
-4©EK Japan 2008
OWIKIT-LAB User’s Manual
1. OWIKIT-LAB SET UP
● Check the hardware and system requirements
The hardware and system requirements to run OWIKIT-LAB properly are as follows;
(TIPS)
You can check the system requirements by double-clicking the “system” icon in the control
panel.
OS
CPU
Memory
Hardware Disk Space
Display
: Windows XP Service Pack 2 or higher / Vista™
: Pentium3, 1.0GHz or higher
: 256MB or higher
: 100MB or more
: Super VGA (800x600) or higher
Color monitor with high color 16 bits or higher
.NET Framework
: Microsoft® .NET Framework 2.0 or higher
* When the above application is not installed, download
from Microsoft® homepage and install.
Satisfying the above requirements does not guarantee the proper operation of the software
under the specific PC environment of each user.
z Microsoft, Windows, and Vista are trademarks or registered trademarks of Microsoft
Corporation in the United States and other countries.
z The company names, product names, etc are registered trademarks of each corresponding
company.
● How to install
First of all, end all applications, and access to OWI (OWI Inc.) homepage. (the link is below.).
http://www.owirobot.com
1. Click “DOWNLOADS”, and select “OWIKIT-LAB”.
2. Follow the directions on the download screen, and save OWIKIT-LAB in an appropriate
folder.
3. After downloading is complete, “OWIKIT-LAB_Installer_V***.exe” is created in the specified
folder.
4. Double-click “OWIKIT-LAB_Installer_V***.exe” and “OWIKIT-LAB_Installer_V***.exe”
folder is created. Double-click “Setup.exe” in the folder, and follow the instructions on the
screen for installation.
* “***” refers to the version number. The description changes depending on the version.
* End all applications when installing “OWIKIT-LAB", or installation may not be executed
properly.
5. Installation is successfully done when “Complete” message appears.
-5©EK Japan 2008
OWIKIT-LAB User’s Manual
● SET-UP procedure
1. Double-click “Setup.exe” icon.
* For Windows Vista, “User Account Control” screen will appear.
Click “Allow”.
2. Click “Next”.
-6©EK Japan 2008
OWIKIT-LAB User’s Manual
3. Select a folder. Normally the folder displayed by default is OK. Then, click “Next”.
4. Specify a name of the folder of which you want to create a shortcut icon. Normally the folder
displayed by default is OK. Then, click “Next”.
5. If you want to create a shortcut icon, then click the box, and click “Next”.
-7©EK Japan 2008
OWIKIT-LAB User’s Manual
6. The items to be installed are displayed. “.NET Framework 2.0” is displayed as well when it
needs to be installed. Click “Install”. When “.NET Framework 2.0” does not need to be installed,
then go on to No.10.
* For Windows Vista, “.NET Framework 2.0” is installed by default.
The screen when “.NET Framework
2.0” needs to be installed.
The screen when “.NET Framework 2.0”
dose not need to be installed. (go to No.10)
7. Files required are downloaded from the Internet. After downloading, the below window is
displayed. Click “Next”.
-8©EK Japan 2008
OWIKIT-LAB User’s Manual
8. Check the box of “I accept…”, and click “Install”.
9. Wait until “.NET Framework 2.0” installation completes. The installation may take a few more
than 10 minutes. When the installation is complete, click "Finish".
-9©EK Japan 2008
OWIKIT-LAB User’s Manual
10. OWIKIT-LAB installation starts.
11. The installation is complete. Click “Finish”.
- 10 ©EK Japan 2008
OWIKIT-LAB User’s Manual
2. Operate ROBOTIC ARM TRAINER from PC
● Connect ROBOTIC ARM TRAINER, Interface Board, and PC.
IMPORTANT: Make sure to follow the below instruction in descending order, otherwise
ROBOTIC ARM TRAINER might execute unexpected operation.
1. Make sure the SW2 of Interface Board is as shown in the below photo.
2. Connect Interface Board and PC with enclosed USB cable.
* Please note that, when Interface Board is connected to PC for the first time, it might take
several tens of seconds for the PC to recognize Interface Board.
3. Connect the cable for robot to the connector indicated as “ROBOT ARM” on Interface
Board.
* Make sure to connect to a correct connector.
- 11 ©EK Japan 2008
OWIKIT-LAB User’s Manual
4. Connect the other end of the cable for robot to ROBOTIC ARM TRAINER.
* Make sure to connect to a correct connector.
5. Start up OWIKIT-LAB in your PC, and select ROBOTIC ARM TRAINER and a mode
you want to use.
* Refer to “Start up OWIKIT-LAB” for detail.
6. Set SW2 of Interface Board to “->R.A” and make sure the LED turns red. Refer to the
photo below for detail.
7. Operate ROBOTIC ARM TRAINER in each mode.
* As for the operation in each mode, please refer to < Key Direct Mode > and
<Program Mode>.
IMPORTANT: Make sure to follow the below instructions, otherwise ROBOTIC ARM
TRAINER might execute unexpected operations.
z Make sure the LED2 (red) on Interface Board is OFF when connecting Interface Board
and PC.
z Do not unplug the USB cable from Interface Board while OWIKIT-LAB is in Key Direct
Mode or Program Mode. If you unplug by mistake, close the Mode screen, go back to
ROBOTIC ARM TRAINER – Mode Select screen, and select a mode again.
- 12 ©EK Japan 2008
OWIKIT-LAB User’s Manual
● Start up OWIKIT-LAB
* OWIKIT-LAB may not operate properly if other application programs are open when
OWIKIT-LAB start up or other application is opened after OWIKIT-LAB is started up. Therefore,
make sure to close all the application programs when starting up OWIKIT-LAB.
In addition, ROBOTIC ARM TRAINER may not operate properly when a screen saver
becomes active when it is operating. Make sure to set the screensaver to [None] when
ROBOTIC ARM TRAINER is operating.
1. Go to “Start” -> “All Programs” -> “OWIKIT-LAB” -> “OWIKIT-LAB”.
2. Robot Select screen appears. Click “ROBOTIC ARM TRAINER”.
- 13 ©EK Japan 2008
OWIKIT-LAB User’s Manual
3. Mode Select screen appears. Click whichever mode you want to use. Each mode is
explained in the following pages.
- 14 ©EK Japan 2008
OWIKIT-LAB User’s Manual
< Key Direct Mode >
In Key Direct Mode, you can operate ROBOTIC ARM TRAINER by clicking the keyboards
and buttons on the screen. In addition, the program performed in Key Direct Mode can be
saved and inserted in Program Mode.
*
To make ROBOTIC ARM TRAINER operate continuously, press a corresponding key
or the part button (Gripper, Wrist, Elbow, Shoulder, or Base) you want to move while
pressing SHIFT key on the keyboard. To stop, press the corresponding key or click the
part button again.
*
To move ROBOTIC ARM TRAINER with the corresponding key on the keyboards,
make sure not to press multiple keys at the same time, or ROBOTIC ARM TRAINER
may not operate properly.
・Corresponding keys
Location
Finger
Wrist
Elbow
Shoulder
Base
Operation
Corresponding
key
Mouse
operation
OPEN
A
Right
CLOSE
Z
Left
RIGHT
S
Right
LEFT
X
Left
UP
D
Right
DOWN
C
Left
UP
F
Right
DOWN
V
Left
CW
G
Right
CCW
B
Left
・ROBOTIC ARM TRAINER movement
CCW
Left turn
CW
Right turn
- 15 ©EK Japan 2008
OWIKIT-LAB User’s Manual
・Screen
Program display area
Operation button area
Total time display area
Operation button area
When using a mouse, put the pointer to the part button
where you want to operate and right-click or left-click to
operate the part.
Total time display area
The total operation time is displayed.
Program display area
Fixed operation commands and the total operation time
are displayed.
ENTER
Fix the total operation time in the program display area.
DELETE
Selected command in the program display area is deleted.
START
The program in the program display area is executed.
STOP
The program under execution is stopped.
HOME POSITION
When this button is pressed, an operation is reversed for
the time specified in the program display area and
ROBOTIC ARM TRAINER goes back to the original
position.
* ROBOTIC ARM TRAINER might not go back to exactly
the same position due to the assembly condition, the
operation condition, etc.
CLEAR
The timer is reset to “0”.
All the movements of all the parts of ROBOTIC ARM
TRAINER are stopped when ROBOTIC ARM TRAINER
is operating continuously.
SAVE
Press this to save the program in the program display
area. The saved data can be imported when in Program
Mode of ROBOTIC ARM TRAINER.
CLOSE
Display goes back to ROBOTIC ARM TRAINER Menu.
- 16 ©EK Japan 2008
OWIKIT-LAB User’s Manual
< Program Mode >
In Program Mode, you can create a program to operate ROBOTIC ARM TRAINER by clicking
the buttons on the screen in order.
・Screen
A property setting screen appears when one of the program buttons on the left side is
clicked.
< [ROBOTIC ARM TRAINER] button >
This [ROBOTIC ARM TRAINER] button is to set the operation direction and the operation time
of each part of ROBOTIC ARM TRAINER. After setting the conditions, click [ENTER] button.
Then the operation time is fixed and displayed in the program display area.
The operation time can be set by either dragging the time bar or inputting a value in the box.
< [FOR] and [NEXT] buttons >
Click [FOR] and [NEXT] buttons to repeat a specific command. [FOR] and [NEXT] are to be
used always in a pair. Click [FOR] and set the number of times you want to repeat a specific
movement, and click [ENTER]. Then, [FOR] and [NEXT] are displayed at the same time in the
program display area. To input a program you want to repeat, click [NEXT] and select [INSERT],
or delete [NEXT] for now and input a program you want to repeat, then click [NEXT].
The commands between [FOR] and [NEXT] are repeated as many times as specified after
[FOR].
- 17 ©EK Japan 2008
OWIKIT-LAB User’s Manual
[NEXT] indicates the end of the program you want to repeat. After the program is repeated for
the number of times specified after [FOR], the program goes on up to the command after
[NEXT]. The commands between [FOR] and [NEXT] are repeated for the specified time.
The commands are repeated endlessly when it is set to “0” after [FOR].
< [GO TO] button >
To jump to a command of the specified LABEL. Click this button, and specify the number of the
LABEL you want to jump to.
< [LABEL] button >
To set the jump destination of [GO TO]. Click this button, and set the number of the LABEL.
< [IMPORT] button >
To insert a program created in Key Direct Mode. Click this button, and select the file you want to
insert in the program.
- 18 ©EK Japan 2008
OWIKIT-LAB User’s Manual
< Editing buttons >
ENTER Enter a program in process in the program display area.
START Execute a created program and move ROBOTIC ARM TRAINER.
STOP
Stop a program in execution.
CLEAR Clear a program not yet fixed.
NEW
Create a new program.
OPEN
Open a saved program file.
SAVE
Save a created program.
CLOSE Go back to ROBOTIC ARM TRAINER menu.
< [IF], [END IF] buttons >
To make a conditional judgment. [IF] and [END IF] are to be used always in a pair. The further
process depends on the condition set after [IF]. Click [IF] and set a condition, then click [ENTER].
Then, [IF] and [END IF] are concurrently displayed in the program display area. Input a program
that is to be executed when the conditions are satisfied by clicking [END IF] and selecting
[INSERT], or delete [END IF] for now, input a program you want to repeat and click [END IF].
* OWIKIT-LAB (OWI-0762-USB) and ROBOTIC ARM TRAINER (OWI-007) do not have a
sensor, and without a sensor, [IF] and [END IF] commands do not function properly. Please add
a sensor by yourself according to need; there are sensor input terminals (SENS1 and SENS2)
on OWI-0762-USB interface for a sensor such as a push switch. Please note, however, that we
are not liable for any damage or trouble caused by installing a sensor.
* Check the box of “Use IF command” when you use “IF” and “END IF” buttons and sensors are
additionally installed to ROBOTIC ARM TRAINER.
- 19 ©EK Japan 2008
OWIKIT-LAB User’s Manual
SENSOR 1=ON
When SENS1 is ON, the commands after [IF] are executed,
otherwise the operation starts from the command after [END IF].
SENSOR 1=OFF
When SENS 1 is OFF, the commands after [IF] are executed,
otherwise the operation starts from the command after [END IF].
SENSOR 2=ON
When SENS 2 is ON, the commands after [IF] are executed,
otherwise the operation starts from the command after [END IF].
SENSOR 2=OFF
When SENS 2 is OFF, the commands after [IF] are executed,
otherwise the operation starts from the command after [END IF].
- 20 ©EK Japan 2008
OWIKIT-LAB User’s Manual
<< Programming in Program Mode >>
Following explains how to create a program to operate ROBOTIC ARM TRAINER with some
examples.
(EX)
Let’s create a program where ROBOTIC ARM TRAINER moves as follows;
Gripper: Close for 5 seconds
Wrist: RIGHT(rotation) for 3 seconds
Elbow: DOWN for 10 seconds
Shoulder: DOWN for 10 seconds
Base: CW (rotation) for 15 seconds
<Program EX1>
When programming 1 movement in 1 line;
1. Click
button, check [CLOSE] of Gripper and set to 5 seconds, and click [ENTER].
- 21 ©EK Japan 2008
OWIKIT-LAB User’s Manual
2. Click
button, check [RIGHT] of Wrist and set to 3 seconds, and click [ENTER].
3. Click
button, check [DOWN] of Elbow and set to 10 seconds, and click [ENTER].
4. Click
button, check [DOWN] of Shoulder and set to 10 seconds, and click [ENTER].
5. Click
button, check [CW] of Base and set to 15 seconds, and click [ENTER].
Now, the program EX1 is complete.
* Click [START] button to execute this program.
* To save the program, click [SAVE], select an appropriate folder where you want to save the
program, name the file, and save.
* When [START] is clicked, the error check is automatically executed on the program. Correct the
program when there is an error.
- 22 ©EK Japan 2008
OWIKIT-LAB User’s Manual
<Program EX2>
When programming all the movements in 1 line;
1. Click
button, check [CLOSE] of Gripper and set to 5 seconds, check [RIGHT] of Wrist
and set to 3 seconds, check [DOWN] of Elbow and set to 10 seconds, check [DOWN] of Shoulder
and set to 10 seconds, click [CW] of Base and set to 15 seconds, and click [ENTER] at the end.
Now, the program EX2 is complete.
* Click [START] button to execute this program.
* To save this program, click [SAVE], select an appropriate folder where you want to save the
program, name the file, and save.
* When [START] is clicked, the error check is automatically executed on the program. Correct the
program when there is an error.
- 23 ©EK Japan 2008
OWIKIT-LAB User’s Manual
How to make a program from [FOR] to [NEXT]
<Program EX3>
Repeat the program EX2 twice.
1. Click
in the program display area, and select [INSERT].
2. Click [FOR], and set the number of times to repeat. For example, to repeat the program for 2 times,
select “2” and click [ENTER].
- 24 ©EK Japan 2008
OWIKIT-LAB User’s Manual
3.
between
and
are displayed at the same time. However, since a program has to be
and
to be repeated, click
in the program display area for now,
and click [DELETE].
4. Select “Add to last” and click [NEXT]. Then
is added to the end of the program (before
[END]). Now, the program to repeat the program EX2 is complete.
- 25 ©EK Japan 2008
OWIKIT-LAB User’s Manual
5. With the above program, the program is repeated for 2 times in the same direction. Therefore, it is
recommended to insert a command to go back to the original position. Click
, select
[INSERT], make a program as follows, and click [ENTER].
Execute this program, and the movement of the program EX2 is repeated twice.
As you see, [FOR] and [NEXT] are the commands to repeat the command between [FOR] and
[NEXT] as many times as specified.
- 26 ©EK Japan 2008
OWIKIT-LAB User’s Manual
How to make a program with [GO TO] and [LABEL]
<Program EX4>
A program using [GO TO] and [LABEL], where the following command is repeated endlessly;
OPEN Gripper for 3 seconds, DOWN Shoulder for 5 seconds, CLOSE Gripper for 3 seconds, and
UP Shoulder for 5 seconds.
* [FOR] and [NEXT] enable to make the command between [FOR] and [NEXT] to be repeated
endlessly. However, in this section, we shall make a repetition command using [GO TO] and
[LABEL].
1. Click [LABEL] and set to “1”.
2. Click
, select [OPEN] of Gripper, set to “3”, and click [ENTER].
3. Click [GO TO] and set to “2”.
4. Click [LABEL] and set to “3”.
- 27 ©EK Japan 2008
OWIKIT-LAB User’s Manual
5. Click
, select [CLOSE] of Gripper, set to “3”, and click [ENTER].
6. Click [GO TO] and set to “4”.
7. Click [LABEL] and set to “2”.
8. Click
, select [DOWN] of Shoulder, set to “5”, and click [ENTER].
9. Click [GO TO] and set to “3”.
10. Click [LABEL] and set to “4”.
- 28 ©EK Japan 2008
OWIKIT-LAB User’s Manual
11. Click
, select [UP] of Shoulder, set to “5”, and click [ENTER].
12. Click [GO TO] and set to “1”.
Now, the program EX4 is complete.
When this program is executed, ROBOTIC ARM TRAINER first executes the command “OPEN
Gripper for 3 seconds”. Then, since there is [GO TO 2] command, the program jumps to [LABEL 2]
and ROBOTIC ARM TRAINER executes the command “DOWN Shoulder for 5 seconds”. Then,
there is [GO TO 3] and the program jumps to [LABEL 3] and executes the command “CLOSE
Gripper for 3 seconds”. Then, there is [GO TO 4] command and the program jumps to [LABEL 4]
and executes the command “UP Shoulder for 5 seconds”. Then, there is [GO TO 1] and it jumps to
[LABEL 1] and repeats the commands from the start. As mentioned above, the number that comes
after [GO TO] indicates each corresponding label. As you see, this is the command to jump to a
specified number of label. Although the operation sequence of this program seems different from
that of the program EX4, you can see that [GO TO] command makes ROBOTIC ARM TRAINER
operate in the order.
- 29 ©EK Japan 2008
OWIKIT-LAB User’s Manual
How to create a program of [IF] and [END IF]
* OWIKIT-LAB (OWI-0762-USB) and ROBOTIC ARM TRAINER (MR-999E) do not have a
sensor, and without a sensor, [IF] and [END IF] commands do not function properly. Please add
a sensor by yourself according to need; there are sensor input terminals (SENS1 and SENS2)
on OWI-0762-USB interface for a sensor such as a push switch. Please note, however, that we
are not liable for any damage or trouble caused by installing a sensor.
* Check the box of “Use IF command” when you use “IF” and “END IF” buttons and sensors are
additionally installed to ROBOTIC ARM TRAINER.
< Program EX5 >
The program EX3 is executed when SENS1 is ON, otherwise the movement where Base rotates in
CW direction for 5 seconds is repeated endlessly.
Program EX3
- 30 ©EK Japan 2008
OWIKIT-LAB User’s Manual
1. Make a program so that ROBOTIC ARM TRAINER repeats the program EX2 endlessly. Click
, and select [INSERT].
2. To repeat endlessly, set to “0” and click [ENTER].
- 31 ©EK Japan 2008
OWIKIT-LAB User’s Manual
3.
and
are displayed at the same time. Therefore, click
for now, and
then click [DELETE].
4. Now the sensor conditions are set. The program EX3 needs to be executed when SENS1 is ON.
Therefore, click the first
and then select “INSERT”.
- 32 ©EK Japan 2008
OWIKIT-LAB User’s Manual
5. Click [IF], select “SENS1” and “ON”, and click [ENTER].
6.
and
are displayed at the same time. However, the program EX3, which is to
be executed when SENS1 is ON, has to be between
and
. So click
in the program display area for now, and click [DELETE].
- 33 ©EK Japan 2008
OWIKIT-LAB User’s Manual
7. Select “Add to last” and click [END IF].
is added to the last, before [END], and the
program executed when SENS1 is ON is complete.
8. Next, a program that is executed when SENS1 condition is not satisfied (when SENS1 is OFF)
needs to be added. Make a program to rotate the Base in CW direction for 5 seconds.
- 34 ©EK Japan 2008
OWIKIT-LAB User’s Manual
9. Lastly, add [NEXT] to repeat the command endlessly, and the program is complete.
Now, the program EX5 is complete.
When this program is executed, the base rotates in CW direction for 5 seconds endlessly when
SENS1 is OFF, but when ON, the program EX3 is executed.
However, the movement does not switch right away when SENS1 turns ON; the program EX3 is
executed only when the sensor is ON at the moment the program is at
, when it checks the
condition of SENS1.
- 35 ©EK Japan 2008
OWIKIT-LAB User’s Manual
3. Let’s transmit a program from PC to WAO “KRANIUS”!
● Connect WAO “KRANIUS”, Interface Board, and PC
1) Make sure the SW2 of Interface Board is as shown in the below photo.
* Make sure the inserting direction.
2) Connect the enclosed cable for robot to the connector indicated as “P!MOT” on the
interface board.
* Make sure the inserting direction.
3) Connect other end of the cable for robot to WAO “KRANIUS”.
4) Connect the interface board and PC with the enclosed USB cable.
* Please note that, when Interface Board is connected to PC for the first time, it might
take several tens of seconds for the PC to recognize Interface Board.
- 36 ©EK Japan 2008
OWIKIT-LAB User’s Manual
● Start up OWIKIT-LAB
* Make sure no application programs other than OWIKIT-LAB are open or active, otherwise
OWIKIT-LAB might not operate properly. In addition, OWIKIT-LAB might not operate properly also
when a screensaver function becomes active while a program is being transmitted to WAO
“KRANIUS” or when a WAO “KRANIUS” simulation is being executed. Therefore, make sure to set
the screensaver to [None].
1) Go to “Start” -> “All Programs” -> “OWIKIT-LAB” -> “OWIKIT-LAB”.
2) Robot Select screen appears. Click “WAO “KRANIUS””.
- 37 ©EK Japan 2008
OWIKIT-LAB User’s Manual
3) Mode Select screen appears. Click either Program Mode or Simulation Mode. Each
mode is explained in the following pages.
- 38 ©EK Japan 2008
OWIKIT-LAB User’s Manual
< Program Mode >
In Program Mode, you can create a program to operate WAO “KRANIUS” by clicking the
buttons on the screen in order.
Program title
display area
・Screen
Program display area
File button area
Comment display area
Edit button area
Operation button area
Program display area
Numerical keypad
Fixed program is displayed in this area when [ENTER] is
clicked.
Comment display area A selected line in the Program display area is described.
To create a program to operate WAO “KRANIUS” by
clicking the buttons and numerical keys in this area in
order. Once a button is clicked, the command is
Operation button area
displayed in the Program display area, and fixed when
[ENTER] is clicked. Refer to the separate chart as for the
function of each button.
Numerical keypad
The operation time or the operation angle can be set.
These buttons switch to condition setting buttons when
[IF] is clicked. As for the detail, refer to the separate chart.
Edit button area
A program in the Program display area can be cut,
copied, pasted, or deleted.
File button area
To open a saved program, save a program, or transmit
([SEND]) a program in the Program display area to WAO
“KRANIUS”.
Program title display
area
To title a program. Click anywhere in the column to input
the file name.
- 39 ©EK Japan 2008
OWIKIT-LAB User’s Manual
Operation button area
FD
WAO “KRANIUS” moves forward.
BK
WAO “KRANIUS” moves backward.
STOP WAO “KRANIUS” stops.
BUZZ
WAO “KRANIUS” makes a buzzer sound.
L
WAO “KRANIUS” moves in a low speed.
H
WAO “KRANIUS” moves in a high speed.
LT
WAO “KRANIUS” turns left.
RT
WAO “KRANIUS” turns right.
LR
WAO “KRANIUS” rotates left in place.
RR
WAO “KRANIUS” rotates right in place.
LABEL To input a label.
END
To end a program.
FOR
To repeat a program.
NEXT
End of repeated program
IF
To set the condition of IF clause.
Numerical buttons switch to sensor selecting buttons
when [IF] button is pressed. (See below)
THEN To set a sequence of movement of IF clause.
ELSE
To set a sequence of movement that does not suit IF
clause.
ENTER To fix a program.
- 40 ©EK Japan 2008
OWIKIT-LAB User’s Manual
The numerical keypad that appears when [IF] button is clicked
When [IF] button is clicked, the numerical buttons switch to sensor selecting buttons. Press the
button of corresponding sensor and press either ON or OFF button to set the IF condition.
IRL Infrared sensor, left
IRR Infrared sensor, right
UFL Floor sensor, left front
UFR Floor sensor, right front
UBL Floor sensor, left back
UBR Floor sensor, right back
- 41 ©EK Japan 2008
OWIKIT-LAB User’s Manual
<< Programming in Program Mode >>
Following explains how to create a program to operate WAO “KRANIUS” with some examples.
(Program EX1)
Let’s create a program where WAO “KRANIUS” moves in a square in middle speed. The operation
time is “2” for all the movements.
* Since a direct current motor is used in WAO “KRANIUS”, the driving distance or the turning
angle of WAO “KRANIUS” is not always accurate; the square movement is not exactly square.
However, accuracy of the turning angle can be improved by setting the spinning time. As for the
detail, please refer to the assembly instruction manual of WAO “KRANIUS”.
1.Click in the order of
→ “2” →
.
2.Click in the order of
→ “1” →
.
3.Click in the order of
→ “4” →
.
4.Click in the order of
→ “1” →
.
5.Click in the order of
→ “2” →
.
6.Click in the order of
→ “1” →
.
7.Click in the order of
→ “4” →
.
- 42 ©EK Japan 2008
OWIKIT-LAB User’s Manual
8.Click in the order of
→ “1” →
.
9.Click in the order of
→ “2” →
.
10.Click in the order of
→ “1” →
.
11.Click in the order of
→ “4” →
.
12.Click in the order of
→ “1” →
.
13.Click in the order of
→ “2” →
.
- 43 ©EK Japan 2008
OWIKIT-LAB User’s Manual
14.Click in the order of
→ “1” →
.
15.Click in the order of
→ “4” →
.
16.Click in the order of
→ “1” →
.
Now, the program EX1 is complete.
* As for the program transmission to WAO “KRANIUS” and the program execution, please refer to
“Program transmission and execution” on Page 51.
* To save the program, click [SAVE], select an appropriate folder, name the file, and save.
* When [SEND] is clicked, the error check is automatically executed on the program. Correct the
program when there is an error.
How to make a program from [FOR] to [NEXT]
(Program EX2)
Let’s create a program of the same sequence of movement as EX1 using [FOR] and [NEXT].
1.Click in the order of
→ “4” →
.
2.Click in the order of
→ “2” →
.
3.Click in the order of
→ “1” →
.
- 44 ©EK Japan 2008
OWIKIT-LAB User’s Manual
4.Click in the order of
→ “4” →
.
5.Click in the order of
→ “1” →
.
6.Click in the order of
→
.
Now, the program EX2 is complete.
When EX1 and EX2 are transmitted to WAO “KRANIUS”, it makes exactly the same movements.
How could this happen even though the length of the 2 programs is different? The answer is the
[FOR] and [NEXT] command used in the program EX2. As you see, [FOR] and [NEXT] are very
useful command when you want a sequence of movement (a process of the program) to be
repeated for a certain number of times.
* As for the program transmission to WAO “KRANIUS” and the program execution, please refer to
“Program transmission and execution” on Page 51.
* To save the program, click [SAVE], select an appropriate folder, name the file, and save.
* When [SEND] is clicked, the error check is automatically executed on the program. Correct the
program when there is an error.
- 45 ©EK Japan 2008
OWIKIT-LAB User’s Manual
(Program EX3)
Let’s create a program where WAO “KRANIUS” repeats a square movement of the program
EX2, moving over little by little.
1.Since the movement of the program EX2 is repeated endlessly, click the 01 line, and click
[INSERT].
2.Click in the order of
→ “0” →
.
- 46 ©EK Japan 2008
OWIKIT-LAB User’s Manual
3.To have WAO “KRANIUS” move over a little every time the program EX2 ends, click “Add to last”.
4.Click in the order of
→ “2” →
.
5.Click in the order of
→ “1” →
.
- 47 ©EK Japan 2008
OWIKIT-LAB User’s Manual
6.Lastly, to repeat the whole movements endlessly, add [NEXT] so that the program goes back to
01 line.
Click in the order of
→
.
Now, the program EX3 is complete.
As you see, you can make a [FOR] and [NEXT] program in between another [FOR] and [NEXT]
command. This is called “Multiple loops”. “Multiple loops” is used in the program EX3 and the
program goes on, repeating a square movement, moving over little by little, endlessly.
* As for the program transmission to WAO “KRANIUS” and the program execution, please refer to
“Program transmission and execution” on Page 51.
* To save the program, click [SAVE], select an appropriate folder, name the file, and save.
* When [SEND] is clicked, the error check is automatically executed on the program. Correct the
program when there is an error.
- 48 ©EK Japan 2008
OWIKIT-LAB User’s Manual
How to make a program with [IF], [THEN], and [ELSE]
(Program EX4)
Let’s make a program where WAO “KRANIUS” makes a Pipo (Pe-Po) sound for once when the
right infrared sensor is ON.
1.Click in the order of
→ [IRR] → [ON] →
→ “1” →
→ “2” →
.
This program refers to; when the right infrared sensor is ON, execute the program after Label 1,
and when OFF, then execute the program after Label 2.
2.Click in the order of
→ “1” →
3.Click in the order of
→ “2” → “1” →
4.Click in the order of
→ “2” →
.
.
.
Now, the program EX4 is complete.
* As for the program transmission to WAO “KRANIUS” and the program execution, please refer to
“Program transmission and execution” on Page 51.
* To save the program, click [SAVE], select an appropriate folder, name the file, and save.
* When [SEND] is clicked, the error check is automatically executed on the program. Correct the
program when there is an error.
Now, let’s transmit the program EX4 to WAO “KRANIUS”. In this program, WAO “KRANIUS”
makes a Pipo sound when the right infrared sensor is ON. So, click [MODE/RUN] button of WAO
“KRANIUS” and put your hand approx. 10cm ahead of the right infrared sensor. Did WAO
“KRANIUS” make a Pipo sound? It might not have made the sound, but that does not mean there is
- 49 ©EK Japan 2008
OWIKIT-LAB User’s Manual
a mistake in the program. The WAO “KRANIUS” did not make a Pipo sound because the program
processing speed was too fast and the program had already been executed when you put your
hand 10cm ahead of it.
(Program EX5)
Let’s make a program, using [FOR] and [NEXT], where the program EX4 is repeated endlessly.
1.Click 01 line, and click “INSERT”.
2.Click in the order of
→ “0” →
.
3.Check “Add to last”.
4.Click in the order of
→
.
Now, the program EX5 is complete.
* As for the program transmission to WAO “KRANIUS” and the program execution, please refer to
“Program transmission and execution” on Page 51.
* To save the program, click [SAVE], select an appropriate folder, name the file, and save.
* When [SEND] is clicked, the error check is automatically executed on the program. Correct the
program when there is an error.
Now, let’s transmit the program EX5 to WAO “KRANIUS”.
WAO “KRANIUS” must have made a Pipo sound when you put your hand toward the right infrared
sensor, and it must not have made a Pipo sound when there is nothing in its front. This indicates
that WAO “KRANIUS” makes a judgment according to the information from the sensor.
As mentioned above, in a [IF], [THEN] and [ELSE] program, execution of a movement depends on
the condition; whether the condition is satisfied or not decides which command is executed.
- 50 ©EK Japan 2008
OWIKIT-LAB User’s Manual
* Program transmission and execution
Follow the below instructions to transmit a program to WAO “KRANIUS”.
1. Connect the enclosed cable for robot to the connector, indicated as WAO “KRANIUS” on
Interface Board.
2. Have WAO “KRANIUS” in SLEEP mode by turning ON the power of WAO “KRANIUS” and
pressing “RESET” -> “RUN/MODE” -> “RUN/MODE” in order, and connect the cable for robot
to WAO “KRANIUS”.
3. After creating and saving a program in PC, click “SEND” in Program Mode. Then, the message
as shown below appears.
4. After pressing “RESET” button of WAO “KRANIUS”, press “RUN/MODE” -> “0” to have WAO
“KRANIUS” in Program Receive mode. The LED of WAO “KRANIUS” starts blinking.
5. Click “OK” in the message displayed on PC, and the program transmission starts.
6. When the program transmission is complete properly, WAO “KRANIUS” becomes in SLEEP
mode again.
7. Remove the cable for robot from WAO “KRANIUS”, and press “RUN/MODE” of WAO
“KRANIUS”. Then the transmitted program is executed.
* WAO “KRANIUS” does not operate properly when there is an error in the program.
* WAO “KRANIUS” does not operate properly when a program transmission is cancelled in
mid-course. In such case, press “RESET” button and start transmission from the beginning.
* When unplugging the cable for robot from WAO “KRANIUS”, make sure not to press “RESET”
button of WAO “KRANIUS” by mistake. The transmitted program is cleared when “RESET” button
is pressed before “RUN/MODE” button is pressed after the program transmission.
- 51 ©EK Japan 2008
OWIKIT-LAB User’s Manual
< Simulation Mode >
In Simulation Mode, you can have WAO “KRANIUS” simulate the program created in Program
More on the screen.
Program title display area
・Screen
Program display area
Simulation area
Program title display area
The title of the program is displayed.
Simulation area
Walls and black floors can be created in this area in which WAO
“KRANIUS” is arranged and a program can be simulated.
Program display area
A program to be simulated is displayed. Click [OPEN] and read
the program you want to simulate. During the simulation, the
program being simulated is highlighted.
WALL
Click this button once, and click anywhere in the simulation area and drag to
create a wall. Right click (and drag if necessary) to delete the wall.
FLOOR
Click this button once, and click anywhere in the simulation area and drag to
create a floor. Right click (and drag if necessary) to delete the floor.
ARRANGE
Click this button once, and click anywhere in the simulation area to arrange WAO
“KRANIUS”.
LEFT
WAO “KRANIUS” rotates left in the simulation area.
RIGHT
WAO “KRANIUS” rotates right in the simulation area.
- 52 ©EK Japan 2008
OWIKIT-LAB User’s Manual
SIMULATION START Starts simulation.
SIMULATION STOP Stops simulation.
READ PROGRAM
Read a program created in PROGRAM MODE.
CLOSE
Goes back to WAO “KRANIUS” Mode Select screen.
IMAGE DISPLAY
WAO “KRANIUS” image is displayed.
GUIDE DISPLAY
WAO “KRANIUS” sensor area is displayed.
- 53 ©EK Japan 2008
OWIKIT-LAB User’s Manual
4. Troubleshooting
Select the current symptom from the below I, II, and III, and refer to the following pages for
troubleshooting.
I. The software cannot be installed in PC
II. ROBOTIC ARM TRAINER does not operate.
III. Data cannot be transmitted to WAO “KRANIUS”.
I. The software cannot be installed in PC.
Q.
The operation system of my PC is Windows XP. The installer is started up and the
installation is executed, but the software is not properly installed.
A. Make sure the operating system of your PC is “Windows XP Service Pack 2” or higher.
(How to check)
(1) Click “Start” of Windows XP, move the cursor to “Control Panel” and click.
(2) Double-click “System” in Control Panel.
(3) System property is displayed. Check the version of Windows XP of your PC.
The description varies
depending on
Windows XP version
of your PC.
When the version of Windows XP Service Pack of your PC is not “2” or higher, then
installation might not be executed properly. Please access to Microsoft URL and update the
version.
- 54 ©EK Japan 2008
OWIKIT-LAB User’s Manual
II. ROBOTIC ARM TRAINER does not operate.
Q. ROBOTIC ARM TRAINER cannot operate by OWIKIT-LAB.
A. Check the following points.
・Are the USB cable and the cable for robot connected properly?
Make sure if the USB cable is connected to PC and Interface Board
properly, or if the cable is not disconnected. When the USB cable is connected
properly when PC power is ON, the LED1 (green) of Interface Board turns
ON.
In addition, make sure the cable for robot is also connected to “R.A.” of
Interface Board and ROBOTIC ARM TRAINER, or if the cable is not
disconnected.
・Is SW2 of Interface Board set to “->R.A.”?
If not, ROBOTIC ARM TRAINER does not operate. Set SW2 to “->R.A”,
and then the LED2 (red) turns ON.
・Are not the batteries of ROBOTIC ARM TRAINER exhausted?
If so, remove the old batteries and set new ones.
・Are you sure you did not connect Interface Board after either Key Direct
Mode or Program Mode screen appeared? If you did, PC might not recognize
Interface Board correctly. Click “CLOSE” to go back to Mode Select screen,
and select a mode you want to use.
III. Data cannot be transmitted to WAO “KRANIUS”.
Q. The program cannot be transmitted to WAO “KRANIUS” after “SEND”
button in Program Mode is clicked.
A. Check the following points.
・Are not the USB cable and the cable for robot unplugged?
Make sure if the USB cable is connected to PC and Interface Board
properly, or if the cable is not disconnected. When the USB cable is connected
properly when PC power is ON, the LED1 (green) of Interface Board turns ON.
In addition, make sure the cable for robot is also connected to “P!MOT” of
Interface Board and WAO “KRANIUS”, or if the cable is not disconnected.
・Is WAO “KRANIUS” in Program Receive mode?
If not, WAO “KRANIUS” cannot receive the program transmitted from PC.
After connecting the cable for robot to WAO “KRANIUS”, make sure to press
the button “RESET” -> “RUN/MODE” -> “0” of WAO “KRANIUS” in order to
have WAO “KRANIUS” in Program Receive mode.
- 55 ©EK Japan 2008
OWIKIT-LAB User’s Manual
When WAO “KRANIUS” mode changes to Program Receive mode, the
red and green LEDs of WAO “KRANIUS” start blinking.
In addition, when “SEND” button is clicked, the following message appears.
This pop-up is a proper message for confirmation and it is not an error. Click
“OK” after making sure WAO “KRANIUS” is in Program Receive mode.
・Are not the batteries of WAO “KRANIUS” exhausted?
If so, remove the old batteries and set new ones.
・Are you sure you did not connect Interface Board after Program Mode
screen appeared? If you did, PC might not recognize Interface Board
correctly. Then, click “CLOSE” to go back to Mode Select screen, and select
Program Mode.
- 56 ©EK Japan 2008