1
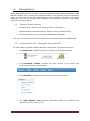
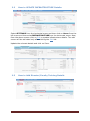
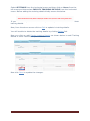
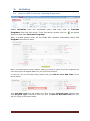
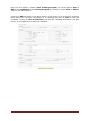
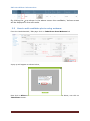
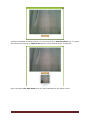
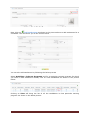
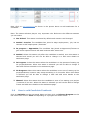
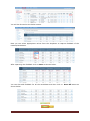
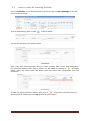
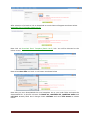
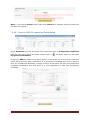
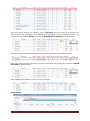
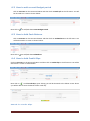
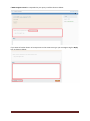
RSETI MIS OPERATING MANUAL By Credo Infotech User Manual Version 2.3 © 2012 Credo Infotech. All rights reserved Page 1 Table of Contents PREFACE .............................................................................................................................................. 3 1. 1.1 1.2 1.3 1.4 2. 2.1 2.2 2.3 2.4 3. 3.1 3.2 3.3 3.4 3.5 3.6 3.7 3.8 3.9 3.10 3.11 3.12 3.13 4. 4.1 4.2 4.3 4.4 4.5 5. 5.1 INTRODUCTION................................................................................................................ 4 SYSTEM REQUIREMENT ............................................................................................................. 4 GETTING STARTED / NAVIGATE THROUGH MIS ........................................................................ 4 HOW TO LOGIN IN TO THE MIS ................................................................................................ 5 INTRODUCTION OF BUTTONS AND ICONS.................................................................................. 5 SETTINGS ............................................................................................................................ 6 HOW TO ADD USERS ............................................................................................................. 6 HOW TO UPDATE INFRASTRUCTURE DETAILS: ................................................................. 7 HOW TO ADD DIRECTOR/FACULTY TRAINING DETAILS ............................................................. 7 HOW TO ADD EMPLOYEES ....................................................................................................... 9 ACTIVITIES ...................................................................................................................... 10 HOW TO ADD IN HOUSE TRAINING PROGRAMS...................................................................... 10 HOW TO ADD CANDIDATE/TRAINEE IN TO A TRAINING PROGRAM ......................................... 11 HOW TO ADD CANDIDATE PHOTO USING WEBCAM: ................................................................. 14 HOW TO ADD BOARDING DETAILS OF A TRAINING PROGRAM. ................................................ 16 HOW TO ADD SETTLEMENT TO A TRAINEE AFTER FOLLOW UP ................................................. 17 HOW TO ADD CANDIDATE FEEDBACK: .................................................................................... 19 HOW TO ADD LAC MEETING DETAILS: ................................................................................... 21 HOW TO UPLOAD CANDIDATE DETAILS FROM EXCEL SHEET: ................................................... 22 HOW TO UPLOAD CANDIDATE SETTLEMENT DETAILS FROM EXCEL SHEET: .............................. 24 HOW TO ADD PROSPECTIVE CANDIDATES ............................................................................. 27 HOW TO ADD CANDIDATES FROM PROSPECTIVE CANDIDATES: ............................................... 28 HOW TO ADD TRAINING COST ......................................................................................... 29 HOW TO ADD ANNUAL ACTION PLAN..................................................................................... 31 ACCOUNTS ........................................................................................................................ 34 HOW TO ADD BANK ACCOUNT DETAILS .................................................................................. 34 HOW TO ADD CURRENT BUDGET PERIOD................................................................................. 35 HOW TO ADD CASH BALANCE ................................................................................................ 35 HOW TO ADD CREDIT SLIPS................................................................................................... 35 HOW TO ADD DEBIT SLIPS..................................................................................................... 36 HELPDESK ......................................................................................................................... 37 HOW TO ADD ISSUE/PROBLEM DETAILS ................................................................................. 37 © 2012 Credo Infotech. All rights reserved Page 2 PREFACE Purpose of This Document This user manual aims to familiarize you with some of the tasks and processes of the MIS application. Intended Audience This document is intended for users at various RSETI’s, who are familiar with the basic tasks and terminology of the application. It will enable you to understand the details of some of the tasks that can be performed using MIS. © 2012 Credo Infotech. All rights reserved Page 3 1. Introduction RSETI MIS (Management Information System) has been designed and developed to help RSETIs maintain their training and candidate details. This will also help the sponsoring banks to track and monitor the performances of their RSETI’s. The MIS is an online application and can be accessed with Username and Password provided to the RSETIs and their controlling offices. 1.1 System Requirement Windows 2000, Windows XP, Windows Vista, or Windows 7 Latest Browsers (Internet Explorer, Google Chrome, Mozilla Firefox) Internet Connection with a minimum bandwidth of 256kbps This user manual covers some of the tasks that can be performed using RSETI MIS. 1.2 Getting Started / Navigate through MIS The MIS window includes standard Windows components. Of particular interest: The Header Bar displays the Logos of the Sponsoring Organizations. The Horizontal Toolbar contains the main menus of the tasks that performing the most common tasks. The Left Menu contains the sub menus of the Horizontal menu. The Main Window Area displays information about the activities and operations you are carrying out. © 2012 Credo Infotech. All rights reserved Page 4 1.3 Open How to Login in to the MIS Internet Browser (IE, Chrome, Firefox etc.) and Type http://www.rsetimis.org/ in the address bar to access the MIS. the URL The resultant screen will be as below. Now, use the username and password provided to your Institution to login to the system. Note: the Password is case sensitive. 1.4 Introduction of Buttons and Icons Add New Record Delete Record Edit Record View Record Home Button Sign out / Logout Button © 2012 Credo Infotech. All rights reserved Page 5 2. 2.1 Settings How to ADD USERS Select SETTINGS from the horizontal menu and then click on Users from the left menu and then selectUsers Listfrom the horizontal menu. Now, from the above screen click on to add more users. Now, from the below resultant screen select the type of user you want to create and also enter all the other relevant details in the fields and click on save. * indicates mandatory fields Edit User You will be able to Edit the user by clicking on the as shown below. Delete User You will be able to Delete the user by clicking on the as shown below. Note: Any details once deleted cannot be reverted back. © 2012 Credo Infotech. All rights reserved Page 6 2.2 How to UPDATE INFRASTRUCTURE Details: Select SETTINGS from the horizontal menu and then click on Users from the left menu and then selectINFRASTRUCTUREfrom the horizontal menu. Now, from the above screen click on Edit to update infrastructure details. The edit screen will be activated only after clicking the Edit link. Update the relevant details and click on Save. 2.3 How to Add Director/Faculty Training Details © 2012 Credo Infotech. All rights reserved Page 7 Select SETTINGS from the horizontal menu and then click on Users from the left menu and then select FACULTY TRAINING DETAILS from the horizontal menu. Before adding the training details kindly ensure the below. If you have already added the Director / Faculties you will be able to add their training details. Now, from the above screen click on Edit to update in training details. You will be able to delete the training details by clicking Delete link. Now you click on add Faculty training Details as shown below to add Training details of other Faculties in your institute. Now click Save to update the changes. © 2012 Credo Infotech. All rights reserved Page 8 2.4 How to ADD Employees Select SETTINGS from the horizontal menu and then click on Employees from the left menu. From the above screen click on Employees. as shown above to add more Now, in below screen enter all the fields with relevant information about the Employee and click on save. *indicates mandatory fields Edit Employee You will be able to Edit the Employee by clicking on the as shown below. Delete Employee You will be able to Delete the Employee by clicking on the as shown below. Note: Any details once deleted cannot be reverted back. © 2012 Credo Infotech. All rights reserved Page 9 3. 3.1 Activities How to ADD In house Training Programs Select Activities from the horizontal menu and then click on Inhouse Programs from the left menu. From the above screen click on above to add more Inhouse Programs. as shown Now, in below screen enter all the fields with relevant information about the Program and click on save. Note: The fields here are inter related, when you select an option from the dropdown the next drop down will appear based on your previous selection. In case you do not find EDP Code, please click the Click to view EDP Code link as shown below. This view EDP code link will visible only after choosing Program type. Please make sure Program Type is selected. Once you click on Click to view EDP Code link, you will see a pop up as shown below. © 2012 Credo Infotech. All rights reserved Page 10 Description is not mandatory, however in case you wish to add any relevant information about the program it can be added here. The Batch Number is usually auto generated; however it can be edited before saving the program. The Sponsor name is pulled from list of sponsors you have created through the Settings menu. The Total Trainees field will allow you to enter the number of trainees in that particular training. This will freeze the No of trainees to this number and will not allow more trainees to be added when adding trainees. The Start Date and End Date are calendar fields; when you click on these fields a calendar will appear from which you need to make a selection. As shown below. * indicates mandatory fields 3.2 How to ADD Candidate/Trainee in to a Training Program © 2012 Credo Infotech. All rights reserved Page 11 Once you have added / created a New Training Program, you will be able to View or ADD more candidates to the Training Program by clicking on either View or ADD as shown in the above picture. Clicking on ADD as shown in the above picture it will direct you to the screen as shown below where you can enter information of a candidate and click on Save to save the candidate; clicking on Save & Add More will save the candidate information and also bring in a new application to add new candidate. © 2012 Credo Infotech. All rights reserved Page 12 View Candidate list of a particular training prog ram . Clicking on View will bring the list of all the candidates in that particular training program. As shown in the below picture. You can go back to the Program list page by clicking on the BACK button as shown below. Further, from the above screen you will be able to View, Edit or Delete candidate information. View Candidate information Click on as shown in the above picture to view the detailed information about the Candidate / Trainee as shown in the below picture. © 2012 Credo Infotech. All rights reserved Page 13 Edit Candidate information By clicking the as shown in the above screen the candidate / trainee screen will be displayed in the edit mode. 3.3 How to add candidate photo using webcam: From the Candidate Add / Edit page click on Take Photo from Webcam link A pop up will appear as shown below, Now click on Allow and the web camera will be activated. As show below, now click on Take Photo button. © 2012 Credo Infotech. All rights reserved Page 14 A photo will appear as shown below; you can now click on Use this photo link or repeat the process by clicking on Take photo button until a desired photo is captured. Upon clicking of Use this Photo link you will be directed to the below screen. © 2012 Credo Infotech. All rights reserved Page 15 Now click on Save button at the bottom of the screen to save the photo on the candidate profile. 3.4 How to ADD Boarding details of a training program. Click on Activities>>Inhouse Programs to reach the list of programs and then click on ADD [Boarding Details] corresponding to the training program, as shown in the picture above. This will direct you to the screen as shown below. On this screen, you will need to first enter the rates of the respective items, viz,. Breakfast, Tea/Cofee, Lunch, Dinner, etc. as shown in the above picture. Then in the bottom part of the screen you will need to enter the no of Trainees /Candidate and No. of Guest Faculties that were available for Break Fast, Morning Tea, Lunch, Afternoon Tea and Dinner. Once entered click on save. For example: © 2012 Credo Infotech. All rights reserved Page 16 In a training program if there are 15 Trainees/Candidates and 2 guest faculties the entry would look like in the screen below. To enter subsequent day’s boarding information, Click on Settings>>Inhouse Programs to reach the list of programs and then click on ADD [Boarding Details] corresponding to the training program. Then click on Add Next Day button to add the next day and there is a Delete Last Day button to delete the last day information. As shown in the picture below. 3.5 How to ADD settlement to a Trainee after Follow up Select Activities>>Inhouse Programs and for a particular training program for which you want to add settlement details, click on View Candidates as shown in the picture below. Clicking on View will bring the list of all the candidates in that particular training program. As shown in the below picture. Now click on [Edit button] for the candidate that you wish to add settlement details. This will direct you to the edit page of candidate information. As shown in the picture below. © 2012 Credo Infotech. All rights reserved Page 17 Now, Click on Add Settlement as shown in the picture above to add settlement for a candidate. This will direct you to the screen below. You can also add settlement by following the below process Select Activities>>Inhouse Programs and for a particular training program for which you want to add settlement details, click on View Candidates as shown in the picture below. Clicking on View will bring the list of all the candidates in that particular training program. As shown in the below picture. © 2012 Credo Infotech. All rights reserved Page 18 Now, Click on Add Settlement as shown in the picture above to add settlement for a candidate.. Note: The status selection plays a very important role. Below are the different statuses you can select. 1. Not Visited: This status is selected by default and remains until changed. 2. Settled - Service: The candidate has joined a wage employment / job, has no interest in Self-employment / Business. 3. In progress – Apprentice: The candidate has joined as Apprentice/Trainee to gain some experience and will start business after some time. 4. Settled: Select this status only after the candidate is settled; once this status is selected and saved you will not be able to change it or add more details to settlement page. 5. In Progress: Select this status when the candidate is in the process of setting up his project/business. When this status is selected you will be able to change it later and add more details to the settlement page. 6. No Progress: Select this status when the candidate is not sure of setting up his project/business, however may setup something in 3-6 months. When this status is selected you will be able to change it later and add more details to the settlement page. 7. Wasted: Select this status when the candidate is sure of not setting up a project / business of his own. When this status is selected you will not be able to change it later and add more details to the settlement page. 3.6 How to add Candidate Feedback: Click on Activities on the Horizontal Menu and then click on Inhouse Program on the left menu then click on View corresponding to a program as shown below. © 2012 Credo Infotech. All rights reserved Page 19 You will be directed to the below screen. Now you can select appropriate values from the dropdown to capture feedback of the trainees/candidates. After capturing the feedback click on Save as shown below. You can also add feedback for all the candidates and then click on Save All button as shown below © 2012 Credo Infotech. All rights reserved Page 20 3.7 How to add LAC meeting Details: Click on Activities on the Horizontal Menu and then click on LAC meetings on the left menu as shown below. Then to add Meeting click on add as shown below. You will be directed to the below screen. Now u can add meeting details, first you select meeting date, name, and designation. For particular Meeting more than 1 person can be added by clicking on as shown below. Enter the name under the Name filed and select their designation from the dropdown. In case you want to delete a person then click on as shown in the above picture. And then fill all details click on save button as shown below © 2012 Credo Infotech. All rights reserved Page 21 The entered details after saving will be displayed as below. If you want edit details click on edit If you what delete records click on delete 3.8 as show below How to upload candidate Details from Excel sheet: Click on Activities on the Horizontal Menu and then click on Upload Excel Cand. on the left menu as shown below. You will be directed to the below screen. © 2012 Credo Infotech. All rights reserved Page 22 From the Batch No. dropdown choose a batch no to upload details. Once you choose the batch number, you will be prompted with the number of candidates that are required to be added in to this batch as shown below. Now click on browse to select the excel sheet, you will be directed to the below screen Browse and choose your excel sheet, then click on open. From the resulting screen select Upload as shown below. You can also click on cancel if you wish to discard the changes and select a new file. If the excel sheet contains any any blank column or Row (only Mandatory fields, Marked in RED) an error message is shown as below © 2012 Credo Infotech. All rights reserved Page 23 Error message contains the details of the column and row that are blank; you can correct these and upload the file again. If your excel sheet are clear of all the errors and the candidates will be uploaded and Upload successful message will be displayed as shown below Note: if you choose batch no it shows required records (Ex.22 records required) the excel sheet must have only 22 rows filled (excluding column name row), else the system will not allow the upload. 3.9 How to upload candidate Settlement Details from Excel sheet: Click on Activities on the Horizontal Menu and then click on Upload Settlement Excel. From the left menu as shown below You will be directed to the below screen. Read instructions marked in Red. Then choose batch no as shown below. © 2012 Credo Infotech. All rights reserved Page 24 After selection of a batch a link to download an excel sheet will appear as shown below. Download Excel Template (Batch No:5) Now click on Download Excel Template (Batch No:5) link. You will be directed to the below screen. Now select Save File and click on ok button as shown below Now that you have downloaded the excel template. Go to your local folder and open the downloaded file. In this file columns for Batch no, candidate Id, candidate name and roll No’s already filled don’t change these columns and excel File name as shown below. © 2012 Credo Infotech. All rights reserved Page 25 Now you can fill candidate settlements details in this excel. Columns that are marked Red are mandatory fields. Go to Upload Settlement Excel in our application click on Browse button as shown below. Browse and choose your excel sheet, then click on open. From the resulting screen select Upload as shown below. You can also click on cancel if you wish to discard the changes and select a new file. If the excel sheet contains any blank column or Row (only Mandatory fields, Marked in RED) an error message is shown as below In case of error, make changes accordingly and try to upload the file again. If your excel sheet are clear of all the errors then the candidates will be uploaded and Upload successful message will be displayed as shown below © 2012 Credo Infotech. All rights reserved Page 26 Note: if you select upload button make sure batch no is selected else the system will not allow the upload. 3.10 How to ADD Prospective Candidates Select Activities from the horizontal menu and then click on Prospective Candidates from the left menu. From the above screen click on Prospective Candidates. as shown above to add more Clicking on ADD as shown in the above picture it will direct you to the screen as shown below where you can enter information of a prospective candidate and click on Save to save the prospective candidate; clicking on Save & Add More will save the prospective candidate information and also bring in a new application to add new prospective candidate. © 2012 Credo Infotech. All rights reserved Page 27 Edit prospective Candidate information By clicking the as shown in the above screen the candidate / trainee screen will be displayed in the edit mode. 3.11 How to Add Candidates from prospective candidates: Select Activities from the horizontal menu and then click on Training/Inhouse Programs from the left menu. From the above screen, click on to add from Prospective Candidates List. Clicking on ADD as shown in the above picture, this will direct you to the screen as shown below. If you want to search candidates, you can use search prospective candidates as shown below. © 2012 Credo Infotech. All rights reserved Page 28 After searching you can select the candidates by selecting check box in the list as shown below After selecting candidates click on Add button as shown below. The selected candidates will be moved to the program. 3.12 How to ADD TRAINING COST In this section you will be able to maintain a record of all the training cost reimbursements/refunds from various organizations. FROM MORD: Select Activities from the horizontal menu and then click on Training Cost from the left menu and then select FROM MORD from the horizontal menu, as shown in the picture above. Now, from the resultant screen show below; the lists of programs conducted are shown (Note: Program should have at least 1 BPL candidate to be shown in this list). Here the maximum refund amount that can be claimed is automatically calculated and shown. © 2012 Credo Infotech. All rights reserved Page 29 From the above screen you have to enter Trng.cost, this will serve as a reference in future. Once the documents are ratified and submitted to the respective agency for refund you can change status by selecting Submitted for Refund as shown below. Once the record is saved the status will be shown as shown in the below screen. Once you have received the funds, you can come back and change the status to refund received as shown below. After updating the status, it will be shown as below. FROM OTHERS: © 2012 Credo Infotech. All rights reserved Page 30 Select Activities from the horizontal menu and then click on Training Cost from the left menu and then select FROM OTHER from the horizontal menu. Now, from the above screen click on to add a records. Now, from the below resultant screen select the batch no for which you want to record to training cost and refund details and all the other relevant details in the fields and click on save. * indicates mandatory fields Now, you will be directed to a screen as shown below. If you want to edit details click on edit button as shown above. You can also update any reference document by clicking on the button 3.13 . How to ADD Annual Action Plan © 2012 Credo Infotech. All rights reserved Page 31 Select Activities from the horizontal menu and then click on Annual Action Plan from the left menu as shown above. Now, from the above screen choose Financial year to add annual action plan, after choosing the financial year it will show as shown as below. Above screen shows program subtype, click on respective add below to add the planned program. button as shown Upon clicking the button you will be directed to the below screen. Now, in below screen enter all the fields with relevant information about the Annual Action Plan and click on save if you want to close click on close. Now, you will be directed to a screen as shown above. © 2012 Credo Infotech. All rights reserved Page 32 You will be able to Edit the plan by clicking on the the and Delete the plan by clicking on as shown above. Repeat the process for all the other EDPs. Note: Any details once deleted cannot be reverted back. © 2012 Credo Infotech. All rights reserved Page 33 4. Accounts This is a basic accounting module that has been provided as add on to the MIS. Below are some of the operations that can be handled in this module. 4.1 How to add Bank Account Details Click on Accounts on the Horizontal Menu and then click on Bank A/C on the left menu. You will be directed to a screen as shown above. Then Click on to add more Bank Accounts. You will be directed to the below screen. Enter all the relevant details and click on Save. * indicates mandatory fields Once the Bank account has been created, you will be directed to the Bank Account list page as shown below. Now click on Add/Edit Balance, to add or edit opening balance of a particular bank account. Upon clicking of Add/Edit Balance you will be directed to a page as shown below. Now click on to arrive at the below screen. Now select the year and enter the amount and click on save. © 2012 Credo Infotech. All rights reserved Page 34 4.2 How to add current Budget period Click on Accounts on the Horizontal Menu and then click on Bank A/C on the left menu. You will be directed to a screen as shown below. Now click on to add/edit the Current Budget Period. 4.3 How to Add Cash Balance Click on Accounts on the Horizontal Menu and then click on Cash Balance on the left menu. You will be directed to a screen as shown below. Now click on to add/edit the Cash Balance. 4.4 How to Add Credit Slips Click on Accounts on the Horizontal Menu and then click on Credit Slip on the left menu. You will be directed to a screen as shown below. Now click on to add Credit Slip. Upon clicking you will be directed to the below screen where you will be able to enter the details of the credit slip. Search for Credit Slips © 2012 Credo Infotech. All rights reserved Page 35 You will be able to search for Credit slips of a particular date range. By selecting the date and clicking on Search. This action will get all the credit slips of a parti cular date range you have selected. 4.5 How to Add Debit Slips Click on Accounts on the Horizontal Menu and then click on Debit Slip on the left menu. You will be directed to a screen as shown below. Now click on to add Debit Slip. Upon clicking you will be directed to the below screen where you will be able to enter the details of the debit slip. Once you have entered and selected the relevant items, click on Save. Search for Debit Slips You will be able to search for Debit slips of a particular d ate range. By selecting the date and clicking on Search. This action will get all the Debit slips of a particular date range you have selected. © 2012 Credo Infotech. All rights reserved Page 36 5. Helpdesk Using this feature you will be able to report any issue that you are facing or you can also submit any suggestion to improve RSETI MIS software. Your queries will be responded by the RSETI Support team. 5.1 How to add Issue/Problem Details Click on Helpdesk on the Horizontal Menu and then click on Issue/Problem on the left menu. You will be directed to a screen as shown above. Then Click on to add more Issue/problem. You will be directed to the below screen. Enter all the relevant details and click on Save. You can also capture the screen shot and attach the file as a reference to the issue. Steps on how to take a screen shot can be viewed by clicking on How to take screen shot link * indicates mandatory fields Once the Issue/Problem has been created, you will be directed to the Issue/Problem list page as shown below. Now click on Issue Subject/Description, to see reply messages from Rseti Support team. Upon clicking of Issue Subject/Description you will be directed to a page as shown below. © 2012 Credo Infotech. All rights reserved Page 37 If RSETI Support Team has responded to your query it will be shown as below. If you want to further discuss or have queries on the same issue type your message using the Reply box as shown as below. © 2012 Credo Infotech. All rights reserved Page 38 © 2012 Credo Infotech. All rights reserved Page 39