1
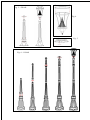
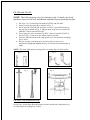
SOLAR LAMP POST
US Patent # 7172307
Instruction Manual
Models: GS-94L, GS-94S
GS-94D, GS-94T, GS-94W, GS-94P,
GS-94F
.
Please read the instruction manual carefully to obtain the best results from your
purchase.
Unpack and identify the following components.
Parts: GS-94L
Parts: GS-94S
Parts: GS-94D
Parts: GS-94T
K
Parts: GS-94P
Parts: GS-94
GS-94F
Tools that needed but not supplied with the high post solar lamp set are: a screw
driver, a wrench and an electrical drill that will be used to anchor the lamp base to the
ground.
Solar Light Location
It’s important to mount your solar lamp post in a spot where it will receive maximum
sunlight throughout the day. Shadows cast by your home; trees and other structures
will move and lengthen during the day. So please consider this before deciding on a
location.
Assembly Instructions
GS-94L and GS-94S
NOTE: The following steps are for reference only. Consult your local
hardware store for the best installation method for your particular surface.
1. Use the electrical drill to make three holes in concrete floor, which
shall be similar to but smaller than the screws (G). The holes shall be
lined up with the holes of the lamp base (F).
2. Put the fastening screws (G) into the holes with their ends facing up
(Fig. 1-2).
3. Secure the screws to the lamp base using a wrench.
4. Make sure the lamp base (F) is stable before installing Part (D) to the
lamp base by using 3 supplied screws.
5. GS-94L: Then screw part (A) into part (B) and part (B) to Part (D).
(Fig 3).
6. GS-94S: Then screw part (A) into Part (H), part (H) to part (B), part (B)
to part (C), part (C) to part (D). (Fig. 4).
7. Turn the On/Off switch in the lamp head (A) to ON position according
Fig. 4 and 5.
8. Be sure to place your lamp post in a spot where it can receive
maximum sunlight throughout the day. It will turn on automatically at
night.
NOTE: The solar light must be charged for two sunny days for best results.
Fig. 1
Fig. 2
GS-94S
GS-94L
Fig. 3 – GS-94L
Fig. 4
Fig. 5
Fig. 4 – GS-94S
GS-94D and GS-94T
NOTE: The following steps are for reference only. Consult your local
hardware store for the best installation method foryour particular surface.
1. Do steps 1 to 5 as described in models GS-94L and GS-94D.
2. Insert part (K) into part (B) as shown in Fig. 5.
3. Screw part (D) into part (B) using the screws (C) provided and screw
the top cup as shown in Fig. 6 . Repeat these steps twice in model GS94D and 3 times in model GS-94T.
4. Screw part (A) twice in model GS-94D, 3 times in model GS-94T as
shown in Fig. 7, and screw the whole top into part (B).
5. Turn the On/Off switch in the lamp head (A) to ON position according
Fig. 4 and 5.
6. Be sure to place your lamp post in a spot where it can receive
maximum sunlight throughout the day. It will turn on automatically at
night.
NOTE: The solar light must be charged for two sunny days for best results.
Fig. 5
Fig. 6
Fig. 7
Fig. 8
GS-94W, GS-94P and GS-94F
Screw part (A) into Part (B) and turn the On/Off switch in the lamp head (A)
to ON position according Fig. 4 and 5.
Be Sure to place your lamp post in a spot where it can receive
maximum sunlight throughout the day. It will turn on automatically at night.
Replacing the Batteries
(After several years of use, the batteries may need replacing)
1. Detach the top of the lamp unit (A) by releasing the 2 screws and
twisting it counter-clockwise (as shown in Fig. 8).
2. Make sure the selector switch is in “OFF” position.
3. Releasing the 3 screws on the silver reflector and Remove the old
Batteries. Make sure the new batteries are high
quality Ni-Mh AA rechargeable pack batteries.
4. Install the new batteries into the battery compartment,
ensuring the correct polarity is observed.
5. Reassemble the unit by reversing the above procedure.
WARNING: Do not dispose of Ni-Mh batteries in the regular trash, municipal waste
stream or by fire as batteries may leak or explode. Do not open, short circuit, or
mutilate batteries as injury may occur. Preserve our environment by recycling Ni-Mh
batteries or disposing of them in accordance with local, State and federal regulations.
Do not mix old and new batteries. Do not mix Alkaline, Standard (Carbon-Zinc) or
rechargeable (Nickel Cadmium) batteries.
Maintenance
Clean the solar module regularly with a damp towel to guarantee optimum
performance of the solar panel. Do not use any type of solvent for cleaning and be
careful not to put too much pressure on the module while cleaning.
Trouble Shooting
If your solar charged light does not come on at dusk despite observance of all the
instructions, please try the following steps:
1. Make sure that the solar light is not being affected by any other light
source.
2. Ensure the solar light is not positioned in the shade during the day.
3. Make sure the switch is in “AUTO” position.
4. Check that the batteries are installed correctly.
NOTE: The performance of the solar light will vary with the time of year. It will
deliver more light when it has had a full day in the sun rather than a day in overcast
weather.
WINTERTIME TIPS: Keep snow and debris cleaned off the solar panels so the
batteries can recharge. If the lights are covered with snow for an extended period of
time, after the snow melts, allow all the batteries to charge in full, direct sunlight for
at least 6 hours to their maximum capacity.
WARNING: Please keep out of reach of children.