1
1
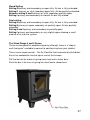
Congratulations on your purchase of a Chesney’s stove.
Please note that it is a legal requirement under England and Wales
Building Regulations that the installation of the stove is either carried out
under Local Authority Building Control approval or is installed by a
Competent Person registered with a Government Approved Competent
Persons Scheme. HETAS Ltd operate such a scheme. Further information
can be found at www.hetas.co.uk
This appliance will become hot whilst in operation. It is recommended that
a suitable guard be used for the protection of young children, the elderly or
infirm.
The Chesney’s range of stoves are all CE approved.
This stove must not be adapted or modified in any way.
All Chesney’s stoves have been approved by HETAS as intermittent
operating appliances
Chesney’s stoves are now all DEFRA exempt appliances that can be used
in Smoke Control Zones only when the Smoke Tab is removed and
installed in accordance with the current Building Regulations. The complete
list is available at www.hetas.co.uk/manufacturer/defra-exemption
Activation of the warranty is completed by returning the
warranty form to Chesney’s or filling out the online
registration at
www.chesneys.co.uk/warranty/registration.asp
2
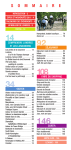
Contents
Section
Page
1
Technical Specifications and Dimensions
4
2
Distance to Combustibles
10
3
Pre Installation
11
4
Installation
13
5
Converting Top to Rear Exit
14
6
Smoke Control
15
7
Apollo 4 & 8 Installation
17
8
Door Seal Replacement & Door Handles
19
9
Commissioning
20
10
The Curing Process
23
11
Stove Paint Application Instructions
24
12
First Lighting & Operation
25
13
Maintenance
31
Dealer & Installer Details
33
Annual Service Record
34
Warranty Registration
35
Appendix
3
1. Technical Specifications and Dimensions
Wood Burning 4 Series
Parameter
Nominal heat output
kW
Mean CO emission (at 13 % 02)
Mean flue Gas temperature
oC
Flue gas mass flow
g/s
Total efficiency
%
Refuelling
mins
Test fuel wood
kg
Fuel size: 2 x logs mm
at 13-14 % moisture
Maximum hearth temp
oC
Beaumont
Belgravia
Shoreditch
Salisbury
4.6
0.76
167
3.2
84.0
45
1
300 x
130 dia
38.1
Apollo
Alpine
Milan
4.5
0.68
200
3.5
82
60
1
300 x
130 dia
N/A
4.6
0.76
262
3.6
80
45
1
300 x
130 dia
33
4.6
0.37
262
3.6
80
60
1.38
300 x
130 dia
55
Dimensions / Weight
Refer to Figure one on page 8
Beaumont
Belgravia
Shoreditch
Shoreditch LS
Shoreditch XLS
Salisbury
Alpine
Milan
Apollo
A
B
C
D
E
mm
mm
mm
mm
mm
552
456
108
408
305
552
456
108
408
305
543
398
108
408
294
687
398
108
552
294
787
398
108
652
294
534
402
108
408
335
586
410
110
442
308
750
448
155
580
340
Fire Cube size 409 w x 550 h x 320 d
Weight
kg
73
73
78
88
104
72
74
78
69
Note: Flue diameter 130mm
Flue Draught at nominal output is 12 Pascal (closed door)
4
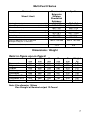
Wood Burning 5 Series
Parameter
Nominal heat output
kW
Mean CO emission (at 13 % 02)
Mean flue Gas temperature oC
Flue gas mass flow
g/s
Total efficiency
%
Refuelling
mins
Test fuel wood
kg
Fuel size: 2 x logs mm
at 13-14 % moisture
Maximum hearth temp
oC
Salisbury
4.9
0.23
211
3.6
84.5
50
1
300 x
150 dia
50
Beaumont
4.9
0.23
211
3.6
84.5
50
1
300 x
150 dia
50
Shoreditch
4.9
0.23
211
3.6
84.5
50
1
300 x
150 dia
50
Dimensions / Weight
Refer to Figure one on Page 8
Salisbury
Shoreditch
A
mm
534
543
B
mm
482
478
C
mm
108
108
D
mm
408
408
E
mm
335
294
Weight
kg
79
84
Note: Flue diameter 130mm
Flue Draught at nominal output 12 Pascal (closed door)
5
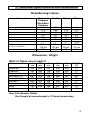
Multi-Fuel 6 Series
Parameters
Wood / Ancit
Nominal heat output
Mean CO emission
kW
(at 13 % 02)
Mean flue Gas temperature
oC
Flue gas mass flow
g/s
Total efficiency
%
Refuelling
mins
Test fuel wood / ancit
Kg
Fuel 2 x logs mm 13-14 % moisture
Ancit per 2.1kg 2.3 % moisture
Maximum hearth temp
oC
Beaumont
Belgravia
Shoreditch
Salisbury
Shipton
7.0 / 6.0
0.34 / 0.37
265 / 199
3.7 / 4.1
85.1 / 80.4
45 / 150
1.5 / 2.1
300 x 150
dia
56.1
Alpine
Milan
6.2 / 6.0
0.34 /
0.37
324 / 294
5.4 / 4.1
85.1 / 80
45 / 150
1.5 / 2.1
300 x 150
dia
56
6.2 / 6.7
0.3 / 0.23
324 / 294
5.4 / 3.7
85.1 / 80.4
60 / 60
2.09 / 2.1
300 x 150
dia
55 to log store
Dimensions / Weight
Refer to Figure one on Page 8
Beaumont
Belgravia
Shoreditch
Shoreditch LS
Shoreditch XLS
Salisbury
Shipton
Alpine
Milan
A
mm
704
704
685
803
903
653
634
686
920
B
mm
522
522
448
448
448
450
488
460
525
C
mm
155
155
155
155
155
155
155
140
195
D
mm
541
541
531
648
748
505
480
523
740
E
mm
395
395
393
393
393
440
395
386
472
Weight
kg
128
120
120
132
139
123
131
125
127
Note:
Milan and Shoreditch LS and XLS can be installed with skirting
boards 50mm from rear of the stove to a maximum height of 200mm
Flue diameter 150mm
Flue Draught at Nominal output 12 Pascal (closed door)
6
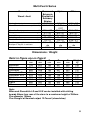
Multi-Fuel 8 Series
Parameters
Wood / Ancit
Nominal heat output
Mean CO emission
Mean flue Gas temperature
Flue gas mass flow
Total efficiency
Refuelling
Test fuel wood /ancit
Fuel 3 x logs mm 13-14 % moisture
Ancit per 2.5kg 2.3 % moisture
Maximum hearth temp
kW
(at 13 % 02)
oC
g/s
%
mins
kg
oC
Beaumont
Belgravia
Shipton
Shoreditch
Salisbury
8.3 / 8.5
0.23 /0.19
360 / 331
6.0 / 6.0
76.7/75.1
60 / 120
2.5 / 2.5
360 x 150 dia
Apollo
10.2 / 8.1
0.70 / 0.18
328 / 319
5.3 / 4.2
78.7 /79.9
45 / 60
2.5 / 2.5
360 x 150 dia
70.3
n/a
Dimensions / Weight
Refer to Figure one on Page 8
Beaumont
Belgravia
Shipton
Salisbury
Shoreditch
Shoreditch LS
Shoreditch XLS
Apollo
A
B
C
D
E
mm
mm
mm
mm
mm
704
642
155
538
395
704
626
155
538
389
634
608
155
480
379
653
570
155
505
428
685
568
155
531
378
803
568
155
650
378
903
568
155
750
378
Fire cube size 600 w x 616 h x 384 d
Weight
kg
148
148
151
143
155
172
180
124
Note: Flue diameter 150mm
Flue Draught at Nominal output 12 Pascal
7
Figure 1
Fitters notes:
8
Apollo 8 Dimensions
Apollo 4 Dimension
9
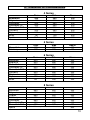
2. Distance to Combustibles
Beaumont
Belgravia
Shoreditch
Shoreditch LS
Shoreditch XLS
Salisbury
Alpine
Milan
Apollo
Rear
400
400
400
400
400
400
150
45
N/A
Shoreditch
Salisbury
Rear
380
380
Beaumont
Belgravia
Shoreditch
Shoreditch LS
Shoreditch XLS
Salisbury
Shipton
Alpine
Milan
Rear
500
500
500
500
500
500
500
450
45
Beaumont
Belgravia
Shipton
Salisbury
Shoreditch
Shoreditch LS
Shoreditch XLS
Apollo
Rear
650
650
650
650
650
650
650
4 Series
Side
350
350
350
350
350
350
100
125
100
5 Series
Side
320
320
6 Series
Side
650
650
650
650
650
650
650
350
200
8 Series
Side
600
600
600
600
600
600
600
Side 100mm up to 100mm from front face
Above
300
300
300
300
300
300
300
300
600
Above
450
450
Above
300
300
300
300
300
300
300
300
300
Above
400
400
400
400
400
400
400
600
10
3. Pre Installation
This appliance must be fitted in accordance with the current
Building Regulations and by an approved HETAS registered installer.
Note: This appliance is heavy and must be handled with care.
The appliance is supplied fully assembled for a top flue arrangement.
The lid, door and internal parts can all be removed to reduce the stove
weight during installation
The paint is soft and vulnerable to marking; refer to the maintenance
section.
Chesney’s stoves must be connected to a suitable chimney. Chesney’s
strongly recommend using a complete and compliant chimney lining
system.
Inside the stove you will find an Installation and user manual and a pair of
Chesney’s Gauntlets. The multi-fuel stoves also have an ash pan and tool.
Ventilation
Please refer to Document J section 2 (table 1) Outside Air Kits are
available please ask your stockist.
The installation of extract ventilation or other appliance that requires air for
combustion in the same area are not recommended and will effect this
appliance. Refer to page 12 Flue Requirements
Chesney’s recommend an appropriate spillage test be conducted with all
appliances post installation.
Air inlet grilles must be so positioned that they are not liable to blockage.
11
Carbon Monoxide
It is now a requirement for an electronic carbon monoxide detector
conforming to BS EN 50291 to be fitted in the room where the appliance
has been installed. This should be maintained and tested in accordance
with the manufactures instructions.
Flue Requirements
This appliance must not be used in a shared flue system.
The optimal flue draft is 12 pascals at nominal output. Minimum flue draft
required is 10 pascals.
Minimum flue height 5 meters.
The 150mm diameter flue models may be increased to 170mm diameter.
The 130mm diameter flue should be increased to 150mm. A 130mm flue
may be used when the stove is fitted in the smoke control mode, i.e.
Smoke Tab removed.
If appliance is fitted in an area that has another flue (mechanical or
otherwise) a flue interference test must be completed and recorded.
Hearths
All Chesneys freestanding wood and multi fuel stoves can be fitted on a
12mm hearth providing there is sufficient load-bearing capacity.
The inset Apollo’s must be fitted on a full constructional hearth.
Chesneys recommend a minimum distance in front of the stove that allows
the door to be opened fully and not overhanging the hearth. This is a
Chesneys recommendations only please refer to Document J Section 2 dia
26 & 27.
Milan 4 Passive.
The Milan 4 Passive has all the dimensions and characteristics of the Milan
4. It has been developed and tested for “air tight” houses.
When the Milan Passive is installed in accordance with these instructions
and with its dedicated outside air kit, it provides not only primary and
secondary air for combustion it also provides a “curtain of fresh air” into the
stove when the door is opened for up to 3 minutes. This “curtain of fresh
air” prevents harmful C02 entering the room.
12
4. Installation
In all cases the installation must comply with current Building
Regulations, Local Authority Byelaws.
It should be noted that the Building Regulations requirements may be met
by adopting the relevant recommendations given in British Standards BS
8303, BS EN 15287-1:2010 as an alternative means to achieve an
equivalent level of performance to that obtained following the guidance
given in Approved Document J.
Therefore this appliance and installation must comply with the following
regulations:British Standards BS 8303. BS EN 15287-1:2010
Building Regulation Approved Document J for England and Wales
Building Regulations Part F for Scotland
Building Regulations/1997 Technical Guidance Approved
Document J-Heat Producing Appliances for the Republic of Ireland
Registered Body: HETAS (GB only) INFO (Ireland)
This appliance must be fitted by an approved installer or inspected and
signed off by a Building Control Officer. For a list of authorised installers
www.hetas.co.uk/nearest_member and follow the links or phone 0845 634
5626 and ask the HETAS team.
13
5. Converting Top to Rear Exit
The Apollo stoves cannot be rear exit. All other stoves can be converted
and are pre-assembled for a top exit. A blanking plate is available please
contact your local stockists.
To Convert the Appliance to Rear Exit:
1) Remove lid.
2) Undo the two flue collar retaining bolts and lift collar off.
3) Remove the rear convector panel by undoing the four hexagonal
bolts and knock out the pre cut panel.
4) Undo blanking plate retaining bolts and remove from rear of stove.
5) Place flue collar onto rear of stove ensuring seal is intact and
seated correctly and secure with the two bolts.
6) Replace rear convector panel with the hexagonal bolts.
7) Place blanking plate from rear of stove into the top of the stove
ensuring seal is intact and seated correctly securing with 2 bolts.
8) Replace lid with the decorative blank.
To convert the Alpine to Rear Exit:
The fire cube will need to be removed from the Alpine cladding.
1) Remove door by opening and taking the weight whilst undoing
the hexagonal bolts that hold the hinges in place, the door is
cast iron and therefore heavy.
2) Look under the fire box and you will see 8 bolts. 4 are holding
the fire box to the cladding and 4 are levelling bolts (these can
be adjusted to line up the fire cube and door to the cladding).
Undo the 4 x retaining bolts.
3) Remove both baffles and undo the flue collar retaining bolts.
Push the flue collar up and twist, it will be held on by two lugs.
4) Remove the rear convector panel by undoing the four
hexagonal bolts.
5) Lift the fire cube out of the cladding from the back.
6) Remove the flue collar from the cladding by twisting.
7) Remove the rear exit blanking plate and place in the top of the
fire cube ensuring the seal is intact and seated correctly.
8) Fit the flue collar to the rear exit ensuring the seal is intact and
seated correctly.
9) Knock out pre cut panel in rear convector panel.
10) Refit fire cube, loosely secure fire cube to the cladding using
the levelling bolts to line up fire cube with cladding. When in
position tighten the four securing bolts.
11) Replace door and rear convector panel and place decorative
blank on top of stove cladding.
14
6. Smoke Control
All Chesney’s stoves are DEFRA exempt appliances that can be used
in Smoke Control Zones.
The “Smoke Tab” is fitted on the underside of the fire cube on the left hand
side and must be removed with the retaining bolt and discarded.
The Milan and Shoreditch stoves have heat shields under the stove that will
have to be removed by undoing the four hexagonal bolts to reveal the
“Smoke Tab”. Always replace the heat shields.
Stove Operation in Smoke Control Zones
Make up fire as described page 28. Do not reduce the Air Flow Bar until the
kindling and logs are fully blackened, this may take 2-5 minutes (moisture
content and type of wood will dictate this) on lighting and on refuelling. You
must always refuel on a hot bed of ash. Do not over load the stove.
The quality of your fuel is of utmost importance.
Only burn HETAS approved wood logs and smokeless fuels (coals).
15
The Clean Air Act 1993 and Smoke Control Areas
Under the Clean Air Act local authorities may declare the whole or part of
the district of the authority to be a smoke control area. It is an offence to
emit smoke from a chimney of a building, from a furnace or from any fixed
boiler if located in a designated smoke control area. It is also an offence to
acquire an "unauthorised fuel" for use within a smoke control area unless it
is used in an "exempt" appliance ("exempted" from the controls which
generally apply in the smoke control area).
The Secretary of State for Environment, Food and Rural Affairs has powers
under the Act to authorise smokeless fuels or exempt appliances for use in
smoke control areas in England. In Scotland and Wales this power rests
with Ministers in the devolved administrations for those countries. Separate
legislation, the Clean Air (Northern Ireland) Order 1981, applies in Northern
Ireland. Therefore it is a requirement that fuels burnt or obtained for use in
smoke control areas have been "authorised" in Regulations and that
appliances used to burn solid fuel in those areas (other than "authorised"
fuels) have been exempted by an Order made and signed by the Secretary
of State or Minister in the devolved administrations.
The Smoke Control Tab MUST BE REMOVED for use in a smoke control
area.
Chesney’s range of Wood and Multi-Fuel stoves have been recommended
as suitable for use in smoke control areas when burning HETAS approved
wood logs and smokeless fuel only.
Further information on the requirements of the Clean Air Act can be found
here: http://smokecontrol.defra.gov.uk/
Your local authority is responsible for implementing the Clean Air Act 1993
including designation and supervision of smoke control areas and you can
contact them for details of Clean Air Act requirements
16
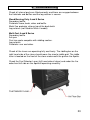
7. Apollo 4 and 8 Installation
The Apollo range of inset stoves have been designed to be installed in two
stages. The outer casing needs to be installed before the fire cube, and the
outer frame and door will need to be removed to install this appliance.
1) Remove all internal parts (baffles, side and rear bricks, solid
fuel grate and ash pan (8 series only).
2) Remove the frame which is secured with four hexagonal bolts
under the top edge circled below (figure 3).
3) To remove the door you must release the door retaining bar
before lifting off the hinges.
4) The flue collar retaining bolts are now visible; remove these
and the flue collar will drop down inside the fire cube.
5) Remove the fire cube retaining bolts (circled figure 2).
Figure 2
Figure 3
6) Remove the four transport bolts in the rear of the outer casing.
The fire cube can now be removed.
7) If in a Smoke Control Zone remove “Smoke Tab”
8) Instal the outer casing. There are eight available securing
points for the outer casing four in the base and four in the rear
a minimum of four points must be used.
17
Chimney Connection
1) Drop the liner through the outer casing and fix the flue
adaptor, then fit the flue collar to the adaptor bending the
adaptor lugs to secure the collar to the adaptor.
2) On the 8 series only there is an additional directional flue
collar that bolts to the inside of the outer casing. This will need
to be done at this stage.
Note: If connecting to an existing chimney you will need to make an
opening in the front face of the chimney breast above the outer casing to
make a compliant appropriate connection to the outer casing flue collar and
the existing flue.
3) Slide the fire cube back into the outer casing and fix in place
with two fixing bolts as previously illustrated.
4) Secure the flue collar inside the fire cube, ensuring a good
seal is achieved.
5) Replace all internal parts starting with the second baffle.
Hearth
The Apollo range must be installed on a full constructional hearth in
accordance with Building Regulations, Document J section 2 dia 26 & 27,
18
8. Door Seal Replacement and Door Handles
Always use gloves when handling ceramic rope.
Apollo and Milan
Remove door from the stove and remove rope seal clamps. Discard old
rope seal and replace with Chesney’s rope seal. Do not tighten rope seal
clamps until all bots are in and hand tight, then tighten all bolts.
Freestanding series stoves
Remove door and place face side down on a suitably protected table.
Remove old seal and clean the rope seal channel thoroughly with wire a
brush. Ensure the rope channel is clean and dust free.
Apply a continuous and even bead of glue in the channel. Place the new
ceramic rope onto the glue, being careful not to stretch or twist. Press the
rope firmly into the channel. Remove any excess glue.
Leave for 2-4 hours before refitting the door, allow 24 hours for the glue to
dry.
Door handles
The door handles and mechanism are designed to be adjustable so they
can be wound in or out to achieve a good seal between the door and the
stove body and to get more use from the rope seal. This configuration
means that the stove handle and mechanism are in two parts and are
secured using a grub screw. Throughout use the grub screw will require
tightening from time to time to ensure a firm connection. There is an allen
key supplied with the stove for this purpose. For appliances with the 90
degree handle configuration see notes on page 21.
19
9. Commissioning
Check all internal parts are fitted correctly and there are no gaps between
the firebricks and baffles and the log retainer is secure:
Wood Burning Only 4 and 5 Series
Secondary baffle.
Firebricks: base, back, sides and baffle.
Metal flue protector strip on top of the back brick
Log retainer (not fitted on Milan 4 model)
Multi-Fuel 6 and 8 Series
Secondary baffle
Ash pan
Cast iron grate complete with riddling section.
Log retainer.
Firebricks: rear and sides.
Check all the levers are operating fully and freely. The riddling bar on the
right hand side of the stove should move the circular riddle grid. The riddle
lever is located on the front of the stove underneath the grid on the Apollo.
Check the Fuel Selector Lever (left hand side of stove) and under the fire
cube front left side on the Apollo 8 operating smoothly.
20
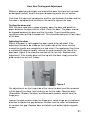
Door Seal Testing and Adjustment
Without a good sound airtight seal around the door the stove will not work
as designed and will lead to the glass blackening and a loss of control.
Over time the rope seal compresses and the seal between the door and the
fire cube is compromised resulting in the need to replace the rope.
Testing the door seal
With the stove cold take a piece of paper, open the door and place the
paper between the door and the stove. Close the door. The paper should
be trapped between the door and the fire cube. There should be some
resistance when pulling the paper out. This should be done on all four sides
of the door.
Adjusting the door
Where the paper is not trapped the door needs to be adjusted. If the
adjustment needs to be made on the handle side of the stove, wind or
unwind the handle one complete turn and retest. For appliances that have
a restricted 90 degree handle, release the grub screw on the side of the
door boss (figure 4) to allow the mechanism to turn fully. Replace after
adjustment. If the handle does not line up with the door simply screw the
grub screw in or out until it does.
Figure 4
For adjustments on the hinge side of the stove the door must be removed.
Lift the top off the stove, twist and rest on the fire cube. Open the door
(Shoreditch, Shipton, Salisbury and Beaumont models) and lift from the
hinge pins.
Loosen the grub screws under the hinge pins, rotate hinge pin in clockwise
direction to reduce the gap between the door and fire cube, anticlockwise
to increase the gap. Replace door and check seal before tightening grub
screws.
21
Apollo models
The frame and door retainer must be removed before the door can be
removed see Apollo information pages. Then rotate the hinge pin clockwise
or anticlockwise as described.
Alpine models
The door will have to be removed as described in the Converting Alpine to
rear exit section. Rotate hinge pin clockwise or anticlockwise as described.
Milan models
There is limited adjustment on this model. Slacken the hinge retaining bolts
that secure the hinge to the fire cube body. Now the door is free to move in
and out on the hinge about 2-3mm. Retighten and test door seal.
If you cannot achieve an airtight seal with these adjustment the rope seal
will need to be replaced.
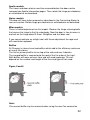
Baffles
All Chesney’s stoves have two baffles which add to the efficiency and ease
of use of the stoves.
The first or primary baffle sits on top of the side and rear firebricks.
The second baffle is secured onto the roof of the fire cube at the front.
Both baffles will wear out over time and will need replacing. This will
depend on the number and length of the fires and type of fuel used.
Figure 5 and 6
Note:
The second baffle may be removed when using the rear flue connection.
22
10. The Curing Process
Your Chesney’s stove has been designed to operate with minimum effort.
As with all wood burning and multi fuel stoves your new stove will need to
be ‘cured’ before commencing normal use.
For the first lighting of the stove after installation it is VERY IMPORTANT
that the door remains slightly ajar during the first firing. During the first firing
the paint finish goes through a curing process which will soften the paint
with the heat. As the stove cools down the paint will harden. This process
can take several firings, and will depend on the temperature achieved and
for how long the fire has been left to burn.
Leaving the door slightly ajar during the first firing will prevent the rope from
sticking to the softened paint during the curing process.
It is also very important the paint is not touched during this process. Due
to the newness of materials, the fire will give off an unpleasant odour for a
period of time after commissioning. This is quite normal as the paint cures
and will disappear after several uses once the stove has been operating at
its normal temperature for several hours.
Operate the appliance at a low output for the first few burns to allow the
curing of the materials. Avoid contact with the painted surfaces of the
appliance during the first periods of use. During this process use the
complimentary gauntlets carefully to avoid brushing the soft paint off the
door.
Keep the room well ventilated to avoid a build up of fumes.
Please note that the Ivory paint is more susceptible to marking and soot
transference and as a result Chesney’s cannot be held responsible for
marks made on the stove by the gauntlets or by other means. All paint
finishes are able to be touched up to a factory finish – please see notes on
paint application
23
11. Stove Paint Application Instructions
Chesney’s stove paint is quality, fast drying high temperature paint for use
on wood, multi-fuel and gas stoves and other steel and cast iron products
with in-service temperatures to 650°C. This product is not recommended
for Vitreous Enamelled surfaces. Stoves, as supplied by the manufacturer,
can be successfully repainted but problems can occur if painting the stove
for the third time. Here it is necessary to remove most of the first two coats
in order that the final paint thickness is not too great. If in doubt please
contact Chesney’s in advance of using this product for more information.
DIRECTIONS
Allow stove to go out and the surfaces to cool. Scrape off any loose paint.
Lightly sand any existing sound paint to provide key. Remove all dust, dirt,
rust and grease. It is essential that the surface is extremely clean. Protect
surrounding furnishings and carpet from spray mist. This aerosol is
designed to work at room temperature (20-25°C) and should be stored
inside for several hours prior to use. Before spraying, shake can vigorously
for 3 minutes after mixing ball rattles. This is especially important when
using light colours as these have more pigments to mix.
For best results the appliance also needs to have been stored in an
environment to room temperature (20-25°C) for several hours prior to the
painting process commencing. If painting steel flue sections then these will
also need to be pre-heated. Ensure work area is well ventilated and you
are not spraying near naked flames or any incandescent materials. Point
spray nozzle towards object. Hold can between 300-375mm (12”- 15”) from
surface to be painted. Press spray firmly. Use steady even strokes. Several
thin coats give a better finish than one heavy coat. Do not apply more paint
than is necessary. If clogging develops, remove spray nozzle with a
twisting motion and clean. Never stick pins or sharp objects
into the can. Gently replace spray nozzle with a twisting motion pointing
away from you. After use, invert can and spray for a few seconds until no
paint, only clear solvent, escapes. This will clean the tube and spray nozzle
and allow for easier future use. During the painting process, while drying
and for the first 3 times you use your appliance, open windows, doors and if
necessary use fans to provide a fresh airflow, as the paint will give off
fumes and smoke during the curing process. Cure Process: Use kindling
only on the first two fires which should burn for 15-20 minutes with the
second burn being started whilst the appliance is still warm. A full fire
should be burnt for 45 · 60 minutes, again starting while the appliance is
still warm, then allowed to cool naturally. Your paint should have now cured
and no longer give off fumes or smoke. These application instructions must
be followed strictly for successful application of Chesney’s stove paint and
the company can not be held responsible for incorrect storage, preparation,
application and usage.
24
12. First Lighting and Operation
Your Chesney’s stove has been designed and built to last, and provided
the instructions and guidance in this manual have been followed the
appliance will give you years of warmth and pleasure.
This appliance is not to be used as an incinerator. Only HETAS approved
wood logs and smokeless fuels are recommended by Chesneys for use in
this appliance.
This appliance is design to operate with the door closed, except for lighting
and reloading, failure to close the door during operation will result in fume
spillage.
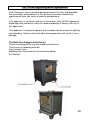
The Multi-Fuel Range 6 and 8 Series
These are designed for use with wood and solid fuel.
They have the following controls:
Fuel selector lever.
Riddling lever illustrated with the red arrow below
Air flow bar.
25
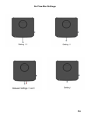
Air Flow Bar Settings
26
Wood Setting
Setting III primary and secondary air open fully. Air bar is fully extended.
Setting II primary air shut secondary open fully. Air bar partially extended.
Between setting II and I primary air shut secondary partially open.
Setting I primary and secondary air closed. Air bar fully closed.
Coal setting
Setting III primary and secondary air open fully. Air bar is fully extended.
Setting II primary air open secondary air partially open. Air bar partially
extended.
Setting II and I primary and secondary air partially open.
Setting I primary and secondary air very slightly open allowing a small
amount of air into the system.
The Wood Range 4 and 5 Series.
These are designed for wood burning only although, there is a “drop in
multi fuel-grate” available to convert to coal burning from your stockist.
There is one simple control - The Air Flow Bar that automatically distributes
the air for combustion into the top or rear of the furnace.
Pull the bar out for more air giving more heat and a faster burn.
Push the bar in for less air giving less heat and a slower burn.
27
Note
Before lighting please note the following points:
Chesneys stoves must only use HETAS approved wood fuels and
smokeless coal.
Do not use any liquid fuels.
Do not over load your stove.
Never empty the ash when the fire is alight.
Do not burn solid fuel and wood at the same time. Wood burns from the top
down, whereas solid fuel burns from the bottom up, therefore there is a
conflict of air supply for complete combustion of your fuel.
The fuel selector must always be either wood or solid fuel. Do not set half
way.
Always use the glove provided to operate the handle and controls.
This appliance will get very hot and fireguards must be used where
appropriate.
In case of a chimney fire close the stove door and push the Air Flow Bar
fully in and call the Emergency services.
Lighting
Open the door place a firelighter at the back of the furnace put 6-8 pieces
of kindling on top of the firelighter. Place 2 split logs on top of the kindling,
set the Air Flow Bar to setting III fully extended. Light the firelighter. If
condensation appears on the glass when the door is closed leave ajar and
it should clear in a minute or two. Do not leave stove unattended when door
is open.
The side and back bricks will go black, when they go clear about 12-20
minutes the fire can be turned down using the Air Flow Bar to the desired
setting (normally between setting I and II ). The quality of your fuel and
chimney draft will dictate your setting.
Refuelling on to a low fire bed
If there is insufficient burning material in the firebed to ignite fresh fuel,
excessive smoke emission can occur. Refuelling must be carried out on a
sufficient quantity of glowing embers and ash so that the fresh fuel charge
will ignite in a reasonable period. If there are too few embers in the fire bed,
add suitable kindling to prevent excessive smoke
Fuel overloading
The maximum amount of fuel specified in this manual (pages 4-7) should
not be exceeded, overloading can cause excess smoke.
28
Operation with door left open
Operation with the door open can cause excess smoke. The appliance
must not be operated with the appliance door left open except as directed
in the instructions.
Refuelling
Always refuel on a hot bed of ash.
Pull Air Flow Bar fully out to setting III. Slowly open the door with the glove
provided equalising the pressure inside the fire cube with the room (if you
open the door quickly ash will be lifted from the furnace into the room).
Place 2-3 logs bark side down onto a bed of hot ashes and close the door.
When the logs have fully turned black set Air Flow Bar to desired setting.
Solid Fuel
The grate should be cleaned out before every lighting using the riddle lever.
Set fuel selector to solid fuel (forward position).
Open door, place 2 firelighters at the back of the fire cube and place
approximately 1 – 1.5kg of solid fuel onto the firelighter and set the Air Flow
Bar to setting III fully extended. Light firelighter and close door, if
condensation appears on the glass when the door is closed leave ajar. Do
not leave stove unattended when the door is open.
The majority of air for combustion in the coal setting comes from under the
grate below the fuel. This action reduces the ability of the air wash system
and some blackening of the glass may occur.
When the solid fuel has an even glow over the fuel bed set Air Flow Bar to
desired setting.
29
Over-Firing
In the event of over firing the stove (flue collar, top of stove or log retainer
glowing red/orange) push the air control in fully (with gloves provided) this
will shut the appliance down. Over-firing will damage the stove and is not
covered under the warranty. Over-firing can be caused by: over filling the
appliance with fuel, burning on maximum setting for prolonged periods, or
with the use of non recommended fuels.
In the event of a chimney fire push the air control in fully to prevent air
getting to the fire and call the fire and rescue services. Do NOT use the
appliance or chimney until inspected by a registered installer/chimney
sweep.
If a fire is "uncontrollable" when the air control lever is in check and the
door is closed properly, allow the stove to cool and perform a paper test as
outlined on page 21.
This appliance is designed to radiate heat. Do not stand too close to the
appliance for prolonged periods of time, loose clothing, man made fibres
and soft furnishings are at particular risk of burning.
This appliance is not supplied with a fire guard, Chesney’s recommend the
use of a fire guard for the protection of children and others.
30
13. Maintenance
Guarantee
Your Chesneys stove comes with a 5 year guarantee on the stove body
and a 12 month warranty on the non consumable parts such as the door,
handle, hinges and air plates.
Consumable items such as fire bricks, baffles, glass, rope seal, ash pans
and grids are consumable items and are not covered by a warranty. These
items will deteriorate over time and will need replacing. The length of time
that these parts last will depend on the type of fuel used, and how hot and
long the stove is left to run. The firebricks, rope seal and primary baffles are
subjected to a huge amount of stress while the stove is under fire and will
appear stressed quite quickly and the bricks can sometimes crack. This
does not mean their integrity is compromised and they will have plenty of
life left in them.
This appliance must be serviced annually and the flue checked for
blockages annually and prior to relighting after a prolonged shut down
period.
To maintain the effectiveness and efficiency of your stove it should be
serviced or inspected annually by a competent person. This should entail
checking these consumable parts.
Door seal: still effective
Glass seal: still effective
Glass not cracked.
Fire Bricks: sound. Replace any that have cracks greater than 3mm
Baffles: not warped or distorted
Grates: not warped and functioning.
Log retainer not damaged or warped.
All controls free and smooth to operate.
The installation and flue connection should be checked and the chimney
swept annually.
Only genuine Chesneys replacement parts should be used and are
available from your local stockist.
To find your local stockist log on to: www.chesneys.co.uk/stockists.asp or
phone 0844 880 8375.
31
Cleaning
The body of the stove should be vacuumed with a brush attachment; any
marks should be wiped with a very lightly damp cloth.
The glass can be cleaned with damp newspaper dipped in the wood ash, or
use a proprietary glass cleaner, no abrasives should be used.
Always ensure the ash is cold before de ashing. On the 4 and 5 series
stoves lift out the log retainer and scoop out the ash from the base of the
fire cube. On the 6 and 8 series stoves carefully remove the ash pan from
under the grate using the ash pan tool provided and dispose ash in a
suitable receptacle. Replace the ash pan close the door and use the
riddling mechanism to drop the rest of the ash into the ash pan, open door
and remove the ash pan as before.
Useful Information
• Always use the glove provided when operating or refuelling.
• The better the quality of fuel you use the better the efficiency,
controllability and clean burn you will experience.
• Aim to get the stove and chimney up to normal operating
temperature as quickly as possible.
• Do not turn down the stove down too early.
• Fully blacken the logs before turning down.
• Always reload on a hot bed of ash.
• Let the ash build up when burning wood 25-35mm deep is ideal.
• Always clean out the grate when burning solid fuel (coal).
• The heat output will differ with different types of fuel.
• Cracks and splits do occur in the firebricks if they are less that
3mm in size, they should pose no problems.
• Atmospheric conditions do have an effect on your chimney and
subsequently the stove. Some of these conditions will cause your
stove to “blow back” into the room, or even prove difficult to light. If
these symptoms persist please contact you installer, who will be
able to advise if your flue arrangement needs to be reviewed or a
new specialised cowl installed.
• Over tightening the door can damage the rope seal and the handle
mechanism.
32
Dealer & Installers Details
Dealers Name and Contact Details
Date of Purchase
Installers Name and Contact Details
Date of Installation
HETAS Reg number
Notes:
Appropriate spillage test completed
yes
no
Flue draft test completed
yes
no
Pascal rating
Flue interference test completed and action taken:
Appliance Serial Number
33
Annual Service Record
Date
Company
Name
Signature
Notes:
34
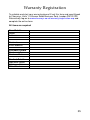
To validate and start your warranty please fill out this form and send it back
to Chesneys, Units 1-4 Zennor Road Business Park, London SW12 0PS.
Alternatively log on to www.chesneys.co.uk/warranty/registration.asp and
complete the online form.
All items are required
Your Details
Name
Address
Postcode
Email address
Purchase Details
Purchased From
Purchase Date
Product Details
Appliance Name
Appliance Colour
Serial Number
35