1
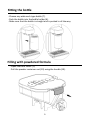
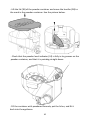
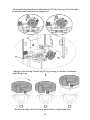
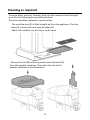
Baby meal brewer
User manual
Art.nr K1500186-040
www.mydiluo.se
Rev. P02, 2015-06-03
CONTENTS
IMPORTANT INFORMATION
DISPOSAL
OVERVIEW OF THE APPLIANCE
BEFORE USE
USING THE APPLIANCE
- Filling with water
- Fitting the bottle
- Filling with powdered formula
- Signals
MAKING THE FORMULA
CLEANING
- Daily cleaning
- Cleaning as required
- Descaling
TROUBLESHOOTING
TECHNICAL DATA
CONTACT
2
4
5
8
8
8
9
9
11
12
12
12
15
18
19
20
20
IMPORTANT INFORMATION
Default
setting
The appliance is delivered with a default setting for a formula amount
of 67.5 ml powder to 200 ml water. The pre-installed portion size is
240 ml for a whole portion and 120 ml for a half portion.
Settings
by app
The appliance can be set for the required formula using the app,
which can be downloaded from the App Store or Google Play. You
can also use the app to change the portion size.
Using the
appliance
The appliance is intended for use by adults only.
The appliance is only designed to make formula, and to dose water
for preparing baby porridge.
2
The appliance is not intended for usage on their own by children, nor
persons with reduced physical, mental or sensory capabilities, or lack
of experience/knowledge, unless they are supervised by a person
responsible for their safety or has been given necessary instructions
concerning use.
Children should be supervised to ensure that they do not play with
the appliance.
Damage
If the supply cable is damaged, do not operate the appliance.
A damage cable must be replaced by a Diluo approved service center.
The cable must not be folded, clamped or pulled along sharp edges,
nor placed at hot surfaces or in contact with chemicals.
Never immerse the appliance in water. Clean surfaces only with a soft
moist rag.
In the event of damage, fault or a suspected fault after knocking the
appliance over, immediately unplug the appliance from the wall socket. Never switch on a damaged appliance. Service and repairs may
only be carried out by an authorised service centre. If a fault is repaired incorrectly, the manufacturer accepts no liability for any damage that may occur.
Water
Diluo cannot be held responsible for the quality of the water. Use
only clean, fresh water.
Fire
In the event of a fire in the appliance, only a powder or CO2 extinguisher should be used.
Warranty If the user opens the appliance, the warranty is invalidated. The appliance should always be removed from the wall socket for service
and maintenance.
Lock
The appliance can be locked and unlocked by holding in the Full Portion and Cleaning buttons simultaneously. When locked, there is a
constant red light around the buttons.
3
Bottle
The appliance’s bottle holder is designed to hold the most common wide
-neck type bottles on the market. Should your bottle not fit, do not force
it into place.
The appliance is fitted with a sensor which senses when the bottle is in
place. If the bottle is not properly in place, formula making can only be
started locally.
Hot
surfaces
In a cleaning cycle, the water is heated to 70°C and washed out into the
bottle. Consequently, the bottle gets hotter than it normally would when
making formula. As children may be near the appliance during cleaning,
please bear in mind this higher temperature. Also when making formula
the water is heated to 70°C before being mixed with the colder water.
Therefore, please take care when making formula.
Storage
If the appliance will not be used for an extended period, run the cleaning
cycle and empty all the containers. The appliance should also be unplugged from the wall socket. The appliance should always be stored
above 0°C, whether or not the system is empty.
Transport When transporting the appliance, the original packaging should be used
to minimise the risk of damage caused by wrongful handling or external
circumstances.
Before first use after unpacking, loose parts such as the water container,
powder container and bottle should be cleaned. Read the cleaning
section for further instructions.
DISPOSAL
The product is marked according to EU Directive 2002/96/EC regarding
the disposal and recycling of waste which comprises electrical or electronic devices. The symbol below indicates that the appliance must not
be treated as household waste, but should be handed over to the applicable collection point for separate handling.
4
OVERVIEW OF THE APPLIANCE
5
6
7
BEFORE USE
- Place the appliance on a flat surface.
- Insert the plug (17) into an earthed wall socket.
- Switch the power on (16) on the back of the appliance.
- Fill with water – see ‘Filling with water’ under ‘Using the appliance’.
- Fill with powder – see ‘Filling with powdered formula’ under ‘Using
the appliance’.
- On first switching on the appliance or when the power has been cut
off, the appliance will need cleaning before you can make formula –
see the separate section entitled ‘Cleaning’.
USING THE APPLIANCE
Filling with water
- Remove the water container (2)
from the appliance by grabbing the
handle on the back of the container
and pulling it to one side.
- Fill the water container with fresh
water up to the maximum level
point.
- Replace the water container in the
appliance.
8
Fitting the bottle
- Choose any wide-neck type bottle (7).
- Push the bottle into the bottle holder (6).
- Make sure that the bottle is straight and is pushed in all the way.
Filling with powdered formula
- Open the front cover (1).
- Pull the powder container out (10) using the handle (19).
9
- Lift the lid (18) of the powder container and move the leveller (28) to
the mark in the powder container. See the picture below.
- Check that the powder level indicator (24) is fully in its grooves on the
powder container, and that it is pointing straight down.
- Fill the container with powdered formula, put the lid on, and fit it
back into the appliance.
10
Signals
The appliance has a signalling system for
different kinds of faults. Light signals (15)
behind the water container and in the
buttons (see the illustration, right) indicate as described below.
During use - A constant white light behind the
water container and on the selected
button indicates that the appliance is
working.
- A constant white light behind the
water container and on the selected
button indicates that the appliance is
working.
Filling
- A flashing red light behind the water
container indicates a low powder
level or no powder container.
- A flashing blue light behind the powder container indicates a low water
level or no water container.
- A constant red light behind the water container indicates that the front
cover is not closed or that the mixing
funnel is not fitted properly.
Cleaning
- The Cleaning button shows a constant orange light when the appliance
needs cleaning.
- The Cleaning button shows a flashing
orange light when the appliance
needs descaling.
11
MAKING THE FORMULA
- Choose a large enough bottle for the selected portion size.
- Make sure the bottle is properly fitted in the bottle holder.
- Press the button for the desired portion size to begin preparation, or
- Select the desired portion size and start preparation via the app.
- When the formula is ready there is a green light in the water container and the bottle can be removed.
When preparing baby porridge, place a larger vessel on the overflow
tray to collect the water. Otherwise the process is the same.
CLEANING
- Choose a bottle that can hold at least 300 ml.
- Make sure the bottle is properly fitted in the bottle holder.
- Hold the Cleaning button in for 3 seconds to activate cleaning.
- The appliance will run a cleaning cycle and show a green light in the
water container when finished.
- Remove the bottle, discard the wastewater and rinse.
- Replace the bottle.
Daily cleaning
To keep the appliance nice and fresh, it is important to clean it regularly. Follow the instructions below for daily cleaning.
- Removal of the powder container is the same as for filling with powdered formula (see page 9).
12
- Disconnect the outlet hose (13) from the mixing funnel (12).
- Remove the mixing funnel and impeller by pulling them straight out.
13
- Remove the mixing funnel attachment (22) by turning it to the right
to detach, and then pull it straight out.
- Remove the mixing funnel lid (21) by turning it counter clockwise
and lifting it up.
- Rinse and wipe clean all loose parts before replacing them.
14
Cleaning as required
To access other parts for cleaning, they must be removed from the appliance. Do this following the instructions below.
The parts should be replaced in reverse order.
- The overflow tray (9) is lifted straight up from the appliance. The tray
cover (8) is loose and can simply be taken off.
- Wash the overflow tray and cover up by hand.
- Remove the lid (18) and the powder level indicator (24)
from the powder container. Then wash the rest of the
powder container in the dishwasher.
15
- If further cleaning and dismantling is needed, loosen the powder outlet locking nut (20) and carefully pull it out of the powder container.
- Loosen the locking peg (26) which holds the stirrer (29) and leveller
(28) in place by squeezing the sides together and pushing down.
16
- Once the locking peg has been
loosened, the stirrer and leveller
can be lifted upwards.
- Loosen the dosage screw’s locking nut (25) by turning it counter clockwise.
17
- Remove the loose parts from the powder container.
Descaling
- Mix 15 grams of citric acid or acetic acid with 1 litre of water in the water container.
- Place a vessel that can take at least 1 litre under the appliance’s outlet.
- Hold the Cleaning button in for 10 seconds to start the descaling process.
- The appliance will run an automatic descaling cycle which takes about
30 minutes.
- Rinse the water container and fill it with fresh water.
- Run two cleaning cycles before using the appliance again.
18
TROUBLESHOOTING
Problem
Cause
Action
Switch on the power on
The power switch is not on. the back of the appliThe appliance does not
ance.
react.
Insert the plug into an
The appliance is not
plugged in.
earthed wall socket.
The appliance is indicating
that water or powder
needs refilling.
Check the water and
powder levels and try
again.
The bottle is not properly Check that the bottle is
fitted in the bottle holder, properly fitted and that
the front cover is not fully the front cover is fully
The appliance will not
closed.
closed.
make formula.
The mixing funnel is miss- Check that the mixing
ing or incorrectly fitted. funnel is properly fitted.
The appliance needs cleanRun a cleaning cycle and
ing before formula can be
try again.
made.
Check that the powder
container is correctly
The powder container or
fitted. Check that the
The front cover won’t
mixing funnel is incorrectly mixing funnel is properly
close.
fitted.
fitted and that the mixer
lid is turned to the
locked position.
Fill the powder containThe appliance indicates The powder container is
er with powdered forno powder container/ missing or the powder level mula and check that the
low powder level.
is too low.
indicator is properly
fitted.
*Troubleshooting continued on the next page
19
Remove the water container and refill it with
water if necessary.
The appliance indicates The water container is missCheck that the round
no water container/ ing or the water level is too
float is in place and can
low water level.
low.
move in its groove. Replace the water container in the appliance.
The formula is not the
right temperature.
The temperature setting
needs adjusting.
Adjust the temperature
using the app.
TECHNICAL DATA
Dimensions (w x h x d) (mm)
Weight (empty)
Water container volume
Powder container volume
Cable length
~
172 x 445 x 275
4.0 kg
1.8 l
0.8 l
1.2 m
220-240 V, 50-60Hz, 1800 W
All materials that come into contact with food meet European Parliament and Council Regulation 1935/2004.
CONTACT
Diluo i Karlstad AB
Pumpgatan 4
SE-652 21 Karlstad, Sweden
Tel: +46 (0)10-410 17 20
[email protected]
www.mydiluo.se
With reservation for clerical errors.
20