1
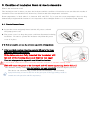
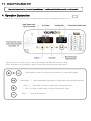
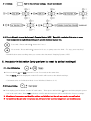
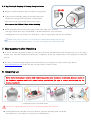
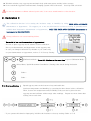
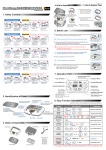
Safety Cautions Electrical hazards Setting Cautions Be careful the details below when you use. Be careful the details below when you use. Do not install in dusty or dirty environment. Risk of damage or fire within the incubator. Do not disassemble or modify the incubator in any way. Risk if electric shock or fire. Please ensure that no small objects get into the holes on the incubator. Risk of electric shock or fire. Cleaning Cautions Do not spray cleanser directly on the incubator surface. Risk of decoloration or crack. Clean the incubator by a soft cloth with a neutral detergent. Risk of decoloration or crack. If the incubator sounds strange or emits smoke contact your service center. Risk of electric shock or fire. Clean the incubator thoroughly before storing Dust can cause risk of electric shock or fire. If you drop the incubator or plastic case is damaged, contact to service center. Risk of electric shock or fire. Be sure to disconnect the electric cord from the outlet before cleaning. Do not use chemicals like wax,benzene, alcohol, thinner,aromatic, or Risk of electric shock or lubricant, etc. Risk of electric shock or fire. fire. Brush away dust on the plug with a dry cloth. For special cleaning of inner part per year, contact to the service center. If you don't clean the inside of incubator for a long time, dust can cause some trouble or a fire. Thanks for purchasing the RCom King SURO20 incubator. SURO is a name of ancient King in GimHae area who was born from an egg and he is revived as RCom Suro incubator based on experienced incubation technique and best quality management. The King SURO incubator is designed for easy and simple use but remember that the user's incubation knowledge and proper operation is very important for best incubation result. Therefore, be sure to read this user's manual carefully before you use this incubator. RCom King SURO offers optimum incubation conditions but users need to observe and manage all incubation conditions such as species of eggs, temperature and humidity. 1. Introduction Main controller Ventilation Control Lever View window Power cover Turning base Humidification Nipple Egg turning motor Frame Aluminum Rods-Insert fully into each side. If not fully inserted the Slip gear incubator will fall out of the turning base. Egg tray Automatic pumping system (sold separately) Divider View window Bottom body 2. Main Componentry Rated voltage and product serial number are marked inside of power cover. Be sure to check this before connecting power. Main controller Dividers View window Egg turning cradle Insert fully into each side. If not fully inserted the incubator will fall out of the turning base. Bottom body Power cord Evaporating Pad Egg tray Egg tray mat ※ Retain the carton and packing materials for storing the unit safely. ※ Operation Instructions for Automatic Pumping System (APS) – Separate sheet Pins – Qty 2 Automatic pumping system (APS) (may be sold separately) 3. Condition of Incubation Room & How to Assemble What is the incubation room? The incubation room is where you place the incubator and the condition of incubation room can effect the results of incubation. The room should be free from noise, vibration and wide temperature variations. Room temperature is ideal when it is between 66°F and 75°F. To be sure the room temperature does not drop dramatically at night and the incubator is not exposed to direct sunlight. (Refer to 6-3. Abnormal Temp. Alarm) 3-1. How to Connect Power ▶ Loosen the screw and gently insert both the AC power cord and APS pump power cord. ▶ The power cover is to keep the power cord from disconnection during incubation. Be sure to operate the incubator only when the power cover is in place. 3-2. How to Assemble and use the automatic egg cradle turning system ▶ Fully insert both aluminum tubes into each side (20 mm) of the frame and secure with provided 4 screws. If the tubes are not fully inserted the incubator will fall out of the turning base and destroy the eggs! Place and only operate the egg cradle on a flat and level surface. Do not FORCE TURN the incubator manually when the incubator is automatic turning cradle. (This will cause the gears to be destroyed and will cause egg turning device failure.) ※ The automatic turning cradle turns the incubator and eggs very slowly, about 90 degrees per hour. The device can sometimes slip a small amount intermittently – this is normal. Spray lubricating oil such as WD 40 on the gear part of the egg turning cradle to extend smooth operation and life expectancy. 3-3. Automatic Pumping System (APS) Operation instructions for Automatic Pumping System – Possibly supplied with some units or sold separately. 4. Operation Explanation ※ Quick Start: : If you connect power, incubator starts incubation with default setting on 4-1. ※ The first time you connect power a dot on the display will blink with a buzzer sound. ※ Press OK button to stop blinking. ( Buzzer sound will stop automatically after 30sec. ) Setting Mode: Press two buttons at the same time to enter Setting Mode. Select Menu / Quick Movement Cancellation / Setting value check during incubation Value + / APS Pump is forced to pump water if pressed for 5sec. / APS is forced to pump water for 2min. if pressed for 10sec. Value - / Factory Initialization 4-1. Settings How to Set your user settings. (follow chart below) 4-2. How to Manually turn on the Automatic Pumping System (APS) – Especially required at first setup to pump water completely through silicone tubing so it gets the incubator sponge wet. 5 seconds ( Press and hold + button for 5 sec.) 10 seconds ( Press and hold + button for 10 sec. to pump water for 2min.- To stop, press any key.) ※ Humidification starts working when you connect the Automatic Pumping System. (APS) 5. Incubator Initialization (only perform to reset to default settings) 5-1. User Initialization ▶ Press both the () and (OK) buttons for over 5 seconds at the same time. Then, " rSt AL " will be displayed on the LCD and it will revert to the default settings. ※ Calibrated value on Calibration Mode is not initialized. (Refer to 9-1.) 5-2. Factory Setting ▶ First unplug your incubator for the AC wall outlet. Then press and hold the () button and then plug the power cord in the wall outlet. Then, "rSt" will show on LCD and the incubator will be initialized to Factory settings. ※ All calibrated temperature and humidity settings are initialized and the unit may require new calibration! ※ To recalibrate the unit to be very precise you will need a very accurate temperature and humidity meter. 6. How to Begin Incubation 6-1 Egg Storage and Sterilization ▶ Store eggs in cool conditions and be sure to turn eggs every day if you need to store the eggs. Do not use eggs which are over 12 days old after being laid. Store eggs in about 60˚F to 72˚F room. ▶ Eggs which are extremely soiled, cracked, or mis-shaped are not good for incubation. ▶ Wash the surface of very soiled eggs with egg disinfectant if possible. 6-2.Temperature Management during Incubation [Default Setting : 37.5˚C or 99.5˚F] This artificial intelligence incubator controls the incubation by regulating the temperature & humidity conditions, ▶ Place the egg tray mat at the bottom of tray and stabilize the incubator temperature and humidity for about three hours before placing your eggs into the incubator. ▶ Properly space the eggs with the dividers so the eggs are not placed too close or too far apart. (see picture to right) ※ After hatching be sure to immediately clean and dry the egg tray mat before storage for next use. ▶ The embryo is very sensitive during the first week of incubation. Be careful the temperature does not fall too low during egg inspection. Temperature variation can highly affect the incubation results. Be sure to watch for power failures, abnormal high temperature alarms, abnormal and low temperature alarms. Periodical egg inspection after 8 days of incubation is helpful to remove infertile eggs. 6-3. Abnormal Temperature Alarm Function ▶ Abnormal High Temperature: If the incubator temperature is higher than setting temperature "HI" and current Temp. will be indicated by alternating display with buzzer sound. After the temperature returns to normal press (OK) button to remove buzzer sound. [Default Setting: + 3˚C] ▶ Abnormal Low Temperature : "LO" will be indicated on LCD. (Same as abnormal High Temp. explanation above – except for low Temp.) [Default Setting : - 2˚C] 6-4. Power Failure Alarm Function ▶ This function is for providing alarm for power failure or power outage during incubation. Temp. indication mark will blink. Press (OK) button to stop. (Buzzer sound will be removed automatically after 30sec.) 6-5.Humidity and Ventilation This artificial intelligence humidity control system memorizes and classifies ambient\ conditions for keeping optimum conditions of evaporating pad. So, humidity can move up slowly. During the first 4 hours of start-up the humidity pad may take a while to become sufficiently wet. The entire pad may never be fully wet, this is normal. ▶ It is important to keep the humidity high during hatching. During incubation the humidity should be kept 45~55% for waterfowl, 40~45% for poultry/chickens, and 35~45% for parrots. At the last stage of incubation (hatching period), the humidity should be kept over 65% for all species of birds. ▶ Do not open lid too often during hatching to keep humidity high. ▶ When the eggs start hatching open the ventilation control lever of main controller at least 1/3 more. Check water level every three days during incubation and refill when needed. It is best to use filtered water to avoid tubing clogs and evaporating pad damage. (New evaporating pads are available from www.KempsKoops.com in the USA) ※ Evaporating pads are replaceable Dew or water forms at bottom body because of temperature Differences between the outside and inside of the incubator. This is normal due to natural consequences. (Dew condensation) Place dry towel to absorb once a week if build-up is too much. ※ For more information of humidification system, refer to the APS pumping system instructions. 6-6. Egg Turning & Stopping of Turning during Incubation ▶ When you start incubation, place incubator in egg turner. ▶ 3 days before hatching, gently lift up and remove the incubator from egg turner and place on flat surface. This will stop the egg turning for the last 3 days. Also remove the dividers 3 days before hatching. ▶ When incubating various species of eggs at the same time, you can move the eggs before three days of hatching to another hatcher for easy and clean management. (You can operate two incubators – One for egg turning and one for hatching) With birds such as parrots or wild birds you should additionally turn the eggs once or twice by hand each day. Be sure your hands are washed and clean. 7. Management after Hatching ▶ If you do not have separate brooder you can leave the newly hatched birds in the incubator for one or two days. In this case, open the ventilation control lever completely. Lower the temperature to 97.5 degrees F during this period. ▶ Be sure you study feeding method of the birds which you are going to incubate before they hatch. www.KempsKoops.com in the USA has several books for various birds. 8. Cleaning Up Never leave the incubator covered with window top portion after incubation termination. Moisture inside of the incubator vaporizes and it will cause electric part failures! Be sure to remove window and dry the incubator perfectly. (↓)Clean the sensor part with brush. Be sure to unplug the main AC power cord when cleaning the incubator. ▶ Disassemble main controller from view window, and wipe smoothly with soft brush. Be careful not to give impact to sensor part or heating part. ▶ Wash the window, tray, egg tray mat and main body with warm water and dry before storage. ▶ Do not wash the egg turner and Automatic Pumping System (APS) with water. Just wipe with soft cloth. Do not use benzene or thinner when wipe the unit. It can cause transformation or decoloration. 9. Calibration !! The calibration function is for setting the incubator temp. or humidity by using YOUR OWN ACCURATE thermometer or hygrometer. We suggest you to not use this function as factory setting is generally more reliable than inexpensive thermometer or hygrometer. ONLY USE YOUR OWN TRUSTED thermometer or hygrometer for CALIBRATION!! Wrong calibration can cause hatching failure. ※ Be careful of low cost thermometers or hygrometers!! ※ Be sure to place egg tray mat in advance before calibration. Place your thermometer and hygrometer on the egg tray mat. ※ In case you changed calibration by mistake or you cannot rely on your thermometer or hygrometer, refer to 5-2. Factory Setting. Calibration Mode : Press ALL 3 buttons at the same time to go to Calibration Mode. Select Menu / Quick Movement Cancellation / Setting value check during incubation Value + Value - 9-1. How to calibration : Spread egg tray mat on the bottom of tray and stable the incubator temperature and humidity by operating for three hours before calibration. Then, observe the temperature and/or humidity with your device placed on the egg tray mat and calibrate with average value readings. Repeat two more times after waiting 1 hour each time ※ If you operate this function improperly, initialize the incubator to factory setting. (Refer to 5-2) 9-3. Humidity Calibration ▶ Humidity calibration way is same with Temp. calibration. Place hygrometer in the incubator. Remember that inexpensive hygrometers purchased from the store can be off as much as +/- 8%. (Refer to 9-1) ※ If you operate this function improperly, initialize the incubator to factory setting. (Refer to 5-2) 10. Servicing Your incubator is produced superb technology and quality. In case of unexpected failure contact the manufacturer Autoelex Co.,Ltd. or www.KempsKoops.com This incubator is manufactured as easy module system but only qualified repair centers should attempt repairs. 10-1. Troubleshooting ▶ If power does not turn on even if you connect the ▶ Open the cover as Fig. then you can see fuse equipped PCB. Remove failure fuse with screwdriver. plug, check fuse. ▶ Replace with new fuse. ( 250V 2.0A Ø5*20mm ) ▶ Reassemble with the opposite order of disassemble. ※ Be sure to assemble the cover exactly. Or, humidity prevent packing will not adhere closely, and moisture can go into electric part. Hatching results can be highly effected by various causes and incubation conditions. The manufacture does not have any responsibility for egg or bird loss. 14. Specification Visit our web site (www.r-com.co.kr) for more information or see www.KempsKoops.com Updated information : Download the necessary information from the resource room at the RCom website or see www.KempsKoops.com RCom digital incubator is designed for easy and convenient use. For the improvement of the functions of the incubator, design, how to use, etc. can be changed without notice in advance.