1
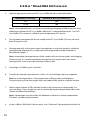
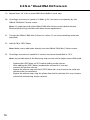
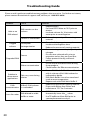
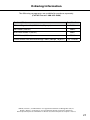
E.Z.N.A.® Blood RNA Kit
Table of Contents
Introduction and Overview.......................................................2
Kit Contents/Storage and Stability.........................................3
Preparing Reagents.......................................................................4
Before Beginning...........................................................................5
Blood Protocol................................................................................7
Tissue Protocol.............................................................................11
DNase I Digestion Protocol....................................................17
Troubleshooting Guide.............................................................20
Ordering....................................................................................21
Manual Revision: September 2011
Innovations in nucleic acid isolation
1
Introduction and Overview
Introduction
E.Z.N.A.® Blood RNA Kits are designed for isolation of total intracellular RNA from up to 1
mL of fresh, whole blood treated with any common anticoagulant such as heparin, EDTA,
or acid-citrate-dextrose. Total RNA yield from 1 mL of blood ranges from 1–5 μg. The
Blood RNA Kit procedure efficiently removes contaminants and enzyme inhibitors making
total RNA isolation fast, convenient, and reliable. There is no need for phenol/chloroform
extractions, and time-consuming steps, such as CsCl gradient ultracentrifugation and
precipitation with isopropanol or LiCl, are eliminated. This kit also is suitable for isolation
of total RNA from cultured cells, tissues, bacteria, and RNA viruses. RNA purified using the
E.Z.N.A.® Blood RNA method is ready for applications such as RT-PCR.
Overview
The E.Z.N.A.® Blood RNA Kits use the reversible binding properties of HiBind® matrix, a new
silica-based material. This is combined with the speed of mini spin column technology.
Red blood cells are selectively lysed and white cells collected by centrifugation. After
lysis of white blood cells under denaturing conditions that inactivate RNases, total RNA
is purified with the HiBind® spin column. A specially formulated high salt buffer system
allows RNA molecules greater than 200 bases to bind to the matrix. Cellular debris and
other contaminants (such as hemoglobin) are effectively washed away and high-quality
RNA is eluted in DEPC-treated sterile water.
New in this Edition: This manual has been edited for content and redesigned to enhance
user readability.
2
Kit Contents
Product
Purifications
HiBind® RNA Mini Columns
R6814-00
R6814-01
R6814-02
5 preps
50 preps
200 preps
5
50
200
Homogenizer Columns
5
50
200
2 mL Collection Tubes
15
150
600
ERL Buffer (10X)
5 mL
50 mL
3 x 50 mL
NTL Lysis Buffer
5 mL
40 mL
150 mL
RWF Wash Buffer
5 mL
45 mL
220 mL
RNA Wash Buffer II
5 mL
25 mL
50 mL
DEPC Water
1.5 mL
5 mL
20 mL
User Manual
P
P
P
Storage and Stability
E.Z.N.A.® Blood RNA Kits should be stored at room temperature. During shipment,
crystals may form in the NTL Lysis Buffer. Warm to 37°C to dissolve. All kit components are
guaranteed for 12 months from the date of purchase.
Modified Protocols
E.Z.N.A.® Blood RNA Kits may also be used for isolation of total RNA from cultured
cells, tissues, bacteria, and from acellular body fluids. In addition, RNA from enzymatic
reactions, such as in vitro transcription, can be purified with this product. For other
modified protocols, please contact our technical support or customer service.
3
Preparing Reagents
1.
2.
Dilute ERL Buffer with sterile distilled water as follows and store at room temperature.
Kit
Sterile Distilled Water to be Added
R6814-00
45 mL
R6814-01
450 mL
R6814-02
450 mL per bottle
Dilute RNA Wash Buffer II with 100% ethanol as follows and store at room
temperature.
Kit
4
Ethanol (100%) to be Added
R6814-00
20 mL
R6814-01
100 mL
R6814-02
200 mL
Before Beginning
Important Notes
Please take a few minutes to read this booklet in its entirety to become familiar with the
procedures.
•
Whenever working with RNA, always wear gloves to minimize RNase contamination.
Use only clean RNase-free disposable plastic pipette tips when using the supplied
reagents.
•
Equilibrate samples and reagents to room temperature before beginning this
protocol. All steps should be carried out at room temperature unless otherwise
noted. Work quickly, but carefully.
•
Prepare all materials required before starting the procedure to minimize RNA
degradation.
•
Carefully apply the sample or solution to the center of the HiBind® RNA Mini
Columns. Avoid touching the membrane with pipet tips.
•
2-mercaptoethanol is key in denaturing RNases and must be added to an aliquot of
NTL Lysis Buffer before use. Add 20 μL 2-mercaptoethanol per 1 mL NTL Lysis Buffer.
This mixture can be stored for 2 weeks at room temperature.
Starting Materials
E.Z.N.A.® Blood RNA Kits are designed for purification of total RNA from up to 1 mL
fresh whole blood. Although the binding capacity for the HiBind® RNA Mini Column is
approximately 100 μg, the maximum amount of starting material depends on the lysis
volume. Due to the abundance of erythrocytes and proteins, greater than 1 mL whole
blood will significantly lower RNA quality. Leukocytes have relatively low RNA content;
therefore, the maximum binding capacity of HiBind® RNA Mini Columns cannot be
reached.
Samples should be collected in the presence of an anticoagulant (preferably acid-citratedextrose) and processed within a few hours. Minimize storage time prior to RNA isolation
as leukocyte transcripts generally have variable stabilities and avoid freezing the blood
samples. The E.Z.N.A.® Blood RNA procedure involves erythrocyte lysis and removal
which cannot be accomplished with frozen blood. For such samples we recommend the
modified protocol (see Page 7). Note that only 150 μL frozen blood can be used with the
modified procedure.
5
Before Beginning
Quantification and Storage of RNA
To determine the concentration and purity of RNA, measure absorbance at 260 nm
and 280 nm with a spectrophotometer. One OD unit measured at 260 nm corresponds
to 40 μg/mL RNA. DEPC-treated water is slightly acidic and can dramatically lower
absorbance values. We suggest that you dilute the sample in a buffered solution (TE)
for spectrophotometric analysis. The A260/A280 ratio of pure nucleic acids is 2.0, while an
A260/A280 ratio of 0.6 denotes pure protein. A ratio of 1.8-2.0 corresponds to 90%-100%
pure nucleic acid. Phenol has a maximum absorbance at 270 nm and can interfere with
spectrophotometric analysis of DNA or RNA. Store RNA samples at -70°C in water. Under
these conditions, RNA is stable for more than a year.
Integrity of RNA
It is highly recommended that RNA quality be determined prior to beginning all
downstream applications. The quality of RNA can be best assessed by denaturing agarose
gel electrophoresis with ethidium bromide staining. The ribosomal RNA bands should
appear as sharp, clear bands on the gel. The 28S band should appear to be double that
of the 18S RNA band (23S and 16S if using bacteria). If the ribosomal RNA bands in any
given lane are not sharp and appear to be smeared towards the smaller sized RNA, it is
very likely that the RNA undergone degradation during the isolation, handling, or storage
procedure. Although RNA molecules less than 200 bases in length do not efficiently bind
to the HiBind® matrix, a third RNA band, the tRNA band, may be visible when a large
number of cells are used.
6
E.Z.N.A.® Blood RNA Kit Protocols
E.Z.N.A.® Blood RNA Kit - Isolation of Total RNA from Blood
Equipment and Reagents to be Supplied by User:
•
•
•
•
•
•
•
•
2-mercaptoethanol
70% ethanol diluted in nuclease-free water
RNase-free pipette tips
RNase-free 1.5 mL microcentrifuge tubes
RNase-free 15 mL conical tubes (depending on sample size)
Microcentrifuge capable of 13, 000 x g
Refrigerated microcentrifuge (if available)
Centrifuge with swinging-bucket rotor for 15 mL centrifuge tubes
Before Starting:
•
•
•
Refrigerated microcentrifuge should be set to 4°C
Prepare an ice bucket
Prepare the following buffers:
1. ERL Buffer and the RNA Wash Buffer II according to the instructions on Page 4
2. NTL Lysis Buffer according to the instructions on Page 5
Note: After red blood lysis and removal, all remaining steps must be carried out at room
temperature. Work quickly, but carefully.
1.
Add 5 volumes ERL Buffer in an appropriately sized tube (not provided). Vortex to mix
thoroughly. For example, add 5 mL ERL Buffer to 1 mL blood in a 15 mL conical tube
or add 500 μL ERL Buffer to 100 μL blood in a 1.5 mL microcentrifuge tube.
Note: ERL Buffer is supplied as a 10X concentrate and must be diluted with sterile
distilled water before use. Refer to Page 4 or the label on the bottle for directions.
2.
Incubate on ice for 15 minutes. Vortex twice during incubation.
Note: Lysis of red blood cells is indicated when the solution becomes translucent. For
blood samples from individuals with an elevated hematocrit or elevated erythrocyte
sedimentation rate (ESR), extend the incubation time to 20 minutes.
7
E.Z.N.A.® Blood RNA Kit Protocols
3.
Centrifuge at 400 x g at 4°C for 10 minutes to pellet leukocytes. Completely remove
and discard the supernatant. If a refrigerated centrifuge is not available, centrifuge at
room temperature, but quickly complete Step 4 below.
4.
Add 2 volumes of ERL Buffer per volume of whole blood used in Step 1. Vortex to
resuspend cells.
Note: For example, if you began the protocol with 1 mL whole blood, wash the
leukocyte pellet with 2 mL ERL Buffer.
5.
Centrifuge at 400 x g at 4°C for 10 minutes. Completely remove and discard
the supernatant. If a refrigerated centrifuge is not available, centrifuge at room
temperature, but quickly complete Step 6 below.
6.
Add NTL Lysis Buffer to the pelleted white blood cells. For <500 μL whole blood,
add 400 μL NTL Lysis Buffer. For 0.5-1.0 mL whole blood, add 700 μL NTL Lysis Buffer.
Vortex to mix thoroughly. Samples may be safely stored at -70°C after addition of NTL
Lysis Buffer.
Note: 2-mercaptoethanol is crucial for inactivating endogenous RNases and must be
added to an aliquot of NTL Lysis Buffer. Add 20 μL 2-mercaptoethanol per 1 mL NTL
Lysis Buffer. This mixture is stable at room temperature for 2 weeks.
7.
Insert a Homogenizer Column into a 2 mL Collection Tube provided with this kit.
8.
Transfer the cell lysate directly to the Homogenizer Column.
Note: If too many cells have been used, the cell lysate will be too viscous to pipet.
In this case, divide the sample into two aliquots and adjust the volume of each
aliquot to 700 μL with NTL Lysis Buffer. Continue the protocol from Step 7 with two
Homogenizer Columns and two HiBind® RNA Mini Columns.
9.
Centrifuge at maximum speed for 2 minutes.
10. Save the filtrate and discard the Homogenizer Column.
8
E.Z.N.A.® Blood RNA Kit Protocols
11. Add an equal volume of 70% ethanol. Vortex to mix. A precipitate may form after the
addition of ethanol. This will not interfere with RNA isolation.
12. Insert a HiBind® RNA Mini Column into a 2 mL Collection Tube provided with this kit.
13. Transfer 700 μL (including any precipitate) to the HiBind® RNA Mini Column.
14. Centrifuge at >10,000 x g for 30 seconds.
15. Discard the filtrate and reuse the Collection Tube.
16. Repeat Steps 13-15 until all of the sample has been transferred to the column.
Optional: This the starting point of the optional on-membrane DNase I Digestion
Protocol. Since the HiBind® matrix of the RNA Mini Column eliminates most DNA, DNase I
digestion generally is not necessary for most downstream applications. However, certain
sensitive RNA applications may require further DNA removal. If an additional RNA removal
step is required, please continue to the DNase I Digestion Protocol found on Page 17.
(See DNase I Digestion Set, Cat # E1091 for further information). If DNase I digestion is not
required, proceed to Step 17.
17. Add 500 μL RWF Wash Buffer to the HiBind® RNA Mini Column.
18. Centrifuge at >10,000 x g for 30 seconds.
19. Discard the filtrate and the Collection Tube.
20. Transfer the HiBind® RNA Mini Column into a 2 mL Collection Tube provided with this
kit.
21. Add 700 μL RNA Wash Buffer II.
Note: RNA Wash Buffer II must be diluted with ethanol before use. Please see Page 4
for instructions.
9
E.Z.N.A.® Blood RNA Kit Protocols
22. Centrifuge at >10,000 x g for 30 seconds.
23. Discard the filtrate and reuse the Collection Tube.
24. Repeat Steps 21-23 for a second RNA Wash Buffer II wash step.
25. Centrifuge at maximum speed for 2 minutes to completely dry the HiBind® RNA Mini
Column matrix.
Note: It is important to dry the HiBind® RNA Mini Column matrix before elution.
Residual ethanol may interfere with downstream applications.
26. Transfer the HiBind® RNA Mini Column to a clean 1.5 mL microcentrifuge tube (not
provided).
27. Add 50-100 μL DEPC Water.
Note: Make sure to add water directly onto the HiBind® RNA Mini Column matrix.
28. Centrifuge at maximum speed for 2 minutes and store eluted RNA at -70°C.
Note: Any combination of the following steps can be used to help increase RNA yield.
•
•
•
•
•
Preheat the DEPC Water to 70°C before adding to the column.
After adding the DEPC Water, incubate the column for 5 minutes.
Increase the elution volume.
Repeat the elution step with fresh DEPC Water (this may increase the yield, but
decrease the concentration).
Repeat the elution step using the eluate from the first elution (this may increase
yield while maintaining elution volume).
Note: No RNA extraction procedure can completely remove genomic DNA. For very
sensitive work we suggest that you treat the eluted RNA with RNase-free DNase. Also for
RT-PCR, use intron-spanning primers that allow easy identification of DNA-contamination.
A control PCR reaction containing the RNA as template will also allow detection of DNA
contamination.
10
E.Z.N.A.® Blood RNA Kit Protocols
E.Z.N.A.® Blood RNA Kit - Isolation of Total RNA from Animal
Tissue
Materials and Reagents to be Supplied by User:
•
•
•
•
•
•
•
•
2-mercaptoethanol
70% ethanol diluted in nuclease-free water
RNase-free pipette tips
RNase-free 1.5 mL microcentrifuge tubes
RNase-free 15 mL conical tubes (depending on sample size)
Microcentrifuge capable of 13,000 x g
Refrigerated microcentrifuge (if available)
Centrifuge with swinging-bucket rotor for 15 mL centrifuge tubes
Before Starting:
•
•
•
Refrigerated microcentrifuge should be set to 4°C
Prepare an ice bucket
Prepare the following buffers:
1. ERL Buffer and the RNA Wash Buffer II according to the instructions on Page 4
2. NTL Lysis Buffer according to the instructions on Page 5
Sample Disruption and Homogenization Equipment:
•
•
•
•
•
•
•
Liquid nitrogen
Omega Homogenizer Spin Columns (Cat# HCR001, HCR003)
Capless 2.0 mL Collection Tubes (Cat# SSI-1370-00)
Needle and syringe
Mortar and pestle
Glass beads
Rotor-stator homogenizer
Disruption and Homogenization of Samples:
Efficient sample disruption and homogenization is essential for successful total RNA
isolation. Cell wall and plasma membrane disruption is necessary for the release of RNA
from the sample and homogenization is necessary to reduce the viscosity of the lysates.
Homogenization shears genomic DNA and other high-molecular-weight cell components
creating a homogenous lysate. Incomplete homogenization can cause the HiBind® RNA
Mini Column to clog resulting in low or no yield.
11
E.Z.N.A.® Blood RNA Kit Protocols
Liquid Nitrogen Method
1.
Wear appropriate gloves and take great care when working with liquid nitrogen.
2.
Excise tissue and promptly freeze in a small volume of liquid nitrogen.
3.
Grind tissue with a ceramic mortar and pestle under approximately 10 mL liquid
nitrogen.
4.
Pour the suspension into a pre-cooled 15 mL polypropylene tube.
Note: Unless the tube is pre-cooled in liquid nitrogen, the suspension will boil
vigorously and may cause loss of tissue.
5.
Allow the liquid nitrogen to completely evaporate and add NTL Lysis Buffer.
6.
Proceed to one of the homogenization steps below.
Homogenization - Choose one method below
•
•
Homogenizer Spin Columns and 2 mL Collection Tubes (Cat# HCR001, HCR003
and SSI-1370-00)
1.
Load the lysate into a homogenizer spin column pre-inserted into a 2 mL
Collection Tube.
2.
Centrifuge at maximum speed for 2 minutes in a microcentrifuge and save
the filtrate.
3.
Proceed to Step 1 of the “Protocol for Isolation of Total RNA from Animal
Tissue” on Page 13.
Syringe and needle
1.
Shear high-molecular-weight DNA by passing the lysate through a narrow
needle (19-21 gauge) 5-10 times.
2.
Proceed to Step 1 of the “Protocol for Isolation of Total RNA from Animal
Tissue” on Page 13.
Rotor-Stator Homogenizer: Sample Disruption and Homogenization
Using a rotor-stator homogenizer for sample disruption and homogenization can
simultaneously disrupt and homogenize most samples. The process usually takes less
than a minute depending on sample type. Many rotor-stator homogenizers operate with
differently sized probes or generators that allow sample processing in 50 mL tubes.
12
E.Z.N.A.® Blood RNA Kit Protocols
Bead Milling: Sample Disruption and Homogenization
By using bead milling, cells and tissue can be disrupted and homogenized by rapid
agitation in the presence of glass beads and a lysis buffer. The optimal size of glass beads
to use for RNA isolation are 0.5 mm for yeast/unicellular cells and 4-8 mm for animal tissue
samples.
Protocol for Isolation of Total RNA from Animal Tissue:
1.
Determine the proper amount of starting material.
Note: It is critical to use the correct amount of starting tissue to obtain optimal yield
and purity with the HiBind® RNA Mini Column. The maximum amount of tissue
that can be processed is dependent on the type of tissue and its RNA content.
The maximum binding capacity of the HiBind® RNA Mini Column is 100 µg. The
maximum amount of tissue that can be used with 700 μL NTL Lysis Buffer is 30 mg.
Use the following table as a guide to select the correct amount of starting material. If
information regarding the RNA content of your starting material is not available, use
10 mg tissue. Based on yield and quality of RNA obtained, the starting amount can be
adjusted up or down for the next purification.
Average Yield of Total Cellular RNA From Mouse Tissue
Source
Amount of Tissue (mg)
RNA Yield (μg)
Brain
10
10
Kidney
10
30
Liver
10
45
Heart
10
5
Spleen
10
33
Lung
10
12
Pancreas
10
40
Thymus
10
20
13
E.Z.N.A.® Blood RNA Kit Protocols
2.
Add the appropriate amount of NTL Lysis Buffer based on the table below.
Amount of Tissue (mg)
Amount of NTL Lysis Buffer (μL)
≤15
350
15-30
700
Note: 2-mercaptoethanol is crucial for inactivating endogenous RNases and must be
added to an aliquot of NTL Lysis Buffer. Add 20 μL 2-mercaptoethanol per 1 mL NTL
Lysis Buffer. This mixture is stable at room temperature for 2 weeks.
3.
Disrupt and homogenize the tissue sample with NTL Lysis Buffer. (Do not use more
than 30 mg of tissue).
4.
Homogenize cells with a rotor-stator homogenizer or until the sample is uniformly
homogenized. Alternatively, sample can be homogenized by other methods as
described on Page 11.
Note: Incomplete homogenization of the sample will cause lower yields and clogging
of the column. It is recommended to homogenize the sample with rotor-stator
homogenizers since it normally produces better yields.
5.
Centrifuge at 13,000 x g for 5 minutes.
6.
Transfer the cleared supernatant to a clean 1.5 ml centrifuge tube (not supplied).
Note: In some preparations, a fatty upper layer will form after centrifugation.
Transferring any of the fatty upper layer may reduce RNA yields or clog the column.
7.
Add an equal volume of 70% ethanol to the lysate. Vortex to mix thoroughly. Do
not centrifuge. If any sample has lost its volume during homogenization, adjust the
volume of ethanol accordingly.
Note: A precipitate may form after the addition of ethanol in certain preparations.
This does not affect the procedure.
8.
14
Insert a HiBind® RNA Mini Column into a 2 mL Collection Tube provided with this kit.
E.Z.N.A.® Blood RNA Kit Protocols
9.
Transfer 700 μL of the sample (including any precipitate that may have formed) to the
HiBind® RNA Mini Column.
10. Centrifuge at >10,000 x g for 30 seconds.
11. Discard the filtrate and reuse the Collection Tube.
12. Repeat Steps 9-11 until all of the sample has been transferred to the column.
Optional: This the starting point of the optional on-membrane DNase I Digestion
Protocol. Since the HiBind® matrix of the RNA Mini Column eliminates most DNA, DNase I
digestion generally is not necessary for most downstream applications. However, certain
sensitive RNA applications may require further DNA removal. If an additional RNA removal
step is required, please continue to the DNase I Digestion Protocol found on Page 17.
(See DNase I Digestion Set, Cat # E1091 for further information). If DNase I digestion is not
required, proceed to Step 13.
13. Add 500 μL RWF Wash Buffer to the HiBind® RNA Mini Column.
14. Centrifuge at 10,000 x g for 30 seconds.
15. Discard the filtrate and reuse the Collection Tube.
16. Add 700 μL RNA Wash Buffer II to the HiBind® RNA Mini Column.
Note: RNA Wash Buffer II must be diluted with ethanol before use. Please see Page 4
for instructions.
17. Centrifuge at 10,000 x g for 30 seconds.
18. Discard the filtrate and reuse the Collection Tube
15
E.Z.N.A.® Blood RNA Kit Protocols
19. Repeat Steps 16-18 for a second RNA Wash Buffer II wash step.
20. Centrifuge at maximum speed (≥12,000 x g) for 2 minutes to completely dry the
HiBind® RNA Mini Column matrix.
Note: It is important to dry the HiBind® RNA Mini Column matrix before elution.
Residual ethanol may interfere with downstream applications.
21. Transfer the HiBind® RNA Mini Column to a clean 1.5 mL microcentrifuge tube (not
provided).
22. Add 40-70 μL DEPC Water.
Note: Make sure to add water directly onto the HiBind® RNA Mini Column matrix.
23. Centrifuge at maximum speed for 2 minutes and store eluted RNA at -70°C.
Note: Any combination of the following steps can be used to help increase RNA yield.
•
•
•
•
•
16
Preheat the DEPC Water to 70°C before adding to the column.
After adding the DEPC Water, incubate the column for 5 minutes.
Increase the elution volume.
Repeat the elution step with fresh DEPC Water (this may increase the yield, but
decrease the concentration).
Repeat the elution step using the eluate from the first elution (this may increase
yield while maintaining elution volume).
E.Z.N.A.® Blood RNA Kit Protocols
E.Z.N.A.® Blood RNA Kit - DNase I Digestion Protocol
Since the HiBind® matrix of the RNA Column eliminates most DNA, DNase I digestion
generally is not necessary for most downstream applications. However, certain sensitive
RNA applications may require further DNA removal. (See DNase I Digestion Set, Cat #
E1091 for further information).
After completing Steps 1-16 of the Blood Protocol (Pages 7-9) or Steps 1-12 of the Animal
Tissue Protocol (Pages 11-15), proceed with the following protocol.
User Supplied Material:
•
DNase I Digestion Set (Cat# E1091)
1. For each HiBind® RNA Mini Column, prepare the DNase I stock solution as follows:
Buffer
Volume per Prep
E.Z.N.A.® DNase I Digestion Buffer
73.5 μL
RNase-free DNase I (20 Kunitz/µL)
1.5 μL
Total Volume
75 μL
Important Notes:
2.
•
DNase I is very sensitive and prone to physical denaturing. Do not vortex the
DNase I mixture. Mix gently by inverting the tube.
•
Freshly prepare DNase I stock solution right before RNA isolation.
•
Standard DNase buffers are not compatible with on-membrane DNase I
digestion. The use of other buffers may affect the binding of RNA to the HiBind®
matrix and may reduce RNA yields and purity.
•
All steps must be carried out at room temperature. Work quickly, but carefully.
Insert the HiBind® RNA Mini Column containing the sample into a 2 mL Collection
Tube provided with this kit.
17
E.Z.N.A.® Blood RNA Kit Protocols
3.
Add 250 µL RWF Buffer to the HiBind® RNA Mini Column.
4.
Centrifuge at 10,000 x g for 60 seconds.
5.
Discard the filtrate and reuse the Collection Tube.
6.
Add 75 μL DNase I digestion mixture directly onto the surface of the membrane of
the HiBind® RNA Mini Column.
Note: Pipet the DNase I directly onto the membrane. DNA digestion will not be
complete if some of the mixture is retained on the wall of the HiBind® RNA Mini
Column.
7.
Incubate at room temperature for 15 minutes.
8.
Add 250 μL RWF Buffer to the HiBind® RNA Mini Column.
9.
Incubate at room temperature for 2 minutes.
10. Centrifuge at 10,000 x g for 60 seconds.
11. Discard the filtrate and reuse the Collection Tube.
12. Add 700 μL RNA Wash Buffer II.
Note: RNA Wash Buffer II must be diluted with ethanol before use. Please see Page 5
for instructions.
13. Centrifuge at 10,000 x g for 60 seconds.
14. Discard the filtrate and reuse the Collection Tube.
15. Repeat Steps 12-14 for a second RNA Wash Buffer II wash step.
18
E.Z.N.A.® Blood RNA Kit Protocols
16. Centrifuge at maximum speed for 2 minutes to completely dry the HiBind® RNA Mini
Column matrix.
Note: It is important to dry the HiBind® RNA Mini Column matrix before elution.
Residual ethanol may interfere with downstream applications.
17. Place the column in a clean 1.5 mL microcentrifuge tube (not supplied).
18. Add 40-70 μL DEPC Water.
Note: Make sure to add water directly onto the HiBind® RNA Mini Column matrix.
19. Incubate at room temperature for 1 minute.
20. Centrifuge at maximum speed for 2 minute and store eluted RNA at -70°C.
Note: Any combination of the following steps can be used to help increase RNA yield.
•
•
•
•
•
Preheat the DEPC Water to 70°C before adding to the column.
After adding the DEPC Water, incubate the column for 5 minutes.
Increase the elution volume.
Repeat the elution step with fresh DEPC Water (this may increase the yield, but
decrease the concentration).
Repeat the elution step using the eluate from the first elution (this may increase
yield while maintaining elution volume).
19
Troubleshooting Guide
Please use this guide to troubleshoot any problems that may arise. For further assistance,
please contact the technical support staff, toll free, at 1-800-832-8896.
Problem
Little or no
RNA eluted
Cause
RNA remains on the
column
Column is overloaded
Clogged
column
Incomplete
homogenization
Source
Solution
•
•
•
•
Reduce the quantity of the starting
material.
•
•
•
Completely homogenize sample.
Increase centrifugation time.
Reduce the amount of starting material.
•
Freeze starting material quickly in liquid
nitrogen.
Do not store cultured cells prior to
extraction unless they are lysed first.
Follow protocol closely, and work
quickly.
•
•
Degraded RNA
•
RNase contamination
•
•
Problem in
downstream
applications
Salt carry-over during
elution
•
•
DNA
HiBind® DNA column
contamination is overloaded
RNA diluted in acidic
Low Abs ratios
buffer or water
20
Repeat elution.
Pre-heat DEPC Water to 70°C prior to
elution.
Incubate column for 10 minutes with
water prior to centrifugation.
Ensure not to introduce RNase during
the procedure.
Check buffers for RNase contamination.
Ensure RNA Wash Buffer II been diluted
with 4 volumes of 96-100% ethanol as
indicated on bottle.
RNA Wash Buffer II must be stored and
used at room temperature.
Repeat wash with RNA Wash Buffer II.
•
•
Reduce the amount of starting material.
Digest with RNase-free DNase and
inactivate at 75°C for 5 minutes.
•
DEPC Water is acidic and can
dramatically lower Abs260 values.
Use TE buffer to dilute RNA prior to
spectrophotometric analysis.
•
Ordering Information
The following components are available for purchase separately.
(Call Toll Free at 1-800-832-8896)
Product (Size)
Part Number
DNase I Digestion Kit (1500 Units, 50 preps)
E1091
ERL Buffer (250 mL)
PR023
RNA Wash Buffer II (50 mL)
PR031
DEPC Water (100 mL)
PR032
DNase/RNase-free Microcentrifuge Tubes (500/pk, 10 pk/cs)
SSI-1210-00
HiBind®, E.Z.N.A.®, and MicroElute® are registered trademarks of Omega Bio-tek, Inc.
Qiagen®, QIAvac® and Vacman® are all trademarks of their respective companies.
PCR is a patented process of Hoffman-La Roche. Use of the PCR process requires a license.
21
Notes:
22
Notes:
23
Notes:
24