1
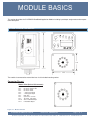
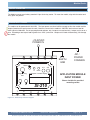
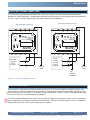
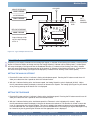
SI-APPMOD-DeadBand
SOLVES-IT! DEADBAND
APPLICATION MODULE
Revision 0 for Software Version 1.0.0.0
PLC on a Chip Patent 7,299,099
A larger format of this manual may be
found at http://www.divelbiss.com
Smart Parts for Managing Automation
9778 Mt. Gilead Rd.
Fredericktown, OH 43019
Toll Free: 1-800-245-2327
Web: http://www.divelbiss.com
Email: [email protected]
2008010.0
Table of Contents
TABLE OF CONTENTS
Table of Contents
Package Contents
Page 1
Page 1
Getting Started
How to Use this Manual
Page 2
Page 2
SI-APPMOD-Deadband Basics
Get to Know the Module
Module Mounting
Module Input Power
Module Operation
User Interface
Analog Input Signal Connections
Output Connections
Tuning the Module
Expandability / Customization
Programmed from Factory Specifications
Page
Page
Page
Page
Page
Page
Page
Page
Page
Page
Page
3
3
4
4
5
5
6
6
7
8
8
WARNING!
The SI-APPMOD-DEADBAND, as with programmable controllers, must not be used alone in applications which would be
hazardous to personnel in the event of failure of this device.
Precautions must be taken by the user to provide mechanical
and/or electrical safeguards external to this device. This device
is NOT APPROVED for domestic or human medical use.
PACKAGE CONTENTS
Whats Included
Qty
1
1
1
6
Description
Part Number
Location
SI-210 with Software Pre-loaded
SI-APPMOD-DEADBAND Manual
Din-rail Socket
Commutating Diodes
SI-210
2008010.X
115-105328
111-101012
In
In
In
In
SI-APPMOD-DeadBand User Manual
Document #: 2008010.0.pdf
Box
Box
Box
Box
Page 1 of 8
Divelbiss Corporation 9778 Mt. Gilead Rd. Fredericktown, Ohio 43019 1-800-245-2327 www.divelbiss.com
GETTING STARTED
This section explains how to read this manual and understand the symbols.
HOW TO USE THIS MANUAL
In this manual, the following conventions are used to distinguish elements of text:
BOLD
Denotes labeling, commands, and literal portions of
syntax that must appear exactly as shown.
italic
Used for variables and placeholders that represent the type of text
to be entered by the user.
SMALL CAPS
Used to show key sequences or actual buttons, such as
the OK button.
OK,
where the user clicks
In addition, the following symbols appear periodically in the left margin to call the readers attention to specific details in
the text:
Warns the reader of a potential danger or hazard that is associated
with certain actions.
Appears when the text contains a tip that is especially helpful.
Indicates that the text contains information to which the reader
should pay particularly close attention.
All Information and Specifications Subject to Change without Notice
SI-APPMOD-DeadBand User Manual
Document #: 2008010.0.pdf
Page 2 of 8
Divelbiss Corporation 9778 Mt. Gilead Rd. Fredericktown, Ohio 43019 1-800-245-2327 www.divelbiss.com
MODULE BASICS
This section describes the SI-APPMOD-DeadBand Application Module including input/output assignments and an operational description.
GETTING TO KNOW THE MODULE
The module is connected to external devices via its included mounting socket.
Connector Pin out
Bottom View (Solves-It! Connector)
Pin
Pin
Pin
Pin
Pin
Pin
Pin
Pin
Pin
Pin
Pin
1
2
3
4
5
6
7
8
9
10
11
Below Deadband Output
Not Used - GPIO3 / HSC
Not Used - GPO4
Not Used - GPO5
- Analog Input Signal
+ Analog Input Signal
Earth Gnd
Input Power Common
10-32VDC Input Power
Above Deadband Output
In-Deadband Output
Figure 2.1 - Module Pin-Out
SI-APPMOD-DeadBand User Manual
Document #: 2008010.0.pdf
Page 3 of 8
Divelbiss Corporation 9778 Mt. Gilead Rd. Fredericktown, Ohio 43019 1-800-245-2327 www.divelbiss.com
Module Basics
MODULE MOUNTING
The Module mounts to an industry standard 11-pin Octal relay socket. To mount the module, align with the socket and
firmly push into position.
MODULE INPUT POWER
The module can be powered with 10-32VDC. The input power must be of sufficient supply to drive the module and the
outputs (based on the load currents for each) Maximum current for the module is 150mADC and maximum load for
each outputs is 300mADC. For the pre-programmed software, only 3 outputs are used and only 1 output may be on at a
time. Exceeding a total output load of greater than 1ADC (more than 3 outputs at full load simultaneously) can damage
the module.
+10-32VDC
POWER IN
11
10
9
Status
AI1
I1
Programming
Port
7
8
EARTH
GND
-DC /
POWER
COMMON
AI2
GPO5
Setpoint / Variable Display
APPLICATION MODULE
INPUT POWER
Shown installed in provided
mounting socket
B1
1
B2
2
SI-210
3
4
5
6
Figure 2.2 - Module Input Power Diagram
SI-APPMOD-DeadBand User Manual
Document #: 2008010.0.pdf
Page 4 of 8
Divelbiss Corporation 9778 Mt. Gilead Rd. Fredericktown, Ohio 43019 1-800-245-2327 www.divelbiss.com
Module Basics
MODULE OPERATION
The SI-APPMOD-DeadBand module compares the analog input signal to the analog setpoint signal plus and minus
the analog tolerance. If the analog input signal is inside the range of the analog setpoint signal, plus and minus the the
analog tolerance; it is considered within the deadband and the In-Deadband Output will be energized. If the analog input
signal is less than the analog setpoint signal minus the analog tolerance; it is considered below the deadband and the
Below Deadband Output will be energized. If the analog input signal is greater than the analog setpoint signal plus the
analog tolerance; it is considered above the deadband and the Above Deadband Output will be energized.
The analog setpoint signal is adjusted using the AI1 potentiometer located on the front of the user interface. The analog
tolerance is adjusted using the A2 potentiometer located on the front of the user interface. The analog tolerance provides a tolerance (in counts) that the analog input signal can be +/- the analog setpoint signal and still be considered in
the deadband. Please note, the tolerance is limited in counts to a maximum of 5% of the analog setpoint signal.
For operation, hysteresis equal to 1/2 of the tolerance (in counts) is provided to prevent output toggling if the analog
input value is near the threshold of being outside the deadband. This hysteresis is functional at both ends of the deadband.
The analog input signal, setpoint and tolerance signals are processed through the on-board analog to digital converter.
Each signal (0-10VDC) is now represented as an integer number from 0 to 1023. 0VDC would be represented as integer
0 while 10VDC would be represented as 1023. 1023 for the top of the scale is approximate. Due to circuit tolerances
and other factors, a typical top end scale for the analog input signal could be 990 - 1000.
USER INTERFACE
The user interface consists of two push-buttons; labeled B1 and B2, the Setpoint/Variable Display, the I1 LED indicator
and the two adjustment potentiometers; AI1 and AI2.
1. Display View Indicator
5
1
2
3
Slowest Flashing indicates analog input signal is displayed,
2nd fastest Flashing indicates setpoint signal is displayed,
3rd fastest Flashing indicates the tolerance % (in counts) is
displayed and Fast Flashing indicates hysteresis (in counts)
is displayed.
2. Analog Setpoint
Adjustment of Analog Setpoint Signal from 0 to
approximately 1023. This is the center of the deadband.
Status
AI1
I1
AI2
GPO5
Adjustment of Deadband tolerance in counts
(limited to 5 % max. of the analog setpoint input).
Setpoint / Variable Display
Programming
Port
3. Deadband Tolerance
4. Setpoint / Variable Display
View the analog input signal, analog setpoint, tolerance
or hysteresis. Signals are viewed as Integer of 0-1023.
5. Module Status Indicator
B1
B2
SI-210
Flashing slowly indicates module problem
Flashing quickly indicated module is operating .
6. B1 Push-button
Each press will display each input signal in order.
6
7
4
1. Analog Input Signal
2. Analog Setpoint
3. Deadband Tolerance (in counts)
4. Hysteresis (1/2 Deadband Tolerance)
7. B2 Push-button
Not Used
Figure 2.3 - User Interface
SI-APPMOD-DeadBand User Manual
Document #: 2008010.0.pdf
Page 5 of 8
Divelbiss Corporation 9778 Mt. Gilead Rd. Fredericktown, Ohio 43019 1-800-245-2327 www.divelbiss.com
Module Basics
ANALOG INPUT SIGNAL CONNECTIONS
The analog input signal accepts a differential 0 to 10VDC input voltage. The input may be connected as either a
differential or single-ended input. Shielded cable should be used as wiring for the analog input signal to promote noise
immunity. Figure 2.4 shows typical analog input signal connection wiring diagrams.
Single-Ended Wiring Diagram
Differential Wiring Diagram
11
10
9
Status
AI1
I1
1
B2
3
10
I1
5
1
6
+
EARTH
GND
B2
AI2
GPO5
SI-210
2
Single
Ended
Analog
Device
0-10VDC
7
Setpoint / Variable Display
Programming
Port
B1
8
AI1
GPO5
4
9
Status
AI2
SI-210
2
Differential
Analog
Device
0-10VDC
11
7
Setpoint / Variable Display
Programming
Port
B1
8
3
4
5
6
+
EARTH
GND
-DC /
POWER
COMMON
Figure 2.4 - Input Analog Signal Connections
OUTPUT CONNECTIONS
When outputs are energized, the output pin will be sourced with +V (equal to the module input power voltage). Each
output can drive a load up to 300mA maximum (resistive). Depending upon the device connected to an output, a minimum load resistor may be required. If the output is energized at all times, connect a 470Ω to 1KΩ load from the output
to common. Figure 2.5 is a typical output wiring diagram.
The factory installed software for this module will only allow one output to be energized at a time. In the event the software is modified; note, all outputs cannot be ON simultaneously. Max total current for outputs is 1ADC. Simultaneous
output loads greater than 1A may result in damage to the module.
SI-APPMOD-DeadBand User Manual
Document #: 2008010.0.pdf
Page 6 of 8
Divelbiss Corporation 9778 Mt. Gilead Rd. Fredericktown, Ohio 43019 1-800-245-2327 www.divelbiss.com
Module Basics
+10-32VDC
ABOVE DEADBAND
LOAD / DEVICE
IN-DEADBAND
LOAD / DEVICE
11
10
9
7
8
EARTH
GND
-DC /
POWER
COMMON
Status
AI1
I1
BELOW DEADBAND
Setpoint / Variable Display
Programming
Port
LOAD / DEVICE
Output Voltage will be
equal to Input Voltage
on Pin 9
B1
1
SI-210
B2
2
AI2
GPO5
3
4
5
6
Figure 2.5 - Typical Output Connections
TUNING THE MODULE
On power up, the display will default to the Analog Input Signal (I1 indicator will be flashing the slowest). Pressing the B1
button will cause the display to change and view the Analog Setpoint(I1 indicator will be flashing faster). Another press
will cause the display to change and view the Deadband Tolerance (I1 indicator will be flashing even faster). Another
press will cause the display to change and view the Hysteresis (I1 indicator will be flashing the fastest). A fourth press
will cause the original Analog Input Signal to be displayed (I1 indicator will be flashing at the slowest speed).
SETTING THE ANALOG SETPOINT
1. Press the B1 button until the I1 indicator is flasing at 2nd slowest speed. Pressing the B1 button several times will
allow you to determine the 4 speeds at which the indicator flashes.
2. With the I1 indicator flashing at the 2nd slowest speed, the Analog Setpoint’s value is displayed (0-1023). Adjust
the AI1 potentiometer above the display to increase or decrease the setpoint. The Analog Input Signal may be viewed
at any time by pressing the B1 button until it is displayed.
SETTING THE TOLERANCE
1. Press the B1 button until the I1 indicator is flasing at the 2nd fastest speed. Pressing the B1 button several times will
allow you to determine the 4 speeds at which the indicator flashes.
2. With the I1 indicator flashing at the 2nd fastest speed, the Tolerance’s value is displayed (in counts). Adjust
the AI2 potentiometer above the display to increase or decrease the tolerance. The tolerance is viewed in counts but
is set as a percentage of the Analog Setpoint. This value is added to the setpoint to determine the upper deadband
limit and subracted from the setpoint to determine the lower deadband limit.The Analog Input Signal and Setpoint may
be viewed at anytime by pressing the B1button until the appropriate value is displayed.
SI-APPMOD-DeadBand User Manual
Document #: 2008010.0.pdf
Page 7 of 8
Divelbiss Corporation 9778 Mt. Gilead Rd. Fredericktown, Ohio 43019 1-800-245-2327 www.divelbiss.com
Module Basics
HYSTERESIS
One the Analog Setpoint and Tolerance have been set, the hysteresis is automatically calculated to be 1/2 of the tolerance. When the analog input signal rises above or below the deadband limit, it must return (rise or fall) within 1/2 of the
tolerance before it is considered in the deadband. This hysteresis prevents toggling of the outputs should the analog
input signal cross over the deadband limit muliple times.
EXPANDABILITY / CUSTOMIZATION
As the module is based on the Solves-It! Analog, Model SI-210, the program can be customized and its functionality
expanded. Accessories are required. The program that was factory installed can be downloaded from
http://www.divelbiss.com. The program can be edited to add additional functionality and logic. To gain functionality of
some inputs and/or outputs, it may be necessary to re-assign the I/O that was factory configured. For more information
about changing the functionality, download the Solves-It! Analog User Manual and the EZ LADDER User Manual.
The following accessories are required to re-program the module and are included in the SI-APPMOD-PGMKIT:
1. SI-PGM
2. EZLDCD-02
Solves-It! Programming Cable
EZ LADDER Lite on CD.
PROGRAMMED FROM FACTORY SPECIFICATIONS
Processor:
Memory:
Outputs:
Solves-It! Analog Model 210, Based on PLC on a ChipTM
64K Flash
3 Sourcing SSR Outputs, rated 10-32VDC @ 300mADC Max. each. Max total output load =
1ADC @ 24VDC power input. Output Voltage = Input Power
Functionality: Above Deadband , Below Deadband, In-Deadband
Power Requirements:
10-32VDC @ 150mADC Max
Indicators:
I1 LED Indicator, 1 Status LED Indicator
Analog Inputs:
1 0-10VDC External Analog Input Signal
1 Internal Potentiometer - Analog Setpoint - Center of Deadband
1 Internal Potentiometer - Deadband Tolerance 0-5% of Analog Setpoint
Display:
Push Buttons:
Operating Temp:
Dimensions:
Mounting:
Type:
4 Digit, 7 Segment Programmable LED Display
1 Programmable Push Buttons
0-60º C
3.62” Wide x 5.21” Length x 1.21” Tall.
Plugs into Industry standard 11-pin Octal Relay Socket
Plastic Housing
SI-APPMOD-DeadBand User Manual
Document #: 2008010.0.pdf
Page 8 of 8
Divelbiss Corporation 9778 Mt. Gilead Rd. Fredericktown, Ohio 43019 1-800-245-2327 www.divelbiss.com
Limited Warranty
Divelbiss Corporation warrants equipment will be free from defects in material and workmanship for
a period of one (1) year from the date of the Divelbiss invoice that the equipment was furnished.
Divelbiss Corporation will not be liable for any design furnished by Buyer and incorporated into the
equipment.
In no event shall Divelbiss Corporation be liable for anticipated profits, consequential damages or
loss of use of equipment or of any installation into which the equipment covered by this order may
be put.
Divelbiss Corporation shall not be liable or responsible for any loss, injury, or damage resulting
directly or indirectly from the use of software and/or programming in any way associated with the
equipment of this order.
Obligations are to be limited to the repair or replacement at the Divelbiss Corporation plant,
Fredericktown, Ohio, upon return of the part or component in question, prepaid by Buyer. The return
freight charges to be paid by Divelbiss. The part or component is only to be returned to Divelbiss
with a Returned Material Authorization number issued by the Divelbiss Service Department. Any
warranty service (consisting of time, travel, and expenses related to such services) performed other
than at Divelbiss Corporation plant, shall be at Buyer's expense.
Warranty of repaired or replacment products will be limited to ninety (90) days or the remainder of
the original warranty whichever is greater.
Warranty is available only if Divelbiss Corporation is promptly notified in writing upon discovery of
any alleged defect and examination of the subject product discloses, to Divelbiss satisfaction, that
any defect has not been caused by misuse; neglect; improper installation; improper operation;
improper maintenance, repair, or alteration; accidents; or unusual deterioration or degradation of the
equipment or parts thereof due to physical environment or due to electrical or electromagnetic noise
environment.
This warranty is in lieu of all other warranties, expressed, implied, or statutory, including warranties
of merchantability or fitness for a specific purpose.