1
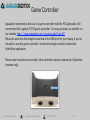
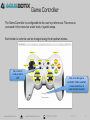
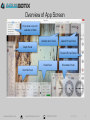
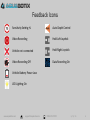
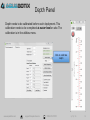
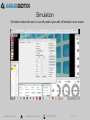
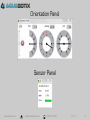
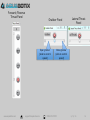
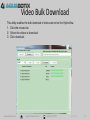
HydroView Pro
PC App
www.aquabotix.com
[email protected]
508.676.1000
3/10/15
1
Getting Started
1.
2.
3.
4.
5.
Download the PC Application from the Aquabotix website at
www.aquabotix.com/support_downloads.php
Connect your HydroView to the topside box as described in the HydroView Pro
User manual, available at www.aquabotix.com/support_manuals.php
Aquabotix suggests the use of a Cat 5E cable for LAN connection between the
topside box and your laptop. LAN connection provides 5X better performance
than the WiFi connection. When using the LAN connection be sure to turn WiFi
off on your laptop.
Once all connections are made, power on the HydroView. Then open the
application.
Please note: The Performance Panel should not be used unless directed by
Aquabotix Customer Service. This can cause damage to vehicle operations.
www.aquabotix.com
[email protected]
508.676.1000
3/10/15
2
Game Controller
Aquabotix recommends the use of a game controller with the PC Application. We
recommend the Logitech F310 game controller. You may purchase a controller on
our website: http://www.aquabotix.com/products.php?cat=27
Please be sure that the dongle is inserted in the USB port for your laptop. If you do
not wish to use the game controller, remove the dongle and then restart the
HydroView application.
Please note the button on the side of the controller must be selected to X (wireless
remotes only).
www.aquabotix.com
[email protected]
508.676.1000
3/10/15
3
Game Controller
The Game Controller is configurable to the user’s preferences. This menu is
accessed in the menu bar under tools > joystick setup.
Each button’s controls can be changed using the dropdown menus.
Be sure that
mode is set to
OFF
www.aquabotix.com
Click to enable game
controller. When enabled,
mouse controls are
automatically disabled.
[email protected]
508.676.1000
3/10/15
4
Overview of App Screen
Drop down menu for
selection of tools
Grabber Arm Panel
Lateral Thrust Panel
Depth Panel
Forward Thrust Panel
Data Panel
Orientation Panel
Control Panel
www.aquabotix.com
[email protected]
508.676.1000
3/10/15
5
Feedback Icons
Sensi&vity Se+ng % Auto Depth Control Video Recording Hold LeE Joys&ck Vehicle not connected Hold Right Joys&ck Video Recording Off Data Recording On Vehicle Ba:ery Power Low LED Ligh&ng On www.aquabotix.com
[email protected]
508.676.1000
3/10/15
6
Control panel
Sensitivity
Controls the vehicle’s
responsiveness. Power
can be set at 25%, 50%,
75% and 100%
Lights
Toggle the LED lighting
on/off
www.aquabotix.com
Focus
Auto Focus or
Manual Focus.
Video and Data Record
Toggle the recording on/
off. Video recording stay
on when you exit the app
without powering off the
vehicle.
[email protected]
Resolution
Camera
Resolution settings
can be selected
from low to HD
Snapshot
Click to take a
picture
Snap Repeat
Take pictures on
regular intervals
508.676.1000
Camera
With the external
camera upgrade, this
setting allows you to
select the camera used
Tilt Camera
Control camera tilt up/
down (only available with
tilt camera upgrade)
3/10/15
7
Vehicle Media
All media and data is stored on the vehicle’s web server. This can be accessed
through the control panel or the top menu bar.
All media is time stamped using Zulu time.
Application
Version
Number
Platform
Version
www.aquabotix.com
[email protected]
508.676.1000
3/10/15
8
Photos/Video
Click the green
arrow to
download
Click the X to
Delete the image
File size
File name –
yearmonthday - time
www.aquabotix.com
[email protected]
508.676.1000
3/10/15
9
Data
Click the green arrow
to download the .csv
file
File name –
yearmonthday-time
www.aquabotix.com
[email protected]
Click the X to
delete the .csv file
508.676.1000
3/10/15
10
Data CFG is used to make
edits to your data
recording configuration
Vehicle Configuration
# CAMs is used to switch
between cameras 1-3 for
systems with external cameras
View CFG shows your
vehicle’s configuration
settings
These menus should not be used unless
directed by Aquabotix customer service
www.aquabotix.com
[email protected]
508.676.1000
3/10/15
11
Utilities Panel
Only to be used with
customer service
Only to be used with
customer service
Save pictures
directly to
documents folder.
Must use when
recording video and
taking pictures
simultaneously.
See pg. 13
Contact customer
service for
compass calibration
Updates should be made before
going into the field. Call customer
service for further assistance.
Click to access to
game controller
configurations.
Manual Focus is set
to 7 different focal
ranges. These can
be altered based
upon customer
needs.
Switch to metric
measurements
Click to control the
vehicle with the
game controller
After changes the
manual focus
settings, Click Save
and reboot the app.
See pg. 14
Set transparency of
control panels
www.aquabotix.com
[email protected]
508.676.1000
3/10/15
12
Depth Panel
Depth needs to be calibrated before each deployment. This
calibration needs to be completed at water level on site. The
calibration is in the utilities menu.
Click to calibrate
depth
www.aquabotix.com
[email protected]
508.676.1000
3/10/15
13
Simulation
Simulation allows the user to see all panels open with all feedback icons shown.
www.aquabotix.com
[email protected]
508.676.1000
3/10/15
14
Orientation Panel
Sensor Panel
www.aquabotix.com
[email protected]
508.676.1000
3/10/15
15
Forward/Reverse
Thrust Panel
Grabber Panel
Open grabber
(slide to control
speed)
www.aquabotix.com
[email protected]
Lateral Thrust
Panel
Close grabber
(slide to control
speed)
508.676.1000
3/10/15
16
Video Repair If a movie downloaded from the HydroView is unreadable or incomplete, the video
repair utility can be used to fix the file.
1.  Find and open the movie. The utility will analyze it.
2.  Select the resolution and enter the save as information.
3.  Click repair file.
www.aquabotix.com
[email protected]
508.676.1000
3/10/15
17
Video Bulk Download This utility enables the bulk download of videos stored on the HydroView.
1.  Click the movies list
2.  Select the videos to download
3.  Click download.
www.aquabotix.com
[email protected]
508.676.1000
3/10/15
18