1
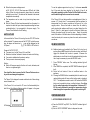
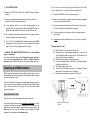
Thermo Pot INSTRUCTION MANUAL Model Nos. TK-12-5L & TK-13-35L Before operating this appliance, please read these instructions carefully. CONTENTS Title Parts Introduction Page Parts Introduction 1 Technical Specifications 2 Before Using 2-3 How To Operate Thermo Pot 4-8 Cleaning and Maintenance 8 - 11 Important Guidelines 12 Disposal/Food Safety Compliance 13 Guarantee 14 EU Declaration of Conformity 15 Returns Policy 16 Troubleshooting Guide 17 Thank you for choosing a Turnkey appliance. We hope you have an enjoyable experience using this product. Function panel 操作面板 1 Technical Specifications Model Voltage Power Capacity TK-12-5L & TK-13-35L 230V~50Hz 680W Boil; 2W &100W Keep Warm. 5 L & 3.5L Specifications are subject to change without prior notice due to the development of technology. Before Using 1. Please read these instructions carefully before using the Thermo Pot for the first time, and keep them for future reference. 2. This appliance should only be used to boil and dispense water. It is not intended for use with any other liquids. 3. Check your local mains voltage to ensure it is the same as stated on the appliance. 4. Handle the power cord carefully. Do not bend or pull the cord. Unplug the appliance from the wall socket when it is not in use. 5. Always use the Thermo Pot in a vertical upright position, and never cover the steam vent. 6. Allow the Thermo Pot to cool before cleaning. 7. The Thermo Pot may be damaged if exposed to heat or used in unstable surroundings (excess water or humidity). 8. Boiling without water in the Thermo Pot will damage the appliance. 9. The outer body of the Thermo Pot becomes warm during operation. Always allow the unit to cool before handling. 10. Do not wash the power cord or immerse the Thermo Pot in any water or liquid. 11. Close supervision is necessary when the Thermo Pot is used by or near to children. Never leave the appliance unattended when children are nearby. 12. Do not operate the appliance with a damaged cord or plug. 13. Do not attempt to repair the Thermo Pot. Always return it to the supplier in the event of a fault. 14. The Thermo Pot must NOT be modified in any way. 2 15. The appliance is not intended for outdoor use or in damp areas. 16. The power cord should not be knotted, left on hot surfaces or left hanging over worktop edges etc. 17. The Thermo Pot should be given ample air circulation on all sides. 18. The Thermo Pot should be placed on a level heat resistant surface. 19. Do not use the appliance for other than its intended use. 20. When opening the lid beware of steam which is released. 21. Place Steam vent of lid away from the power switch and furniture. 22. Do not place flammable material near the Thermo Pot. 23. There may be an odour emitted during the first use. This is normal and will stop after a short period of usage. Fill and boil the Thermo Pot twice and pump the water through the auto-dispense option both times to ensure the system is clean before first use. When the water level is too low to allow the auto-dispense function to work, tip the remaining water from the second boil away manually before filling with fresh water to commence normal use. 24. Be careful if moving the Thermo Pot when it is filled with hot water. Make full use of the handle when moving the Thermo Pot when it contains any hot water. 25. Do NOT fill the Thermo Pot above the “Full” water indicator scale (on the inside of the boiler) as this may cause it to overflow when it boils. 26. Always ensure that the Thermo Pot lid is closed properly. 27. To get the optimum benefit from your Thermo Pot DO NOT turn it off at night. When in regular domestic use the appliance can be left on at all times to ensure that you always have instant hot water when you need it. 28. The unit must be unplugged to be re-filled (as per the instructions) but apart from that it does not need to be turned off. 29. When not being used for an extended period then the unit should be switched off, emptied totally until no water runs out of the dispensing outlet, and then left open to air (see instructions). 30. If the unit is not used for 72 hours it will automatically turn itself off (see instructions). 31. It is recommended that the original packaging is retained so that the Thermo Pot can be adequately protected if further transportation (or return) is required. Damage arising from inadequate protection during any such further movement is NOT covered by the guarantee. 3 TO BOIL WATER How To Operate The Thermo Pot OPENING THE TOP LID Push down front edge of TOP COVER LOCK FLAP located on the lid. Lift up back portion by pulling upwards to open the top cover. Beware as water may still be hot and hot steam may escape. 1. After the power is switched on, the water will start to boil automatically. Do not open the top cover when the water is boiling. Do not add water when appliance is still boiling. Do not obstruct the top lid steam vent. Boiling LED is lit LCD indicates water temperature progress REMOVE LID (when required) Lift top lid to about a 45º angle, press the UNLOCK button located at the rear of the top cover and pull upwards at 45º. Keep warm 4temperature selection KEEP WARM Keep warm LED lit LCD indicates water temperature FILLING 1. Open the Top Cover as per the above instruction (no need to remove it), and using another container (such as a jug) pour cold water into the inner pot until the FULL mark is reached (on the inside of the boiler). Do not overfill as hot water may splash out during boiling. As with a kettle this appliance should never be filled directly from the tap when it is connected to the mains supply. The power input socket on the Thermo Pot must NEVER come into contact with any water or other liquid. 2. Close the top cover and ensure that the lid is secured by pressing firmly down until a “click” sound is heard. 3. When filling the Thermo Pot always keep the lid away from you as there is hot steam trapped under the lid. 4. The Thermo Pot has a 360º rotating base to assist with ease of access. Keep warm temperature selection A beeper will sound 5 times when the water is boiled. The keep warm LED will then be lit and the water will keep warm at the chosen temperature. USING THE KEEP WARM TEMP SETTING Press the “SELECT” button to select your ideal temperature. The default setting is 98º Press “SELECT” button once to change Temperature. 98º℃ 85º℃ 60º℃ 50º℃ 40º℃ 4 5 When the keep warm settings are set at 98º; 85º; 60º; 50º; 40º;℃the keep warm LED with be lit after boiling. When the water temperature drops below the selected settings by more than 3º, the water will be reheated to the desired temperature automatically. The temperature can be reset at any time during keep warm phase. After the Thermo Pot has been disconnected from the mains it is important to check that your chosen temperature setting has been re-selected when it is reconnected to the power supply. The Thermo Pot will default to the 98º setting. AUTO CUT-OFF In the event that the Thermo Pot runs dry, the auto CUT-OFF function will be activated. The power source will be CUT-OFF and at the same time, the beeper will sound and a sign will be displayed on the LCD panel. The “REFILL LED” will be lit. Causes of AUTO CUT-OFF The power is on, but the Thermo Pot is not filled. Water level is below “add water” indicator but water is still boiling. If no water is added when the water is used up. The top cover is not secured properly. Solution Switch off the power supply, allow the unit to cool, add water, and then turn on appliance again. Care should be taken to ensure that the Thermo Pot does not run dry as this can damage the appliance. The Thermo Pot is designed to remain switched on at all times during normal domestic use. If the Thermo Pot is not used for 72 hours it will automatically turn itself off and the following flashing symbol will appear in the green To use the appliance again touch any key. It is however essential that if the water has been standing for this length of time, it is discarded completely and the Thermo Pot filled with fresh water, and flushed through before normal use is resumed. If the Thermo Pot is not being used for an extended period of time (in excess of 72 hours) then it is recommended that the appliance is disconnected from the mains, emptied and left open to air in the upright position. Ensure that water is cleared from all outlets by gently inverting the appliance until there is no water flowing from the spout. When it is used again it should be filled and boiled once flushing the water through to rinse the pipes. Empty the residual water at the bottom of the boiler when the auto-dispensing is finished, rinse the internal pot to remove any loose lime scale, and commence normal use. RE-BOIL FUNCTION Additional water can be added to the Thermo Pot to top it up at anytime (though NOT when the boil function is active) and this will trigger the automatic boil function to operate. If however the added water is not sufficient to start the automatic boiling function then it may be necessary to press the RE-BOIL button. 1. Press “RE-BOIL” button once. The re-boiling indicator light will light up. 2. After RE-BOIL is completed, the KEEP WARM indicator light will be lit. Re-boil will not function if there is insufficient water in the appliance.. Pressing the RE-BOIL button immediately after the water has just reached boiling point will have no effect as the water is already at 100℃. The temperature needs to cool to 94º before the RE-BOIL button can be pushed to achieve a rolling boil again. If a rolling boil is needed again when the temperature is between 95º – 98º this can be achieved by moving the temperature selector down through the temperature settings and re-selecting 98º. DISPENSING WATER 1. AUTO DISPENSE WATER OUTLET a) Press the “UNLOCK” key ONCE. The “UNLOCK” indicator light will come on. b) Push the “AUTO DISPENSE” button to dispense hot water. LCD display. 6 7 2. CUP WATER OUTLET a) Press the “UNLOCK” key ONCE. The “UNLOCK” indicator light will come on. Do not scrub the inner lining with any metal objects, nylon brush, scourer, toothbrush etc., or the inner pot lining may peel off. Clean the INNER POT with a soft damp cloth only. b) Use cup touch dispenser water outlet by placing cup under the outlet and raise the cup slightly upwards. Never use any chemical or abrasive solution or cleaning materials to clean your electric water boiler. If the dispense button or cup switch dispense button is not selected within 10 seconds after selecting the UNLOCK key, the appliance will automatically revert back to the LOCK position. The exterior surfaces of the water boiler should also be cleaned with a soft damp cloth. No chemicals are needed. Do not press the dispensing button when the inner water reservoir is empty. (Doing so can cause damage.) Do not immerse the unit in water or allow the operating panel to become wet. The “Auto” and “Cup Water Outlet” dispensing functions will NOT operate if the electric Thermo Pot is not connected to the mains supply. (Use Air Pump dispensing as No. 3 below) Do not place the unit upside down to dry it. Leave it in an upright position. 3. MANUAL AIR PUMP WATER OUTLET (can be used without power connection) Put the cup under the water outlet. Depress the centre section of the lid manually ensuring that the “unlock” position has been selected. Ensure that the manual air pump is locked again after use. Cleaning and Maintenance Before cleaning the appliance, always ensure that the power cord is disconnected from the mains supply, and that residue water is poured out and the device is cooled. It is recommended that the water is emptied every few days and any loose lime scale rinsed out before re-filling the Thermo Pot with fresh water. Always disconnect the Thermo Pot from the mains before emptying it manually. Cleaning with citric acid. Fill the Thermo Pot with water to the full level. Add 15g approx (three heaped teaspoons) of citric acid (in very hard water areas this may need to be increased to an amount that is found to be effective). Close the lid and connect to the power supply. Press the “Cleaning Button” and hold for 3 seconds (approx) to start cleaning function. The water will then heat to 100º. The water will then keep warm at 98 – 99 degrees, and the water boiler will count down from 70 minutes. During the cleaning phase the green LCD will be lit. LCD stops flashing Ihr 10 Mins later Inner pot & Inner cover Clean the device with a soft sponge and wash it with water. Lime scale should be remove every month as a minimum. It may be necessary to do this more frequently according to the hardness of the water in your area. Citric acid is required (see instructions below). An 80g supply of citric acid is provided with the appliance. Further supplies are easily obtained via amazon.co.uk. LED flashes boiling to 100ºC 70 mins. 9 During the cleaning process no keys/buttons will function. If you want to stop the cleaning process then press the “cleaning button” again and hold for 3 seconds. At the end of the cleaning cycle the Thermo Pots beeps frequently. Ensure that you are present at the end of the cleaning process to respond to the bleep alerts. At the end of the cleaning process it is necessary to disconnect the Thermo Pot from the mains supply and reconnect it to the power supply again to enable the keys/buttons to function again. (If the water has cooled it may initially re-boil and the LCD will be red during which time the dispense button will continue to remain inactive. When the green LCD is lit again normal dispensing can again be undertaken) Using the “Auto Dispense” function flush the water through the unit to clean the pump/dispense outlet. When there is insufficient water left to use this function, allow to cool, remove the lid, and tip the remaining water away manually. Rinse the inner pot with cold water and refill. Replace lid and boil. Flush through the first half a pint of the new water to ensure that there is no residue from the citric acid left in the pump or dispensing outlets. Wipe Thermo Pot with soft cloth and it is ready for use again. Failure to keep the Thermo Pot free from excessive lime scale may result in the stain becoming difficult to remove, and may damage the unit. If the Thermo Pot is not clear of lime scale after the first cleaning cycle it may be necessary to repeat the cleaning process again before proceeding to the second boil/rinse instruction above. The unit should be completely clear of lime scale before normal use is resumed. Quick Clean Use of the cleaning cycle is recommended as above, but a quick clean can be used in between the full clean if required. Fill the Thermo Pot as previously described, and add two heaped dessertspoons (or amount as required) of citric acid to the water and boil. Leave for half an hour at 98º. Use the auto-dispense to flush through the water to clean the pump and outlets. Allow to cool, remove the lid and tip out the residue from the bottom. Rinse with cold water and re-fill. Replace lid and boil again. Dispense half a pint of water to clear any citric acid from the pump and water outlets. Use as normal. It is important to ensure that nobody uses the Thermo Pot whilst it is being cleaned using this method, as unlike the full cleaning programme the Thermo Pot will still dispense water. DO NOT USE THE FOLLOWING ITEMS TO CLEAN THE THERMO POT: Volatile oil or thinner. Abrasive cleaning powder, nylon brushes etc. The electric Thermo Pot is NOT dishwasher safe. STORAGE: Clean as above and dry the Thermo Pot thoroughly before prolonged storage as previously described. 10 11 Important Guidelines A short power cord is provided to minimise hazards involving longer cords. The Thermo Pot should be situated so that the power lead does not hang over the edge of a counter top etc. and does not touch any hot surfaces. The power lead and plug must NEVER come into contact with any water etc. Do not place the appliance on a metal surface when it is connected to the mains supply. Extension cables should NOT be used with the Thermo Pot The Thermo Pot must NOT be modified in any way. European Directive 2002/96/EC Correct Disposal of this product This appliance is marked according to the European Directive above on Waste Electrical and Electronic Equipment (WEEE). This symbol indicates that this appliance may NOT be treated as household waste. To prevent possible harm to the environment or human health from uncontrolled waste, disposal must be carried out in accordance with local environmental regulations for waste disposal. By ensuring that this appliance is disposed of correctly, you will help prevent potential negative consequences for the environment and human health, which could otherwise be caused by inappropriate waste handling of this item. . The Thermo Pot is supplied with a 13 amp plug. If the fuse needs changing it must be replaced with a 13 amp BS 1362 cartridge fuse. Do not use the power cable if it becomes damaged. Consult an electrician or replace the entire cable. WARNING: THIS APPLIANCE MUST BE EARTHED WARNING: This appliance is not intended for use by persons (including children) with reduced physical, sensory or mental capabilities, or lack of experience and knowledge, unless they have been given supervision or instruction concerning use of the appliance by a person responsible for their safety. The Turnkey Thermo Pots comply with Regulation (EC) no. 1935/2004 on materials and articles intended to come onto contact with food. WARNING: The use of any electrical appliance requires both common sense and the adherence to the safety guidelines within this instruction manual, to avoid risk of injury to a person and of damage to the Thermo Pot. 12 13 Guarantee This Electric Thermo Pot is covered by a one year guarantee from the date of purchase, which covers manufacturing defects that occur under normal use only, and where the original purchaser still owns the appliance. Turnkey Domestic will during the guarantee period replace or repair the appliance, or part found to be not working properly free of charge. Beyond the guarantee period repair and carriage charges will apply. The receipt including date of purchase must be provided in the event of any claim within the guarantee period. The Thermo Pot should be returned in the original packaging to avoid damage during transit. If this is not available then equivalent protection must be used. This guarantee does not cover damage caused as a result of inadequate protection during carriage. Exclusions: 1. Failure to carry out the maintenance as described above with regard to the cleaning to prevent lime scale build up may cause damage to the unit which will not be covered by the guarantee. 2. Where the fault has been caused by misuse, neglect or used contrary to the manufacturer’s instructions. 3. Where repairs have been attempted by anyone other than the manufacturer. 4. Where the appliance has been used for hire. EC DECLARATION OF CONFORMITY We the importers certify that the Turnkey Thermo Pots TK-12-5L & TK-13-35L conform with the protection requirements of Council Directive 2004/108/EC, relating to Electromagnetic Compatibility, and Council Directive 2006/95/EC, relating to the Low Voltage Directive, by the application of the following Test Standards: EN 55014-1:2006+A1:2009+A2:2011 EN 55014-2:1997+A1:2001+A2:2008 EN 61000-3-2:2006+A1:2009+A2:2009 EN 61000-3-3:2008 EN 55014-1: Electromagnetic Compatibility – Requirements for household appliances, electric tools and similar apparatus – Part 1: Emission EN 55014-2: Electromagnetic Compatibility – Requirements for household appliances electric tools and similar apparatus – Part 2: Immunity product family standard EN 61000-3-2: Electromagnetic Compatibility (EMC) Part 3-2: Limits for harmonic current emissions (Equipment input current up to and including 16A per phase) EN61000-3-3: Electromagnetic Compatibility (EMC) Part 3-3: Limitations of voltage supply systems for equipment with rated current ≤ 16A EN603351:2002+A11:2004+A1:2004+A12:2006+A2:2006+A13:2008+A14:2010+A15:2 011 EN 60335-2-15:2002+A1:2005+A2:2008 EN 62233:2008 Household and Similar Electrical Appliances – Safety 5. The appliance is second hand. This guarantee does not confer any rights other than those expressly set out above and does not cover any claims for consequential loss or damage. This guarantee is offered as an additional benefit and does not affect your statutory rights as a consumer. Part 1: General Requirements Part 2-15: Particular Requirements For Appliances For Heating Liquids Measurement Methods For Electromagnetic Fields Of Household Appliances And Similar Apparatus With Regards To Human Exposure After Sales Service: If you have any queries regarding this appliance please contact the Sales Team (during normal office hours). Email: [email protected] Phone: 01932 781178 Turnkey Domestic Ltd www.turnkeydomestic.co.uk Registered in England VAT No: 851 486 613 15 Company Reg: No: 8426307 Returns Policy In the event that you wish to return the Thermo Pot please contact your supplier directly. Where the purchase has been made directly from Turnkey Domestic Ltd we will accept return of the item if the customer changes their mind within 14 days of the customer receiving the Thermo Pot. The customer will in this instance pay the cost of the return carriage. A refund less the cost of the original carriage) will be made upon safe receipt of the unused Thermo Pot which must be returned in all of the original packing. If the item develops a fault due to a manufacturing defect within the first six months of the guarantee Turnkey Domestic will pay for the cost of returning the Thermo Pot to us. The item will then be repaired or replaced at our cost assuming that the fault is not due to misuse or general “wear and tear”. If the Thermo Pot is more than six months old then the cost of returning the item to us will be paid by the customer. The return postage (as above) will be paid by Turnkey Domestic Ltd. Troubleshooting Fault Possible Cause Solution Unit doesn’t work Not plugged into power supply Plug in unit and switch on power supply Any malfunction Power lead not inserted into back of unit properly Doesn’t dispense water after boiling or running cleaning cycle Air in the pipes Ensure that power lead is fully plugged into the back of the unit Depress the Auto Dispense button several times until water flows freely Any other fault contact supplier Returns should be sent to: Turnkey Domestic Ltd Access Storage Unit F Dolphin Industrial Estate Windmill Road Sunbury on Thames TW16 7HT In all cases the Thermo Pot must be returned in ALL of the original packing, or equivalent protection used. In the event that damage occurs during transit due to inadequate packing then if the unit is repaired the cost of replacing the damaged casing would be subject to a charge. Please fill in the enclosed “Returns Note” and include with the return. 17 v6 15.20.14