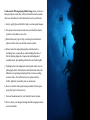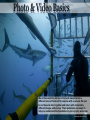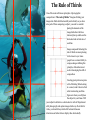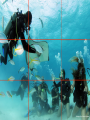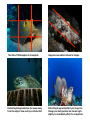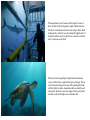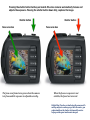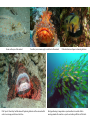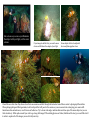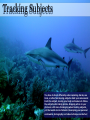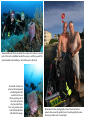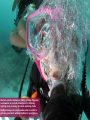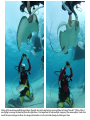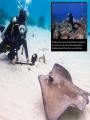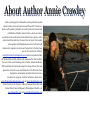
1
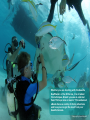
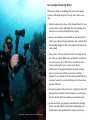
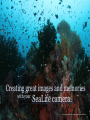
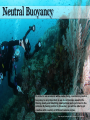
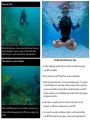
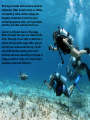
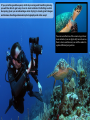
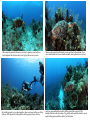
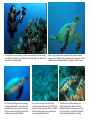
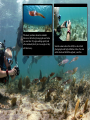
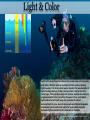
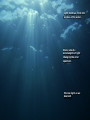
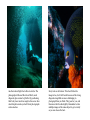
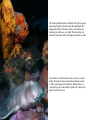
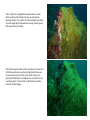
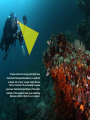
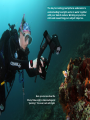
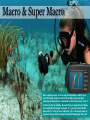
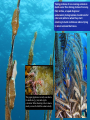
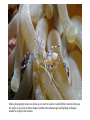
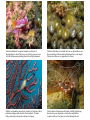
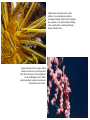
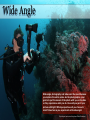
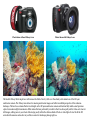
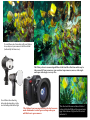
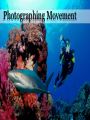
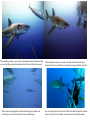
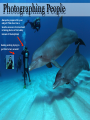
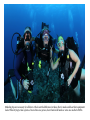
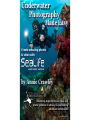
Underwater
Photography
Made Easy
Create amazing photos
& video with
by Annie Crawley
Including
Including high
high definition
definition video
video and
and
photo
photo galleries
galleries to
to show
show you
you positioning
positioning
and
and best
best techniques!
techniques!
BY ANNIE CRAWLEY
SeaLife Cameras
Perfect for every environment whether you are headed on a tropical vacation
or diving the Puget Sound. These cameras meet all of your imaging needs!
©2013 Annie Crawley
www.Sealife-cameras.com
www.DiveIntoYourImagination.com
Edmonds Underwater Park, Washington
All rights reserved. This interactive book, or parts thereof, may not be reproduced in any form without permission in writing from the publisher, Dive Into Your Imagination, LLC a
company founded by Annie Crawley committed to change the way a new generation views the Ocean and themselves. Dive Into Your Imagination, Reg. Pat. & Tm. Off.
Underwater Photography Made Easy shows you how to
take great photos and video with your SeaLife camera system.
After our introduction to this interactive book you will learn:
1. Easy to apply tips and tricks to help you create great images.
2. Five quick review steps to make sure your SeaLife camera
system is ready before every dive.
3. Neutral buoyancy tips to help you take great underwater
photos & video with your SeaLife camera system.
4. Macro and wide angle photography and video basics
including color, composition, understanding the rule of
thirds, leading diagonals, foreground and background
considerations, plus lighting with strobes and video lights.
5. Techniques for both temperate and tropical waters, how to
photograph divers, fish behavior and interaction shots, the
difference in capturing animal portraits versus recording
action in video. You will learn how to capture sharks,
turtles, dolphins, clownfish, plus so much more.
6. How to visualize and capture images needed to tell a great
story plus tips to tell your story.
7. Care and maintenance for your SeaLife Camera system.
8. How to share your images through SeaLife imaging contests
and social media.
Whether you are shooting with the SeaLife
ReefMaster or the DC Series, it is all about
the technique. Should you use an external
flash? Fisheye lens or macro? This enhanced
eBook shares a variety of diving situations
and how you can get the most from your
SeaLife Camera.
Stingray City, Grand Cayman
Welcome to the Underwater Photography & Video Club!
About SeaLife Cameras
Underwater photography and video changes your life and your
diving. Once you see how easy it is to capture your experience and
share it with your friends and family, you want to do it again and
again. SeaLife Cameras are a great way to capture memories
underwater whether you are a beginner diver or more advanced
and want to start underwater imaging. I created this guide for
SeaLife Cameras to give you professional tips and tricks so you can
take amazing underwater photographs and video with your system.
For nearly twenty years, I have been training divers and snorkelers,
kids and adults, beginners and pros on the skills and techniques of
how to shoot great underwater photos and video. SeaLife Cameras
can do it all. This enhanced eBook will inspire and help you. You
will learn proper body positioning, composition, lighting, and what
shots you need to tell a great story. Most of us dream of diving and
swimming with turtles, dolphins, and sharks; but with your SeaLife
Camera in hand you get to capture
your experience to share with
others! Consider me your personal
camera coach as I’m sharing my
professional secrets with you. As
you explore this eBook, imagine
you are behind your SeaLife camera
taking the shot. I’m looking forward
to go on an adventure with you.
Keep diving into your imagination
and let’s get started creating
Underwater Photography Made
Easy!
SeaLife DC1400 shoots photos and
high definition video.
Whether it's your first
time snorkeling or
your annual scuba trip
in the tropics, SeaLife
Cameras help you
discover the
underwater world. For
over 25 years, SeaLife
has made the world’s
most popular
underwater cameras.
All SeaLife products
have something in common - they make great images easy to
obtain. At SeaLife, our goal is to develop innovative underwater
cameras and accessories that make underwater photography easily
accessible to everyone.
The first SeaLife underwater camera was developed in 1993. Our
cameras made it easier and more enjoyable then ever before to take
pictures underwater. In 2000, SeaLife pioneered underwater
imaging with the introduction of its first digital underwater camera
which revolutionized the world of underwater photography.
Today, SeaLife offers a range of underwater cameras and
accessories that allows users to change from photography to high
definition video underwater. SeaLife is the only truly expandable
camera that allows you to add accessories when you want because
all SeaLife underwater strobes and lenses are interchangeable with
nearly every SeaLife camera.
Annie Crawley
4
Table of Contents
I.
Creating Great Images
• Intro to Camera
6
• Buoyancy
9
• Body Positioning
II.
1
Photo & Video Basics
12
17
• The Rule of Thirds
16
• Light & Color
21
• Macro & Super Macro
32
• Wide Angle
37
III. Photographing Movement
40
• Tracking Subjects
45
• Photographing People
47
IV. SeaLife Care & Maintenance
55
V.
56
Share Your Images
Photo by Goh Iromoto
Information and Support
Getting to Know Your Camera
We created easy to read and use downloadable manuals on
our website: www.sealife-cameras.com/manuals
If you practice using and operating your SeaLife camera system
on land before you go scuba diving or snorkeling, you can focus
on finding animals you want to photograph and film when you
get in the water.
SeaLife cameras are designed to be EASY to set up!
See the buttons and display clearly underwater.
6
Set Up Before Entering Water
When scuba diving or snorkeling with your SeaLife camera
system, run through this quick five-step review before every
dive.
1. Check to make sure you have a fully charged battery for your
camera, strobe, and/or video light. Consider bringing extra
batteries so a set can be charging while you dive.
2. Ensure your memory card is inserted. Do you have plenty of
empty space? Review images underwater, but avoid deleting.
Save deleting images for after you download and back up the
card on land.
3. Take a photo with your system on land. Try zooming in and
out with your camera. Make sure your digital zoom function
on your camera is set to OFF. Can you switch from macro
mode to wide angle? Is your camera set for land or
underwater? Go through the Easy Set-Up menu to make
sure you are shooting with the correct menu settings
designed for your system. Turn the camera around and take
a photo of yourself. Is your strobe firing and your lens clean
and free of debris?
4. Shoot 20 seconds of video and review. Toggle back and forth
between photo and video. Switch from macro to wide angle.
Practice on land until it is stored in your muscle memory.
5. Double check that you prepared your underwater housing,
strobe, and video lights correctly before submerging your
SeaLife camera system underwater. Prepare yourself for...
Raja Ampat, Indonesia diving aboard Dewi Nusantara
7
Creating great images and memories
with your
SeaLife camera.
Raja Ampat, Indonesia diving aboard Dewi Nusantara
Neutral Buoyancy
In order to use a camera while scuba diving, maintaining neutral
buoyancy is very important so we do not damage aquatic life.
Moving slowly and breathing slowly allows us to get close to the
animals. By having control in the water, you will be able to get
creative with a variety of different camera angles.
Raja Ampat, Indonesia diving aboard Dewi Nusantara
Buoyancy First
Before taking photos or video, always check your buoyancy
and positioning. You never want to create a dust storm
while diving or you will create bad viz and backscatter.
Then Sneak Up on Your Subjects
Underwater Buoyancy Tips
1. Practice weighting yourself so that you slowly sink when you empty
your BCD and exhale.
2. Slowly add air to your BCD until you can hover effortlessly.
3. Watch for signals that mean, “I am not neutrally buoyant.” If you have
to breathe deeply, use your arms, or kick your legs to stay in one place,
you are not neutrally buoyant. Add air in small amounts to your BCD.
Practice patience as you establish buoyancy and watch for these signals
throughout your dive.
After establishing buoyancy you can move in close to your
subject without damaging the reef. The less you move, the
better.
4. Every time you equalize your ears, check your buoyancy. As you
descend, you will have to add more air to your BCD.
5. As you start to ascend to a shallower depth, you will need to deflate
your BCD. Re-check buoyancy again, you may need to add more air!
We may get excited when we see a sea turtle
underwater. When we get excited, we change
our breathing, which can then change our
buoyancy. Sometimes it is hard to resist
swimming towards a turtle, yet if you remain
calm they will often swim directly to you.
Look at the different divers in this image.
Notice the angle they are in, in relation to the
turtle. The angle of your body in relation to a
subject will change the image. When you get
low with your camera and shoot up, it looks
much different than shooting down. Each
technique can work, depending on the type of
image you want to create. Let’s look at a few
examples to show the difference.
If you practice good buoyancy skills by moving and breathing slowly,
you will be able to get very close to most animals. Perfecting neutral
buoyancy gives you an advantage when trying to create great images
and makes shooting underwater photography and video easy!
You can zoom the lens of the camera to get closer
to an animal or you can physically move closer so
there is less room between you and the animal to
capture different perspectives.
When shooting animals that move you want to position your body low
and anticipate the direction they travel, giving them room to move.
By including people in your photographs, others can imagine they are diving
with you. It is important to take pictures of the people you are with too.
When we move and breathe slowly we can get close to the animals. If we
move and breathe fast we can startle animals, causing them to swim away.
Look how camouflaged the turtle’s shell is against the coral reef. This
hawksbill turtle swam down deep. Try getting underneath the turtle to get an
angle looking up towards the surface for blue water.
As you get close to your subjects you may need to adjust your strobe setting
up or down. The larger sun icon indicates more light output, the smaller sun
icon indicates less light output.
If you are experiencing out of focus images,
you might be shaking the camera when you
press the button. Use only your index finger
to de-press and be careful not to shake your
arm which can cause shots like this.
When you get a subject that cooperates with you take multiple
images and try different angles. Animals move and you do too. Take
multiple images of the same subject to capture a variety of poses.
If you are too far away from your subject,
everything might look green or blue. The light
from your strobe can only reach so far. Rule of
thumb in photography, when you think you
are close enough, move closer!
Great buoyancy and knowledge of your
subject creates better photos and video.
Hawksbill turtles love to eat sponges. If you
don’t scare them, you can dive/snorkel with
turtles for hours while they are feeding.
The more you know about an animal’s
behavior, the better photographs and video
you can take. Try approaching squid (and
other animals) slowly at a low angle or they
will dart away.
SeaLife cameras have the ability to shoot both
photographs and high definition video. You can
switch back and forth throughout your dive.
Photo & Video Basics
We all have exciting stories to tell, and everyone has a
different view of the world to express with a camera. We can
be on the same dive together and return with completely
different images and stories. These guidelines are meant to
help you understand the foundation of photography and video.
Guadalupe Island, Mexico
The Rule of Thirds
One of the most well known principles of photographic
composition is “the rule of thirds.” Imagine dividing your
images into thirds both horizontally and vertically so you have
nine parts. When composing a subject, you want to consider
placing the elements of the
image both where the lines
intersect plus up and down the
horizontal and vertical axis of
each line.
Images composed following the
rule of thirds are more pleasing
to the viewer’s eyes. Some
people have a natural ability to
compose images utilizing this
principle, while others must
work at developing the skill of
composition.
Creating great pictures requires
a bit of thinking. When looking
at a scene, break it down to find
what is interesting and then
figure out where you will place
the subject in your frame. Will
your subject look better as a horizontal or vertical? Experiment
with photography and capture images both ways. Note that for
video, you should always stick with horizontal because
televisions and other devices display video horizontally.
Stingray City, Grand Cayman
The Rule of Thirds applies to all subjects.
Distracting backgrounds take the viewer away
from the subject. How could you reframe this?
Diagonal views add an interest to images.
Distracting foregrounds affect your image too.
Change your body position and camera angle
slightly, to immediately affect the composition.
Light & Color
Light is the most important element in underwater photography
and video. We lose light as we descend. The surface refracts
light causing it to bend, while water absorbs the wavelengths of
light causing changes to the color spectrum. Red is the first
color to go, followed by orange and yellow. SeaLife cameras are
engineered with color correcting firmware. They understand
light and were built with easy set up menus to adjust
automatically for you. SeaLife also engineered interchangeable
underwater photo and video lights for expandable systems
because light is essential for underwater images.
Raja Ampat, Indonesia diving aboard Dewi Nusantara
Light bends as it hits the
surface of the water.
Water absorbs
wavelengths of light
changing the color
spectrum.
We lose light as we
descend.
Customize your SeaLife camera for your underwater environment: photos.
We see the world with light coming from above. The biggest light
source on our planet is the sun. It is the most powerful tool we
can use to create our images. When shooting underwater photos
and video without a strobe or light, keep the sun at your back to
get the best color. As you dive, always think about where the sun
is in relation to the subject you want to photograph. When you
start adding underwater photo and video light sources, you can
begin to paint your picture with light. With lights on your system,
you become an artist. Browns become red, greens and purples
“pop”, and we can truly appreciate the bright and colorful sea.
Studying other people’s images helps you start thinking about
creating images before you shoot. Every time you look at a
photograph or video you like, try to figure out what the creator
did to capture the image. How is the image composed? Did they
shoot with one light or two? Strobes or no strobe? Does the light
come from the top, side or bottom? All of these suggestions are
guidelines because every rule can be broken. Photography is
subjective. Use your imagination and experiment.
This batfish was taken without a strobe, adjusting for the correct
depth using the camera's Easy Set-up Guide. This is a portrait of a
batfish. There is a strong composition angle drawing the viewer
into the scene. The blue background compliments the image.
Another natural light shot without a strobe. The
photographer followed the rule of thirds, used
diagonals, plus created a 3D effect by positioning
their body lower and at an angle to the scene. How
does this photo make you feel? Great photographs
evoke emotion.
Every rule can be broken. This shot divides the
image in two, but it still works because of the strong
diagonals. Angelfish are more challenging to
photograph than you think. They pose for you, and
then move their bodies slightly. Remember to take
multiple images of the same subject to get a variety
so you can choose the best.
The strobe paints this picture with light. The yellow sponge
and orange frogfish come alive from the added light. The
background is dark. This type of shot can be taken early
morning, late afternoon, or at night. The time of day you
dive and snorkel also affects the images and video you take.
Horn sharks are often found in cracks, crevices, or under
ledges. Shooting in these circumstances without a strobe
would create images with a blue hue. Adding strobes or
video lights gives you the ability to paint your subject with
light to see the true color.
This is a photo of a magnificent anemone taken on a late
afternoon dive with one light. Use my one arm rule for
shooting subjects. You want to be one arm length away from
any wide-angle subject because there is only so much power
that comes from your strobe.
This is the same shot taken of the same subject. Go back and
forth between photos to see how the light paints the scene.
If your camera is set correctly with a strobe and you are
getting shots like this it is usually because your strobe is not
reaching subject, it is turned off, or the batteries could be
dead and need changing.
This image draws you in because of the subject, the use of
lines, the rule of thirds, diagonals, depth of field, and color.
The diver is in shallow water and is not using a strobe. Start
looking at the world as if you are looking through the lens. It
is important that even if you don’t have a camera to take the
shot, you always see the shot!
When you start recognizing how light works underwater,
you too will be able to capture these types of images. This is
a shot taken shooting into the sun while painting the turtle
with the light of a strobe. Imagination drives creativity and
innovation. We want to see your images. Share your photos
and video with us through our social media sites.
Customize your SeaLife camera for your underwater environment: videos.
When close to the surface, you do not need
a video light. As you descend, video lights
add more color.
Add one or two video lights for shooting
during the day or night.
If your camera is set for underwater while
photographing or filming on land, all of
your images will appear red.
When shooting underwater video, you want to hold the camera as still as possible to avoid camera shake. Shooting video is all about
capturing the motion and you want to give viewers action. Action is caused by the subject moving in and out of frame, you moving, or both
the subject’s and your motion. Check buoyancy, try to figure out which direction the subject may move, and then engage your arm muscles
and apply a little bit of pressure on either side of the camera to stabilize the camera before hitting record. Apply all the guidelines you
learned at the beginning of this chapter. Think about color, composition, keep the sun at your back, and consider the rule of thirds. SeaLife
cameras are great because you can switch back and forth between photo and video of the same subject during your dive.
Light comes out of your Digital Pro Flash and Photo/Video
Light at an angle. Be close enough so the light reaches
your subject. You can easily adjust your strobe or light if
your images are too bright or too dark.
Remember the one arm rule: when shooting wide angle, you
want to be close enough to the subject so that if you reached
out your arm, you would be able to touch it.
If you are too far away, the light may
illuminate the space between you and the
subject. All of your images might be too
dark or look as if it is snowing because
you have illuminated particles in the water
instead of the subject. Keep your shooting
distance within 5 feet of your subject.
The key to creating great pictures underwater is
understanding how light works in water together
with your SeaLife camera. Working on your dive
skills and researching your subject helps too.
Here you can see how the
Photo/Video Light is illuminating and
“painting” the coral reef with light.
Macro & Super Macro
Macro photography is close-up photography in which you
look for small subjects and fill the frame. You can take
pictures in Macro Mode, indicated by the flower icon, from 3
inches (7 cm) to infinity. By switching to Super Macro Mode,
indicated by the flower icon and "S," you can shoot within
one inch (2. 5 cm) of your subjects. Try to move as close as
you can to your macro subjects without damaging the reef.
Taking pictures of non-moving animals is
much easier than taking photos of moving
fish, turtles, or squid. Beginner
underwater photographers should look for
color and patterns when they start
shooting to build confidence before trying
to shoot animals that move.
The pygmy pipehorse is rarely seen due to
its small size (3-5 cm) and cryptic
coloration. When shooting video in macro
mode you need to hold the camera steady.
Macro photography slows you down as you start to look for colorful little creatures living on
the reefs. As you look at these images consider the camera angle and lighting technique
needed to capture the creature.
Colorful nudibranchs are perfect subjects for all levels of
photographers to shoot. They move very slowly so you can focus
on body and camera positioning plus strobe or light placement.
The head of this blenny is smaller than one cm. Remember to use
the surroundings of the animal to add perspective to your images.
Patterns and color are very appealing to a viewer.
Sticking to animals that move slowly is easier for beginners. Shoot
patterns and shapes with colorful, vibrant subjects. Consider
body positioning to change the outcome of an image.
We slow down with cameras and explore. Find the right shrimp
that wants to pose. Be patient as you look for subjects that
cooperate with you, in a place you will not damage the reef.
Feather stars come in the colors of the
rainbow. You can make great patterns
shooting the design of their arms. This photo
also captures a 2 cm yellow shrimp. Shrimp,
crabs, squat lobsters, and cling fish make
homes in feather stars.
Pygmy seahorses live in sea fans. These
creatures are the size of your fingernail.
They often turn away from your light and
can be challenging to shoot. When
shooting animals, you need to make sure
the animal’s eye is in focus.
Wide Angle
Wide angle photography and video sets the mood because
you capture the entire scene. As the photographer, your
goal is to put the viewer of the photo with you on the dive
so they experience what you do. How will you paint your
picture with light? What perspective will you choose to
shoot? Have fun as you experiment with wide angle!
Raja Ampat, Indonesia diving aboard Dewi Nusantara
Photo taken without Fisheye Lens
Photo taken with Fisheye Lens
The SeaLife Fisheye Wide Angle Lens will increase the field of view by 80% over the already wide 26mm lens of the DC1400
underwater camera. The Fisheye Lens allows for amazing underwater images and offers incredible perspective of the undersea
landscape. The lens has a 16mm effective focal length on the DC1400 underwater camera and features fully multi-coated precision
optics for maximum light transmission. What makes this lens particularly versatile is that it works equally well for video as it does for
still images, adding more to your shots while staying easily within the distance limits of flash or video lights. It also fits all the DC
series SeaLife cameras and works very well above water for landscape photography too.
To avoid these out of focus shots with your Fisheye
Lens, always set your camera to the Macro Mode
(indicated by the flower icon).
The Fisheye Lens is an amazing addition to the SeaLife collection and is easy to
take on and off your camera so you can shoot super macro, macro, wide angle
and super wide angle on every dive.
Use a diffuser when shooting
wide angle photography or video
to soften and spread out the light.
*The Fisheye Lens was engineered to be shot in macro
mode. Remember to check your settings when you
add this lens to your camera.
This video has little camera shake with lots of
action as the butterflyfish eat the sergeant major
eggs. Notice the use of light as the fish swim in
and out of it.
Photographing Movement
Frogfish use camouflage to blend into the coral reef.
Now that you understand the basics of macro, super macro,
wide angle, and lighting underwater, let’s explore different
techniques for capturing animals. When you compose your
subject and press the shutter button to take a photo, SeaLife
DC-series cameras focus and display a green box in the
viewfinder. When taking non-moving subjects it is easy to
hold your camera steady and still. When you transition from
non-moving subjects to ones that move, you will need to
practice how the focus works together with the shutter. I
suggest starting with slow moving or static subjects before
transitioning to moving animals.
When taking images of underwater creatures, the
most important focus area is the eyes. You always
want to have the eyes in focus because people tend to
connect with animals when looking at their eyes.
Pressing the shutter button halfway on SeaLife DC-series cameras automatically focuses and
adjusts the exposure. Pressing the shutter button down fully, captures the image.
Shutter button
Focus area box
The focus area frame turns green when the camera
is in focus and the exposure is adjusted correctly.
Shutter button
Focus area box
When the focus or exposure is not
suitable, the focus box turns red.
Helpful hint: Practice on land using the camera with
moving subjects so when you get into the water, you
understand how the shutter button and focus box
helps you take great underwater images.
Focus on the eye of the animal.
Consider your camera angle in relation to the animal.
Fish “yawn” when they feel threatened. Capturing behavior of the animals adds
action to an image and interest to video.
Fish slow down and pose in cleaning stations.
Body positioning is important as you transition from static fish to
moving animals. Be creative so you do not end up with lots of fish tails.
Get as close as you can so you illuminate
the subject with your light, not the water
column.
If your images look like this, you need to move
closer and dial down the output of your light.
Same subject with strobe adjusted
down and photographer closer.
Clownfish move fast when they dance above their sea anemone and dart through the tentacles. Some fish are easier to photograph than others.
When photographing and filming animals, look for subjects that will pose for the camera so you can concentrate on keeping your camera still.
Sometimes when animals move, we will move our bodies too. Try to shoot wide angle, medium shots and close-ups of the same subject so you can
tell a visual story. What caption would you write to go along with images? When taking photos and video, think about the story you would like to tell
in order to capture all of the images you need to tell your story.
Tracking Subjects
You have to shoot differently when capturing sharks, sea
lions, or other fast moving subjects. Hold your camera and
track the subject, moving your body and camera to follow
the subject while taking photos. Stopping action in your
photos is a bit more challenging when tracking subjects,
yet the results can be fantastic. Developing your personal
underwater photography and video technique can be fun!
When tracking a subject you want to give them head room in the direction they
are moving. Many animals have patterns they follow and often circle around.
In this video the photographer tracks the shark allowing for head room
in the direction of travel as the shark circles around the cage.
When tracking animals you can capture the same subject with a variety of
backgrounds. Observe the differences in these two images. What do you like?
Can you see the pole in the divers hand? This is the SeaLife AquaPod. It allows
divers to get closer to the animals or shoot self-portraits with the animals.
Photographing People
Always be prepared for your
subject! This diver has a
SeaLife camera in his hand and
is taking photos of his buddy
instead of the dolphins!
Buddy pointing trying to
get him to turn around!
Most of us start shooting photos and video underwater because we want to document what we see and share our experiences
with our friends and family. An important rule of thumb to follow while building your picture library is to include images of
people. Although you and I might be able to watch dozens of images of marine life, our non-diving friends need to imagine they
are underwater with us. The only way they can do that is if you include images of people with turtles, sharks, clownfish and all
the other creatures you like to photograph and video. If you think shooting fish is challenging, just wait until you start trying to
capture people! Here are a few modeling tips to consider discussing with your dive buddies before you go underwater:
1. What kind of mask is your buddy
wearing? Clear masks open up the eyes
and the face unless your strobe is placed
just right. Black masks are harder to
photograph. My spare mask has a clear mask
skirt, just in case I need to loan it to my buddy.
2. Review communication skills before you
go diving. There are times you want your
buddy in your photograph with the turtle and
times you may want them out of the shot.
3. If you want your buddy in your image,
discuss proper buoyancy techniques and
body positioning. Make sure their gauges are
in place. Figure out your position with the
camera in relation to where you want your
buddy and talk about scenarios before diving.
4. Get your buddy to smile! You don’t need to
take your regulator out of your mouth for every photo and give a big cheesy grin, yet when a diver smiles while holding their
regulator in their mouth they actually look happy. Their eyes light up and they look like they are having fun. Our faces change
when we smile.
Some people like taking their regulators out of their
mouths in photographs. I will always take the photo but
most published photos are with divers having their
regulators in their mouth. It's best for divers to have all of
their equipment in place.
Whether you are trying to take portraits of your friends or
have a dive buddy model, basic underwater photography and
video tips apply. Remember to start by checking your
buoyancy. Where is the sun? Do you have your strobe or
video light turned on? Are you shooting wide angle or closeup? Is your camera set correctly in the Easy Set Up menu?
How will you use the rule of thirds to capture the scene? Are
you close enough? Take a photo and review it. If you are
using strobes or video lights, do you need to adjust them? Are
they too bright or too dark?
Have fun, use your imagination and be creative
underwater.
Modeling tips are necessary for all divers. Check out the difference in these diver’s masks and how their equipment
looks. When trying to take a photo of more than one person, have them hold hands or onto one another’s BCDs.
Sisters Debbi and Terri model for the camera. We found a colorful
part of the reef, established neutral buoyancy, and they posed. We
synchronized our breathing so no bubbles are in the shot.
Be careful of what you
place in the foreground
and background. Be
careful not to have
divers growing out of
the coral reef as the
diver pictured here.
How you position your
body behind the lens
will affect the image.
Remember to take photographs on land. An hour before
sunset is known as the golden hour for photography because
the sun provides such a warm light.
We face similar challenges taking photos of people
underwater as on land. Watch out for blinking,
looking away, moving, and even exhaling. Take
multiple images of people underwater in order to
get one great shot without bubbles in your image.
Many of the most successful images taken of people are when capturing a scene without a trained “model.” When I dive, I
am trying to convey the emotion from the experience. It is important to take multiple images of the same subject. Look how
much the scene changes in these two images. Remember to relax, breathe slowly and take your time.
Another great accessory from SeaLife is the AquaPod.
You can use it to get closer to the animals without
disturbing them with your body or your bubbles.
SeaLife Care & Maintenance
SeaLife cameras are easy to care for and maintain.
1. After using your camera underwater, thoroughly rinse the
sealed camera housing in fresh water for at least five
minutes. Dive boat operators and resorts have special rinse
buckets for cameras only, since equipment rinse buckets
often have detergents in them. Use only clean fresh water
on your SeaLife camera. Push each housing button and
knob several times while camera is submerged.
2. Shake the housing dry. Use clean lens tissue to dry the lens
to avoid water spots.
3. Once you get home after traveling, repeat the above steps.
Allow your housing and photo and video lights to dry
completely before storing them for long periods of time.
Remove the batteries from your camera and lights. Charge
them and store them with your camera case.
Make sure you
have extra
Moisture
Muncher for
your trips. This
eliminates
condensation
inside the
camera's
housing.
Consider extra
batteries and an
extra charger so
you can charge
batteries without
needing to plug in
your camera.
4. Always check your O-rings whenever you open and close
your system. SeaLife camera housing O-rings do not need
to be greased, but should always be free of debris such as
hair or sand. If you need to clean the O-ring, remove it with
the end of your cleaning brush (never use a sharp object).
Clean it with a damp cotton cloth. Check the groove to
make sure it is clean. Re-install the O-ring so it matches
the shape of the groove and gently push it into place.
Share Your Images
Once you start taking great pictures and video
with your SeaLife camera, please share them
with us on the SeaLife website and our social
media channels.
Kevin Roche uses his SeaLife Camera to capture his first shark dive!
Connect With Us
Each calendar month, SeaLife accepts photo and video submissions for
contests and photo galleries on the SeaLife website and social media
channels. You can find out more at: www.sealife-cameras.com/photocontest
To submit your photos, head over to the Photo Upload page and submit
your photo and information.
By doing this, there's an opportunity to appear in the SeaLife online
gallery
Photo by Goh Iromoto
Don't forget to share your images on your own social media pages with
your friends and family - images convey the unique experience of diving
in a way that words are unable to do.
www.facebook.com/
SeaLifeCameras
www.youtube.com/
sealifecameras
www.twitter.com/
sealifecameras
www.flickr.com/photos/
sealifecameras
www.pinterest.com/
sealifecameras
We’d love to hear from you!
[email protected]
Learn more about SeaLife Cameras: www.SeaLife-Cameras.com
Underwater Photography Made Easy by
Annie Crawley teaches you how to take
amazing photos and video with your SeaLife Camera
Professional photographer and filmmaker, Annie Crawley, gives you
inspiring and creative imaging ideas. Check out all of the Dive Into
Your Imagination ocean based enhanced ebooks. They offer an
amazing range of interactive features including:
High Definition Video
Amazing Underwater Photo Galleries
Interactive Screens
Titles by Annie Crawley and Dive Into Your Imagination to get you
excited and inspired about underwater photography and video:
http://itunes.apple.com/us/artist/annie-crawley/id561639012?mt=11
About Author Annie Crawley
Author, photographer, filmmaker, and inspirational speaker
Annie Crawley, lives and works around the world. Trained as a
photo and broadcast journalist, her work has been broadcast and
published worldwide. Annie Crawley, aka Ocean Annie,
specializes in the underwater realm and has been a photo, video,
and scuba diving instructor for more than 20 years. She teaches
photography and filmmaking classes for both land and
underwater, beginners to advanced. Contact her to find out how
you can dive and travel with her:
[email protected] Annie was inducted into
the Women Divers Hall of Fame and nominated an Oris Sea Hero
because of her award winning series of books, enhanced eBooks,
DVDs and Educator Guides developed to change the way the next
generation views the ocean and themselves. The Dive Into Your
Imagination entertaining and educational series is a
revolutionary program. Visit her websites to learn more:
www.DiveIntoYourImagination.com and www.AnnieCrawley.com
Annie Crawley is the Director of Beach Camp at Sunset Bay and
Scuba Diving Camp in Edmonds, Washington. Check it out:
www.SunsetBay.com and www.ScubaDivingCamp.com
Special Thanks
Now you are ready to bring back your amazing encounters from the undersea world. The most important thing you can do
is shoot, edit, and share your images. You will excel as a photographer with the foundation of this interactive enhanced
eBook, but remember you can break every rule. We encourage you to experiment, take classes, edit your photos and video,
and look at other artists. You do not have to be great to get started, but you do have to get started to be great! Scuba
diving changes our lives. Helping you document your experiences by coaching you on creating great images and video has
been an exciting endeavor. Please make comments, email questions, and let us know what else you would like to learn.
This interactive book has been made possible because of underwater enthusiasts like you! SeaLife Cameras wanted me to
create an interactive easy-to-apply book on underwater photography and video for divers, snorkelers, scuba instructors,
and retail dive centers. Underwater Photography Made Easy with SeaLife Cameras used a variety of user images and
world class destinations. We would like to thank the dive operators and their crews including: Underwater Sports Seattle,
Dewi Nusantara, Kasawari Resort, Anthony’s Key Resort, Beach Camp, Sport Diver Magazine, Shark Dive Roatan,
DiveTech, Cobalt Coast Resort, Kids Sea Camp, Underwater Sports Edmonds, and Scuba Diver Life. Special thanks also to
dive buddies, contributing photographers, and models including Terry Keffler, Katie Fraser, Charlie Nichols, Lorretta
Brown, Richard Jones, Shelly McGahee, Guido Brink, Jen Peyton, Addie Benz, Margo Peyton, Doug Laing, John Dawson,
Jennie Savage, Kevin Roche, Leroy Wickham, Simon Vetterli, John McCullough, Bill Kuiper, Liz Logan, Dan Johnson,
Bernd Rac, Terri Bodle, the Bodle family, the Stiber family, the Sylvester Family, Zen diver Zebedee Wakely, Kaitlyn
Unterman, Barry Fackler, Madeline Velazquez, Goh Iromoto, Sven Harms, Bjorn Harms, Joshua Gilmour, Karl Schuster,
and Vu Phan.
Thanks for helping create a SeaLife underwater world view!
Keep diving into your imagination,
Annie Crawley
aka Ocean Annie