Transcript
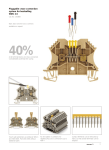
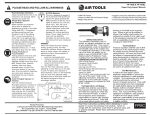
User’s Manual
No. 99MAG026B
Series No. 215
Stand For Small Holes
Introduction
To take full advantage of this instrument, read this manual thoroughly first. After reading it, retain this manual for future reference. The product
specifications and the information in this manual are subject to change without notice. Warranty: In the event that the Mitutoyo Comparator Stand
should prove defective in workmanship or material, within one year from the date of original purchase for use, it will be repaired or replaced, at our
option, free of charge upon its prepaid return to us. Please contact your Mitutoyo office.
Export Control Compliance
The goods, technologies or software described herein may be subject to National or International, or Japanese Export Controls. To export directly or
indirectly such matter without due approval from the appropriate authorities may therefore be a breach of export control regulations and the law.
On Various Types of Notes
IMPORTANT
・ Type of note that provides information essential to the completion of a task. You cannot disregard this note to complete the task.
・ An important note is a type of precaution, which if neglected could result in a decreased accuracy or instrument malfunction/failure.
NOTE
・ A note emphasizes or supplements important points of the main text. It also supplies information about specific situations.
■Operating Environments
this stand carefully and in an environment in which the operating temperature is between 0 and 40℃
IMPORTANT ● Use
between 30 and 70%RH with no condensation.
and the humidity is
● Use this stand at a site with a minimum amount of dust, oil, and oil mist, and which is not direct exposed to sunlight.
■Cautions on Use
IMPORTANT ● This stand is for measuring small holes using a 526 series bore gage. It cannot be used
for a 511 series bore gage.
● Be careful not to drop the stand or knock it over. If the stand is dropped or bumped
strongly, be sure to check that it works properly before using it again.
● Check that the clamp holder and the flat anvil (base) move up and down smoothly. Check
that screws used to attach parts are not loose.
● Parts such as the flat anvil can easily become rusted. Do not use the stand in a humid
environment.
● Do not apply a concentrated load at a single, localized point as this might damage the flat
anvil, which could affect the measurement results.
● Mitutoyo's warranty will become void if the stand is repaired, disassembled, or modified
by other than Mitutoyo.
■ Names of Parts and How to Use Them
○This stand was designed to attach a 526 series bore gage (sold separately) to enable a large volume of workpieces to be measured quickly
and smoothly.
○First loosen the column slider and slide it up to the top of the column. Tighten the column slider and anchor the clamp holder. Turn the knob
on the front of the clamp holder and anchor the bore gage. Place the setting ring on the flat anvil. [Figure 1]
○Push the lever until it reaches the stopper to raise the flat anvil, fasten the flat anvil clamp and anchor the flat anvil in position. Lower the
clamp holder until the stylus of the bore gage is inserted into the setting ring. Hold onto the clamp holder to make sure that it does not drop
down suddenly. [Figure 2]
○Loosen the flat anvil clamp and lower the flat anvil. Hold onto the flat anvil to make sure that it does not drop down suddenly. Return the lever
to its original position and confirm that the stylus of the bore gage is inserted firmly in the setting ring. Align the setting ring with the origin and
place the workpiece on the flat anvil. Measure the workpiece. [Figure 3]
○The flat anvil position can be adjusted for measurement (by 38 mm when a workpiece is shipped). Loosen the hex screw at the base of the
lever to loosen the lever and flat anvil. Adjust the flat anvil to the desired height and tighten the flat anvil clamp. Push the lever until it reaches
the stopper and tighten the hex screw.
○Workpieces with a diameter of φ25 to 50 can be positioned on the flat anvil by using a V attachment (No. 902798: sold separately), allowing
even smoother and faster measurement.
Size of clampable objects:
φ8 to 16
Maximum flat anvil
adjustment: 38 mm
Bore gage
(526 series)
Clamp holder
Workpiece
Setting ring
Column slider
Lever
Flat anvil
[Figure 1]
[Figure 2]
[Figure 3]
Stopper
V attachment
(sold separately)
No.902798
Flat anvil
clamp
NOTE
■
● Move the lever slowly. If it is not moved slowly, the measuring instrument and workpiece might interfere with each other, causing
scratching or damage.
Maintenance and repairs
● The flat anvil can be cleaned by using a dry cloth or a cloth on which a small amount of alcohol cleanser has been applied.
● Metal parts such as the flat anvil and brackets can easily become rusted. When not using the stand for a long period time, rub the
stand with anti-corrosive oil and store it in a cool dry place.
● The life of the stand varies significantly depending on the usage environment. Be sure to establish a maintenance schedule based
on rules that accord with the conditions under which the stand is used, such as frequency of use, usage environment, and usage
method, and carry out regular inspections based on this schedule.
Mitutoyo Corporation
Kawasaki, Japan
http://www.mitutoyo.co.jp